3D printing scalescenes
Posted
#174131
(In Topic #9834)

Inactive Member
instead of cutting card
One of the the things I hate doing and am not very good at doing well, is cutting 2mm card for John's Scalescenes kits. As I have a 3D printer I thought I would print the 2mm card with all the windows, door openings etc already cut out. I've started with the small terraced house kit; nothing to ambitious to start with. The technique seems to work well, but I have yet to get my dimensions exactly matching the printed sheet. I do know what I am doing wrong though!If you already own the machine, then the cost of the plastic is less than the cost of buying card. It isn't going to be commercially viable to print for some time (maybe years), but if anyone has a 3D printer (or free access to one), I'd be happy to email the model files (STL files) to any of the members here, if they are like me and find card cutting difficult (or boring). Just message me if you are interested.
I'll post some progress pictures of the trial project when it stops raining and the camera battery has re-charged.

Posted

Site staff
Ron
NCE DCC ; 00 scale UK outline.
NCE DCC ; 00 scale UK outline.
Posted
Inactive Member
Well I have printed onto A4 self-adhesive labels (as I do with card) and that seems to be sticking.
Posted
Inactive Member
Having drawn the walls up in CAD and created a file for the printer. I set the printer do the stuff that I am bad at and went away and did something else.
I set it to print all the "thick card" walls in one print. A three hour print time.
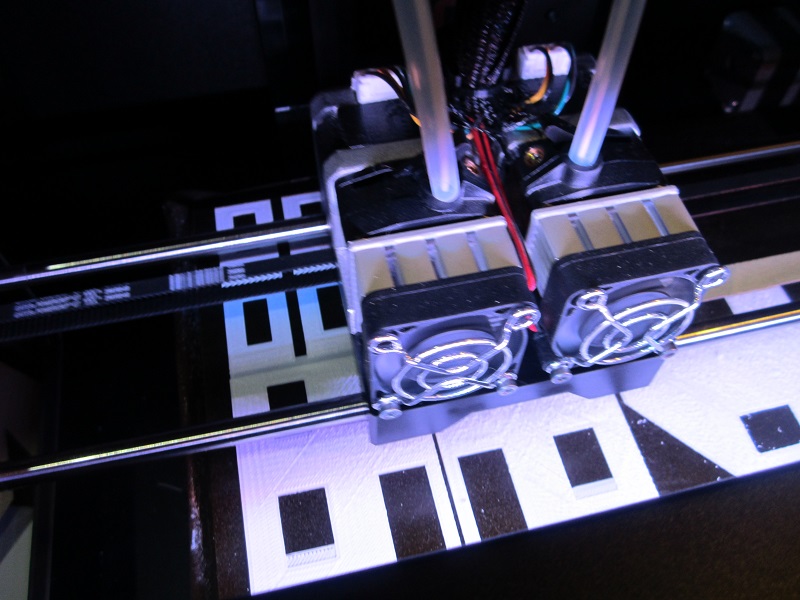
The picture was taken about 1 hour in.
Posted

Full Member
Posted
Inactive Member
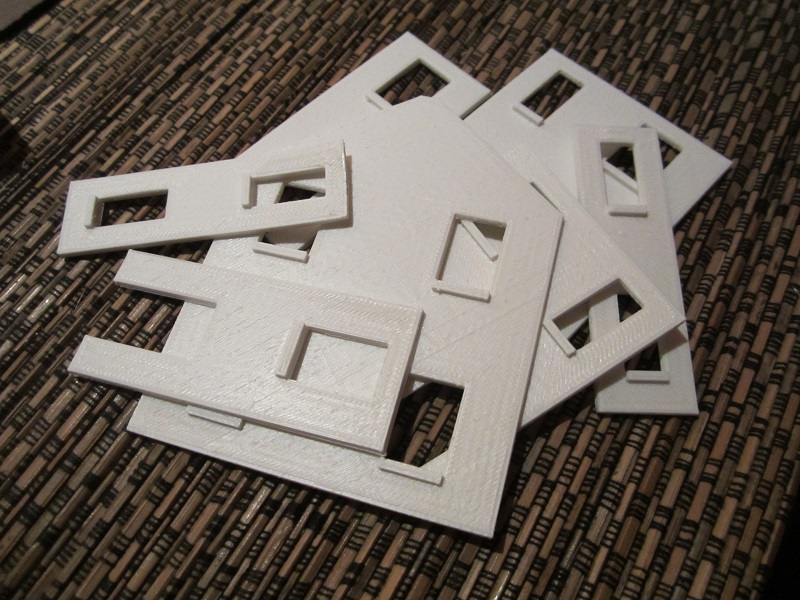
Next job, overlay on the printed sheets to check I have the holes in the right place. Then read the instructions… I think I can stick on the printed brick overlays next.
Posted
Site staff
starting to look good . when you said a 3 hour print time, that probably be the same for cutting it all in thick card anyway and I guess far cleaner corners in the windows with printing and a touch up with a file
No doubt John will read this thread in the fullness of time.
Ron
NCE DCC ; 00 scale UK outline.
NCE DCC ; 00 scale UK outline.
Posted
Guest user
Posted

Full Member
I didn't realise you could print "on the flat" - does it just squirt molten plastic (nylon) onto a sheet ?
'Petermac
Posted
Inactive Member
The plastic I'm printing with there is ABS (same as Lego). To be honest I haven't yet tried any major structural gluing, so this will be a first. Tamiya have an ABS cement that is supposed to be good. In general I am a superglue person for things like this. I think though if I am wrapping the plastic with paper, I'm probably just sticking paper to paper so PVA or superglue will probably do it.
Hi Ron
The main thing is it's three hours when I can be doing something else. Ironically in this case it was cutting card. Internal walls for the apartments over my second station.
I thought I might still try and stick the sill overlays over the plastic to be true to John's model. But if that proves too tricky I might reach for the paint brush.
I have been having some email discussion with John, so he is aware I was thinking of doing this. Anything that makes the construction of the model easier can only be good for sales of his products.
Hi Petermac
The printer uses a filament of ABS plastic, feeds it through a hot nozzle and extrudes it in place as it zips around the inside of the printer. The plastic re-solidifies as soon as it leaves the nozzle (which is about 0.4mm diameter). My printer has two extruders, but in this case only one is being used. The second nozzle could be used for another colour, but I currently have it loaded with a dissolvable material that is used to support plastic that would otherwise be printed in mid air.
Here's a 10 second video of it in action.
Avant d'accéder à YouTube
Posted

Full Member
I note with interest that in my weekly news letter from Hattons which arrived today, that they have gone into the the sale of 3D printing equipment for model railways on their website. They have a printer for about 400 pounds and another for much more, plus all of the plastic cartridges etc.
Bob
Posted
Full Member
Cheers
Trevor
Posted
Inactive Member
Bob The more expensive printer that Hattons have is the same as mine, a Makerbot, except mine has a dual extruders (so even more expensive). They are good for the sort of printing I've been showing in this thread, but not yet up to producing the sort of detail that you can get with the commercial machines. A lot of my test prints of small detail items on the Makerbot end up as little bundles of plastic spaghetti. It doesn't take long to learn though what is printable at home and what needs to be sent away. The main other issue with them is speed. One order alone today on my Shapeways site would take the printer a week to print (20 items). Not a sound business model for a home production business therefore but a uesful tool for the home user. It's a bit like comparing a DIY skilsaw with a computerised joinery factory.
Posted

Full Member
The only time consuming operation is waiting for the glue to dry, but as I usually cut about half a dozen A4 sheets of buildings at one time (3 to 4 minutes per sheet with up to 4 buildings to a sheet). Having cut a number of sheets I start production line assembly of a number of buildings in stages.
 Last edit: by Dorsetmike
Cheers MIKE
I'm like my avatar - a local ruin!
I'm like my avatar - a local ruin!
Posted
Inactive Member
I guess it's horses for courses and I too was sorely tempted to look at a plotter cutter.
The main thing about 3d printing is that it is 3 dimensional and can't be replicated with cut card (without multilayering) or brass etching. Yes there are castings, but the range is limited and the development of new products and actually casting them is a bit old tech and not necessarily that environmentally friendly.
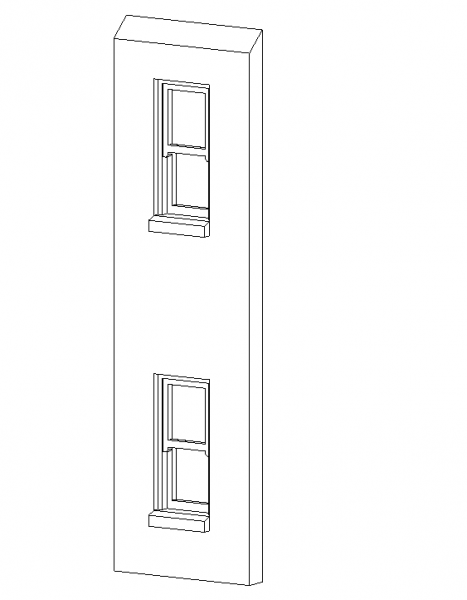
Please ignore the fact that the window openings don't match the scalescenes printout. I made the openings to suit the windows I had to hand, rather than the windows suit the openings. I wanted to see what tolerance of fit I needed for the paper to wrap into the opening and the window be a reasonably tight push fit. But the picture does show how the 3D printed windows actually look three dimensional. The window sills were also printed as part of the wall. The final model for the terrace house walls (as printed above) will have the right size openings to suit the Scalescenes printout.
I know you could do this in layered card and with etched windows, and I've done it this way to replicate the Scalescenes construction method. I could probably print it all in one go, with the windows doors, interior furniture and fittings, complete with the roof on. But I don't think I could do it on my home machine. The cost of printing it like that at Shapeways would be unaffordable at the moment, but printing prices are tipped to plummet over the next few years.
I know you are an N gauger Mike, so here is a pair of doors I thought might suit a cinema entrance in your scale. The crash bars are 0.3mm in diameter. You might say that you can't see it so why bother just use an etch or a piece of printed acetate, but I think some people might care (hopefully). If you want one at a slightly different size, I can have one available to buy in a couple of minutes from being asked. All my door and window models are parametric, driven by height and width dimensions.
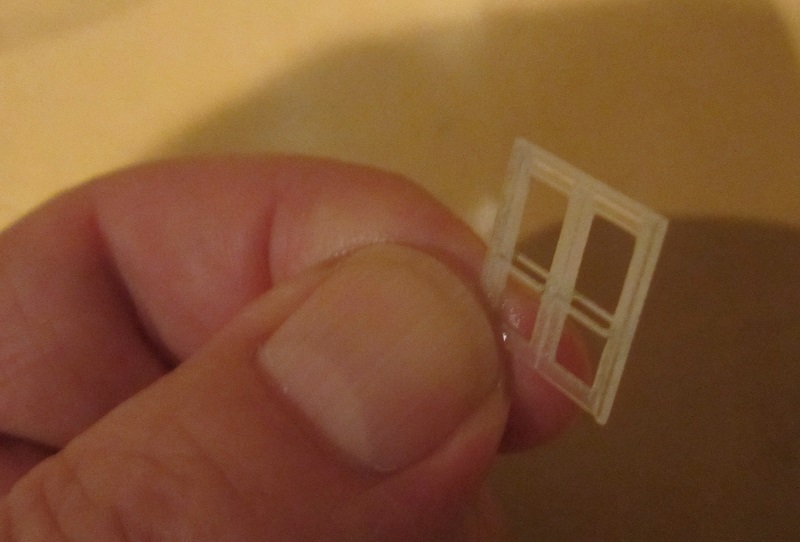
BTW I think the only way to glaze the doors is with a film of canopy cement. It seems to create nice shiny windows with soapy water, but it's not that permanent.
Last edit: by Wizmacnz
Posted
Full Member
 thumbs
What sort of cost was it in terms of plastic ? I realise it's not economical to have it done by Shapeways and nor would one buy a printer just to print a wall but the plastic is a fixed cost for each print. :roll:
'Petermac
Posted
Inactive Member
The plastic filament is about NZ$80 a kilo. ( 8 cents per gram) The wall in my hand uses about 7 grams, so the maths tells me that the printed wall uses 56c of plastic. A quick conversion to UK money (at around 2) says 28p.
Posted
Full Member
However, it does seem to make an excellent job - particularly having the sills moulded in and you don't have to cut the card !!!! :thumbs Registering the paper overlays could be a bit tricky………………:roll::roll::roll:
'Petermac
Posted
Inactive Member
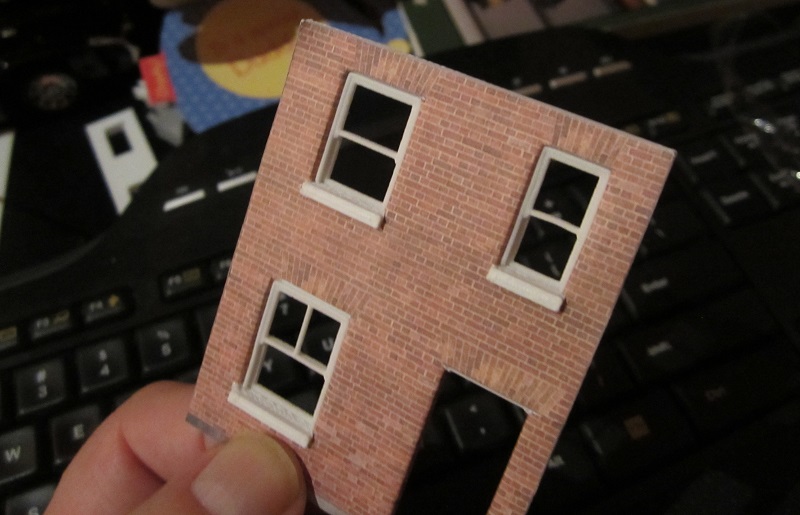
Hopefully I'm going to have time tomorrow to stick some printed paper on the walls. Then I can tell you how hard it is. The test was only tricky around the sills where I had to cut around rather than fold in.
Posted
Inactive Member
Of course being me, I started again. This time I thought I would try and print the windows and doors in with the walls so that it could be a Shapeways free print, only needing John Wiffens excellent texture sheets to finish the thing off.
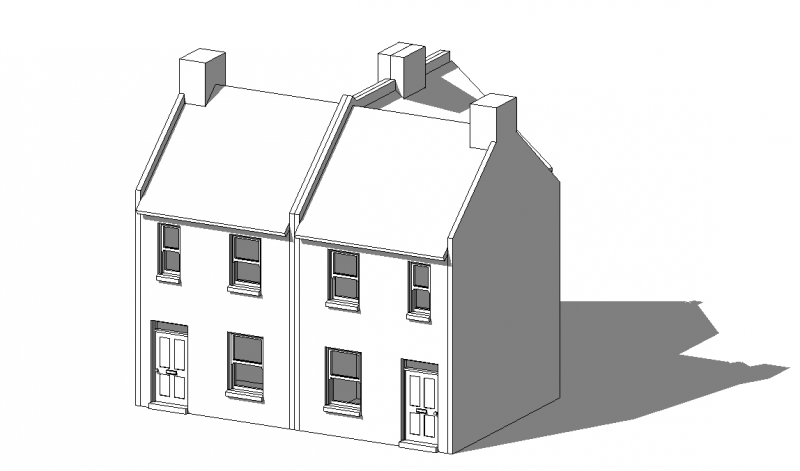
The buildings were remodeled in my CAD software to create thicker walls and the CAD model of my Scalescenes Shapeways windows and doors were adjusted to suit home 3d printers and inserted into the openings. The individual wall panels were then exported for printing.
The smallest of the panels took about 20 minutes to print.

The larger front panels will take around 45 minutes. Of course you can do other things while it's printing, but at an estimated 6-7 hours to print, the machine is never going to be a commercially viable production machine. But on the upside the material is cheap.
Just to see…. I uploaded the complete two house model to Shapeways.
https://www.shapeways.com/model/3002472/small-terraced-houses-4mm.html?li=aeTabs
It isn't offered for sale, but the Shapeways print cost would be just over US$400. Home printed about $8.
More to come ….
Last edit: by Wizmacnz
1 guest and 0 members have just viewed this.