Building an N-Gauge Scalescenes High Street
Posted
#161728
(In Topic #9185)

Full Member
Tracking the cost and time needed to make a High Street for Tedderton
Now that my station building is complete, I am going to make a few buildings to go alongside it, making up one side of Tedderton's High Street. Because I love making Scalescenes kits, I am using the Low Relief High Street combined with the Low Relief High Street Backs (they go together with special pieces to hide the joins).I've started this thread to track how much it costs me, in monetary terms, and the time it takes to build the kit.
Here are the bits all printed, (nearly all) laminated, and varnished:

A word on the materials I am using. Prices include postage, so are what I actually paid for the items.
- Heavy Card - 1mm greyboard. £3.08 for 10 sheets, eBay
- Medium Card - 160gsm white card. £4.00 for 100 sheets, Hobbycraft
- Light Card - 80gsm Tesco Value printer paper. £2.35 for 500 sheets, Tesco
- Glue Sticks - Hobbycraft 'ValueCraft' sticks. £4.00 for 24, Hobbycraft (Better than Pritt Stick, IMHO)
- Scalpel Blades - Swann Morton No. 10A. £8.99 for 100, eBay
- Snap-off craft knives - "Edwards". £1.00 for 5, Poundland
- Lights - Warm White LEDs. £4.90 for 10, Rapid Electronics
- Resistors - £4.57 for 100, Rapid Electronics
- Wire - Had lying around, but let's say £1.00 for 1 metre.
- Self-adhesive copper tape. £1.85 for 3 metres, eBay
- Printer ink. £12.78 for a colour cartridge (Kodak), Amazon
- Printer paper. 110gsm matt photo paper. £4.18 for 100 sheets, eBay
- Matt spray varnish. £4.85 for 2 cans, eBay
[/*]
- Low relief high street kit: £5.99
- Low relief high street backs kit: £5.99
- Heavy card. 7 sheets - £2.16
- Medium card. 6 sheets - £0.24
- Light card. 1 sheet - £0.005 (!)
- Glue sticks. 3 - £0.50
- Printer ink (guesstimate). 20% of a cartridge - £2.56
- Printer paper. 23 sheets - £0.96
- Spray varnish (guesstimate). 50% of a can - £1.21.
[/*]
- 90 minutes
[/*]
- 90 minutes and £19.61
Mike
Pig Hill Yard - a small Inglenook shunting layout for my boys, in 00.
Pig Hill Yard - a small Inglenook shunting layout for my boys, in 00.

Posted
Full Member
Terry
Posted
Full Member
It's Clear Matt Varnish from The Rapide Paint Factory. I got it from eBay here:
http://www.ebay.co.uk/itm/2-x-Clear-Matt-Varnish-Spray-Exterior-Interior-Aerosol-Can-250ml-All-Purpose-/330920797918
It's dirt cheap, but I have found this one to do the job well for building the kits. It does not discolour, but leaves an ever so slight texture to the paper. I've not had any problems with it… YET.
I then paint the model with a Humbrol clear matt varnish when I'm finished, just for the extra protection.
Mike.
Mike
Pig Hill Yard - a small Inglenook shunting layout for my boys, in 00.
Pig Hill Yard - a small Inglenook shunting layout for my boys, in 00.
Posted
Full Member
Out of interest, I started a thread sometime ago regarding which varnishes people used to waterproof their Scalescenes models.
http://yourmodelrailway.net/view_topic.php?id=9610&forum_id=101&page=1
I was surprised that few people had actually tested the varnishes for their waterproof qualities. I found that manufacturers' claims should be taken with huge doses of salt! I had done some tests and was unimpressed with the results on my inkjet printed brickpaper. I photographed the results which appeared in the thread. It might be wise to run a test on some spare inkjet printed paper before committing yourself to this particular varnish.
Terry
 Last edit: by col.stephens
Posted

Full Member
Also I find A4 size adhesive labels much less hassle than gluing printed sheets to card
Laser Labels & Inkjet Labels | Square Corners | LP1/210H | Labelplanet
Probably not much difference in overall price if you consider how much less glue you would use. You only need glue for fixing windows and assembling parts.
Cheers MIKE
I'm like my avatar - a local ruin!
I'm like my avatar - a local ruin!
Posted

Site staff
Hi Terry,
It's Clear Matt Varnish from The Rapide Paint Factory. I got it from eBay here:
http://www.ebay.co.uk/itm/2-x-Clear-Matt-Varnish-Spray-Exterior-Interior-Aerosol-Can-250ml-All-Purpose-/330920797918
It's dirt cheap, but I have found this one to do the job well for building the kits. It does not discolour, but leaves an ever so slight texture to the paper. I've not had any problems with it… YET.
I then paint the model with a Humbrol clear matt varnish when I'm finished, just for the extra protection.
Mike.
Thanks for that link Mike,i've been looking for some for ages and that was a good price so just bought some.
Regards
Alan
Born beside the mighty GWR.
Alan
Born beside the mighty GWR.
Posted
Full Member
The Humbrol acrylic varnish I've used has worked fine for me so far, but when it runs out I will keep my eyes open for Testors Dullcote.
Mike.
Last edit: by emmess
Mike
Pig Hill Yard - a small Inglenook shunting layout for my boys, in 00.
Pig Hill Yard - a small Inglenook shunting layout for my boys, in 00.
Posted
Full Member
I considered sticky labels, but then I worry about my ability to stick a large A4-sized label down without getting any bubbles in it. How do you find it?
As for Romford or Thurrock, they are 208 and 218 miles away from me!
 There is a Range in Bradford (3 miles!) but I have never been before. Thanks for the recommendation, I will definitely pop in there the next time I am in town.
Mike.
Last edit: by emmess
Mike
Pig Hill Yard - a small Inglenook shunting layout for my boys, in 00.
Pig Hill Yard - a small Inglenook shunting layout for my boys, in 00.
Posted

Full Member
(Yoda mode) A useful guide will this be. (/Yoda mode)
Marty
Posted
Full Member
As for Romford or Thurrock, they are 208 and 218 miles away from me!
Sorry, I blame the eyesight, I read your location as Basildon!.
One problem with the Range don't take the wife - you'll never get out of there, art & craft is only one department!
Cheers MIKE
I'm like my avatar - a local ruin!
I'm like my avatar - a local ruin!
Posted

Inactive Member
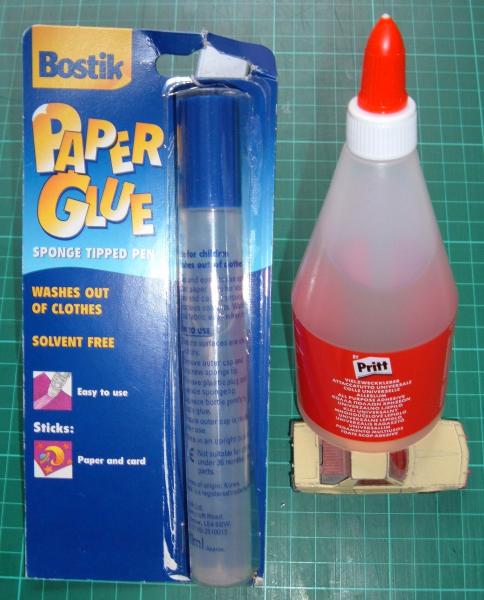
The Bostic is usually found in most stationers and the Pritt I got from Lidl. I don't use the applicators as they clog up, instead I use a thin piece of strong card poked down into the bottles and I then use this like a brush to transfer the glue onto the paper. Both glues allow about 30 seconds or so to slide the paper into the correct position and smooth out any bumps etc, also they do not cause the printed surface of downloaded brickpapers etc to run or smudge even when gluing signs etc onto said printed surfaces.
Another point: I never use any kind of varnish on my finished models (and being an artist I am very familier with Acrylic Varnish) and have never had any problems with them fading or the paper coming unglued even when ballasting right up to the platform edge with the usual PVA/Water/W.up L. method!
Hope this helps,
Ken.
'It don't mean a thing if it ain't got that Swing'
Posted
Full Member
So far I have been using Rocket Card Glue, and been getting good results using its fine-tip applicator.
I must admit that it is fading rather than waterproofing that I have been worried about, hence the varnishing. It's good to hear that you've not experienced this. Do you think it's a waste of time?
Mike
Pig Hill Yard - a small Inglenook shunting layout for my boys, in 00.
Pig Hill Yard - a small Inglenook shunting layout for my boys, in 00.
Posted
Inactive Member
It really depends on where your layout is situated, ie., if it's near a window then it will be effected particularly if it gets sunshine on it. Varnishing may help to some degree but a better protector is to cover the layout; I use the flimsiest (cheapest!) black dustbin liners which are incredibly lightweight and do no damage when lifting on and off plus they have the advantage of keeping the dust off. Saves a lot of work too! ;-)………….I must admit that it is fading rather than waterproofing that I have been worried about, hence the varnishing. It's good to hear that you've not experienced this. Do you think it's a waste of time?
Incidentally, I'd meant to mention before that your layout is looking very good and you're certainly well organised! :cool:
Ken
'It don't mean a thing if it ain't got that Swing'
Posted

Banned
Will be watching your High Street build with interest. Great little excersise on time and money. For those who are new to the hobby, this thread will be invaluable. :thumbs
Cheers, Gary.
Posted
Full Member
I considered sticky labels, but then I worry about my ability to stick a large A4-sized label down without getting any bubbles in it. How do you find it?
Mike.
The way to stick down large labels (I am a Graphic Designer and so do it for work) is to peel back and fold over a very thin edge of the backing and stick down the exposed label making sure all is square to the sheet you are sticking to. Get a smooth edged straight edge and put it at the edge of the stuck down piece, the majority of the label with its backing sheet will be vertical at this point. Grab hold of the small bit of backing paper and as you pull this slowly smooth down the label with the straight edge. Practice on a bit of spare to start with as it takes a bit of getting used to.
Simon
Posted

Full Member
I actually use the 'Soho Creative', 'Linen Weave' 100 gsm paper from Hobbycraft for N Scale brickwork as the slightly embossed rectangular pattern gives just the right amount of texture for N Scale brickwork. I also use their 'Folio' brand 'Laid' paper where I need a slightly rough surface such as for concrete. I prefer the artists board from Hobbycraft to the grey card as it is much denser and less prone to warping though my real card of choice is replacement photo album pages which is only 1mm thick but is really hard and dense.
For fixing the print-out to the card I use a 50:50 diluted PVA mix which I apply with a brush as it is much easier to get a very thin and even layer of glue. I then run a rolling pin over it to make sure it is fully bonded over the whole area. If I do get an occassional 'bubble' then a prick with a needle and anoyther pass with the rolling pin soon sorts it out.
Good luck with your build and don't forget to take lots of progress photos.
Regards,
Trevor
Trevor
Posted
Full Member
Thanks, Ken! I am really enjoying working on Tedderton, and putting the Scalescenes kits together.Incidentally, I'd meant to mention before that your layout is looking very good and you're certainly well organised! :cool:
Thanks for the info, Simon. I will try it one day, perhaps. But for now, I am getting good results with the glue stick and wallpaper roller, so I think I will stick (!) with that for now.Practice on a bit of spare to start with as it takes a bit of getting used to.
Good luck with your build and don't forget to take lots of progress photos.
Will do, Trevor. Watch this space!
Mike
Pig Hill Yard - a small Inglenook shunting layout for my boys, in 00.
Pig Hill Yard - a small Inglenook shunting layout for my boys, in 00.
Posted
Full Member
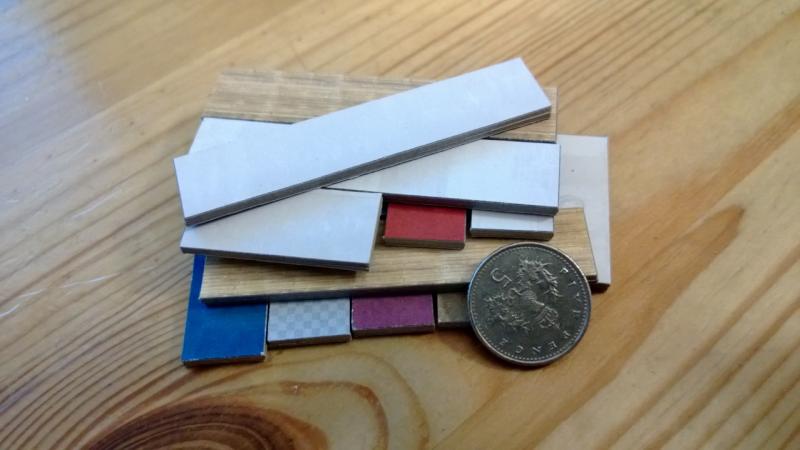
The first step was to cut out all the windows and mount onto clear film. I spent 40 minutes doing this, and am less than a quarter of the way through. Some of the apertures are tiny. Here is an example of some frames mounted onto film (the window from a box of chocolates):

There is the option to print frames onto acetate, but I like the 3D feel of the cut-out frames. There is also the option of Brassmasters etched frames, but I don't want to pay for those.
It started to dawn on me that I won't need all of the windows. I am not making all five buildings (yet) as I only need three (and a half - that's a later project) to fill the space on the side of the high street I am making. There are also some variations as to which shop front you're making. So I've decided to leave the windows for now. I will cut and mount the rest once I know which ones I definitely need.
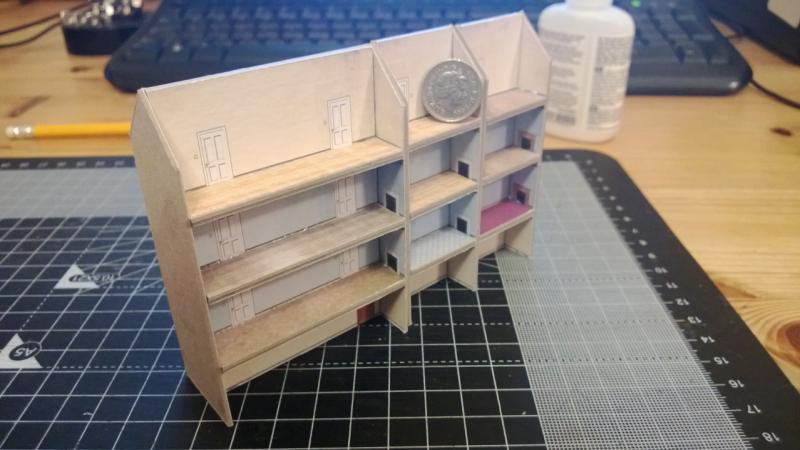
The next night was to create the interior carcasses of the buildings. Step one was to cut out the ceilings and floors and glue them back-to-back. In "heavy card" in N-Gauge, these are 1mm thick, leading to panels just over 2mm (two layers of card, and two of paper). I love the detail here. I don't think you will ever see the ceilings through the tiny windows, even when lit from within, yet they have tiny subtle ceiling roses printed on them. And there is a good range of carpet styles. Bright purple - nice!
Some of the edges were not glued together perfectly, so a bit of rubbing over with fine sandpaper sorted them out.
Gluing the floors into place on the back walls came next. With the Rocket Card Glue, you get a small window of slipperiness, but then it grips hard and strong as soon as you press them down. So I laid the floor up against a small engineer's square, glued it, and pressed it into place, confident it was at 90 degrees. The glue gripped right away, so I could quickly move onto the next. This meant I had all the interior walls done in no time…

Another wonderful detail is shown above. This shows two walls. One from the High Street kit, and one from the High Street Backs kit. They are separate kits, designed two years apart, yet the interior walls are printed in such a way that when they are placed back-to-back, the internal doors match up, in position and colour. Wonderful!
The camera really does enhance any imperfections though. I can see that there is some further sanding required before I can attach the external walls!
The side walls went on next. Each kit, although low-relief, presents the walls side-by-side in such a way that you can cut them out in one single piece to represent the full building's side. So I glued the backs back-to-back and then placed the side walls on. Again, I used the square to keep them all aligned, and I needed to tweak the floors a little to make sure they are in the right place. So I now have a small row of three building insides:
Each building will be free-standing as will become clear once placed on the layout.
The next step is to build the external side walls. These use a clever system for modelling downpipes, so I am interested to see how that turns out. The next thing I am going to do though is get the lighting in place, as this will be the last chance to install the LEDs. That will be my next update.
Until then…
Mike.
Time spent to date: 5 hours
Cost to date: £20.20
Obvious mistakes made: 0
Last edit: by emmess
Mike
Pig Hill Yard - a small Inglenook shunting layout for my boys, in 00.
Pig Hill Yard - a small Inglenook shunting layout for my boys, in 00.
Posted
Site staff
Regards
Alan
Born beside the mighty GWR.
Alan
Born beside the mighty GWR.
Posted
Full Member
Mike
Pig Hill Yard - a small Inglenook shunting layout for my boys, in 00.
Pig Hill Yard - a small Inglenook shunting layout for my boys, in 00.
1 guest and 0 members have just viewed this.