Tinwald workshop weathering
Posted
#246330
(In Topic #13601)

Full Member
So I've taken a few snaps, as I weathered a wagon I recently purchased.
here goes nothing …………………..
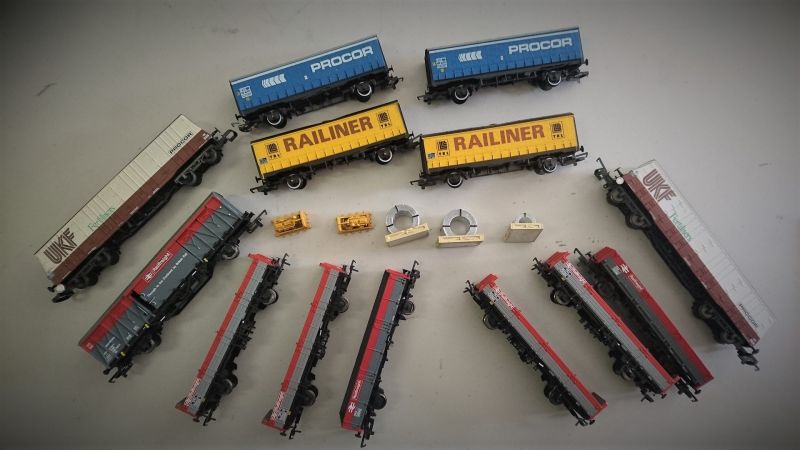
I received a parcel in the mail this morning, and opened it with great gusto………….
Then I was reminded about how I weather my rolling stock, and I thought I'd share with you all my technique. Now, I do have an airbrush and compressor, but they are currently gathering dust, on a shelf under my bench. I just find my way of weathering a lot quicker, and tactile (as you will see soon).
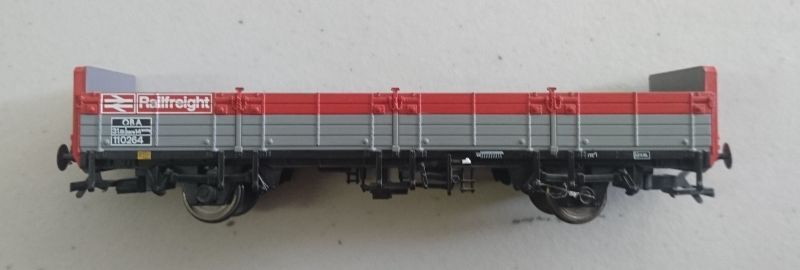
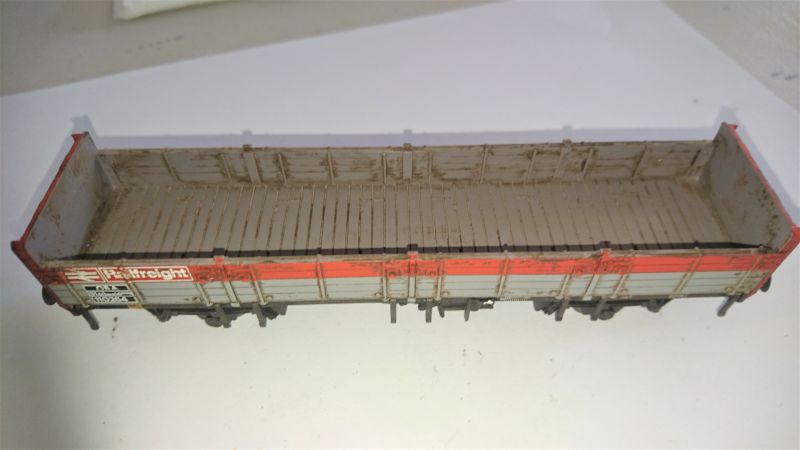
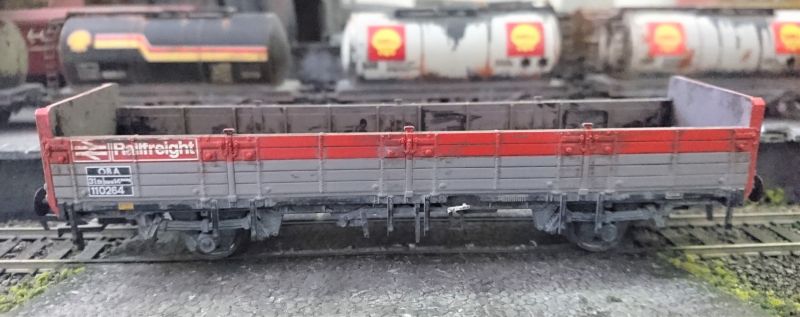
Out of all that lot that arrived, I picked this OBA wagon to weather first, as it will be a simple job that will take about 5 mins.
I use acrylic paints bought from the $2.00 store, where they have a rather good selection of colours. They also have the paint brushes I use (looks like it's time I should buy some more by the looks of my rather used one
 ). The colour I have chosen for my first application of "grime" is Raw Umber, I rather like the darkness of it, as it screams DIRT to me! You can use any shade you like, but this is my "go to" colour. I squirt about a teaspoon full into a small plastic takeaway container (that had gravy in it - washed out obviously!) and add about the same amount of water to make a sloppy mixture of dark brown.
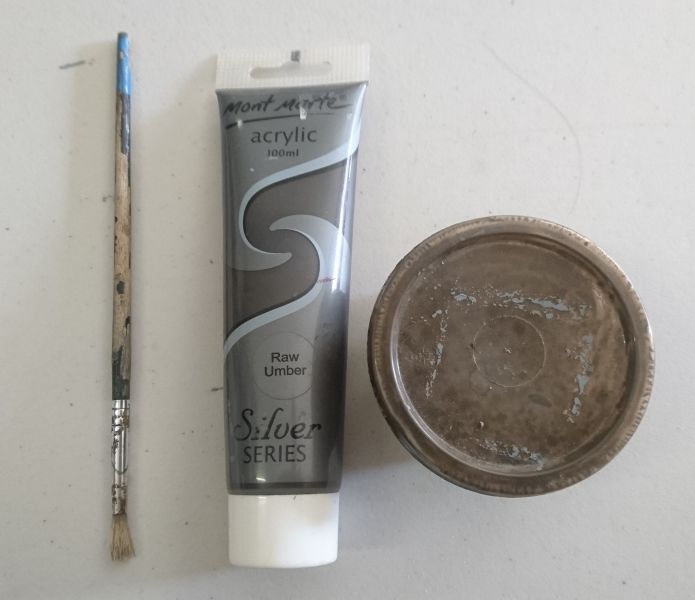
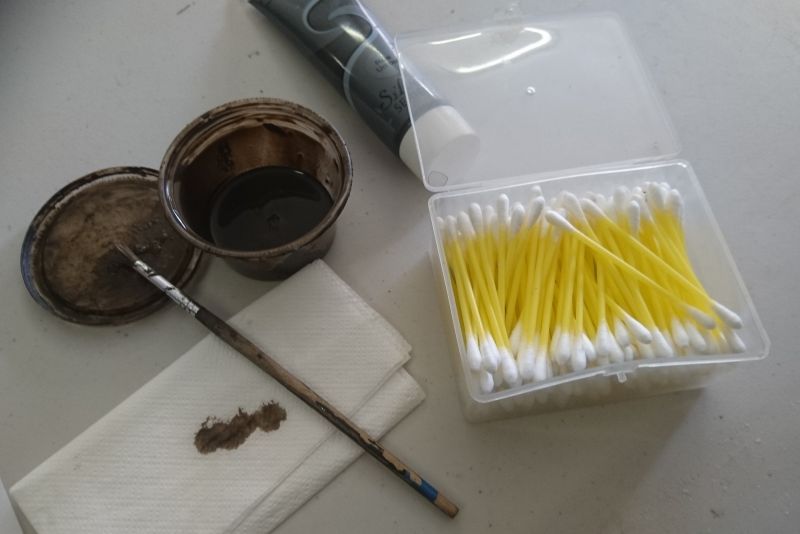
Now you'll need a couple of things at the ready, in case of mistakes, and to help you clean up the inevitable mess. So get yourself some serviettes, or a roll of paper towels. They are great for soaking up accidental spills, cleaning your brush, "unloading" your brush (taking off excess paint from the brush), ohhhh and blowing your nose, should you need too ;-) . Also keep some cotton buds handy, they are great for getting paint out of confined spaces where your fingers can't reach.
Right so now I'm ready to start painting. I use a stiff (but not hard) brush to "stipple" the Raw Umber onto a clean and dry wagon. Before you start painting, I dip the brush in so it has a good amount of paint on it, then I use the inside of the lid as a palatte. This will give you a bit of extra paint to use instead of dipping your brush into the main container again. Now, use a serviette/paper towel to "unload" it by stippling the brush 2 or 3 times.(see pic above) This makes sure your not putting too much paint on the surface of the wagon, you can always load your brush from the lid, should you need more paint (and it's likely you will). So coat your wagon with the "stipple" motion all over it, making sure you are wary of delicate parts, but also ensuring you get into all the nooks and crannies, the under carriage & axle boxes and INSIDE as well. It should look something like this:-
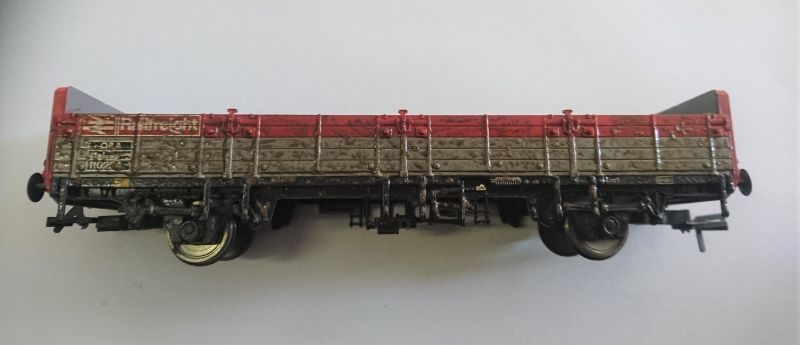
It all looks rather messy and I can heard a few anxious gasps. I was rather anxious too at first, but the beauty of acrylic paints is they wash off in water! So if you decide not to proceed just find an old toothbrush (or your flatmates) and scrub it all off! OK let the coat dry (only takes a minute or so) then using your fingers (or in this case my thumb) and rub off the paint. This is the tactile part, and rather enjoyable too as you will reveal a nicely weathered wagon with dirt in all the right places
OK, so now you should have something looking like this, (see below) if you haven't taken enough off, keep rubbing until it's to you liking (I moisten my thumb/finger and wipe more off if its too thick) OR if you took too much off, you can re-apply more paint, wait for it to dry, then use your thumb again. But wait!! we haven't done the inside yet! No wagon is THAT clean inside!
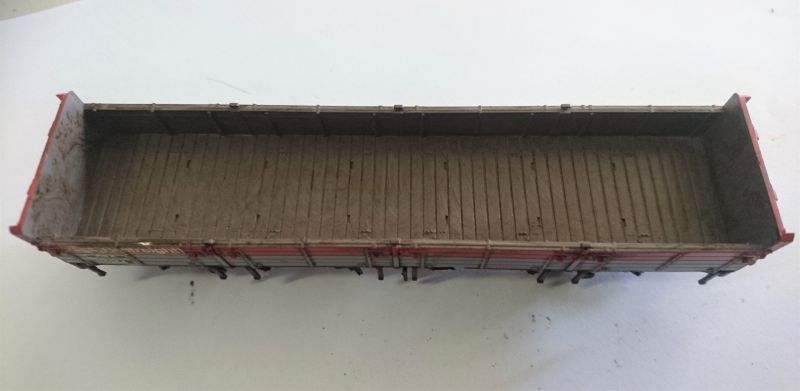
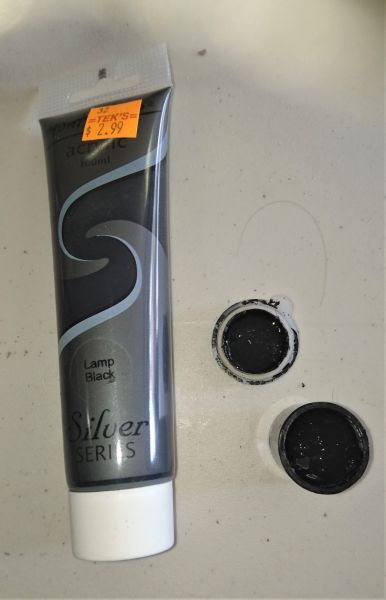
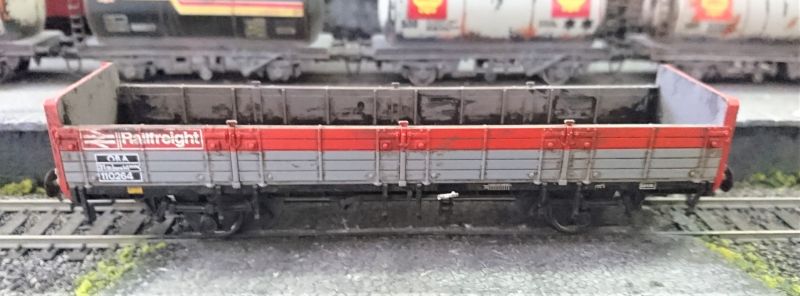
I'm going to use a black inside the wagon, which will sit with the Raw Umber nicely. The effect I want is a grubby "worked" wagon, its had all manner of machinery, rubble and detritus inside it. I have some Lamp Black for this. Again purchased from the $2.00 store for ($2.99
)
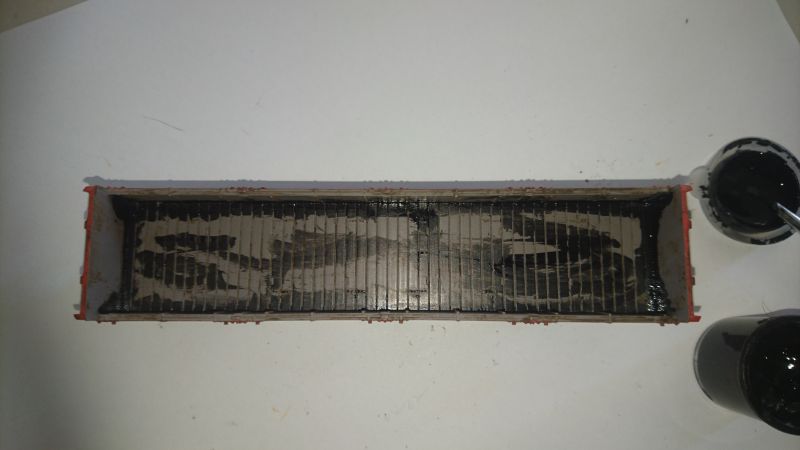
This is where it gets interesting. Apply the black liberally, with a small, finer brush into the corners of the wagon. Place a few random streaks in the middle of the floor just for good measure. I know it doesn't look nice right now, but trust me, once we do the finger and thumb thing, it will look just right! Now we wave our fingers inside the wagon, rubbing away the excess paint (using the moistened thumb to take more off if needed) until you get the effect that you're happy with….
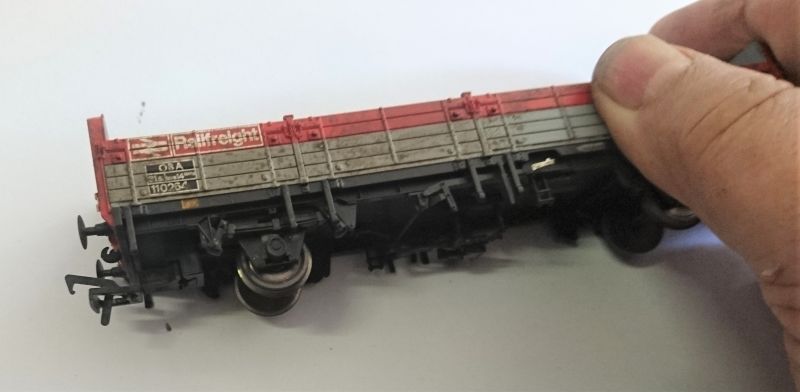
Presto!! Instant weathered wagon!! it should look like this ……….. (see below)

You can stop at this stage, as it looks fine the way it is! (pictured on my layout) I, however, take it a step further, since I discovered weathering powders, aka chalk pastels.

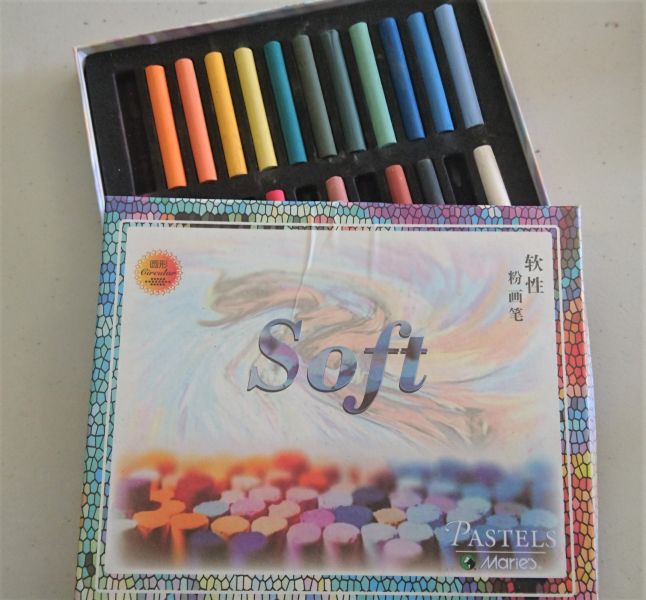
Now if you should wish, there are these great things called weathering powders, they are available online and they work very well adding a softness and some "reality" of dust and rail borne grime. They are not cheap (as you will probably need about 5 or 6 jars of one colour or another) so I discovered a cheaper version of the powders by "doing it yourself". So read on to find out how to prepare your own weathering powders.
At "Ye Olde $2.00 Shoppe" find some soft pastels. Make sure they are the chalky ones and NOT the waxy ones!!They should have a pack with several colours.
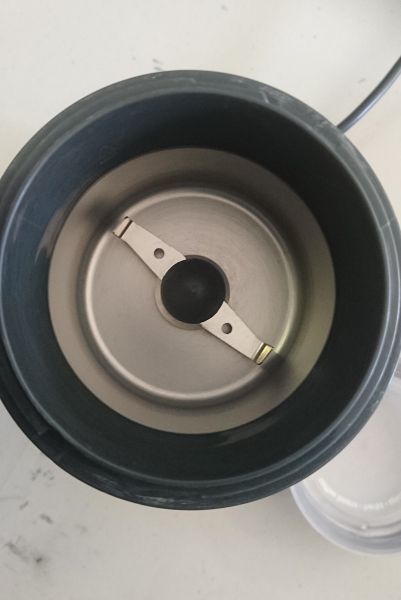
At the same shop (or shopping centre) buy yourself a cheap coffee grinder (if you don't already have one) ]

Once you've got all this home,select a coloured chalk stick, break it into small pieces (2 or 3 should be adequate) then grind them into a powder (shake the grinder up and down, whilst its grinding, to make sure it blends it all nicely)
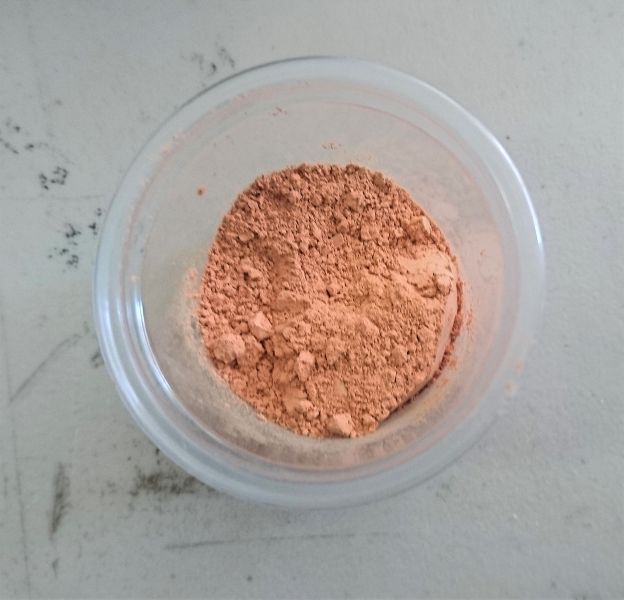
On a table, empty the grinder onto an A4 piece of paper, fold in half to make a sort of U shape, and funnel the ground up powder into a small container. I have used some small vinegerette containers, from Greek salads I've consumed over the months, they have another use after all! You should have something like this………
OK you'll have to wash out your grinder, and wait for it to dry properly (or the next lot of powders will turn into paste).
It will take time but it's worth it. Do as many colours as you like, and make sure to wash and dry between grinds!
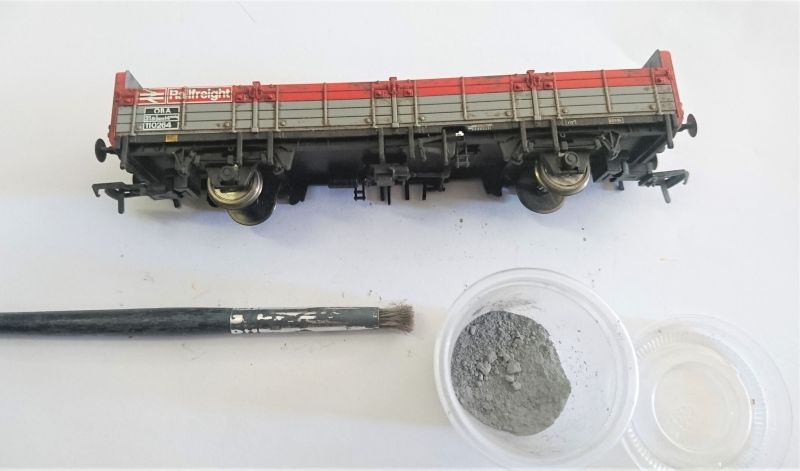
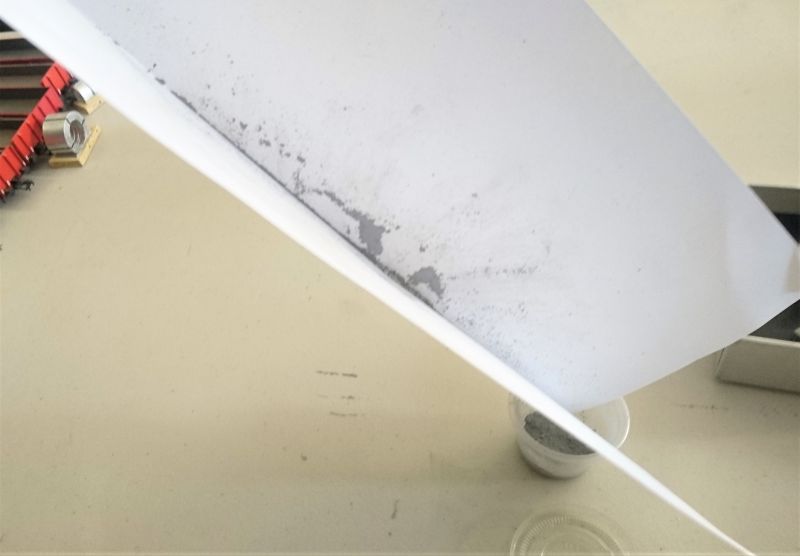
Right, I'm going to use a Grey on this particular wagon, as I want it to look like its covered in ballast dust. (notice the stiff "stippling" type brush I use) Place your wagon (or whatever you're weathering) on piece of A4 paper, so it will catch all the powder that won't stick to the wagon, then you can funnel it back into your container. ;-)
So here we go, DIY weathering powders! :shock:
Stipple liberally all over both sides, axle frames, and headboards. Have another clean dry brush available to brush off the excess powder.
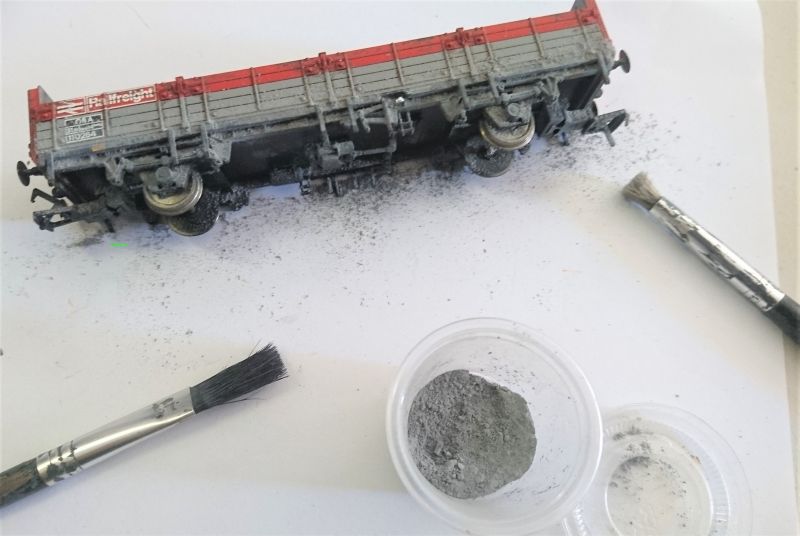
Use the brush to sweep into the middle of the A4 paper

Fold it into a V shape and funnel excess powder into your container…………
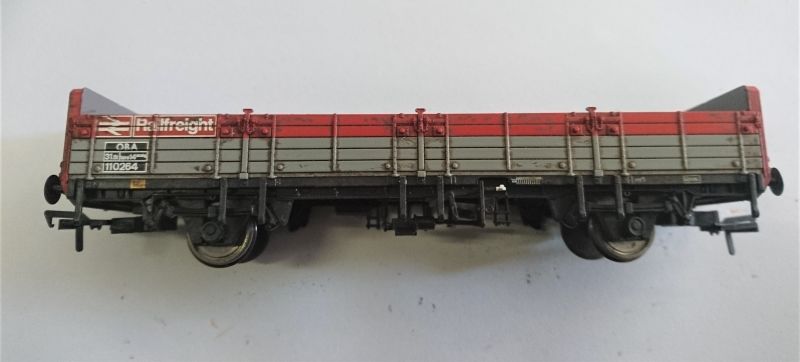
Ta Daaaaaa! Weathered Wagon complete!
without powders …….
OK some people would now spray a Matt Varnish over the wagon to preserve your work. I don't. Just personal preference. I just don't like the varnish, and should I not like the weathering on any particular wagon, I can wash it off! Try doing THAT with enamels!
There you have it, my dry brush technique for weathering rolling stock.
Good luck with you own efforts, and I hope you may have picked up a few things to help you out.
Cheers - Tony
research = asking a bloke who knows a bloke who said something vaguely similar to what I wanted to hear! - Tony (aka the Phat Controller)

Posted

Site staff
Bookmarked for future reference.
Thanks Tony
Ed
Posted
Full Member
Cheers from Ocean Grove
Trevor
Posted
Full Member
Weathering a Loco that has cost you more than £100.00 ( AUD$181.85) is a rather daunting prospect, as it is an expensive hobby, and you may be reluctant to "damage" your prized possessions by taking to them with a brush, and I understand, I really do!
I too was wary of doing it. If you're not comfortable taking the brush to your expensive Loco, my advice is - DO NOT DO IT until you have the confidence to tackle it without regret!
Practise on a less expensive Loco, or gain your confidence on some smaller rolling stock, before you tackle your loco.
As I've said Acrylic paint DO wash off, however the longer you leave them on, the harder they are to take off. They come off easier after being applied, so study you work and if you're happy carry on, if not, go to the sink. With your soft toothbrush, start washing off the paint, being careful not to break off any fragile parts of your model (I brush over a bowl or large container that will catch any unfortunate pieces that come loose, otherwise they are lost forever, down the plughole!! :oops:
OK all that being said, here we go ………………
My most recently acquired loco is LIMA Class 50 50043 EAGLE
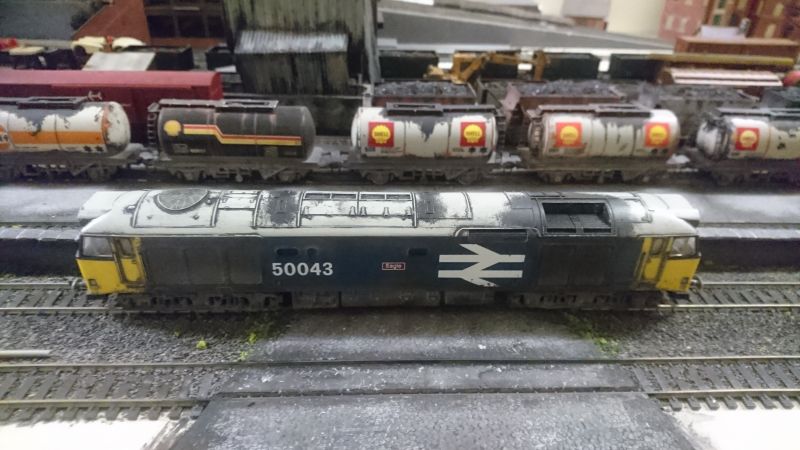
Class 50 50043 waiting on the through line very mucky after a few days hauling oil tankers through very rough weather

50043 Idling on the up Line
 Last edit: by Phat Controller
research = asking a bloke who knows a bloke who said something vaguely similar to what I wanted to hear! - Tony (aka the Phat Controller)
Posted
Full Member
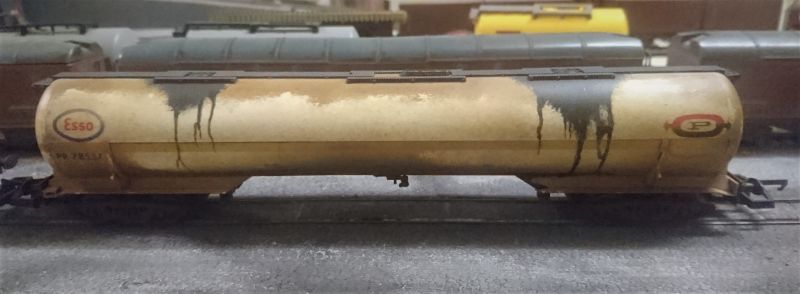
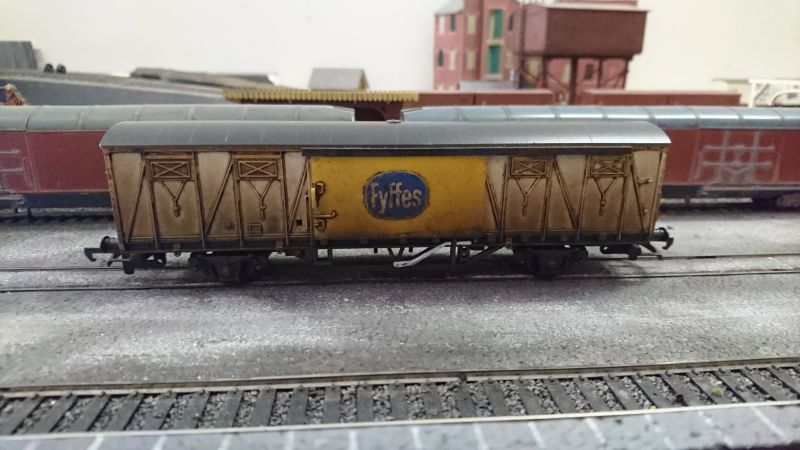
I bought this PWA Pallet Van off the well known auction site, "as is". It had been weathered, but not to my liking.

So when it arrived in the post, I had a good look at it, and decided I would take it to the extreme, and weather it even more!
Not by adding paint, but removing it, and adding my own subtle touches.
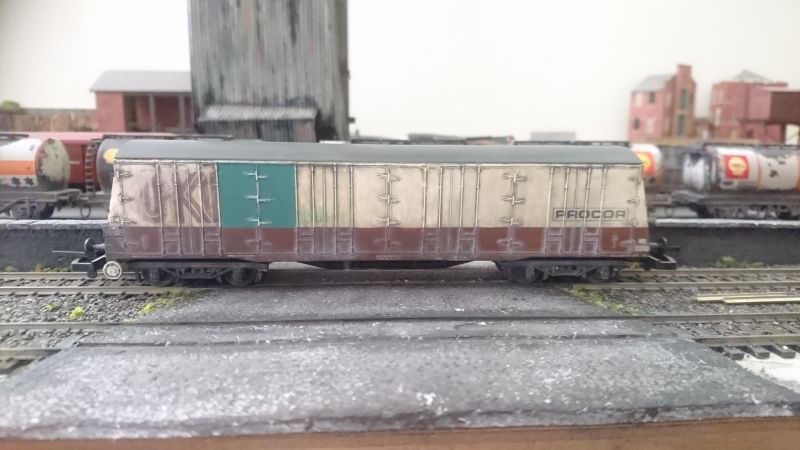
By taking off some paint, and adding a few interesting features (such as painted doors), it's been transformed into a VERY weathered Van and I like it very much! It came out better than I expected.
research = asking a bloke who knows a bloke who said something vaguely similar to what I wanted to hear! - Tony (aka the Phat Controller)
Posted
Full Member
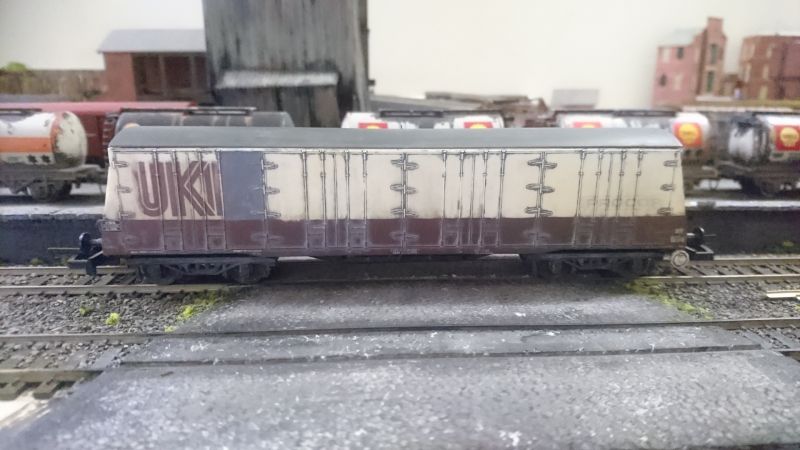
So I got busy and gave it some TLC with the paint brush, and this is the result ……………
Quite happy with the results, but maybe I'll readdress it after a while and put a splash of colour in it somewhere ………
but atm I'm happy with it
research = asking a bloke who knows a bloke who said something vaguely similar to what I wanted to hear! - Tony (aka the Phat Controller)
Posted

Full Member
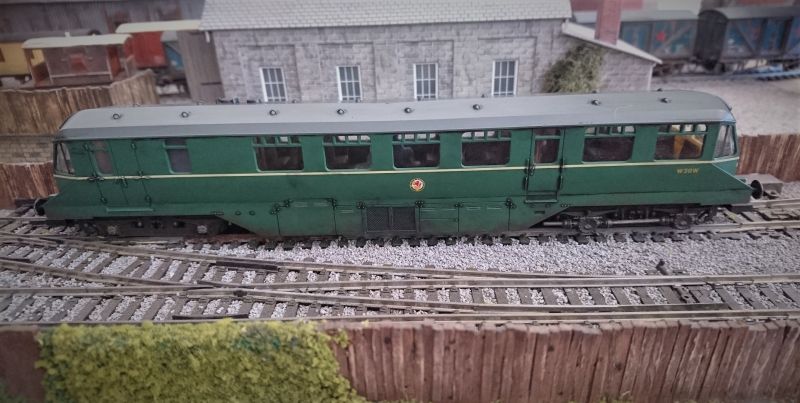
Nice understated weathering there. Those ex-GWR railcars had one cardan shaft removed during WW2 never to be replaced. Small point and often missed. Something about the roller bearings being made by SKF in Sweden, who were pressured by Germany not to supply to the UK, who because of alloy shortage couldn't make them. Ran just as well with one shaft and thus prolonging the life of the bearings as the unused side supplied the replacements.
Nigel
©Nigel C. Phillips
Posted
Full Member
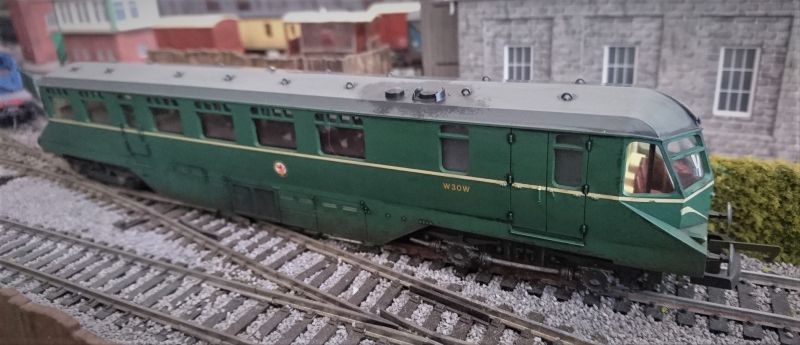
Nice bit of info about them too, never knew about the single drive shaft trick.
Well I did a bit more on another favourite of mine Class 47 47522 Doncaster Enterprise resplendent in her light green livery.
I did a bit more weathering to this than the Railcar, as I wanted it to look like it has been is service, but not overdone too much, again, knowing when to stop is the hard part.

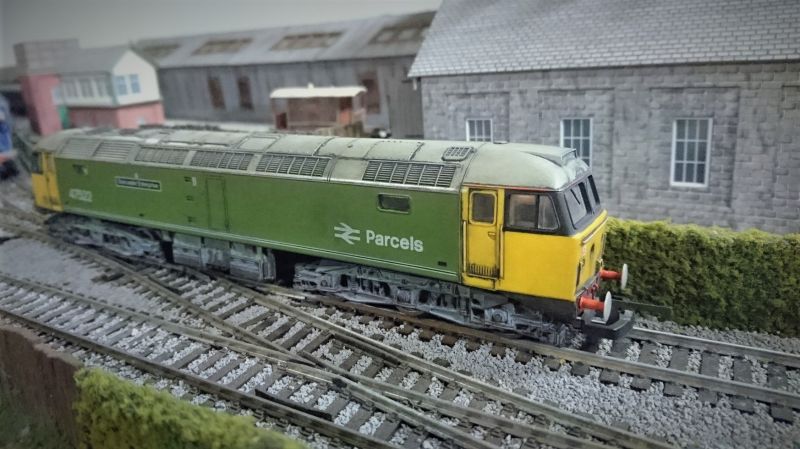
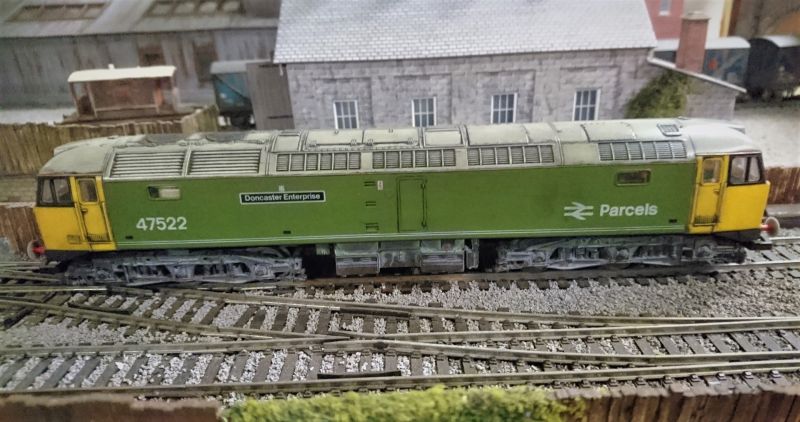
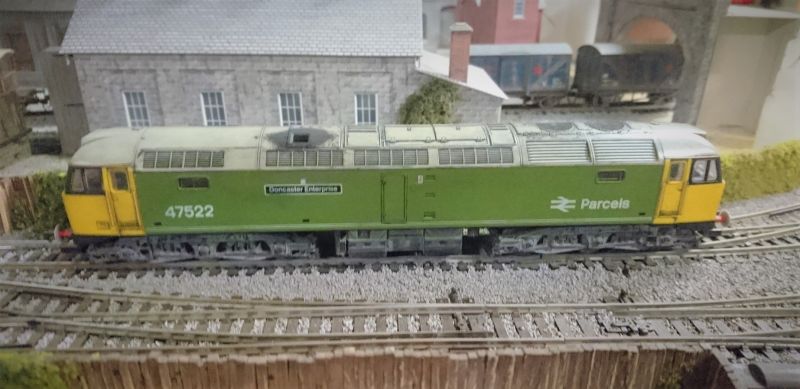
Sometimes I just do a bit of weathering,then put it down, and do something else for a while, then come back to it with "fresh eyes", and see if I want to leave it as is or do more.
Last edit: by Phat Controller
research = asking a bloke who knows a bloke who said something vaguely similar to what I wanted to hear! - Tony (aka the Phat Controller)
Posted

Full Member
Bill
At 6'4'', Bill is a tall chap, then again, when horizontal he is rather long and people often used to trip over him! . . . and so a nickname was born :)
Posted
Full Member
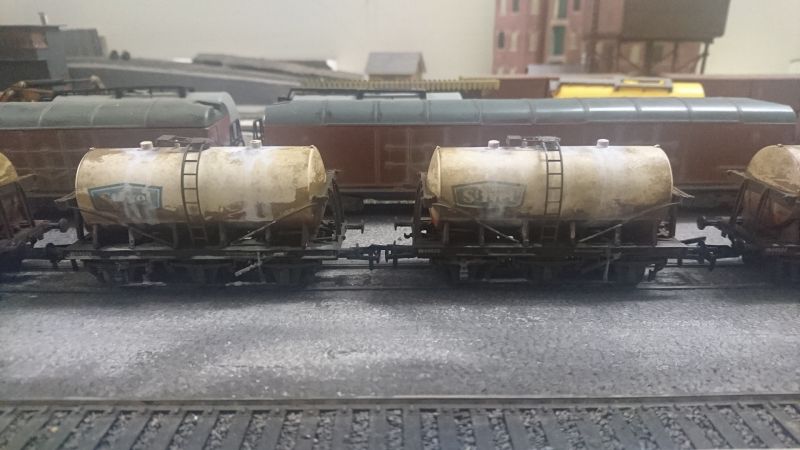
The 2 PCA Vee Tankers were already slightly weathered, but not to where I wanted them.
I took them to another level, being the pedantic weathering nut that I am.
With a bit of imagination, and just a smidge of research, they ended up like this ……………
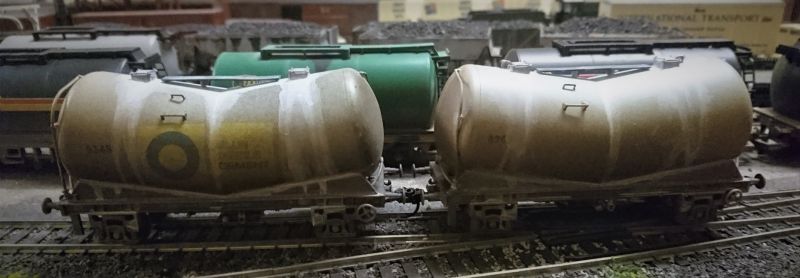
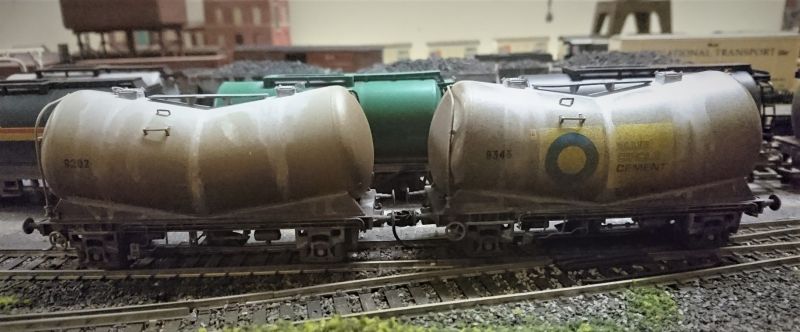
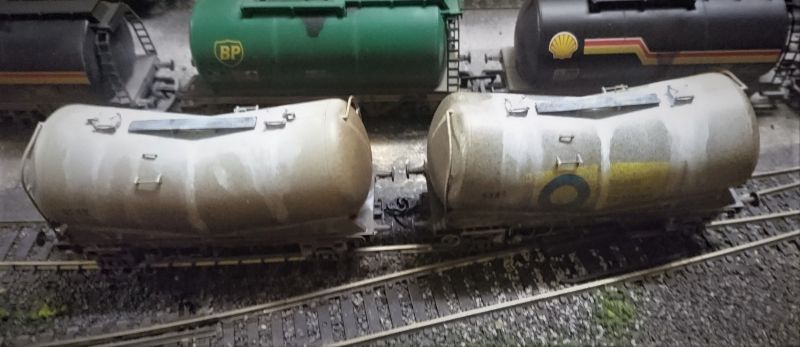
A nice twin rake of grubby Cement Tankers, that I just might add too, if the price is right!
Last edit: by Phat Controller
research = asking a bloke who knows a bloke who said something vaguely similar to what I wanted to hear! - Tony (aka the Phat Controller)
Posted
Full Member
Trick was "slow wins the race", lots of as small "dustings" of paint, let it dry, then another, building up the layers, then scrutinising the finished product, making changes, or leaving it at that!
I'm still having trouble stopping when I should!! It's a failing of the image in my head not being transferred into whats in front of me!! lol
Anyways I persevered, and after a while I got to an acceptable level, which I could live with. Then I added detail! THIS is the difference, "it's all in the detail", making that extra effort to make your products stand out and be one of a kind, marking your own stamp on things.
I like grubby, the dirtier the better, but then sometimes it can be a good idea to hold back and just create an image of a slightly soiled loco or carriage.
Ive already put some of my earlier efforts up for sale, and I'm watching with baited breath to see if I actually get a bite.The airbrush isn't as scarey as I thought and I'm actually having fun with it.The sky is the limit now!!Lemme at 'em!!
Last edit: by Phat Controller
research = asking a bloke who knows a bloke who said something vaguely similar to what I wanted to hear! - Tony (aka the Phat Controller)
Posted

Full Member
Some of us (i.e. me) would be interested to hear how you used your airbrush - paint type and consistency and air pressure etc……………..
I have one in a box but am scared of it ………………(an airbrush that is, not a banana van) :roll:
'Petermac
Posted
Full Member
Next to them, airbrushes are a piece of cake!
Bill
At 6'4'', Bill is a tall chap, then again, when horizontal he is rather long and people often used to trip over him! . . . and so a nickname was born :)
Posted
Full Member
you mean like these critters …………………Lots of scary things in banana vans Peter, beware of them dark, hairy multi-toothed and legged monsters!

research = asking a bloke who knows a bloke who said something vaguely similar to what I wanted to hear! - Tony (aka the Phat Controller)
Posted
Full Member
'Petermac
Posted
Full Member
These lil critters scare the crap out of you!!
As for my airbrushing, well there's nothing spectacular about airbrushing, which is the scarey thing! Once you decide to get it out of the box, and set it up, connect the air hoses to the nozzle, you've basically done 80% of the work.
The rest is what I like to call "style" - how you actually mix it, and spray the paint on.
First bit of advice I would give you all is to use a large cardboard box.The cardboard box is to stop the over spray from going over your car/furniture/wife/carpet - you get the idea.
Second, get an old plastic cake stand, to place your intended "victim" on, put it in the middle of the box, and using the base of said cake stand to turn it around, therefore not leaving any dirty/paint soiled fingerprints on said spray victim.
Thirdly, don't rush out and purchase the best Golden Wand XXXX brand air brush you see!! Just get a cheap, usable, one to start with, you'll probably use this one until it gives up the ghost! Same goes for the Compressor. I have a small compressor that cost me about $AUD50.00, off Ebay, there's plenty on offer, just have a look for a decent one, not the most expensive!
Word of advice: Please! OH PLEASE stay away from the "can of air" spray guns, they are shyte for what we do. The air will run out, and as it runs out, the pressure will drop, and your paint will spit, and froth, and splutter all over the place! Believe me, I've seen the results - it was not good!
Now, I use acrylic paints. They are water soluble, and relatively easy to wash off, should you make a hash of things (I find dish washing liquid, and a toothbrush adequate for this). I use acrylics for this reason, and this reason only.
Enamels are just as good, however I would advocate using water based acrylics first, until you "get your style".
I usually invisage firstly what I want the object to be painted is used for, and how I want it to look at the end of the process.
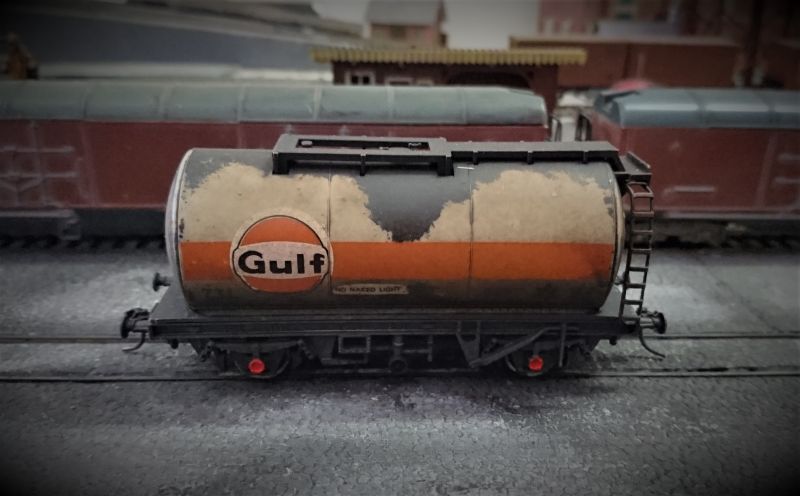
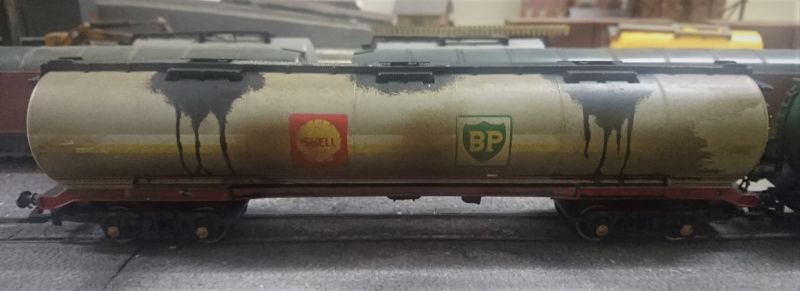
So a TTA tank wagon, used for hauling fuel oil, would probably have a few leaks and "dribbles" from careless operators filling/unloading the contents, so I would use black to paint them in with a brush first, using my "dry brush method", and then maybe enhance it with a few fine brush strokes, representing the oil "dribbles".
Once I was satisfied with that I would then get my "go to" paint option, Burnt Sienna, and mix a squirt (approx broad bean sized dollop) in a disposable plastic thingy (I use old gravy tubs I get from the takeaway) then using a pipette, put in about enough water to make the viscosity the same as milk or ink (watery, but doesn't loose its texture) this will be an experiment in how much paint vs how much water to get the right consistency - it will take many a few goes, but once you've got the hang of it, you'll be 98% there.
(tip: just like baking - put a small amount of water in, and add more, if necessary, to make the right consistency)
OK, fill your lil cup or jar, with you're desired colour of paint.
I have a basic airbrush with a "jar" under it, that is mixed with the air, as you press the button. There are a couple of different types of airbrush with even more variety of pricing that goes with them. Since I was beginning, I chose a relatively cheap one (about AUD$29), until I have mastered the technique, then I will look at more expensive brands, which will more than likely give me better results!
Before you spray anything! Get a piece of plain paper, inside of a cereal box is good too, anything that is waste and white! You're gonna use this as a "syc" - a test piece of paper/cardboard, to see how you're airbrush is performing (if at all!).
Place this paper/cardboard inside your box - so you don't spray the curtains, and start up the compressor (I'm assuming at this stage it's all connected)
Now gently in one gentle, sweeping movement, push down on the button and move your arm from left to right, you should see a fine mist of paint appearing on the white background. It SHOULD be a fine mist! If it's a straight line - you're in trouble!! If there is nothing at all then the screw aperture by in the nozzle probably needs adjusting to open it out to let some paint flow through.
Keep practicing, sweeping from side to side, getting in closer to see how the paint reacts and out also to see how far out the mist will go as you may only need a very fine mist in some applications.
THIS IS THE TIME TO EXPERIMENT!
Anyways my "style", "technique" - whatever you want to call it is quite simple! I place my object on the cake stand/plate/table (whatever you've decided to use) and with the compressor pumping its lil heart out, I spray from left to right, starting to spray about 2 or 3 inches BEFORE the spray will get to the object (which is why you should have that cardboard box!) and release the button, to finish the spray, as soon as the gun has passed the object.
The reason I do this is that you will get an even spray all over. With acrylics you may not notice that you've actually sprayed anything, as the paint is still wet, it dries rather quickly (about 2 - 3 minutes). In the meantime you can turn the object around, and do the other side, whilst you have the gun and the compressor going.
Once you've done one "pass", after it dries (or even before, if its obvious) have a look and see how much paint has gone on. Adjust your nozzle or distance accordingly. Depending on your type of "gun" you can adjust the amount of paint coming out by screwing in the nozzle if there's too much paint, or out, if not enough. If its going on too thick you maybe in too close as well, so be mindful of hoe close you are getting with the nozzle. I usually denote 4 to 6 inches away from the object is quite sufficient, but again its trial and error according to your own set up.
Keep "sweeping" away, stopping to let the paint dry, inspect, and carry on until you've got the grubbiness you desire. If you don't like it just wash it off and start again.
The beauty of acrylics are, they are cheap, and water based, so easy to clean up, and a little goes a long way.
OK that's about it! Nothing to it guys.
Be brave! Dust off that compressor! Attach the hose! Flick the switch! Give it a red hot go!
Last edit: by Phat Controller
research = asking a bloke who knows a bloke who said something vaguely similar to what I wanted to hear! - Tony (aka the Phat Controller)
Posted

Full Member
So its button down for air, pull back for paint, make your pass on the model, then push forward to stop paint flow then after a few seconds button up to stop the air.
Cheers
Andy
Andy
Posted
Full Member
You're spot on Tony when you say that there's nothing spectacular about airbrushing. I had a very good introduction from a professional modeller and then used the simple fundamentals to develop and improve my technique. The airbrush should be treated as a friend and most definitely not one to be frightened of, as it will serve well for years and years and help bring great pleasure to our modelling activities.
Bill
Last edit: by Longchap
At 6'4'', Bill is a tall chap, then again, when horizontal he is rather long and people often used to trip over him! . . . and so a nickname was born :)
Posted
Full Member
I purposely left the dual action air brushes out of the equation, and made references to them - "There are a couple of different types of airbrush with even more variety of pricing" as I didn't want to make it anymore confusing as it is for a novice who is hesitant to pick up an air brush. For my mind, the simpler the better.
But you are correct the dual action air brushes are great, when you master them.
Another tip for the beginners amongst us, would be to gather all your wagons/locos/ ,or whatever you're spraying the SAME colour, in one place close at hand, and spray them whilst you have the same colour in the jar.
That way you don't have to waste time, and spillages (and there will be), swapping over colours.
When you DO swap over colour, PLEASE remember to wash out your air brush, with clean water!
And another tip to keep your relationships together, use your air brush in the shed or garage. The last thing you want is to spill paint on the Mahogany dining table, staining the doilies, and dripping paint on the shag pile carpet!!
Anyways, I'm still learning as I go, and having immense fun spraying anything that doesn't move!
research = asking a bloke who knows a bloke who said something vaguely similar to what I wanted to hear! - Tony (aka the Phat Controller)
Posted
Full Member
One thing I have found with acrylics is that diluting past 10-20% with water can really affect the polymerization (acrylate to polyacrylate). Too much dilution and the airbrush is being used to spray on weathering powder. Best to use one of the proprietary diluents meant for the job if preparing washes for weathering. Vallejo, the brand I use, and Polyscale, no longer available, have specific limits for diluting. As do the gallon cans from the home improvement store.
Nigel
©Nigel C. Phillips
1 guest and 0 members have just viewed this.