Maiden voyage
Posted
#183245
(In Topic #10327)
Guest user
First tentative steps into weathering and overhauling
Well the big day looms,I am awaiting the arrival of my respirator which comes today. I am also awaited a rather funky airbrush cleaning vessel ( thanks Paul L ).
I'm going to use this thread to track my start in weathering and re sprays, or at least that is the intention.
As far as the weathering goes I have. Few suitable wagons to act as experiments but I did not fancy donating a new loco to the cause. With that in mind I scoured that well known website and bought a selection of five or so pug type steamies at a cost of between about £10 - £16 each, or there shouts.
I have dreamt up a use for them when re liveried. A small traction lease depot hiring out to private yards and the like.
These lococ's will be painted probably black and a simple numbering scheme adopted for use in the identification for the purpose of the DCC control addresses.
Some of these loco will be able to take a decoder I think but others will not. However I have been given a great idea ( thanks Paul L ) whereby a 5 plank wagon can be cut down and converted for the purpose of taking the decoder.
The bottom line is, this thread will be used to detail all the required exercises as these loco conversions take place so it's a bit of a painting / hacking workbench.
I hope all the required odds and ends will be here over the next couple of days as I am keen to get my hands dirty. I'll update as these bits arrive.
I hope this proves to be of interest going forward.
Cheers
Toto
Posted

Full Member
It's a couple of years since took a serious plunge into weathering. Previously I had confined myself to light, but effective, marking of doorframe and grime with a mapping pen and smudging the ink with a cotton-wool bud. I still use the technique all the time.
Finding a pack of weathering powders at a "local" shop (I use the term loosely - it's the nearest retailer but almost a 3-hour round trip by car) I thought "why not" and came home with a few soft brushes as well.
I'm no-one's expert but almost all my regularly-used rolling stock is now weathered. As is the track, ballast, most buildings and even a couple of buses.
All this and I still haven't mastered the airbrush which sits in the workbench most of the year waiting for my next attempt.
I started on a 4-wheel wagon. I'm happy now weathering much more expensive locos.
It doesn't happen unless you start and at some point that initial leap of faith has be taken. Go forth and weather.
By way of illustration everything in this view started pristine:

 Last edit: by Gwiwer

Posted
Guest user
Fantastic job done on these wagons. Very convincing and nice and rusty. I was thinking of going to B & Q and getting a 2.5 litre tin of a mustard coloured emulsion and just chucking over the whole layout. Saves a lot of time.

I have a few 5 planks that at are present pristine and some bogie well flats and some box vans that will all fall foul to my airbrush over the next wee while. I will try one at first and if the results are ok, set up a production line of about half a dozen or so .
They will all get the track grime on the chassis / frames etc and then depending on the wagon type will start to receive altering versions of general weathering above chassis level depending on the characteristics of the wagons.
The loco's will get it as well in time. I have a number of pristine class 47's which will be my first attempt probably.
The reason I went out and bought some cheaper loco's specifically for this initial exercise is that some of them I intend to strip back to the plastic and completely refinish. I was not so keen to use £ 80. - £100 s worth of loco for that purpose.
I'm pretty confident that I'll do a half decent job. Improvement will come with time and experience. As you say …….. You've gotta start somewhere.
Cheers
Toto
Posted
Guest user
single plank wagon

Private owner wagons,

and another,

and a lowmac thingy,

Container wagon,

and a queen mary brakevan,

I have at least two or three of each so plenty of practice ground.
here are also some other private owners, bogie well with boiler loads and a few odds and ends.
They'll never look the same again.
cheers
toto
Posted
Inactive Member
.Best of luck with them I am sure all will be well.
Derek.
Posted

Full Member
Here's my rendition of the Crocodile.
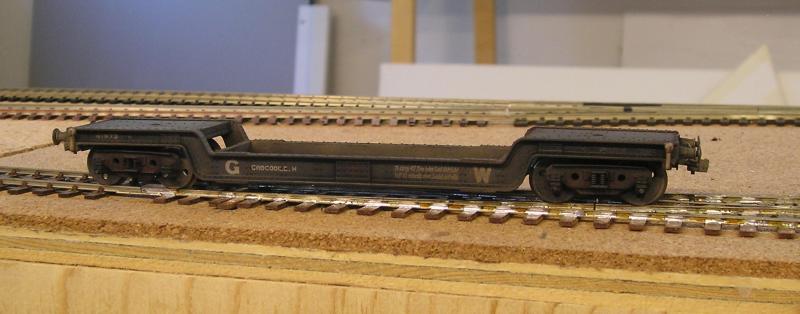
John
Last edit: by Brossard
John
Posted
Guest user
They are all signing up for voluntary redundancy. But there is no escape, their fate is sealed.
Cheers
Toto
Posted
Guest user
thanks for posting the picture. it looks ideal. just an irregular coat of filth. A bit heavier on the bogies and a bit lighter here and there on the body work.
What about a bit of a dab of a slightly shinier black on the axle boxes to suggest grease and oil and stuff.
what's your thoughts.
I just came back in from running a quick errand and look whats arrived,
one respirator,
No………. I'm not modelling it Gormo.
and of course the filter pack ( purchased separate )

Thats it for now.
cheers
Toto.
Posted
Full Member
http://paulbartlett.zenfolio.com/paulbartlettsrailwaywagons
John
John
Posted
Guest user
I just dipped into the link you gave me there and on the first page there was a further link to bogies and axle boxes. I opened it up and it must just about every configuration that you can think of.
What's more, it's a hit or a miss with regards to the oiling / greasing. Basically it's however you want to show it yourself. Some of these wagons don't look like they have had much attention in a while.
A good bit of information there. I'm off to have a more in depth look.
Thanks for posting.
Cheers
Toto
Posted
Full Member
John
John
Posted
Guest user
The reason I brought up the axle boxes was that I had just been watching a DVD of Tim Shackletons on weathering and I'm sure that he had made comment that generally maintenance on goods wagons etc were often neglected unless it was sponsored / owned / leased by some of the bigger transporters ( let's say Cadbury ) apparently these companies would only tolerate grubby wagons to an extent. Especially when it can to the finish like paint or replacement wooden spars etc.
However, given that my knowledge of these points is still very limited, I tend to take the first opinion that I hear and run with it until I eventually forge my own.
That's the beauty of the forum, everybody can tell you something different and give a bit of creativity to the subject.
One thing that I think the glossy oily finish to axle boxes can help with is to take away the matt finish used on about 95% of the wagons body. It just breaks the sequence a bit. Just opinion and I wouldn't do it everywhere as variation is the name of the game here I think.
Again.
Thanks for the info. Much appreciated.
Toto
Posted
Full Member
John
John
Posted
Full Member
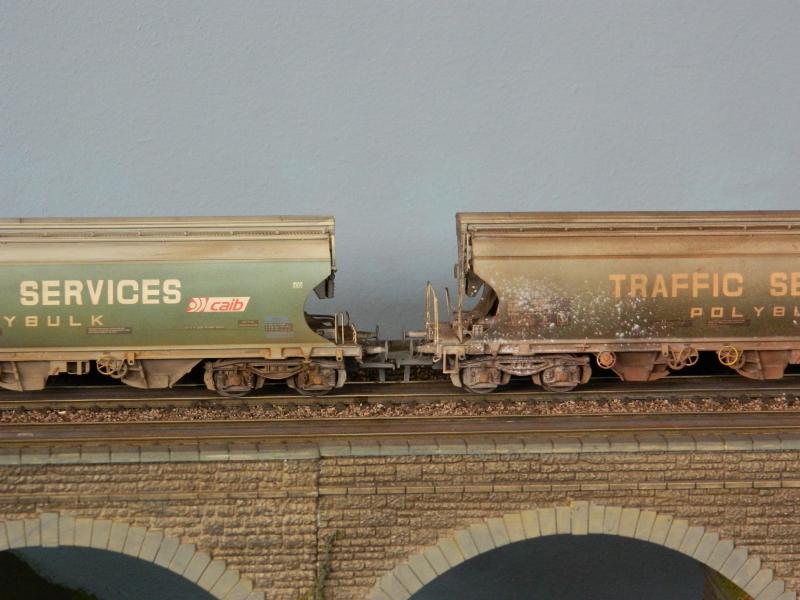
Wagons also become stained by their cargo.Those of us modelling china clay can get through prodigious amounts of white weathering powder!
Here's a sequence of three showing work I carried out to add to the factory weathering applied to a china clay plank wagon.
The area below / right of the angled brace shows that the mapping pen has been applied to ink in the gaps between planks. This view was taken to compare the before and after effects with just a part of the wagon done.
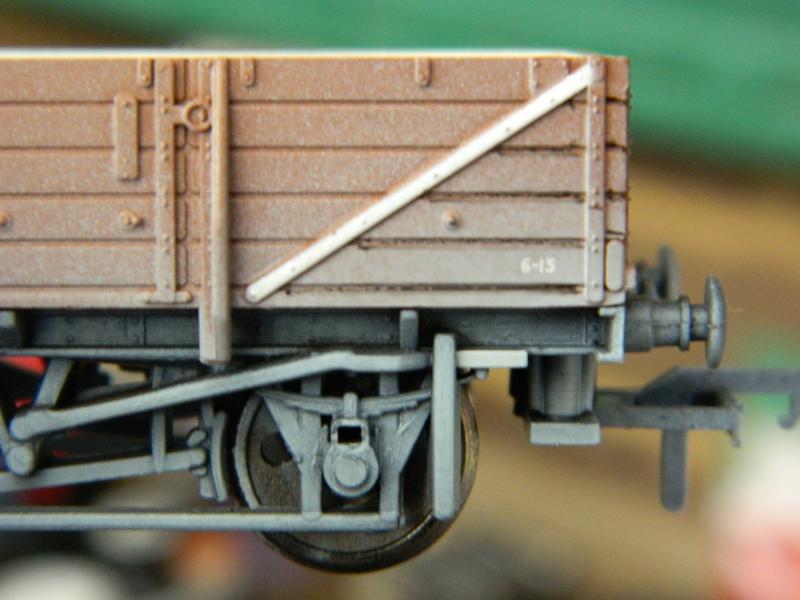
The paints are Jo Sonjas acrylics which take on the plastic nicely and finish flat without any need to seal or mattcote.

Looking a lot more "used" now!
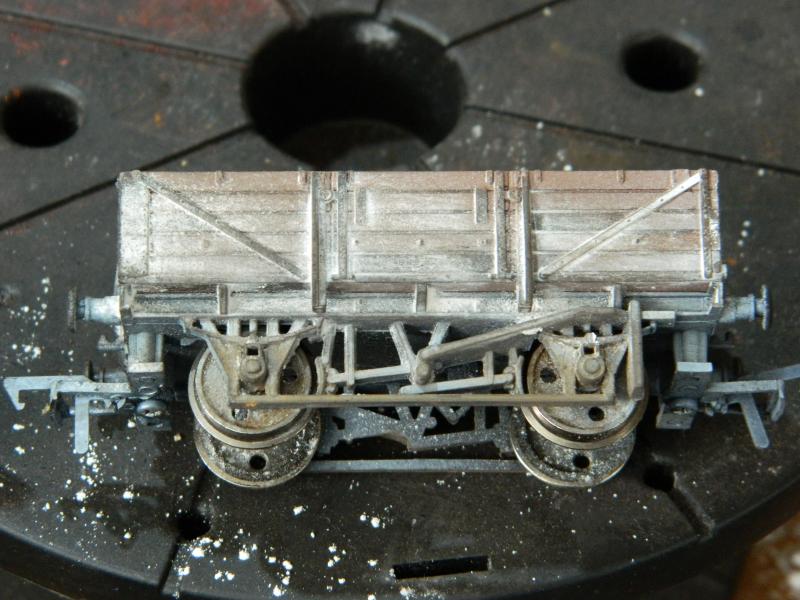
I also had fun with the rake of Polybulk hoppers which again arrived with an even coating of factory "dirt" but are all now individually weathered. One even has spatter created by loading a fine paintbrush with powder and giving it a deft flick above the wagon.
Last edit: by Gwiwer
Posted
Guest user
Excellent results, as you say as well as the overall coverage of general weathering, localised repairs etc can really add that bit extra. It is an amazing and rewarding facet of the hobby with really endless potential.
No two wagons need be the same.
Toto
Posted

Full Member
Again look at the prototype, old built up oil attracts dirt so end up being matt, only new oil or leaks will appear gloss.
If I want a built up effect, I use artists oil paints and then sprinkle weathering powders on while they are still wet, when its all dry (a day or two) you get the effect of accumulated crud.
Last edit: by Campaman
Cheers
Andy
Andy
Posted
Guest user
There are so many different applications of various materials . I have acrylics, enamels and powders in my arsenal at the moment. The powders will need a little more reading up on as if not applied correctly, can easily be taken off through handling. I think certain coatings like matt varnishes and the like need to be used along side them to seal them in.
I've not jumped at it yet as I need to be happy with myself that I have the correct plan of attack in my head. The dive in is soon though, I feel it in my bones. I have a couple of questions on the alteration of my recently acquired industrial shunter and then I will show my experience start to finish for all to see.
Cheers for now
Toto
Posted
Guest user
the time draws nearer,
apart from the unpainted traders wagons that I have ordered to convert into small coal tenders for the industrial shunter fleet and one more shunter, I think everything has arrived.
meet the family,

and another ,

I took advice and put a 9v battery over the wheels just to check that they run.

No shortage of these then.
And ……….. my favouritist ever thing …………….. my airbrush cleaning doofer.

On checking with the battery, all ran well. they all go like the clappers…….. except Thruro which seems to go a bit slower, in fact, probably about half speed.
Now, I am not moaning about that as really ……… the other are really to fast. Can I buy different motors for these that will slow them down to a bit of a more realistic speed or is that it ?
I'm also assuming that the way to use the brush cleaner is just to load some thinners into the cup when finished and put the nozzle into the jug and spray through. maybe repeat several times. depending on how heavily used it has been, take it apart and clean thoroughly. Tell me if I'm wrong.
Anyway, here is the intention. Tomorrow, I need to first go for a Tony Blair cut and after that the day is mine ( I think ). I'm going to wash down some wagons and take the airbrush for a whirl.
I need a bit advice for when I do the other wagon conversions into tenders for the industrial loco's but that can wait a bit. possible after my first weathering attempts.
The same can be said for the butchering of the industrial loco's as they will need modifications. I could have posted queries on that tonight but I have a meeting at the office with my dad. ( The Tynecastle Arms ).
anyway, things should start to move now ( apologies for the wait Marty )
how it is worth while.
cheers
Toto
Posted
Inactive Member
No shortage for the industries now.
Those little blighters are fast.Kids love that plus they have to get across dodgy rail joints and electrics.
To slow them you would probably need to change the gear sprocket and worm The originals are probably 20-1 ratio.
No doubt Hornby and others should carry higher gears from some of their other range of locos for a straight swop.
If you want to spend big then its Mashima motors and High level gear boxes and then you have axle problems as Hornby used a 9/16th dia axle.
Best of luck.
Derek.
Posted
Full Member
John
John
1 guest and 0 members have just viewed this.