First Attempt at Weathering a Loco, Rolling stock etc? Show us Yours.
Posted
#139572
(In Topic #7495)

Banned
Not Just a Coat of Grimey Black !
Hello all,Some of us out there are about to attempt, or just had their first go at weathering a locomotive, rolling stock, buildings, vehicles etc. If that is you, post a pic with a description of techniques used, whether it be air brush, powders, pencil, what ever ! I know myself that I'm still learning the best way to get that 'desired effect', so I'm hoping other experienced modellers will be the critics of our attempts and give us hints, tips or praise. But just remember, if you do post a pic, criticizing should be taken as a positive, even if you do think it is negative ! We all learn from our mistakes and it will only help improve your techniques.
Here is a pic of the 'first proper attempt' at weathering an older Hornby Ivatt 2MT. This is really a practice run before I attempt a 'new' loco.
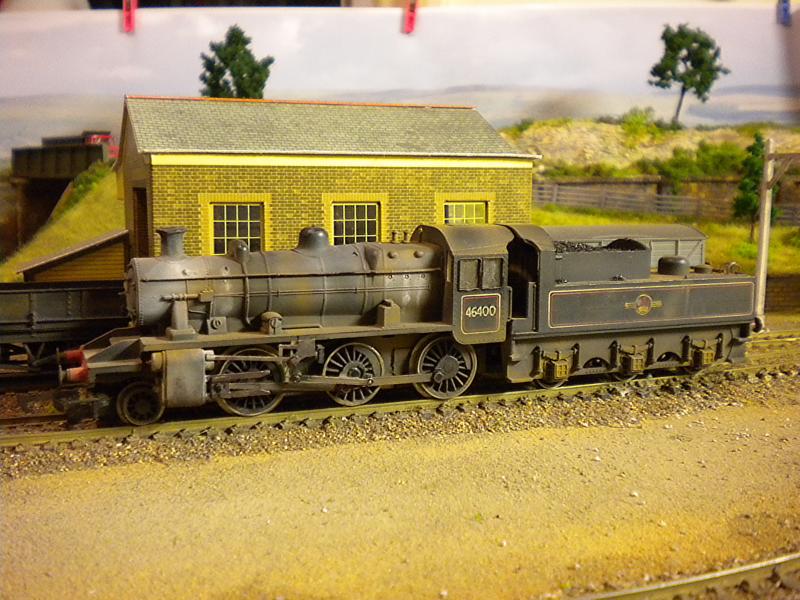
This 'attempt' was all done using an air brush ang a fine paint brush.
First, I gave it a light spray of rust around the boiler, cab roof, valance, tender sides, tender top and bearing boxes, (Humbrol Matt Leather 62). Once touch dry, I dusted the loco with Floquil Weathered Black, which covered up some over-spray of rust. With the weathered black still in the pot, I added a touch of Matt White (Humbrol 34) to simulate smoke/ash/heat affected areas, mostly around the Chimney, smoke box and cylinders. A little watered down flat white was used around the plugs on the fire box area and the cylinders also where there would be slight water or steam leakage, using a fine brush. The rods/vaves were treated to a coat of grimey black and rust and once dry I mixed a little Red (Humbrol 5) and Matt Black (Humbrol 33) to represent grease and applied by brush . The bearings were treated to straight black and draged slightly along the con rods to simulate oil marks etc. The only other addition is the 'real coal' in the tender, including some over dregs of coal scattered around the top of the tender.
Any criticism will be well received. Now lets see your first attempt..
Cheers, Gary.
 Last edit: by Gary

Posted

Inactive Member
I know diddly about pommie locos, but I'm convinced. :thumbs
Perhaps they could wash the windows?
Max
Port Elderley
Port Elderley
Posted
Inactive Member

Technical details:- Hit it with the dreaded lacquer hairspray and dust it with brown, grey and black weathering powder. :oops:
Not a patch on yours, mate. ;-)
Max
Port Elderley
Port Elderley
Posted

Full Member
Perhaps a little over weathered for my taste.
Posted

Full Member
Posted

Full Member
In contrast to DD, if it's towards rthe end of steam, it looks just about the right level of weathering. They really were sorely neglected towards the end and your colouring gives exactly that impression.
My only concern is that it looks a little "dry" everywhere…………:roll::roll:
Neglected or not, the bearings and valve gear would still have been greased and so would look "oily" rather than dry and baked. Other than between the front 2 drivers, your Nos 5 and 33 "grease" doesn't really show up in France …….. I'd guess some "oily black" around some of the moving parts would be visible across the Channel.
Also, I'm not too sure about the white staining on the smoke box…………:hmm. The white was, as you say, limescale from hard water leaking through the various seals and thus, wherever this might take place, there could be a streak of white. The smokebox was a "dry area" and would more likely have been stained with smoke and soot rather than limescale. The steam pipes exiting from there into the cylinders on the other hand ……………………;-)
It's still head and shoulders above anything I've ever done ……..:cheers
'Petermac
Posted

Full Member
Stubby47's Bespoke Model Buildings
All photos I post are ©Stu Hilton, but are free for use by anyone.
Posted
Full Member
Apart from the loco, those buffers are fantastic !!! Tell us more please ……………………….:roll:
'Petermac
Posted

Full Member
Perhaps post a pic of the model along with a link to the prototype pic you have used to do the weathering?
It's easier to offer critique if we can compare with what you were trying to do
Cheers
Jim
Jim Smith-Wright
Rule 1 - Model what you really see and not what you think you know!
www.p4newstreet.com
Rule 1 - Model what you really see and not what you think you know!
www.p4newstreet.com
Posted
Full Member
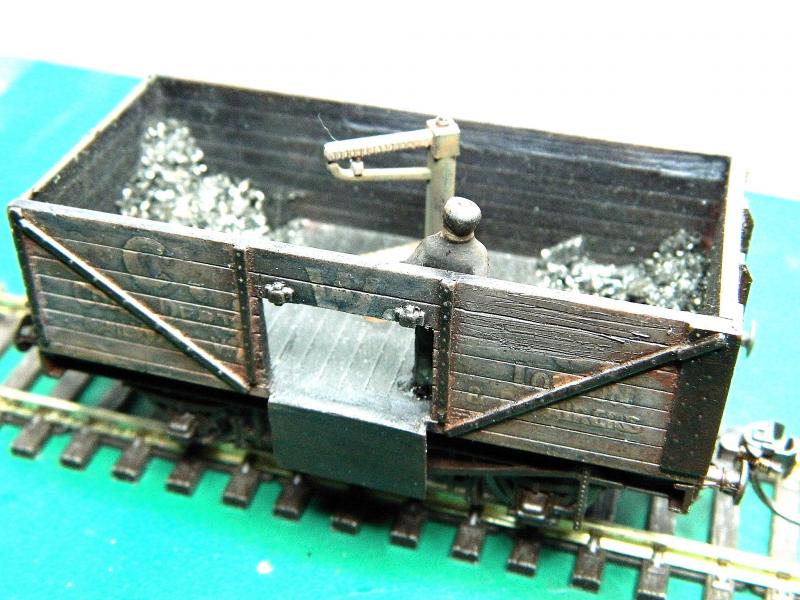
The picture has been on before, on my original 'this is what I've done' thread.
The buffers are standard Peco. I removed the extra plastic which clips them to the track, then just dry brushed with black, rust and a bit of grey on the wood. The ground cover is real coal dust.
Stu
Stubby47's Bespoke Model Buildings
All photos I post are ©Stu Hilton, but are free for use by anyone.
Posted
Full Member
 thumbs:thumbs
'Petermac
Posted
Banned
I have just read your reply and I know what you mean by looking 'dry'. I have also just learnt that if you apply a little clear lacquer over these wet areas it will or should show up as a 'wet look'. Unfortunately the light in the layout room probably does no justice to the pic, as it tends to put a yellowish tone over the items of interest. The smokebox area is actually more grey in real light as opposed to what the pic tells us. I will attempt to improve this loco using your sugestions which is greatly appreciated, including any advice from other members.
:cheers and thanks for the feed back as it all helps !
Gary.
Posted
Full Member

Posted
Banned
Cheers, Gary.
Posted
Full Member
It's as much personal taste as anything.
Posted

Full Member

A Troublesome Truck from the Bachmann Thomas range. They're nice enough seven-plank wagons, but oh man do they look wrong out of the box with that bare light gray plastic and the undercarriage and cleats and all just being a darker gray. Never been wholly satisfied with this, so a do-over will be forthcoming

Posted

Legacy Member
Constructive criticism;- (all personal choice you understand)..
Little too much yellow/green algae.
The outside edges of the wheel treads need dulling down (too shiney). Even when newly fitted the outside edges were never polished just plain old dull metal with the only polished bits being where wheels ran on rails…
Otherwise, 11 out of 10…..
Mike
Praise is an excellent fillip for waning ambition.
Praise is an excellent fillip for waning ambition.
Posted

Full Member
Only the numbers so they could find the engines on a gloomy morning.I'm sorry Gary, but it looks excellent.
I know diddly about pommie locos, but I'm convinced. :thumbs
Perhaps they could wash the windows?
Nigel
©Nigel C. Phillips
Posted
Full Member

"Ere, wots all this then?
There's more?

And the original offering.
Mainline CWS wagons, Kadee couplers and NEM 362 pockets, matt acrylic vanish and weathering powders (black, grey, rust). Aim was to create a "seen better days" atmosphere with faded paintwork (lots of IPA) and coal dust among the rust. Inspired by faded paintwork in the "PO Wagons" series.
Nigel
©Nigel C. Phillips
Posted
Full Member
Last edit: by ZeldaTheSwordsman
1 guest and 0 members have just viewed this.