TO36 [Edwardian] School Building
Posted
#191562
(In Topic #10699)

Full Member
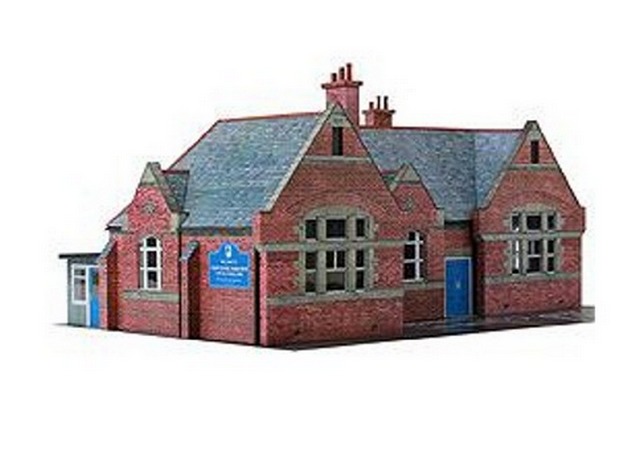
When I first saw the TO36 School building [ http://www.scalescenes.com/products/T036-School ] by John Wiffen I was looking for a free-lance 1920-40 station building, and wondered if I could kit bash this charming model.
First of all, even as a practised admirer of John's work this is not a building for the beginner, or indeed someone lacking staying power. It is complex and ingenious.
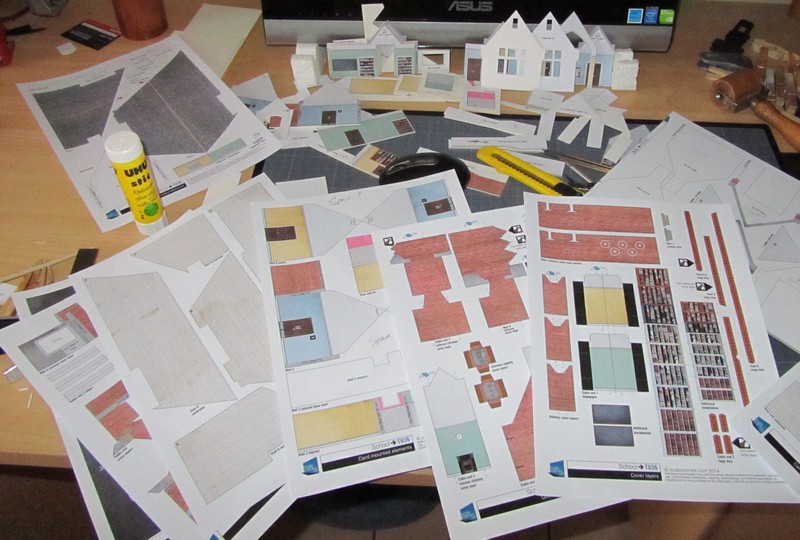
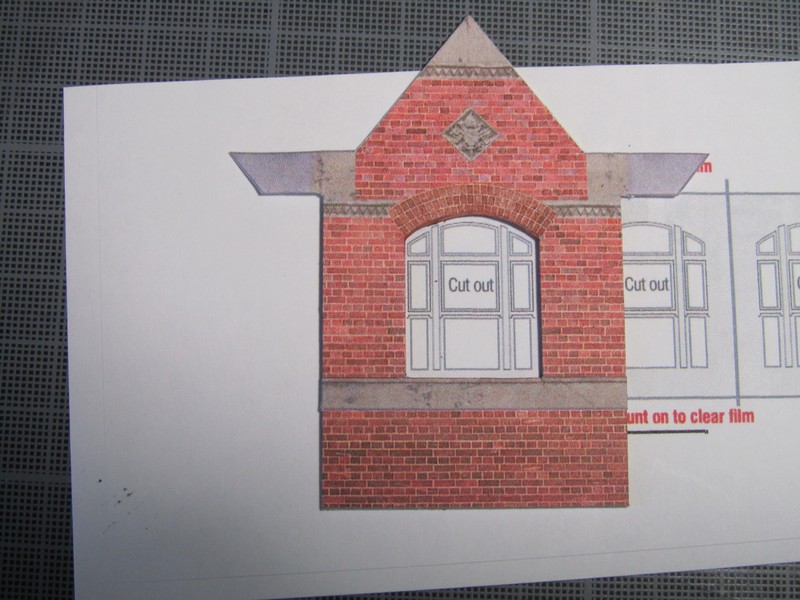
With advancing arthritic problems in my shoulders, I knew cutting out a number of components in 2mm grey pasteboard would give me grief, so have deliberately chosen to use 1.3mm and 0.6mm white card rather than the recommended 2mm and 1mm, concious that I would have to supplement the thickness of 'stacked' components with an extra layer or two. I have read each of the 11 pages of instructions and studied the 14 pages of components and reckoned that the alteration in thickness of the card would not compromise any 'length' accuracies, but the thinness of card would necessitate additional layers to make up the 8mm thickness needed for chimney stacks, which are covered by a complete wrap of texture paper.
I will simply make them up in two layers of 1.3mm card, allow them to dry and then stick them as often as needed to extra layers of card, cutting each using the component shape as a guide. This will hopefully obviate the need to print out additional copies of the components.
We will see! I hope to take photographs during the build, not that the instructions need any amplification, but to offer some hints that might make the job easier for anyone who wants to try it with me…
First of all…some bits and pieces, plenty of cutting out still to do..
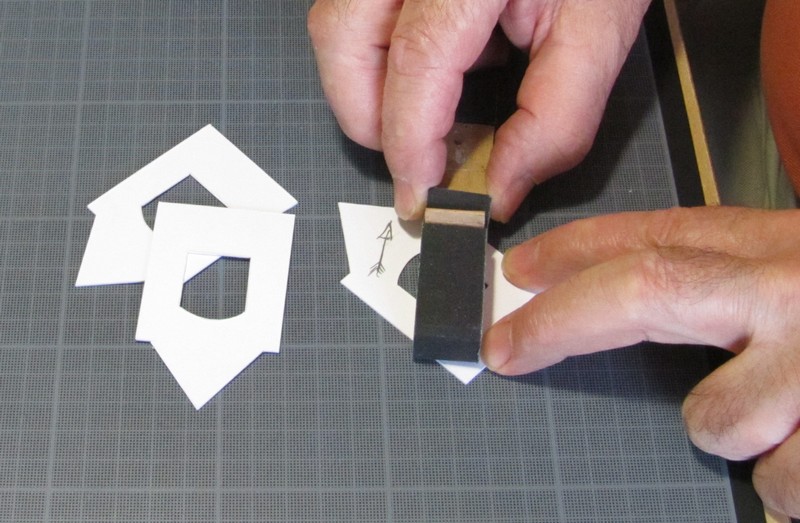
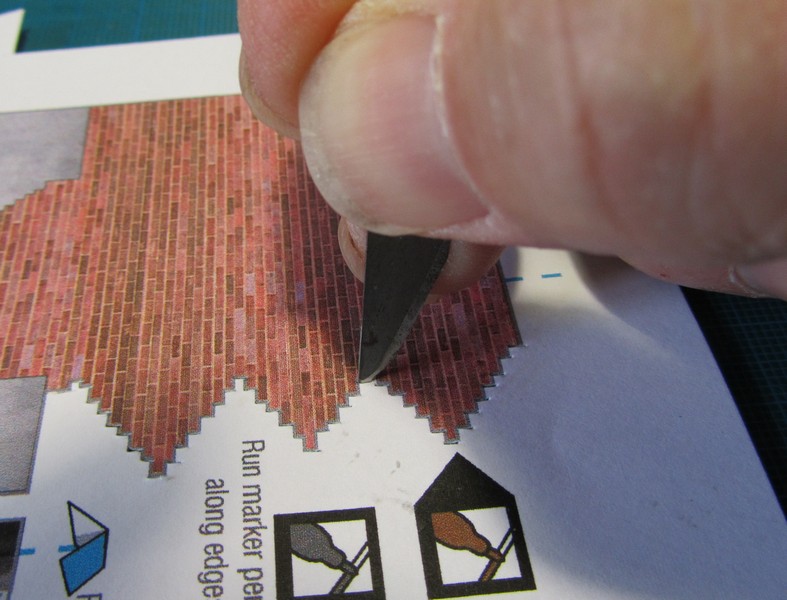
The first parts to cut out are the window overlays, I chose to print them out onto self adhesive label stock. This I stuck to clear acrylic before cutting straight across the bars and window frames and picking off the 'glazed' areas with sharp tweezers. Then came cutting out two large curved arches which must be accurately mated back to back.
My method here is to put down my Stanley snap-off knife, and use a pointed scalpel, holding the blade right down by the tip, to make a shallow cut. Then follow in the same line several times. I like to pierce the line in several places with a sharp point, every say 1/2" and if I start to go astray, stop cutting, and begin again at the next prick mark.
It'll all work out fine in the end. Then, ensuring I have the 'back to back' sense correct, I use the cut-out portion to guide me around the shape on the second piece. This saves you having to use the cover strips provided to cover up any rough or uneven areas. If you are using white card there is no need to use them anyway..
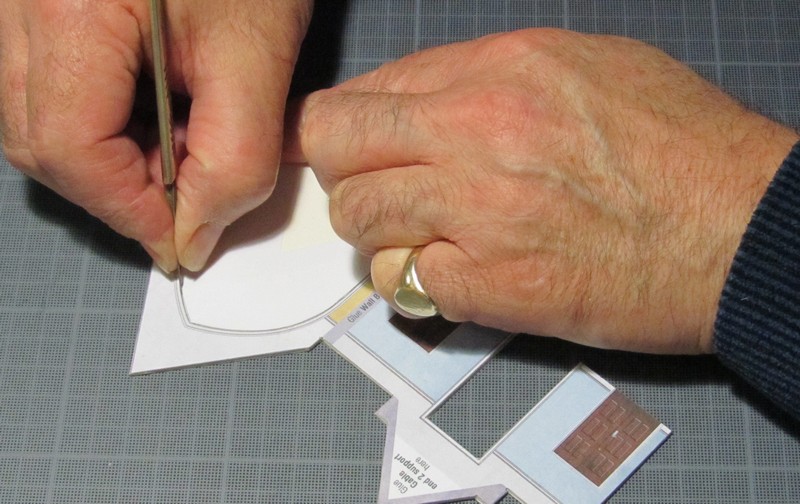
On the subject of cutting out, I usually prick the corners of components and use the little holes as guides to start and stop cuts, also, where angled components are draw inter-joined, cut through the entire lines of each component, then even if you are a little out of line, the components will match each other when glued back-to-back. It is comparatively easier to consistently pierce a drawn line with a sharp point than it is to cut the same side or distance of a line every time…

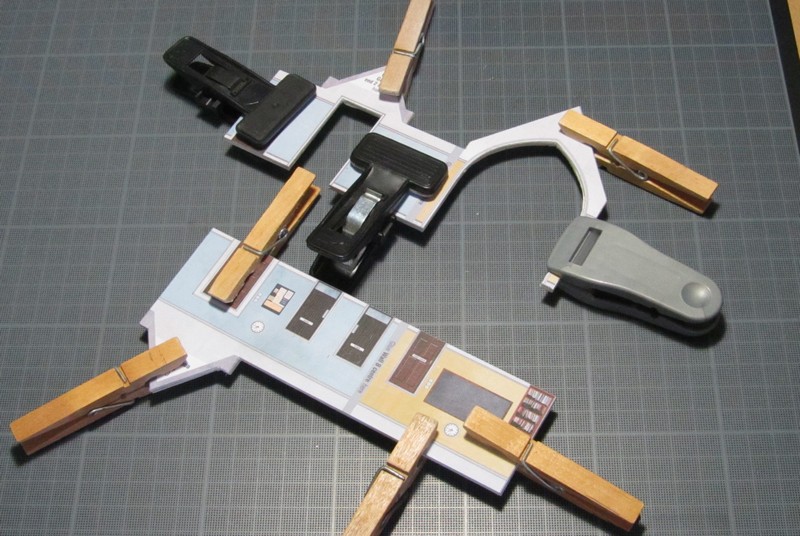
Finally for now, you can't have too many clamps….
'You may share the labours of the great, but you will not share the spoil…' Aesop's Fables
"Beer is proof that God loves us and wants us to be happy" - Benjamin Franklin
In the land of the slap-dash and implausible, mediocrity is king
"Beer is proof that God loves us and wants us to be happy" - Benjamin Franklin
In the land of the slap-dash and implausible, mediocrity is king

Posted
Full Member
Sorry Doug, you have completely lost me with this paragraph. I have read and re-read it and I still don't understand what you mean. Is it just me being a bit thick?
Nevertheless, looks like it's going to be a wonderful build as usual.
Terry
Posted

Full Member
Mike
Pig Hill Yard - a small Inglenook shunting layout for my boys, in 00.
Pig Hill Yard - a small Inglenook shunting layout for my boys, in 00.
Posted
Full Member
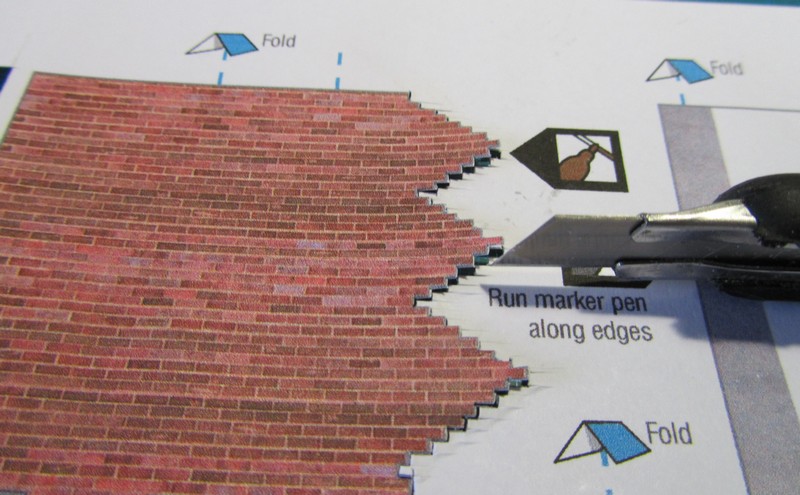
After getting several PM/emails in the past asking me 'which side of the line should I cut…' , what I was trying to say was don't even try to cut 'just' beside a line, you will end up a with a random accumulation of errors.
Instead, using something like the point of a dart, or school compasses [but stick a cork on the free end] or similar, prick every corner outline intersection of a component quite deeply before attempting to cut it out.
It is comparatively easy to make an accurate stab at a line with a sharp point, rather than judging where a blade will be, with its attendant breadth, inevitable cast shadow etc etc.
Then, when you come to cut it out, place the tip of your knife blade in one of the holes, and slide your steel straight edge up against the blade. Hold the straight edge there at that end. Repeat at the hole at the other end of the line, and the edge should line up so that the blade cuts down the centre of the drawn line. Have a very light exploratory cut, you should feel the blade go 'plunk' and 'plunk' as it drops in and out of the hole at each end.
If you do feel the 'plunk-plunk', start the real cut with the tip in one hole, towards the other hole. When it gets there you will feel a slight change in resistance indicating you have cut far enough.
Don't be afraid to make quite deep holes until you get a feel for it, the component parts will be covered by wraps/textures and you will not see them.
If you look carefully at the second to last picture you will see two prick marks arrowed, the straight edge butted up to the other two. You'll also notice that one straight line forms the outer edges of two gable end parts. By cutting them together in one continuous line you'll ensure they will form equal shapes when they are glued up back to back.
Sorry if that wasn't clear, does it make sense now?
Basically, prick the corners of all components stuck to card and use the tip of your blade in the holes to align your straight edge. Yes, it can be a PITA going round each component, but it does pay dividends.
Doug
 Last edit: by Chubber
'You may share the labours of the great, but you will not share the spoil…' Aesop's Fables
"Beer is proof that God loves us and wants us to be happy" - Benjamin Franklin
In the land of the slap-dash and implausible, mediocrity is king
"Beer is proof that God loves us and wants us to be happy" - Benjamin Franklin
In the land of the slap-dash and implausible, mediocrity is king
Posted
Full Member
Mike
Pig Hill Yard - a small Inglenook shunting layout for my boys, in 00.
Pig Hill Yard - a small Inglenook shunting layout for my boys, in 00.
Posted
Full Member
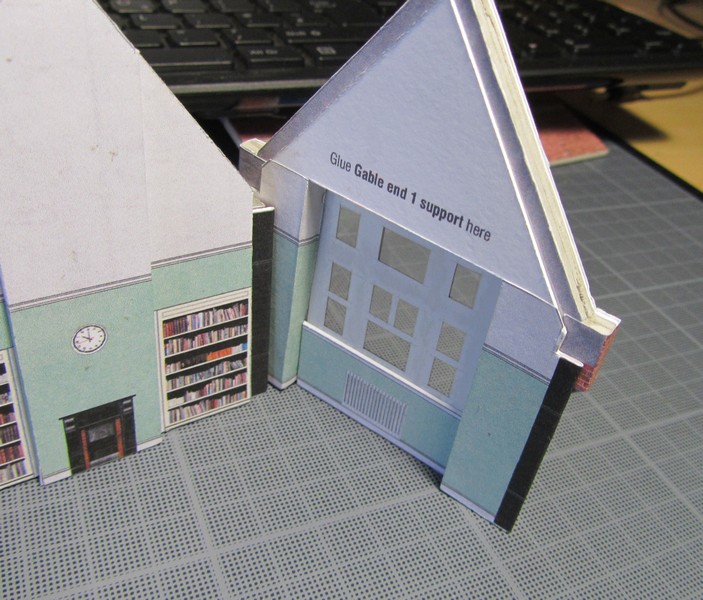
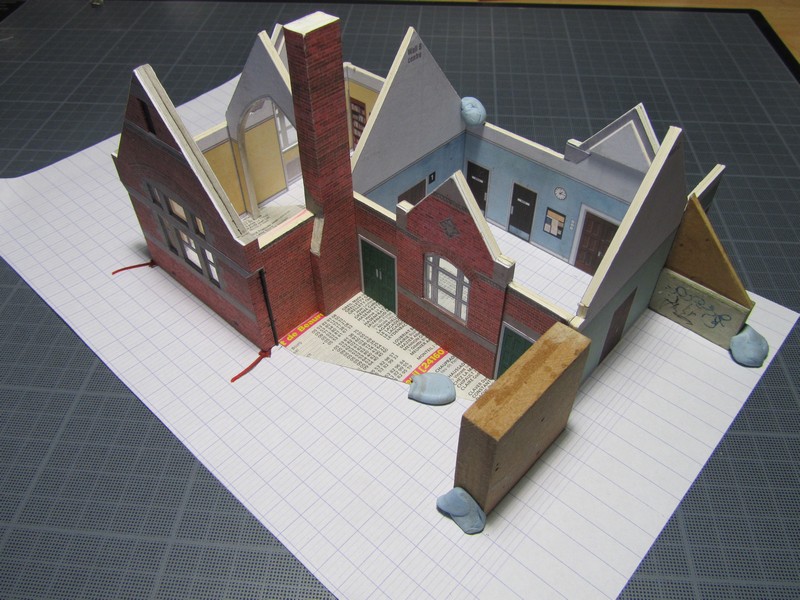
This picture shows the above elements covered, note the two flaps that are left unglued/unwrapped until several stages later.
On some parts, where a comparatively complicated wrap is needed, I like to locate one edge/corner that I can easily line up such as the peak of this gable, peg or pin it and slide/rotate the wrap to the best position. Then I peg it firmly down one whole side, fold back the paper, apply glue stick to the card underneath, return the paper and smooth it down. After the glue has dried I un-peg the paper the paper, lift it up, apply glue stick to the dry area of card and finally roll the whole flat with a wallpaper seam roller.

Laminated gable ends showing thin card components fixed between thick card pieces.
Returning to the cutting out business, you might like to consider cutting all the lines that run in the same direction first before turning the card to cut the other sides. This is in 2mm card, but relatively easy as it is all straight line cutting. Note thepricked holes and the large Stanley snap-off knife, easier to hold with less strain, and always sharp..and with the pricked hole system, running straight down the centre of the line.

That's all for now, folks..
Last edit: by Chubber
'You may share the labours of the great, but you will not share the spoil…' Aesop's Fables
"Beer is proof that God loves us and wants us to be happy" - Benjamin Franklin
In the land of the slap-dash and implausible, mediocrity is king
"Beer is proof that God loves us and wants us to be happy" - Benjamin Franklin
In the land of the slap-dash and implausible, mediocrity is king
Posted
Full Member
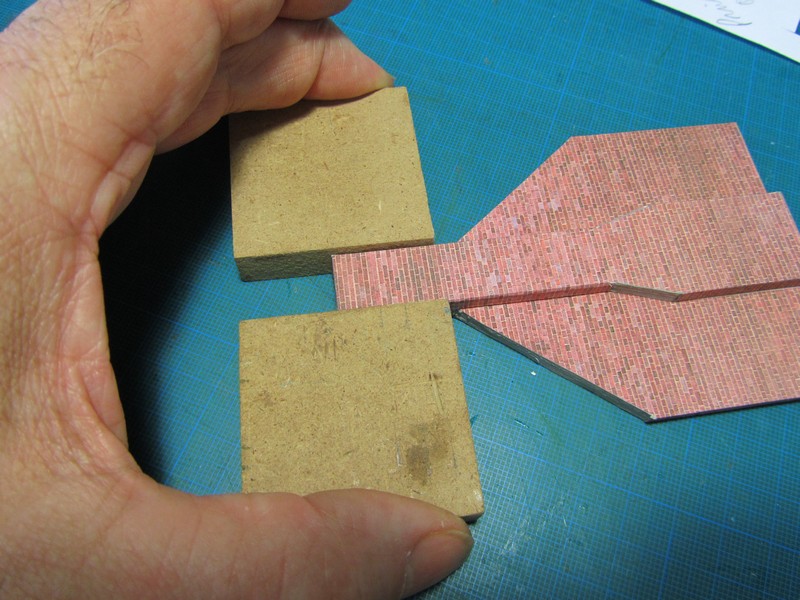
Bearing in mind that this Scalescene chimney stack is pretty standard in that it needs to be about 8mm thick for the wrap to encircle it properly, leaving enough paper for the pattern to work all round, I made sure my layered up stacks were about that thick by adding extra layers of my 1.3mm card.
John has designed the overlap to look as inconspicuous as possible by drawing the overlap edge in a stepped brick pattern. Personally, I prefer to do the same as wallpaper hangers, and tear overlaps rather than leave a straight line, but here I will do it as designed.
Cutting 1mm steps isn't too irksome if you grind a scalpel blade to a tiny chisel point and it it to 'stab' the vertical divisions. After a stabbing session, the horizontal parallel cuts can be made swiftly from one side.
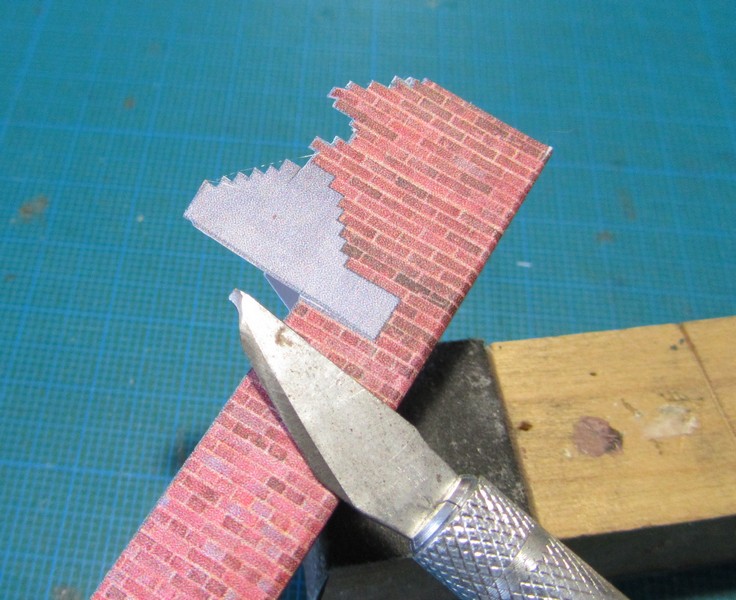
the ground down blade is invaluable when making blue brick corner overlays like these on Bear's End Station.
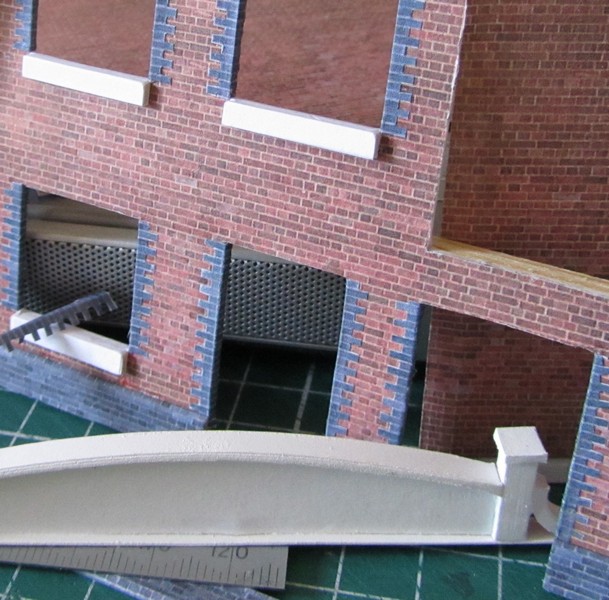
Each inch of right angle wrap takes 92 separate cuts. In truth, it is better to grind the chisel edge to be about 1.2mm so that the little bits fall out readily.
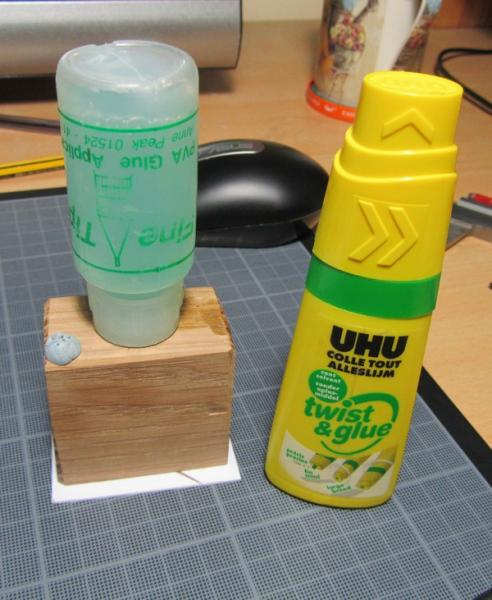
I apply glue to the card and cover the first face, then score down the first edge to be folded, apply glue there and use 45mm squares of MDF to press and fold up the first side cover of a stacked card part, repeating until it's covered on all 4 sides. I resist the urge to smooth it with by fingers, as all this does is neatly print through any unevenness in the laminations. If the laminations are too uneven, I use Testors filler, smoothed flat with an old dining knife, then rubbed down with the 600 grit paper. P.I.T.A.? Possibly, butit covers a multitude of sins. I had to do it on this model for both stacks.
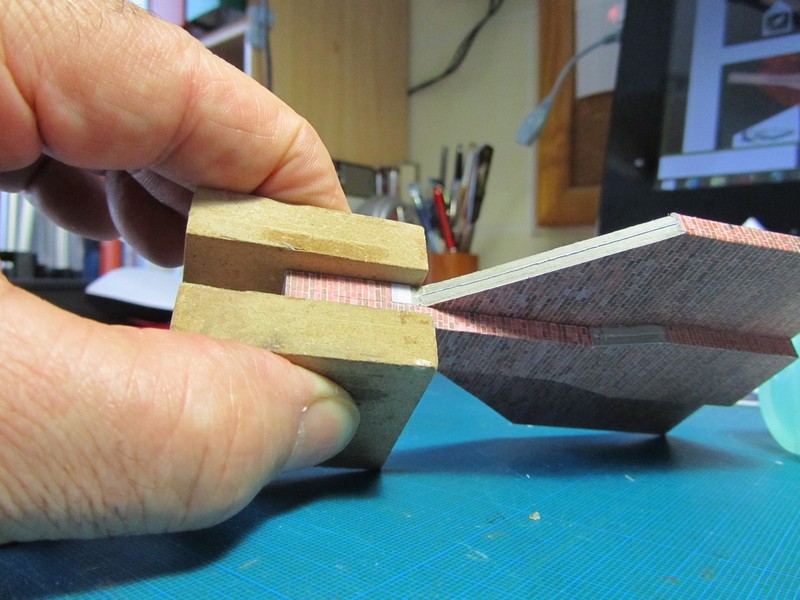
I know I could not get the same consistently acceptable results without these two little pieces of MDF.
Talk soon, the TV man cometh…
'You may share the labours of the great, but you will not share the spoil…' Aesop's Fables
"Beer is proof that God loves us and wants us to be happy" - Benjamin Franklin
In the land of the slap-dash and implausible, mediocrity is king
"Beer is proof that God loves us and wants us to be happy" - Benjamin Franklin
In the land of the slap-dash and implausible, mediocrity is king
Posted
Inactive Member
Those kits sure look like patience and a steady hand is required.
Thanks,
Derek.
Posted
Full Member
Well, the TV Man cameth, and wenteth, with €150 of mine in his pocket for a new satellite-box. Ouch! Looks like I'll not be using any SLW tokens for fun things for a week or two…
Doug
'You may share the labours of the great, but you will not share the spoil…' Aesop's Fables
"Beer is proof that God loves us and wants us to be happy" - Benjamin Franklin
In the land of the slap-dash and implausible, mediocrity is king
"Beer is proof that God loves us and wants us to be happy" - Benjamin Franklin
In the land of the slap-dash and implausible, mediocrity is king
Posted

Full Member
Posted

Site staff
No wonder my lines aren't straight :thud
Thanks Doug, all tips being filed away for future reference.
Ed
Posted

Inactive Member
Very interesting. :thumbs
Max
Port Elderley
Port Elderley
Posted
Full Member
Mike
Pig Hill Yard - a small Inglenook shunting layout for my boys, in 00.
Pig Hill Yard - a small Inglenook shunting layout for my boys, in 00.
Posted
Full Member
Thanks,
Doug
:oops::oops:
'You may share the labours of the great, but you will not share the spoil…' Aesop's Fables
"Beer is proof that God loves us and wants us to be happy" - Benjamin Franklin
In the land of the slap-dash and implausible, mediocrity is king
"Beer is proof that God loves us and wants us to be happy" - Benjamin Franklin
In the land of the slap-dash and implausible, mediocrity is king
Posted

Full Member
Dont smooth the chimney cover casings with a finger………you will shortly be able to see a perfect example of what happens if you do!:oops:
Posted

Full Member
Watching and learning.
Marty
Posted
Full Member
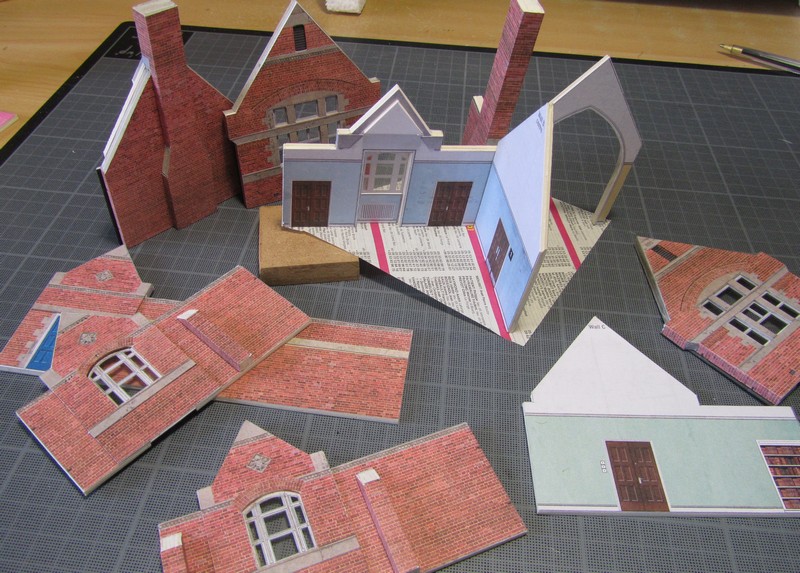
The instructions detail which walls are stuck where..
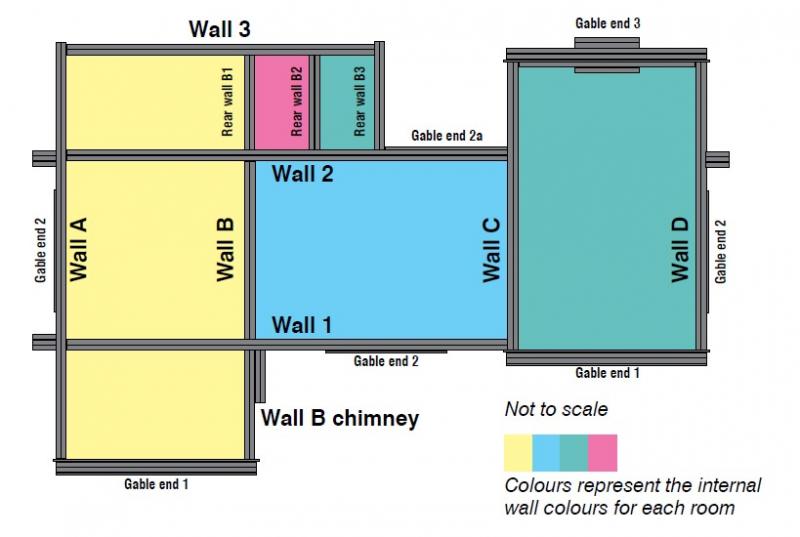
starting with these….glued together at right-angles.
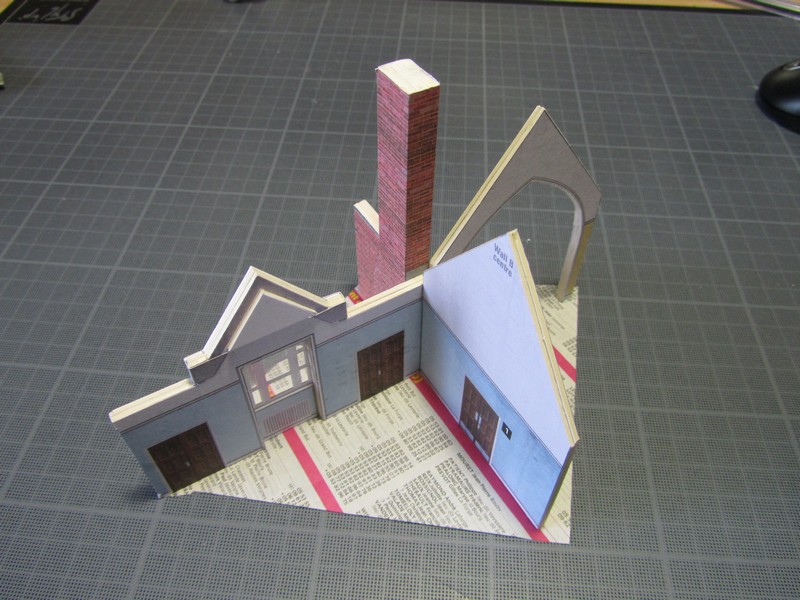
You'll notice they are all stuck to the same piece of very thin soft paper [ex-'phone directory*]. This ensures that as they are added to with more walls, these initial pieces will remain in the same alignment, preventing me from forcing them out of square just to get another piece to fit. If there is a need to lengthen/trim a piece, I'll know. I discovered this whilst scratch-building, as my buildings grow rather 'organically', new bits being offered up and cut to suit. The paper is easily torn away as the build takes on shape and rigidity.
* I like this stuff as it gives lines and columns printed at right-angles, useful for alignment.
Here's another little idea for gluing and aligning walls… Gable end 2 wall and wall B must end in line at the front so that gable end 1 will align in parallel with wall 1. By using graph paper, and God's gift to card modellers [Bluetack] relevant edges and corners can be aligned [red arrows] and held in place while the glue dries. So, no matter if it appears slightly at variance with the 'Glue Here' line, gable end 2 wall will finish in the right place, here at the prominent front of the building.
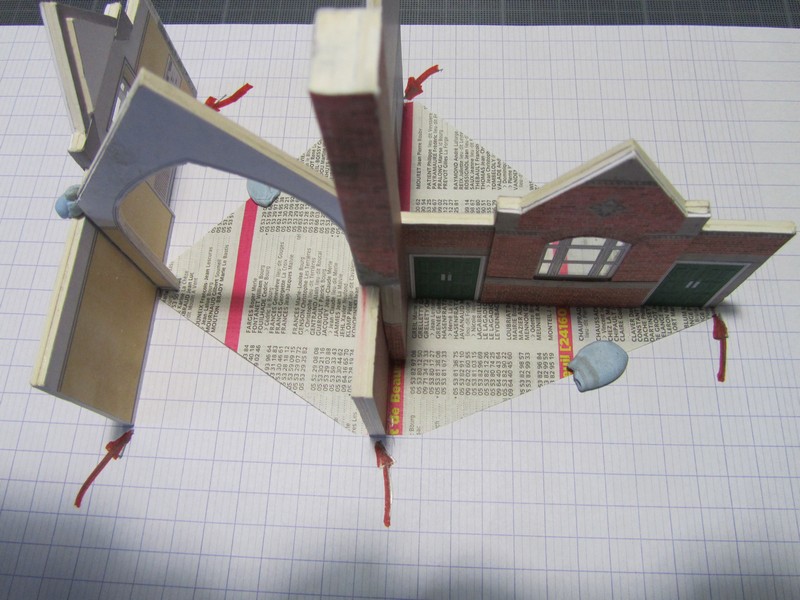
There is the added advantage that it can all be spun round on the paper to get at another side, something more difficult if it is stuck to your 3ft x 2ft cutting mat….
Last edit: by Chubber
'You may share the labours of the great, but you will not share the spoil…' Aesop's Fables
"Beer is proof that God loves us and wants us to be happy" - Benjamin Franklin
In the land of the slap-dash and implausible, mediocrity is king
"Beer is proof that God loves us and wants us to be happy" - Benjamin Franklin
In the land of the slap-dash and implausible, mediocrity is king
Posted
Full Member
You try to glue a walls end to a texture paper covered component with PVA etc. It's not a job for glue stick.
The Law of Sods dictates that sooner or later you will end up sticking a wall end to a patch of texture paper that isn't too well stuck to the underlying card, and it either pulls away or tears off your paper.
However, if you comprehensively prick through the joint area before gluing, the PVA will enter the pricked holes and form 'micro-dowels', greatly enhancing adhesion and stiffness…

Last edit: by Chubber
'You may share the labours of the great, but you will not share the spoil…' Aesop's Fables
"Beer is proof that God loves us and wants us to be happy" - Benjamin Franklin
In the land of the slap-dash and implausible, mediocrity is king
"Beer is proof that God loves us and wants us to be happy" - Benjamin Franklin
In the land of the slap-dash and implausible, mediocrity is king
Posted
Full Member
Notice supports backed up with BlueTack.
I have recently started to use UHU Solvent-Free adhesive in my FineTip dispenser. It doesn't string at all, no odour, and dries more quickly than PVA. It dries slightly flexible, and makes a good substitute for DeLuxe cockpit transparency glue which until now I have preferred for sticking in acrylic window sheet but is three times the price!
John Wiffen recommended it to me. Additionally, he tells me that if you forget to replace the pin at the end of a session and the nozzle dries out, it will readily re-dissolve in very hot water.
I still use PVA where I want a bit more time to slide things about.
That's all for a little while, as Christopher Robin said said
"Backson Bisy Backson"
Last edit: by Chubber
'You may share the labours of the great, but you will not share the spoil…' Aesop's Fables
"Beer is proof that God loves us and wants us to be happy" - Benjamin Franklin
In the land of the slap-dash and implausible, mediocrity is king
"Beer is proof that God loves us and wants us to be happy" - Benjamin Franklin
In the land of the slap-dash and implausible, mediocrity is king
Posted
Full Member
1 guest and 0 members have just viewed this.