Building a Scalescenes Large Overall Roof
Posted
#229892
(In Topic #12569)

Full Member
N Gauge station on a curve for Chantley Junction
Chantley Junction track laying is slowing due to budgetary constraints, so I have taken the plunge and decided to build the Scalescenes Large Overall Roof as the fiddle-yard entry on Chantley station. I have read every word of Jon's build of this monster (http://yourmodelrailway.net/view_topic.php?id=9373&forum_id=101), and hopefully I am fore-armed with some of the things he learned. Mine won't be as long, but if it looks half as good as John's, then I will be happy.To make things more complicated, or at least more interesting, I plan on making this a curved build. I always loved York and Newcastle stations with their amazing curved roofs.
I have planned out the angles and lengths and have decided on a simple wedge-shaped design where each wedge is exactly the same. Each long edge is exactly the length of the Scalescenes arch. The inside has edges that are exactly half the length of the Scalescenes low relief arch so that when placed atop of one, there will be a pleasing symmetry.
Before getting ahead of myself, here's a full-size print out of the plans for the arches at the station end of Chantley Junction:
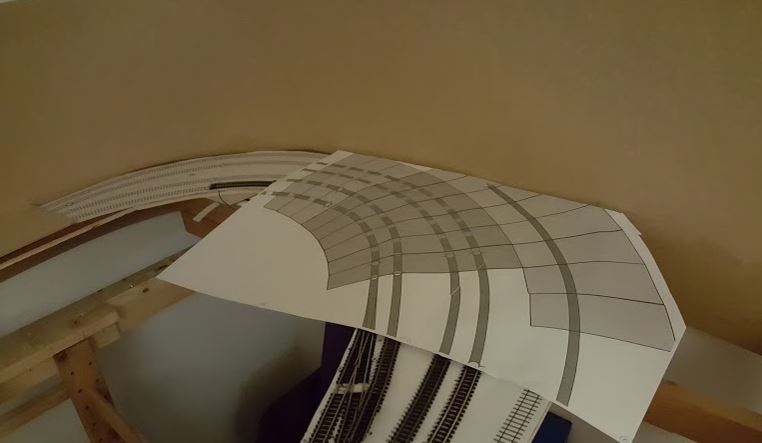
Look only at the dark grey. The light grey is a test to see if I could get away with a second, smaller roof, but I'm ignoring that for now.
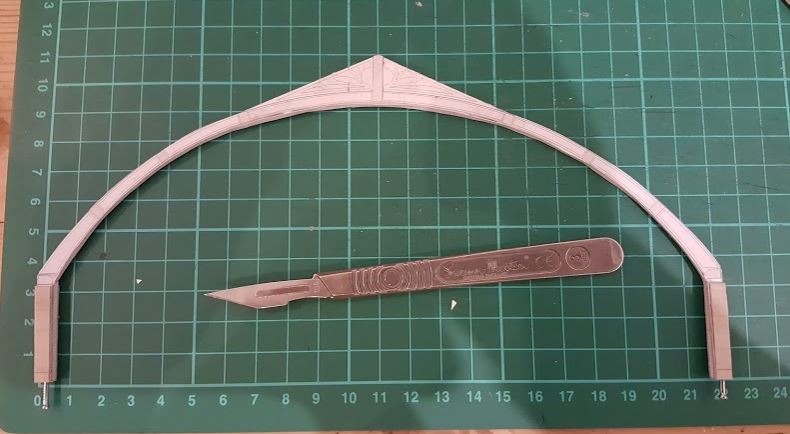
So the first job is to construct ten arches for the roof. This is less cutting that John needed to do as in N Gauge, each arch fits on one piece of card. However, they are tiny. The inner arch supports are less than 5mm wide at some points, so they are very flimsy when first cut. I bent and tore this one with my clumsy hands.
Once stuck together it is sturdy, but getting it accurately together was a real challenge. It is so floppy that slipping them over each other while the glue is wet is difficult, and you can see places where I didn't get them matched up properly. This one will be an arch at the back, out of sight!
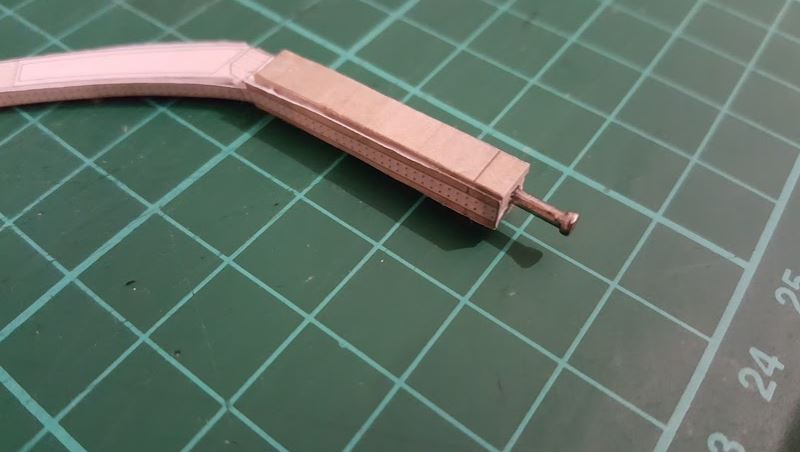
One thing that John recommended was a method to pin the arches down. To this end, I cut a notch in the 1mm inner support and glued a nail inside. This will serve two purposes. Firstly, I intend to use a bit of scrap plywood with the roof plan stuck on top. I will use small holes to keep each pillar in the right place while I glue on the separate layers of wall. This should give me something sturdy to attach the wall to, and will hopefully enable me to get a nice curve in the wall. Secondly, it will enable me to plant it reliably on the layout whilst keeping it removable. (I would have liked pointy-side-out, but the nail head is bigger than the 1mm inner layer…)
Another thing I learned from John's build is to use accurate card widths. On Pig Hill Yard (00 Gauge), I used proper 2mm and 1mm grey board. Scaling it to N Gauge, this needed to be 1mm and 0.5mm. I had no 0.5mm but I had some light card that when glued into pairs came to 0.5mm. I am so glad I did this. The inner wrapper that represents the girder of the arch is exactly the right width. Had I omitted that layer, it would have overhung and not looked good at all.
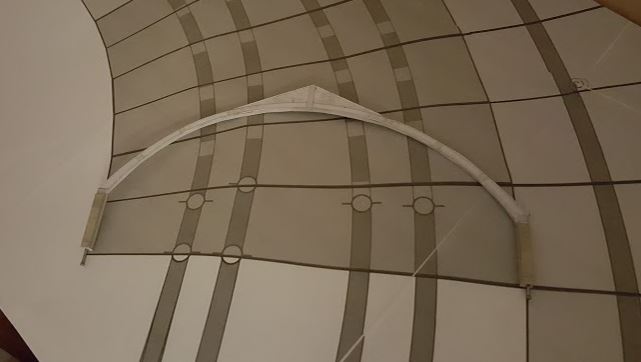
And just to test, it fits the full-size plan perfectly.
Nine more to go. That's at least 9 hours. Since I am still laying track and also travelling again with work, this one may be a slow build.
Mike
Pig Hill Yard - a small Inglenook shunting layout for my boys, in 00.
Pig Hill Yard - a small Inglenook shunting layout for my boys, in 00.

Posted

Full Member
Cheers MIKE
I'm like my avatar - a local ruin!
I'm like my avatar - a local ruin!
Posted
Full Member
Mike
Pig Hill Yard - a small Inglenook shunting layout for my boys, in 00.
Pig Hill Yard - a small Inglenook shunting layout for my boys, in 00.
Posted
Full Member
https://www.amazon.co.uk/s/ref=nb_sb_noss?url=me%3DAXJLU7T6LT8E6&field-keywords=foam+board
I believe 10mm is also available from other sellers.
Cheers MIKE
I'm like my avatar - a local ruin!
I'm like my avatar - a local ruin!
Posted

Full Member
I hadn't realised you had to scale down the card thickness for N……glad you got it right
Foam board would certainly save on cutting……I wonfer if it would have the on edge strength of laminated card?
Watching with interest
John
Posted

Full Member
Marty
Posted

Full Member
I find laminating thinner layers gives me more square edges.
Cheers
Andy
Andy
Posted
Full Member
https://www.amazon.co.uk/Logan-Werks-Cutting-Straight-Bevel/dp/B001JSQX3K/ref=sr_1_2?ie=UTF8&qid=1505231480&sr=8-2&keywords=logan+foamboard+cutter
[yt]fAO5C_Y9qKg[/yt]
Cheers MIKE
I'm like my avatar - a local ruin!
I'm like my avatar - a local ruin!
Posted
Full Member
I've completed three arches and almost done another two. That leaves five to go.
I couldn't resist a trial to see how it's looking. The nails sticking out of the bottom are a great idea as it means I can use Blu Tac to hold the arches in place on the plan to get a feel for how the roof will look.
I think it's going to be good! Five more arches to go and we will see…
Mike
Pig Hill Yard - a small Inglenook shunting layout for my boys, in 00.
Pig Hill Yard - a small Inglenook shunting layout for my boys, in 00.
Posted
Full Member
Marty
Posted
Full Member
Moving right along ……how are you going to handle the roof elements?…….I guess with your location and your baseboard height, viewer visibility is not an issue like it was for me.
It might be worth spending some time testing by running a load of trains just to determine how often you need access for unexpected train movements……..I run auto loco exchanges so being able to see/ nudge :oops: a loco on the uncoupler is important……as a storage entry blocker it might not be an issue
Great progress
Cheers
John
Posted
Full Member
I have a couple of luxuries that you didn't though…
The N Gauge arches are obviously only half the size of yours so are lighter and easier to handle. The whole thing should be small enough to poke a hand in when needed, but should also be light enough to lift up easily.
As a scenery break, for me the more opaque the structure the better, so grimy glass and obstructed sight-lines are what I am after. Since it is only just below my eyeline, I hope it will work well. You will see the gap between the tracks widens for clearance around the tight curves, so if this is hidden then we are looking good.
I think the main challenge will be fitting the roof elements as the roof is now a series of ten wedge shapes rather than a few rectangles, but I have a printed template which I hope will help.
Mike
Pig Hill Yard - a small Inglenook shunting layout for my boys, in 00.
Pig Hill Yard - a small Inglenook shunting layout for my boys, in 00.
Posted
Full Member
I started with the façade. This was fiddly in N Gauge… The strips are about 1mm wide, and I moved them into position with the tip of a scalpel. It was definitely a job for the holder thing…

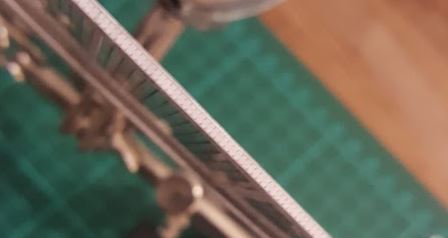
There is a thin strip that goes along the underside of the façade. This is in two parts, both about 150mm long and 1mm wide. This was fiddly to apply, but looks good…
Next, I stuck the full-size roof plan for 10 arches to a piece of 9mm ply and drilled 3mm holes at the points where the arch columns will rest…
And into this the nails sticking out of the bottom of the arches slot perfectly. They don't hold tight enough to keep the arches perpendicular to the board, so I will still have to take care when attaching the side walls, but I think I'm on to a winner with keeping things together when attaching the walls. An inspired idea, John; thank you…
Here's the roof in place on top of the tracks in roughly its final position…

Mike
Pig Hill Yard - a small Inglenook shunting layout for my boys, in 00.
Pig Hill Yard - a small Inglenook shunting layout for my boys, in 00.
Posted
Full Member
I am embarrassed :oops: :oops: I forgot to mention for my second end I used plastic strip for the facade strips…….too late now I guess. It might be worth reinforcing the bottom cross beam with a plastic beam in rear…..without it the facade can be a bit flimsy
Its going to look great….you must be very pleased
Regards
John
Posted
Full Member
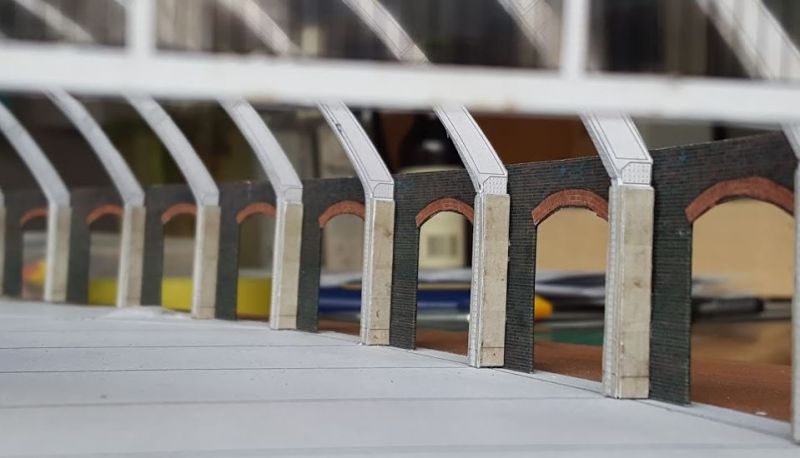
Today I started on the walls. Because of the curved nature of this building, I couldn't just use the walls from the kit, so I decided to make my own. The inner wall will be solid brick, but with recessed arches. The outer wall will comprise wider, open arches.
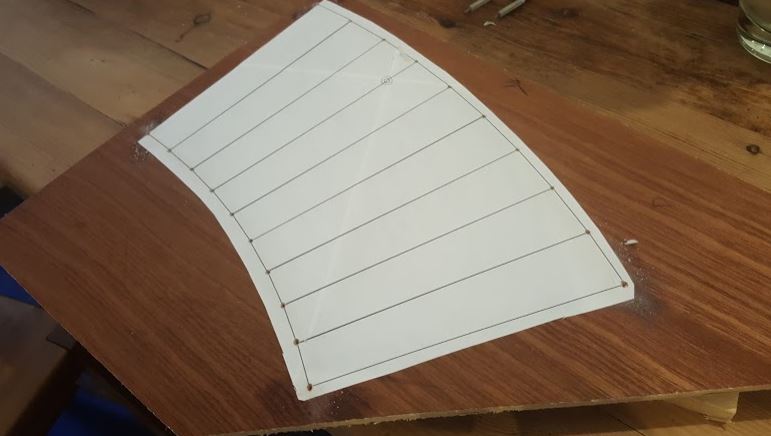
The first thing I did was draw a template to the exact dimensions of the inner and outer walls, and mark on this the centre-lines of each arch. I did this in Microsoft Visio. This was printed and stuck to 0.5mm card. Onto this I used the Scalescenes arch template to draw the positions of each arch, before cutting the whole thing out:
I started with the inner wall. I wrapped it in Scalescenes Dark Brown brick, taking care to keep the folds as crisp as possible, following all the good advice elsewhere on this forum…
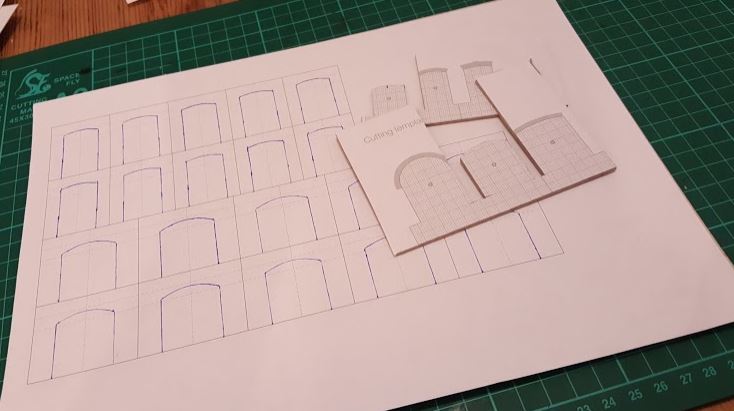
I used the Scalescenes arches to put across the tops of the cut-out arches, having already coloured the card edges with brown marker. These arches are tiny. A couple of millimetres wide. I coloured the paper edge with marker which was a fiddly job, and time consuming too…

After this was done, I had the inner surface of the inner wall, ready to be applied to the arches of the roof…

It was tricky getting started as the first join has to be perfectly square. With a couple of these metal things whose names I can't remember, I managed it eventually…
I'd already been on over two hours, so I stopped after fixing the wall to four arches. One of them I didn't get quite square which is annoying, but I don't want to rip it off otherwise I risk pulling the bricks off too, and it probably won't be noticeable once it is all finished.

Once the inner part of the inner wall is complete, I will do the inner part of the outer wall. Then the outer layers of each will be laminated on top. My hope is that this will be quite sturdy once complete.
It's slow going, but I think it's going to be good!
Mike
Pig Hill Yard - a small Inglenook shunting layout for my boys, in 00.
Pig Hill Yard - a small Inglenook shunting layout for my boys, in 00.
Posted
Full Member
Marty
Posted
Full Member
Looking good Mike :thumbs
Terry
Posted

Full Member
'Petermac
Posted
Full Member
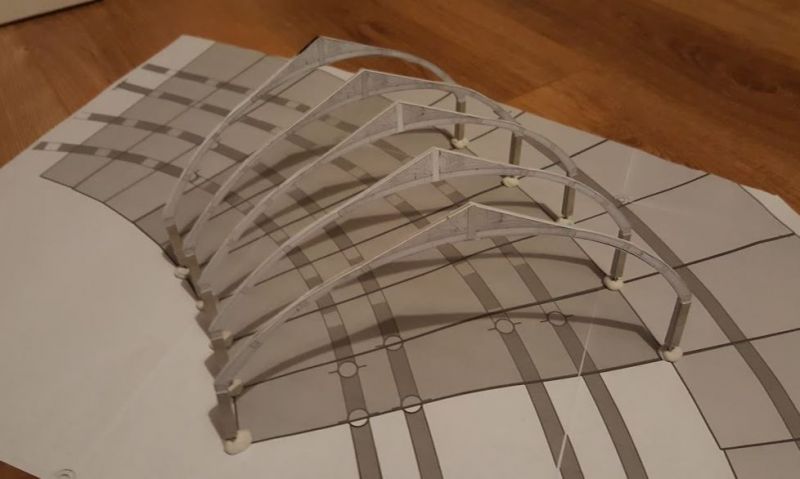
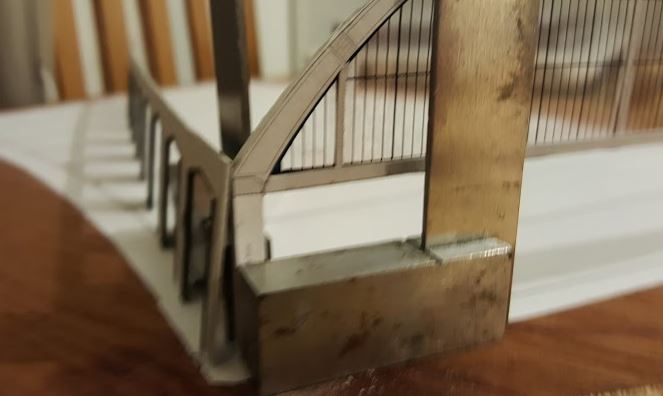
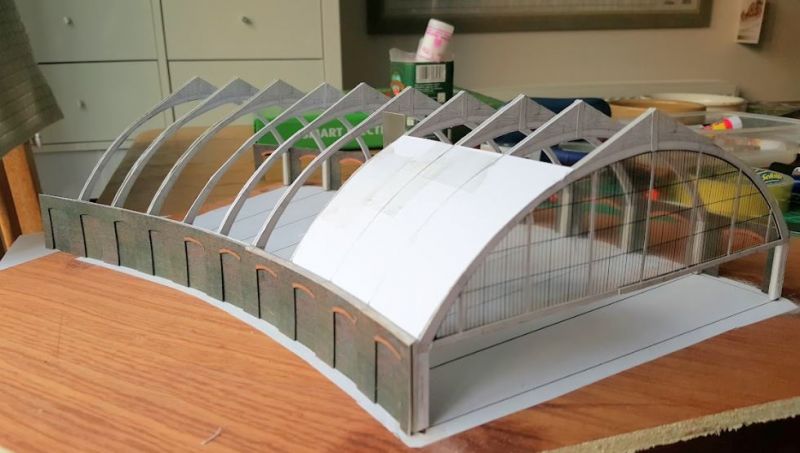
Using the wooden jig, the arches were slotted into their holes and the layers of walls added. The curve's inner wall is more or less complete - a layer of arches on the inside, two layers of solid brick, and then a final layer of arches. The curve's outer wall will be open arches, and bigger ones at that as they are on the wider side of the curve. Here's an overall shot with the first three roof panels in place, and the wall's capping beginning.
And here is a look from the inside. The roof panels need to be cut individually as they are wider at the top than the bottom because of the curve of the main arches. This is proving fairly easy to do - simply marking with a pen where the arches are and cutting appropriately. I am holding in place with a bit of tape as the glue dries. Here's a look from the inside towards the inner wall:
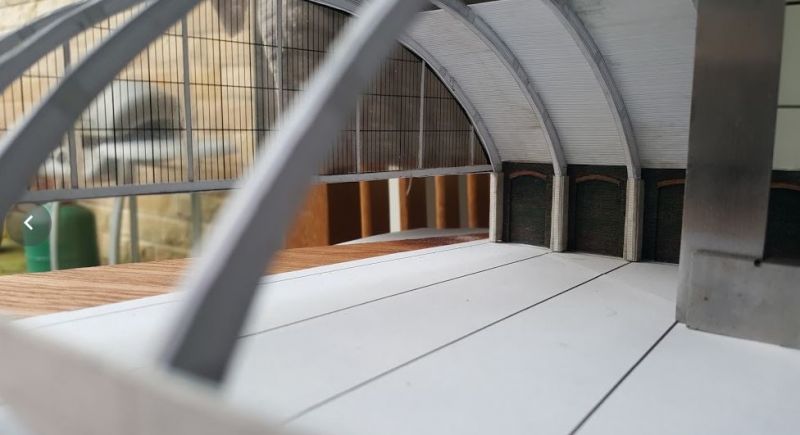
And a view from the front of the same thing. The engineer's square is there to hold the arches straight while the glue dries, as they tend to bend one way or the other.

Here's a look at the curve's outer wall - open arch work through which you will glimpse the interior of the station. I don't want the views to be totally unrestricted though as it will be possible to see the trains disappear around the back of the back scene, so I will be introducing something (a building perhaps) to hide most of these arches.
And here is the back wall, giving a good idea of the curve and of the design of the outer wall at this side.

It is slow going, but it is rising from the building site and I am quite pleased with it so far…
Mike
Pig Hill Yard - a small Inglenook shunting layout for my boys, in 00.
Pig Hill Yard - a small Inglenook shunting layout for my boys, in 00.
Posted
Full Member
Marty
1 guest and 0 members have just viewed this.