007.5 Loco Run Around.....how it was done
Posted
#124929
(In Topic #6535)

Full Member
A useful introduction to end of schedule operations
Loco Run AroundThis may be a little slow but I prefer the building block approach……if nothing else it means I can get my own thoughts in order
First off I should make it clear that this operation assumes you are using Kaydee uncouplers and basic Kaydee above track uncoupling magnets. The details will change for other systems but the fundamentals remain the same.
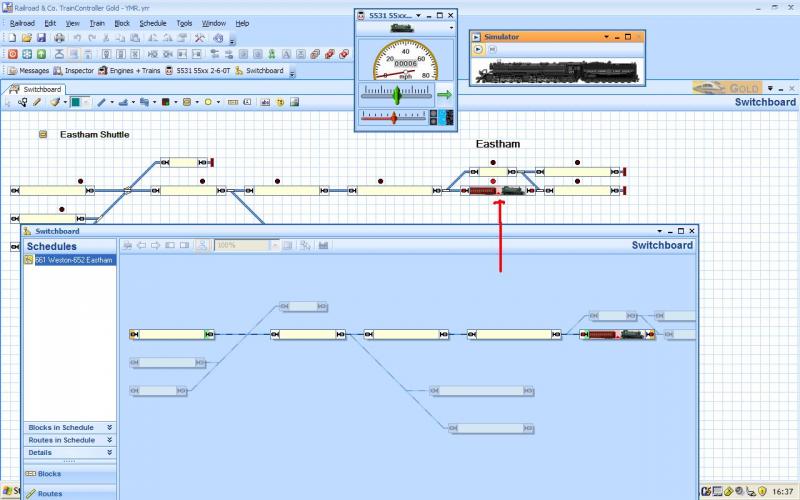
[1] We need to either install a schedule specific stop marker at Eastham Station or adjust the existing stop marker so that the engine will stop with its rear coupling centred over the magnet
If you are using a number of different locos, or more specifically locos of significantly different lengths……say a Pug and a King (admittedly unlikely…..but modellers licence:roll:) you will have a slight problem…..but not insurmountable….. it would just involve some more stop markers with carefully constructed conditions. This caveat applies to the tutorial about stopping at Ashby Halt…..which I meant to point out at the time:oops:
The beauty of Kaydee Magnets is athough they are unsightly and un-prototypical they are quite long……..and TC is very accurate……. I run my BSet in real life with a loco that is 7" long and one that is 5" long…….with a single stop marker
[2] We are going to modify the Weston_Eastam schedule so its no longer a shuttle
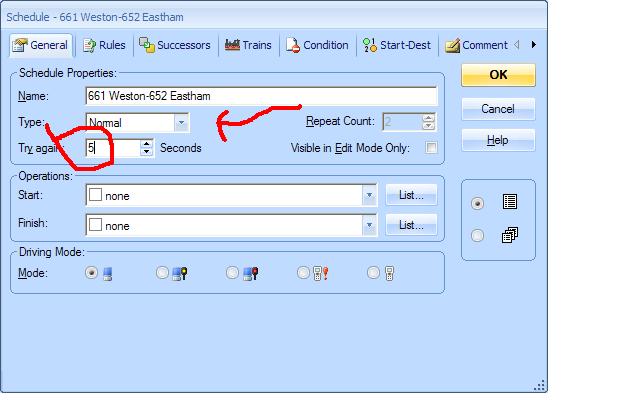
I changed Try again to 5 secs but recent experience leads me to believe 20 secs is better
I would also change the title to of the schedule to "1 Eastham Shuttle"……to be explained next session
[3] Next we want to carry out a number of commands (operations) that will commence at the finish of the schedule. These operations will separate the engine from the carriages
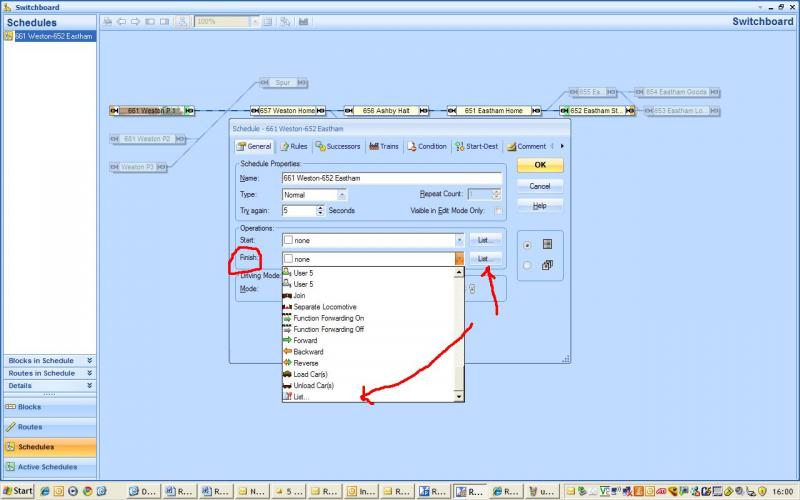
If we wanted a single operation we could select it from the dropdown menu but we need to select a series of operations so its quicker just to press the list button
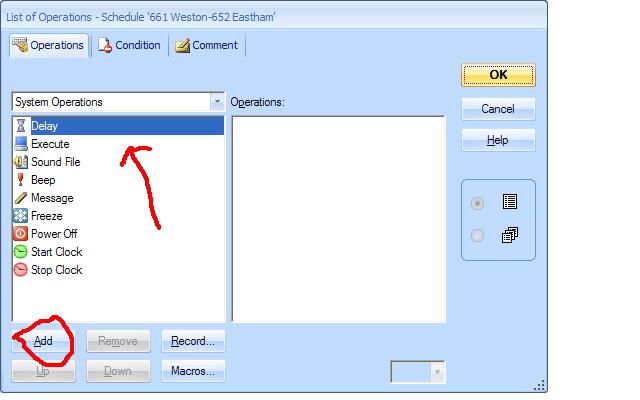
Select [System Operations] and then [Delay] and press [Add]
Delay will now appear in the Right Hand Operations Window
The delay operation is similar to the Delay used at the start of a schedule. The schedule shuts down for the period specified (Real Time). Here we are using it to create a protypical effect. The train shouldnt stop and then immediately uncouple…..give the passengers a chance to alight.
To set the length of the delay press the [Change] button in the Right Hand Bottom Corner

Now select [Train Operations] from the drop down menu
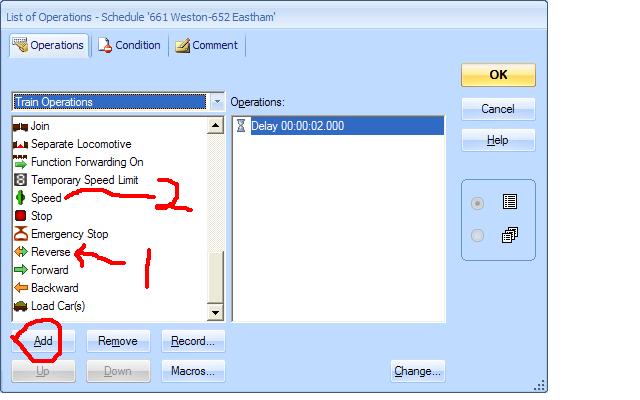
First Select [Reverse] ………this instructs the loco to move in the opposite direction to its last movement
Second select [Speed]
Press [Add]

Select Speed in the right hand window and then Change
In the Train Operation Window select 8 mph
Go back to the drop down menu and select [System Operations] and [Delay]
This time change the delay time to 7 milliseconds…..007
Now go back to Train Operations and select Speed again……..this time dont change the speed……the default is 0 Mph
So the effect of these commands is that the loco will jerk backwards at 8 mph for .007 seconds and then stop:
The Kaydee Shuffle:doublethumb which will physically uncouple the loco from the carriages
Note: I now use a higher speed 12 mph to get a more definitive jerk
Once this command is carried out the loco will be physically separated from the carriages.
Now we have to redlect this in TC……..from System Operations select [Train Operations] and then add [Separate Locomotive] to the list of operations
Your list should look like this:

Finally add another [Delay] this time for 2 or more seconds. This delay is not for visual effect……its required to give TC time to carry out these operations before starting the next schedule…………..I have found this to be prudent full stop;-)
There are a couple of short cuts you can take…..you dont have to bounce back and forth from System to Train Operations …..just select 3 x delays from system and then 2 x speed from trains and then use [Up] and [Down] to get them in the correct order.
Alternatively if you are going to use this identical routine many times you can set up all the commmands in a macro so you only have to enter one line.
So now check if it works…… make sure the train set is assigned to the Weston Block, correctly orientated and the contact indicator activated and the appropriate Train Window is up.
Start the schedule……when the train reaches Eastham it will stop in the normal manner then if you watch carefully you will see the Kaydee Shuffle on the Train Window………….then you should see this
You can see that the uncoupling has taken effect becuse loco and carriages are separated by a small red triangle.
Next:
[4]Create a schedule from Eastham Station to Eastham Loco Relief………………[Eastham UnCouple]……..test that it works
The engine should move into the Relief Block and the carriages remain in the station block
The schedule has to be limited to these two blocks because schedules can only travel in one direction
To go back through the loop we have to create another schedule
[5] Create a schedule from Eastham Loco Relief to Eastham Home……………….[Eastham Loop]
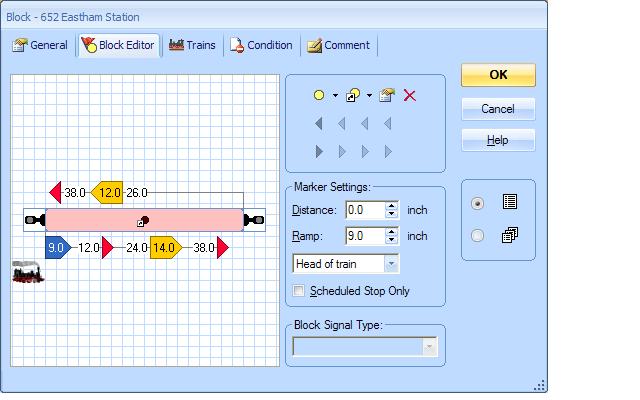
Eastham home is 40+ '' long …….. we dont want the loco to have to run to the end of the block before it stops so we have to create schedule specific stop and brake markers which will stop the loco just after it has cleared the xover points

Check the schedule works
[6] Set up a schedule from Eastham Home to Eastham Station…………..[Eastham Couple]
This schedule will move the loco into a block that is already occupied……by the carriages. If the carriages dont have decoders or resistive wheel sets the contact indicator would be de activated
when the loco left the block but TC recognises the carriages are there…………to get the loco into the block select [SCHEDULE PROPERTIES] and then [RULES]:

Create schedule specific brake and stop markers. Make sure the Distance and Ramp measurements of the brake marker are set so that once the loco has reached threshold speed it will crawl on for about 2" beyond the carriages…..pushing them slowly back and coupling
At the finish of this schedule set up an operation……[Join]
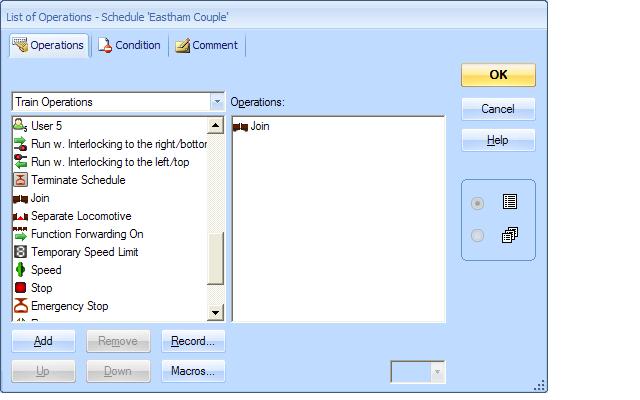
as a precaution add [Delay] [2secs]
Check it works…………as the schedule starts you should see this
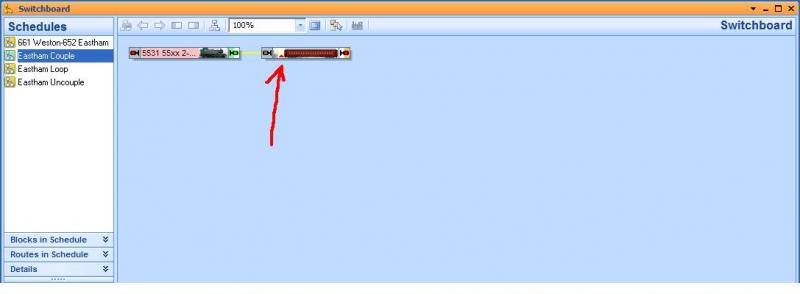
Note the red triangle in the station block indicating a join is about to take place
When the schedule is complete the loco will be joined to the carriages ready to go back to Weston:doublethumb
So I guess the homework is to check that all this works on your own layout by starting each schedule in turn……….and then working out the most effective way of doing it all at the touch of a button………as per the video……..it is by no means as obvious as it might seem…………………007.6 "One Schedule after another" and 008.0 "Accessories….Switches" should provide the answers
Finally here is a video of the real thing courtesy of Brianpr1
http://www.youtube.com/v/DCrjO5byyck
A couple of points. Brian uses conventional tension lock couplers with Seep uncoupling ramps operated by servos so it is slightly different from the Kaydee Shuffle but you can still see the jerk induced by operational speed commands at the finish of the schedule
The coloured pins are a neat way of showing the position of the ramps or magnets while finalising stop marker distances

1 guest and 0 members have just viewed this.