007.3 Blocks............Scheduled Stops
Posted
#124809
(In Topic #6527)

Full Member
If you are following the Tutorial Layout the plan is to have our shuttle train stop at Ashby Halt on its journey to and from Eastham and Westham
Imagine the block Ashby Halt is 40" long. 5" from the left hand edge of the block is a 20" platform. The train is 25" long (loco 5" carriages 20")
Travelling from right to left the head of the loco has to stop 5" from the end of the platform
The platform ends 5" short of the end of the block. So in this direction of travel we can use the normal 40" stop marker that should be at the end of the block. (a 35" stop would leave 1/2 of the last carriage behind the platform)
Travelling from left to right the platform is 15" from the end of the block….after allowing for the length of the loco, we need the front of the loco to stop 10" short of the end of the block…….hence a 30" stop marker (a 35" stop marker would leave 1/2 the leading carriage clear of the platform)
However if we merely adjust the end of block stop distance it means that if any train has to stop when travelling left to right because, say, the signal at the end of the block is at red……the train will stop 10" short of the signal which is not very prototypical.
This is clearly a case for inserting an additional stop marker (and its associated brake marker)
In the next shot you can see we have retained the two end of block stop markers and inserted a new stop marker specifically to stop the train so that the carriages line up with the platform.
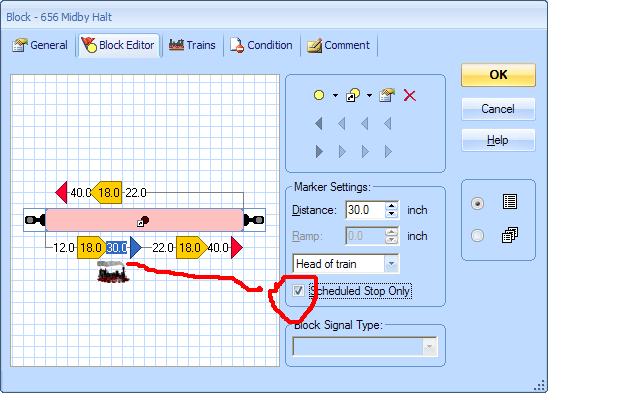
When setting up the new marker I have checked the "Scheduled Stop Only" box. This ensures that only trains running on schedules where a stop in this block is specified will use this marker………if through trains have to stop because the signal is red they will ignore this marker and stop at the end of block marker
This particular option is only available in Gold. If you are using Silver edit the properties of this particular stop marker and insert a condition to ensure that it only applies to the specified schedule
However do not apply any conditions or check the box for the left hand 40" marker……..otherwise through trains would not have a stop marker in this direction.
This solution is fine if we are planning to always run the same fixed set of two carriages (pretty typical for a branch)…….However, if the number of carriages is going to vary then a better solution would be to insert a schedule stop only marker for each direction specfying "Centre of train" as the measurement point and specifying distances from the start of the block to the centre of the platform.
The markers we have set up will now apply to any schedule where we specify a stop…….we do this by selecting the block Ashby Halt…..right click and select [Schedule specific properties]
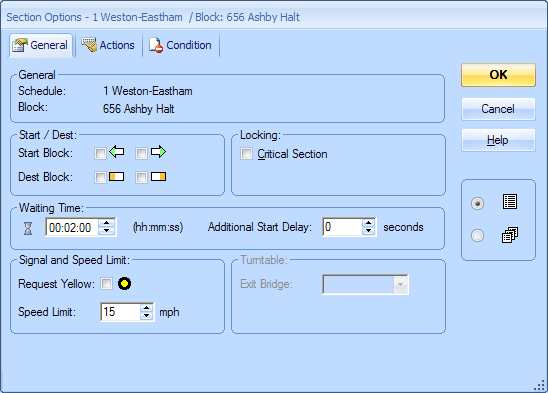
Under [Waiting Time] I have entered 2 minutes……so now every time we run the schedule Weston-Eastham the train will draw slowly to a halt and wait for 2 (scale) minutes before continueing on its journey. Other schedules will pass straight through without stopping.

1 guest and 0 members have just viewed this.