007.0 Schedules........first steps
Posted
#104049
(In Topic #5507)

Full Member
One mouse click: Runs a train from Point A to Point B....
SCHEDULESWe have previously learned how to run a train on a journey from one block to another using a computor throttle and the computor switchboard to throw points…….quite neat but not that different from the usual anologue process.
This section takes the first steps in exploiting the full potential of RR&Co.
You will now start reaping some reward from all the detail you laboriously entered (I hope) as we set up the properties of blocks and engines.
A Schedule is the name RR&Co gives to an automatic version of the journey we previously made manually from one station to another
Schedules are constructed using a block diagram which is now automatically created in Version 7.0
We are going to create an automatic shuttle between Weston and Eastham operated by a push button
Make sure you are in Edit Mode
Select [WINDOW] from the main railroad menu
Select [NEW DISPATCHER WINDOW]
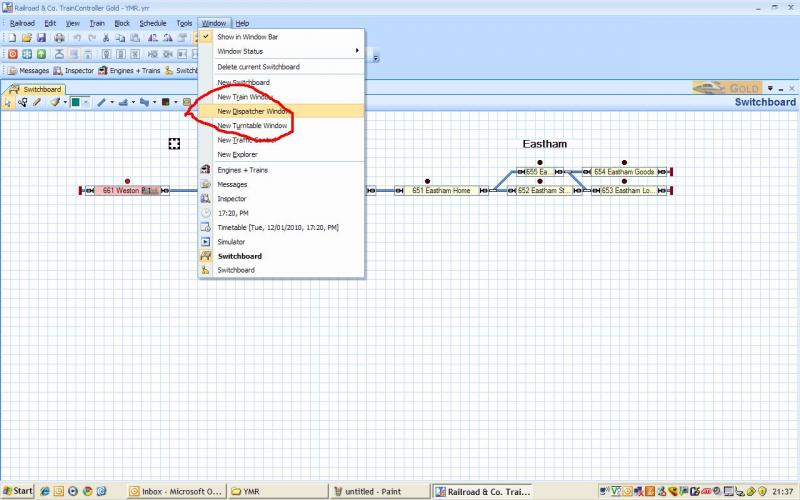
The Dispatcher window is actually a Block Diagram like the one below. For some reason when you are not actually hooked up RR&Co calls it a switchboard…..which it is not…….you can tell the difference because the block diagram has the little schedule icon on the header board
The main window in the Block Diagram shows all the blocks and connections you set up on the main switchboard…..notice however that the contact indicators are not shown
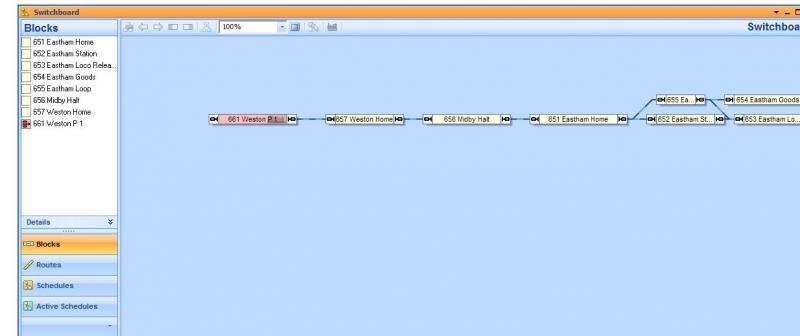
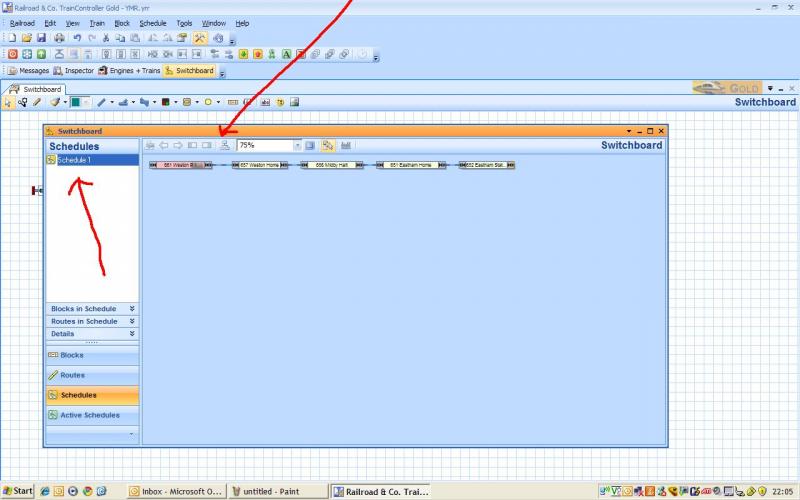
On the left hand side are a series of tabs……select [SCHEDULES] and ensure it is highlighted
From the main menu select [SCHEDULE] and then [CREATE SCHEDULE]
This sequence is a little clunky and can initially be frustrating……just remember the sequence.
If [Create schedule] is greyed out….. you havent followed all the steps outlined above
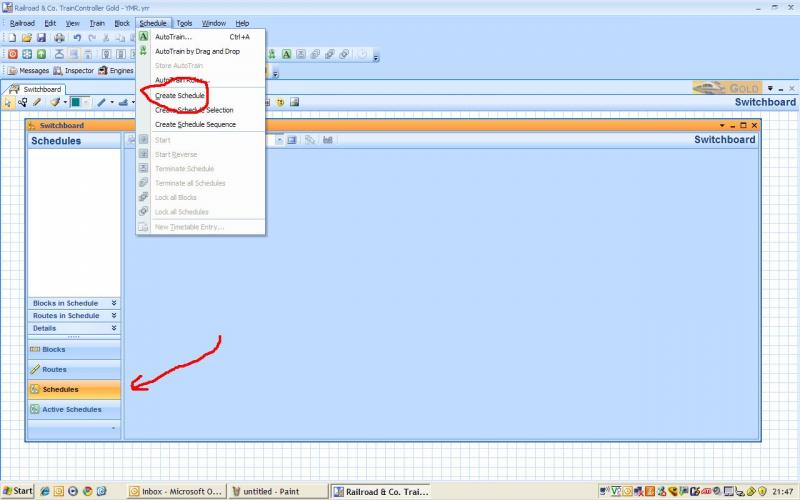
Notice that on the menu above Create Schedule there are a couple of Autotrain Options……RR&Co make quite a fuss about them and they are, I think, designed to be the entry level for creating schedules. I have found the conventional method, that I am describing here, to be just as quick and actually more efficient
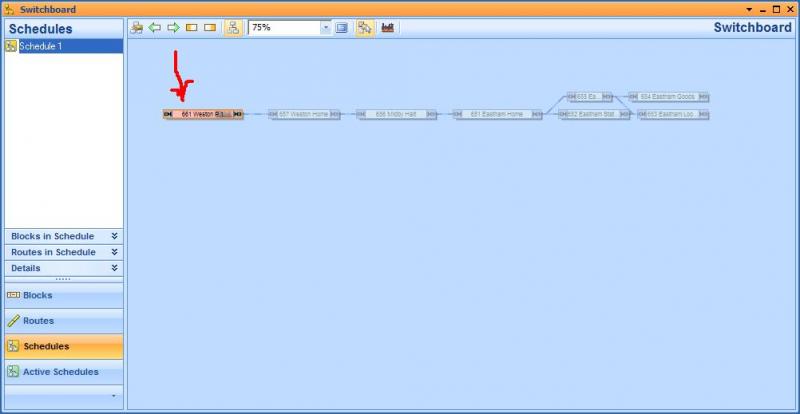
When you go back to the Block Diagram (still irritatingly labelled switchboard:twisted:) you will see the blocks have been shaded

[1] Under schedules there is now a schedule listed by default: "Schedule 1". Highlight it.
[2] This icon reads "Show main block diagram" If you toggle it on and off the blocks will appear and disappear…..make sure it is on
[3] This icon reads "Pick from Block Diagram" select it
Now move the mouse pointer to the Block Weston …….notice the pointer changes to the schedule symbol
Click and the block is highlighted.
Immediately above the base of the hand drawn arrow are two green arrows. These are used to select the start block.
Our schedule is going to start from Weston travelling from left to right so select the arrow pointing to the right…..Weston is now designated as our start block
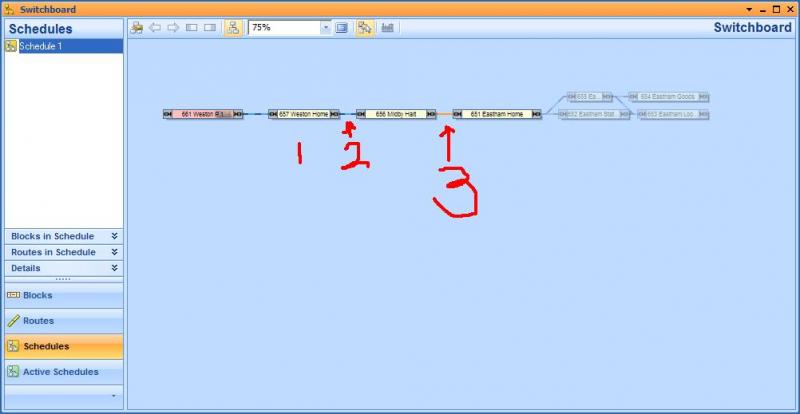
Now we need to:
[1] select the intermediate blocks by pointing and clicking as you select each block:
[2] point and click on the connecting links (RR&Co calls them routes)….in our case they are just a short bit of track….sometimes nothing in reality….but they have to be connected on the block diagram
Notice that once you have selected a block or route it remains highlighted and [3] that at the moment you point at a route it becomes a solid colour.
Sometimes when using Point and Click ….TC can be too intuitive….for example where you are selecting a route through a fan of points TC will sometimes "Select" the wrong route/block. In these instances it is easier to highlight the route menu on the left hand side of the window and select the specific route from there.
Now we select the point connecting the station…..note this is still a route ,and shown as such.
Finally select the end block at Eastham Station
This is the destination block, so we need to select the right to left icon you can see highlighted next to the start block arrows
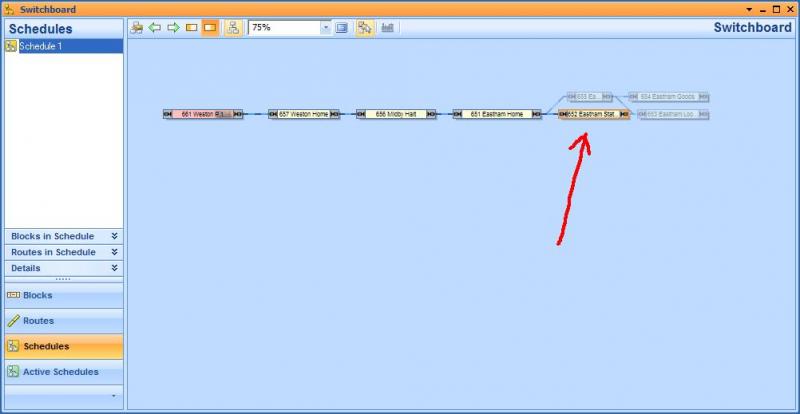
Now turn the Main Block Diagram toggle OFF.
The only blocks and routes that remain on the screen should be the ones you selected………..this is a really useful tool. When creating a schedule I never move on until I have done this basic check. It is quite easy to inadvertently click on an incorrect route which then gives TC an undesired option:twisted:
One of the most common causes of a schedule not operating is a failure to connect each block or select each connection
Now right click on "Schedule 1" and select [PROPERTIES]
You will see some familiar tabs and some new ones…..select [GENERAL]
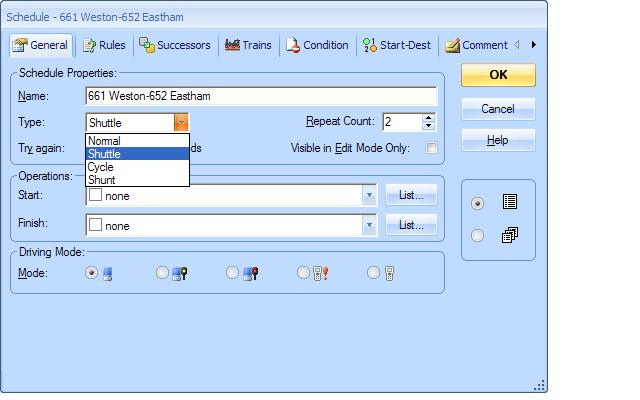
There are some important options here. I dont want to over complicate things now but Schedule Properties demonstrate the astonishing flexibility (and complexity) of TC. Hopefully as this topic continues we will be developing more sophisticated schedules and visiting these properties a lot. For now I am just going to give a brief over view
TC automatically allocates a default name and number. You will inevitably finish up with a lot of schedules……I have 19 just to shunt the branch goods yard alone. Its worthwhile developing a system where you can quickly recognise them so that they are displayed together on the schedule menu. This system, which is not ideal, means that all schedules starting in Weston P1 will be grouped together. One of the big pluses is if you change your mind you only have to make one alteration and then everything is changed
There are 4 types of schedule
Normal A to B
Shuttle A to B and then back again
Cycle A to A perfect for roundy roundy
Shunt Reserves all the blocks and routes in the schedule preventing other schedules using them while you manually shunt…..automatic shunting is a sequence of normal schedules
Select "Shuttle" and enter 2 in the repeat count box which means it will go out and back ….once
Below Schedule type is
[Try Again].…. enter the time period that TC will continue to try and start the schedule if it initially fails (eg couldnt reserve the blocks because of another schedule)
Operations
This is a very powerful tool. You can specify particular actions that will be carried out at either the start or finish of the schedule……we will use this when we do the loco run around
Driving Mode
Different methods of control ranging from completely automatic to completely manual
For universal application you can select these modes from the main menu. Here you are selecting them to apply to this specific schedule
Select [RULES]
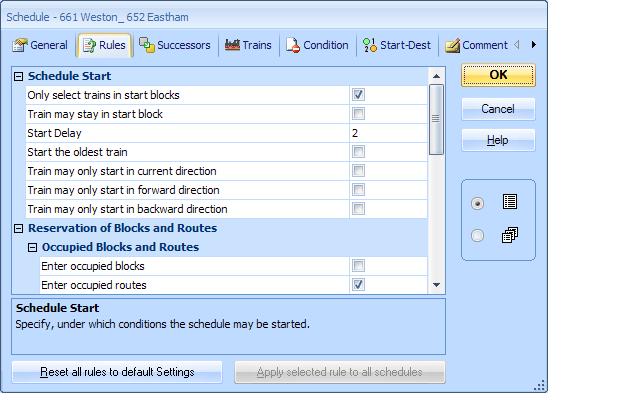
The rules appear complicated but are extremely useful in fine tuning your operation. We will use them a lot later but for now we will accept the default………..incidentally the reset tab at the bottom can be very handy….I have used it quite often:???:
Notice the Delay entry…..you use this to specify in real time the delay between you pressing the button and the schedule actually starting……the default is 2 seconds…….its worth remembering this when you are waiting and wondering why your schedule hasnt started!
SUCCESSORS
Enables you to specify the schedule (s) that will start when this one finishes….good for shunting routines or commutor trains
TRAINS
You can specify the schedule only applies to certain trains or types of train…..Passenger or Goods for example
CONDITION
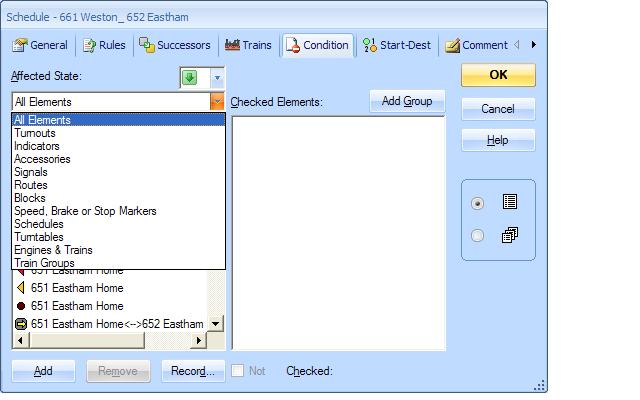
This has been briefly discussed earlier. The TC condition set up is very powerful and you can introduce and create some extremely complex and therefore selective conditions
START DEST
I think this allows you to set up hot keys on the Computor for the start and finish…..I have never used it
COMMENTS
As always I recommend writing notes to describe the purpose of the Schedule and any Operations that have been embedded.
Finally one further set of Properties before we start to play trains.
We have already covered individual Block properties. In addition to the generic properties for each individual block you can make further adjustments to Block properties that specifically apply to a given schedule
Right Click on Weston P1 and select [Schedule Specific Block Route Settings]
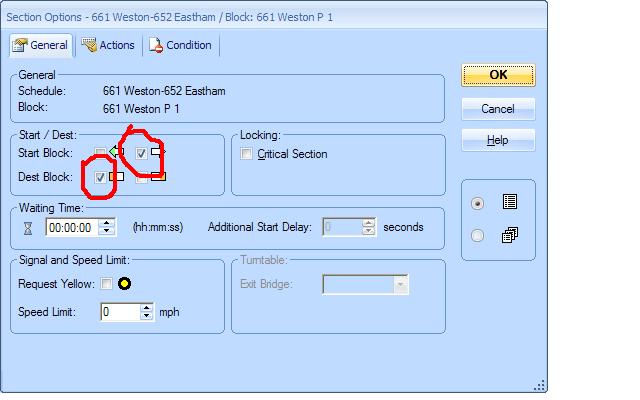
Start/Destination Blocks
Another common reason I have found for schedules not to start is my failure/omission to specify start and destination blocks…..elementary but frustrating. This is a good way to check,
In this case because we are going for a shuttle I am going to specify it as a destination block right to left as well
The other stuff here, we will leave to later……except notice we can have a lower speed just for this schedule and just for this block………or route……….you can do this editing on routes ie points on the schedule as well……..really handy over a fan of points and some less than perfect carriages…..make them creep over!
Select [ACTIONS]
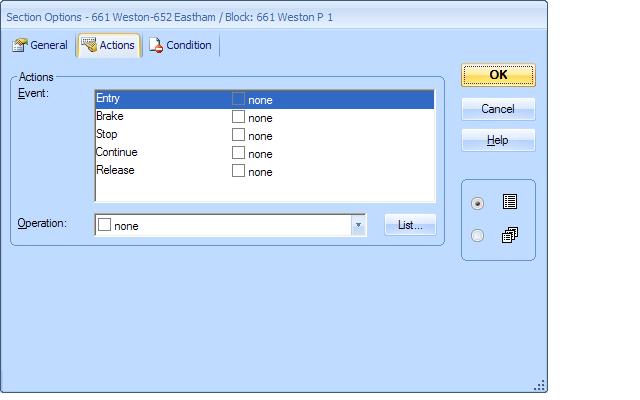
Another useful tool……you can specify different operations to take place depending on where the train is in the block or after it has left and released the block……just for this schedule.
For example one could use it on EXIT to start a second schedule with a different train knowing that the block is now clear
CONDITIONS is the standard tab
So now we are ready to go.
Make sure you have a loco in the block Weston P1 and that it is correctly orientated and the contact indicator activated
Make sure there are no other activated indicators on blocks on the schedule
Bring up the Simulator
Bring up the train window for the loco that is in the block Weston P1. This is not essential but its pretty cool to watch the speedo react to the limits you have inserted as the loco goes from block to block
Try and arrange your windows like this so you can see both the switchboard and the block diagram
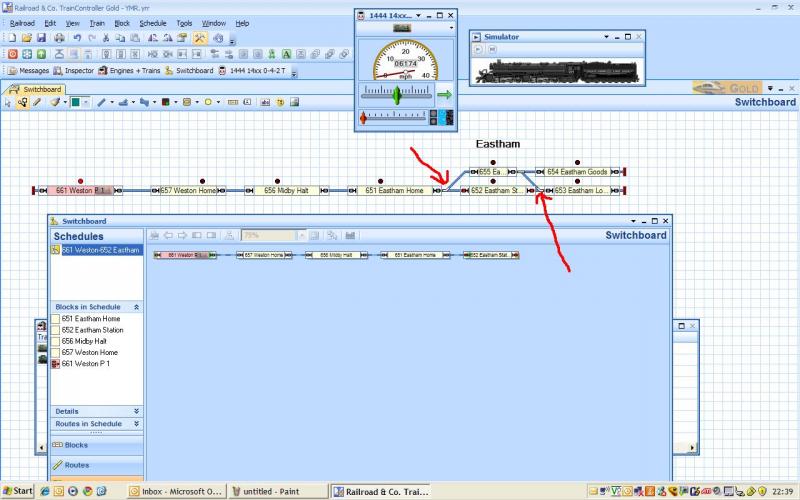
Select OPERATION mode
Just to check that TC does its job properly turn the points that I have arrowed AGAINST the schedule
Make a careful note when they are thrown
There are a number of different ways of starting a schedule and later we will construct a specific button but for now right click on the schedule in the block diagram
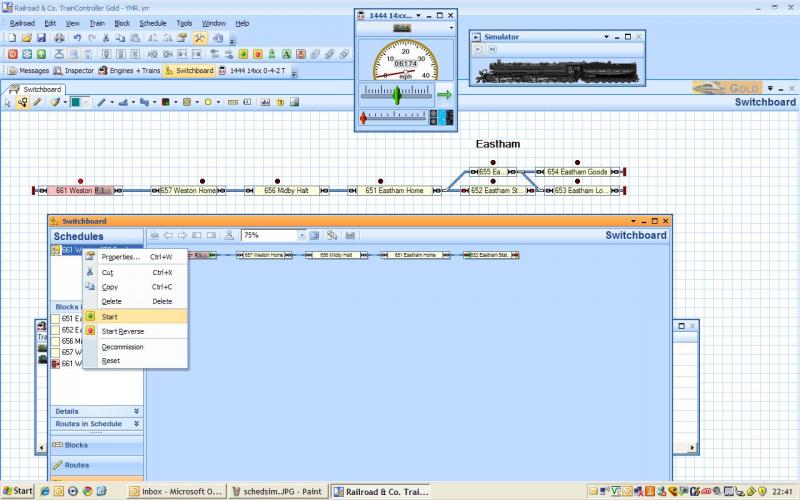
Select start……..and sit back and enjoy the show (make certain the simulator is working)
TC will check and reserve the next two blocks. The calculated block signals will change colour accordingly. The train window will show whatever is the lower of the max engine speed, block max speed or schedule max block speed!
After 2 seconds the point entering the loop will be thrown and the engine will move to the next block, the indicator will be activated and block 4 reserved with appropriate signal changes. The initial block will be cleared and the indicator deactivated
And so on until it reaches the destination block when after a 2 sec delay it will shuttle back to the original start block
:doublethumb
Pretty cool……..but you have to see it on the screen to appreciate it
Run it a few times and fiddle with individual block Max Speeds and see what happens
Homework:
Why did the point at the exit of the loop change when it is not part of the schedule? Secondly why did it change when it did?
The answer will be in the next post which will also cover the start button

1 guest and 0 members have just viewed this.