005.3 Train Sets Creating and Changing
Posted
#123464
(In Topic #6457)

Full Member
Essential foundation for shunting and Loco xchange
TRAIN SETSOne of the more significant changes in Version 7 Gold is the introduction of the concept of train sets…….a collection of carriages and engines (note the plural) that can be changed at will…….. as opposed to the more rigid system of trains used in previous versions of TC.
Version 7 Silver continues with this legacy approach. It is perhaps one of the more significant differences between Gold and Silver. There is a separate post explaining how to handle train sets with Silver.
Before we can create a Train Set we need to set up some specific Carriages or Wagons
CREATING CARS
From the main menu select [TRAINS] [TRAIN SET] [CREATE CAR]
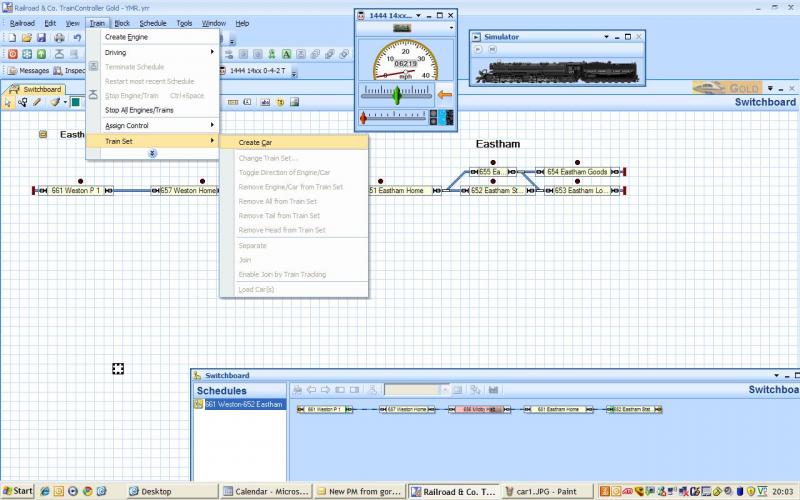
Notice how the rest of the Train Set Menu is greyed out……because we have not yet created any "Cars"
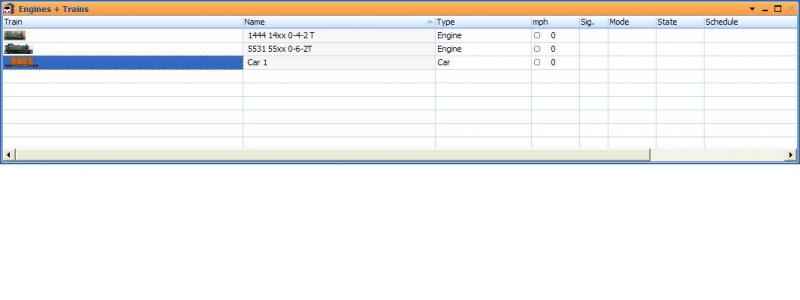
The Engines and Trains window appears with a new entry……a default icon and description….in this case "Car 1"
Right click on the Car1 Icon and select PROPERTIES] [GENERAL]
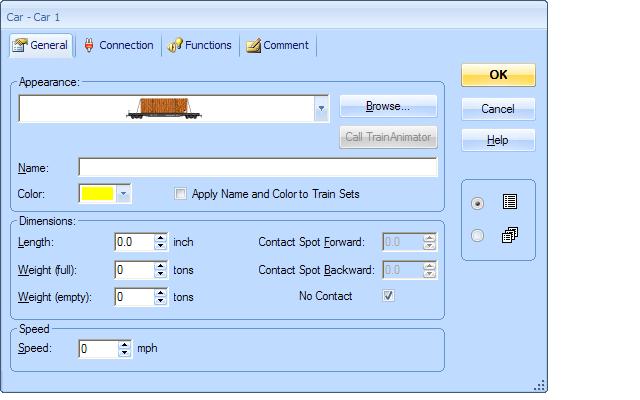
Just as with Engines there is a drop down menu for appearance and you can choose the most appropriate icon from a fairly limited selection or you can set up your own using Train Animator…….(this is covered in 020.0)

Going through the options…..this is a two carriage set (Sorry about the GWR slant) hence the name…..I cant choose Brown and Cream so Brown will have to do.
Check the "Apply Names and Color to Train Sets" to ensure that any Train Set that contains these carriages will be called "B Set" otherwise leave it unchecked. The default is for the trainset to bear the name of the lead loco. If you are going to be doing a series of loco exchanges it makes sense for the Train Set to be named after the carriages
Length is important because TC uses this to calculate the overall length of the train set for Block management purposes. There are two carriages in this "Car"
Like the prototype they are set up forever so 2x 10 = 20".
Similarly if you enter weight, TC will combine this with Loco weight to calculate inertia and momentum and apply this to acceleration and deceleration rates .You will notice that you can enter laden and unladen weight which I imagine can create some interesting effects . At this stage I think we can can ignore entering car weight.
If you are not going to change the composition of a trainset you dont need to set up all the individual components. I intend to have a couple of long coal trains and I will just set each of them up as one unit (plus the loco) with a length of 84" One is going from the mine and the other returning empties.
Contact Points would be used if the car had any decoder…..coupler, lights sound……anything that will draw current (however small) and thus activate contact indicators
If you are backing a train into a siding and the lead wagon has a current drawing function decoder the stop mark distances will not be correct if you havent told TC the contact point details
This also applies to Wagons with resistive wheel sets (more on this later)
Speed is an interesting feature…..you could set up a wagon with a vulnerable load and a low speed and when that wagon was included in a trainset……the train could only move at that speed. 0 mph is the default and means no speed limit is applied to the particular car. The train set will, of course, be subject to the loco speed limit and any route or schedule block speed limits that may have been set.
I am going to write a separate post about the [Connection] and [Function] tabs…….they can be ignored for this part of the exercise
The [Comment] tab can be used for any notes and reminders……I jot down reminders of things that need to be done to the Carriage Set…..Train Lights, Passengers etc
So now we have a "car" or Carriage set up we can connect it to a loco and create a Train Set
Make sure the Engines and Trains Window is active
Highlight the carriage you have just set up………note if you have checked the "Apply Names and Color to Train Sets" to a number of carriages it is the first carriage or train set you select which will determine the train set name.
In the main menu again select [TRAINS] [TRAIN SET]
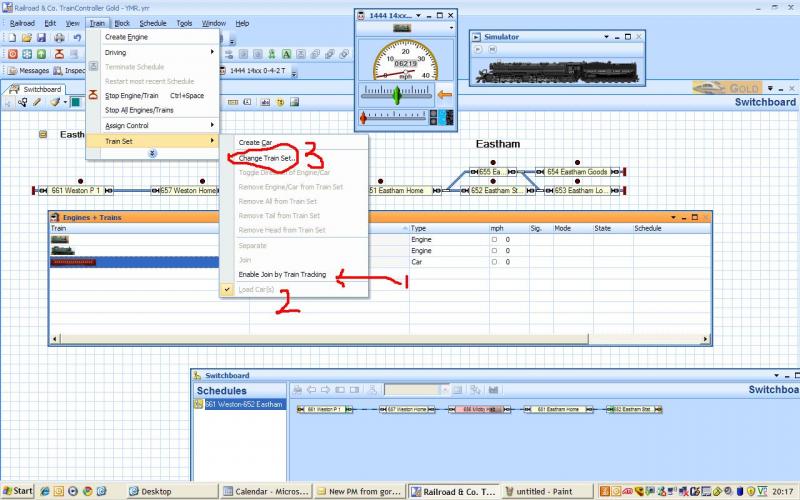
Notice you have a few more options
[1] "Enable Join by Train Tracking" make sure this is checked. Basically if TC tracks a loco into a block where there is a car or trainset it will automatically join it……we will show this later.
[2] " Load Cars" the default is for it to be checked……I havent used it yet but it is one of the functions you can employ. Run a schedule with an empty freight into a yard…. as an operation at the end of the schedule select [Load Cars] and ,assuming you have entered laden and unladen weights in the car properties, note the difference in performance.!
[3] Finally select [CHANGE TRAIN SET]
You can also access this menu by right clicking on a loco or car in the Engines and Trains Window
TC assumes that the item you have selected is the train set so it appears in the right hand window :

Once a loco or car becomes part of a trainset it will no longer show as individually available for inclusion in another train set. You can join two or more trainsets together.
The only way you can transfer an individual car from one train set to another is by first removing (SEPARATE) the component from the original trainset before attaching (JOINING ) it to a new tran set
This can be done by menu or automatically as an OPERATION within Schedules etc. It is perhaps one of the most powerful of the new features in 7.0 Gold
Ignore all the buttons for now
Select one of the two available engines and make certain it is highlighted

Press [ADD]
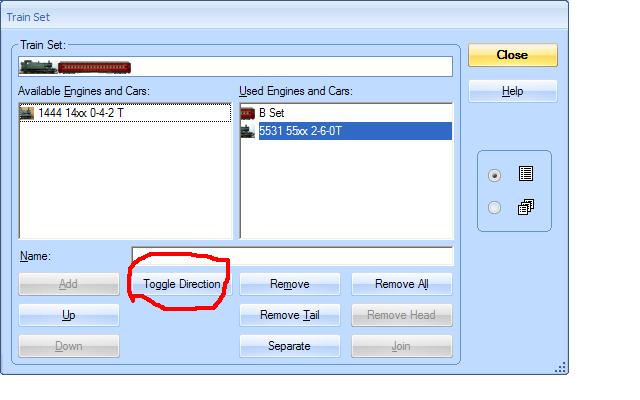
Notice the icon for the selected loco has now been linked to the carriage in the train set window. However the loco may not be facing in the right direction.
Use Toggle Direction to change the orientation ……but make sure the loco is highlighted otherwise all you do is flip the carriage! Failure to get this right can cause some unexpected results:hmm
Going through the other buttons:
Remove means the highlighted component is removed from the train set
Remove All means the train set is dispersed
There are currently only two components in this trainset…..and the last item is highlighted……so we can move it UP or select [Remove Tail] to remove it. If we select the first component then the Down and Remove Head buttons would be highlighted
Use the Up/Down Buttons to make sure the loco is at the Head and in the case of goods trains the Brake Van is at the Tail otherwise your stop markers may not operate correctly.
So having created our first train we are ready to send it on its way.
Use the Assign Train option to place in in Weston P1……remember to activate the contact indicator…..ensure all other contact indicators are inactive.
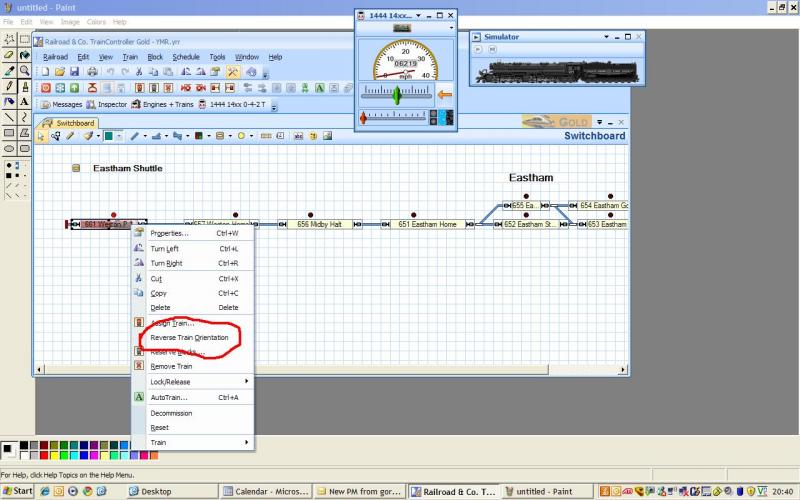
So this is where the train should be…….if its facing the wrong way…… right click on the block and select [REVERSE TRAIN ORIENTATION].
…..however if the engine is facing the wrong way you have to select the Train Set in Engines and Trains and then [TRAIN SET]
[ALTER TRAIN SET] [TOGGLE DIRECTION]
Next post we will run the shuttle but have the loco run around the train at Eastham before heading back

1 guest and 0 members have just viewed this.