004.2........ Blocks Stop and Brake Markers
Posted
#102564
(In Topic #5451)

Full Member
How to slow and stop a train at a specified distance
Blocks: Stop and Brake MarkersEvery block must have at least one stop marker
Stop Markers are activated by contact indicators so a contact indicator must be allocated to a block before attempting to set up a stop marker. It it is good practice to set up at least one stop marker at the same time as you allocate the contact indicator to the block.
You can also activate stop markers using Virtual Contacts. These will be discussed in another section.
Stop Markers only work in connected mode…….you will not see them function when using the Simulator. Even so, to avoid error messages in Dr Railroad you should insert stop markers at this stage even if you plan to be in demo mode for some time
To set up a stop marker
Right click on the block……..if you are following the tutorial layout select Block 651 Eastham Home
Select [Properties]
Select the
A block file is missing: (sources/blocks/.php or an overridden equivalent to this path)
tabClick on the block…..it should then be surounded by a blue frame and the icons to the right hand side highlighted. If this does not happen and the icons remain greyed out………ie there is no contact indicator allocated to the block

Click on one of the red triangles below my blue circle ………….you should see this:
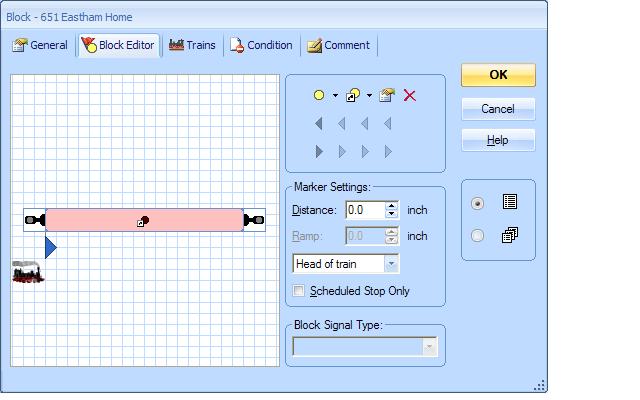
The blue triangle and loco icon indicates you are in set up mode. Note the other icons are greyed out while you are setting up. The blue triangle indicates direction of travel.
Assuming you want the loco, travelling from left to right, to stop at the end of the block drag the blue triangle there
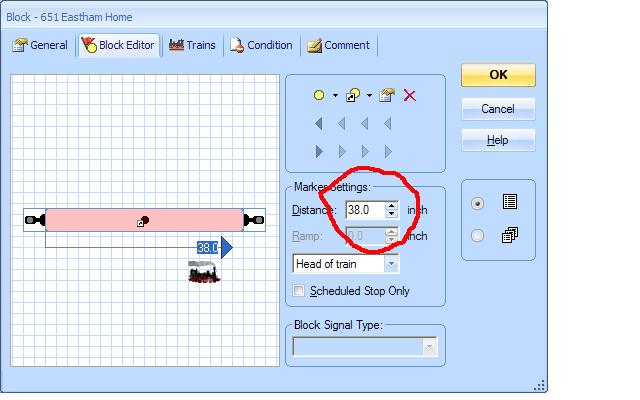
Now enter the distance from where the the loco entered the block (ie the moment current was detected ) to where you want it to stop.
In the case of Eastham we want it to stop at the very end of the block (there are no point clearances to worry about) so enter 38" or the metric equivalent.
You can determine precisely where the train will stop by adjusting the distance. If for example you had a signal positioned 2" from the end of the block then you would set the distance at 36" to ensure the train stopped prototypically before the signal
Once you have speed profiled your locos they will always stop within .25" of the specified stop marker. (We cover speed profiling in some detail in a separate post.)
Notice that we have selected the measurement point as "head of train" which is the usual selection. However assuming TC knows the length of the train we can tell it to measure from the tail of the train or the middle of the train……we will use this feature in the tutorial when we stop our train at the halt we are planning.
Leave the [Scheduled Stop Only] box unchecked. The use of this option is covered in post 007.3 "Blocks…….. Scheduled Stops"
Right now if the train had to stop….either because the signal was against it (next block unavailable?) or it was the end of the schedule……the train will move from a scale 35mph to 0 mph in an instant……not very prototypical
So now we need to insert a brake marker
Note the block is in edit mode…..blue surround……select the yellow triangle icon circled in red
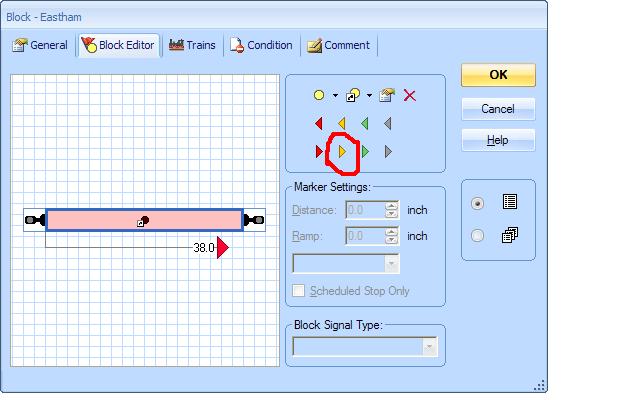
Now you will see a similar blue triangle to the brake marker set up……drag it towards the stop mark

Note that there are two windows now open in the marker settings……Distance and Ramp
The distance is the measurement from the start of the block to the point where you want to start braking
The ramp is the actual braking distance
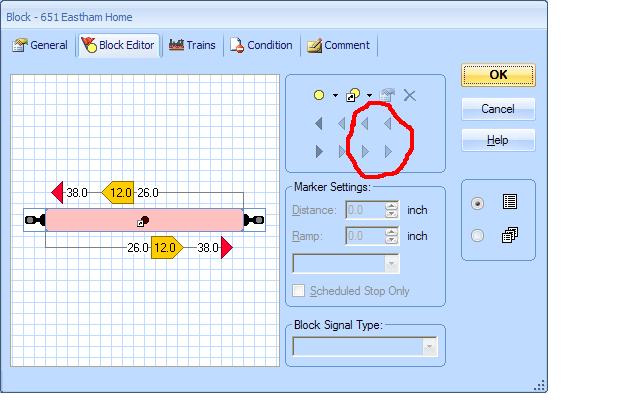
The stop marker will activate 38'' after the head of the train has entered the block………By specifying a distance of 26" and a ramp of 12" (the sum of the two measurements equalling the stop distance of 38") we have ensured that 26" after entering the block the loco will progressively start to slow to the threshold speed……… stopping 38" from the block entrance.
This is a two way block so we now have to set up brake and stop markers in the other direction
Speed Indicators and Action Indicators
The two controls I have circled are additional controls which we are not going to use right now but are very cool
The first is a speed indicator…….say you have a main line block (1) with a max speed of 60mph which leads into a station block (2) which has a max speed of 30 mph. Rather than drop abruptly from 60 mph to 30 mph put a speed indicator in block 1 and it will progressively brake from the specified distance so the train enters block 2 at 30 mph
The second is an action marker………a very powerful and versatile tool…..enter it in the block, specify the distance (12"?) and then specify an action…….so 12" after the train enters the block a whistle could sound, the lights could go on (or off), a level crossing could open, a switch could be turned on or off. A later post will cover this in detail.
Multiple Stop Markers
You can specify a number of stop markers (each with its associated brake marker) in each block. In a station, for example, in addition to the basic end of block marker you may have a second marker to ensure that passenger trains stop opposite the station building and a third at the entrance to the block linked to an uncoupling routine.
Here is a screen shot with from Pete's (Wogga) layout which has a buffer stop marker and a stop marker earlier in the block for an uncoupling routine. Notice that both stop markers have their own brake markers with individual distance and ramp measurements matching the appropriate stop mark distance

And finally this is a Block from Max's Shunting Puzzle with no less than 5 stop markers in one direction enabling a loco to shunt a train with a number of different wagon combinations. If each marker has a descriptive name and its function is described in the comments tab you only have to place the mouse pointer on the marker and this detail is displayed

This shot also demonstrates how you can vary the size of the property windows…..a necessity with this number of markers!
The grey markers are action indicators described in a later post
Conditional use of Stop Markers
Obviously you have to take steps to avoid every train stopping at every marker. This will happen unless you specify very precise conditions. Each marker's individual properties can be accessed by double clicking on the marker itself. By using the Train Tab you can ensure the marker applies only to certain specified trains. Use the schedule tab to limit the marker to specified schedules or use the Conditions tab to build quite complex requirements that must be satisfied before the marker is activated.
It is important to remember that if you assign a specific schedule (or schedules) to one stop marker in a block then every schedule that terminates in that block must be assigned to a stop marker……it took me a while to work this out……it isnt documented
Most stop markers should have brake markers assigned to them. If a stop marker has conditions or schedules assigned to it then its matching brake marker must have the same conditions assigned.
This is a very brief overview of customising the activation of stop markers. As we progress with the tutorial we will provide specific examples
Use of Conditions in Blocks
There are similar possibilities by using Block Properties. The trains tab enables you to select which trains or groups of trains can use the block…….for example if you had a double main line, Up Main and Up Relief ,you could specify that freight trains could only use the Up Relief Block……TC when selecting a route for a freight train would ignore Up Main
The Tutorial Layout
Now for some practical work…..You should now complete your trial layout by installing 4 blocks in the Eastham Station Area, and then going left from Eastham Home a Block for Midby Halt followed by a block for Weston Home and Weston Main…………all with contact indicators on the switchboard and linked to the blocks…………you can see how it should look in the very next post
All blocks to have stop and brake markers for both directions.
Even though you may have set up your own layout I would strongly recommend creating the tutorial layout and saving it as such. It then provides a common template which we can all use when discussing problems

1 guest and 0 members have just viewed this.