004.1 Blocks......Contact Indicator Properties
Posted
#101542
(In Topic #5400)

Full Member
If you are displaying Contact Indicators on your switchboard you can access the properties by right clicking on the icon (black/red dot).
Alternatively and, of course, if they are not displayed on the switchboard, you can access the properties by:
Right click the block to which the contact indicator is attached
Select (Block) Properties
Select the Block Editor Tab
Double Click on the Block Image
There are Five Tabs
General
Connection
Operations
Memory
Comments
[General] and [Connection] were discussed in Section I
Dealing with the remaining three in reverse order
Comments: virtually every type of element has a comment tab. Their purpose is self evident. You write down notes to remind you of any unusual function you have assigned to the element……..you will see one use of this shortly.
One of the nice aspects of comments is they are exposed when the mouse icon hovers over the element icon…..this is a big time saver later on
Memory
This is the MEMORY tab which lists the ways in which a contact indicator can be re-set from occupied to unoccupied. The default reset method is Automatic ie the moment the Contact Indicator fails to detect current, the indicator turns off……the block is declared unoccupied
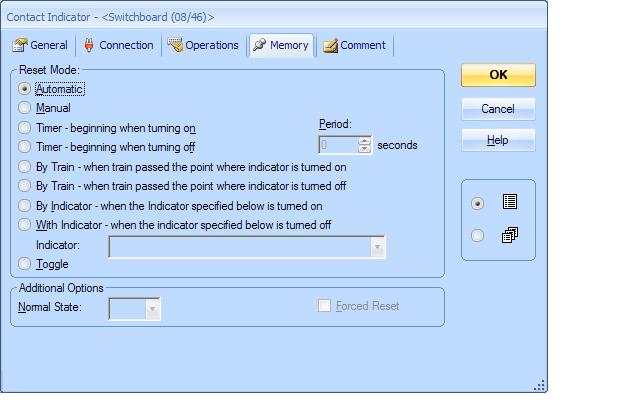
However it follows that if an engine is pulling a number of cars (none of which have any current draw) that even though the block is still occupied by cars the block will be released (ie accessible by another train) the moment the last current drawing wheel of the engine leaves the block.
A standard work around in this situation is to ensure that cars in the train are fitted with resistive wheel sets (see index ???) . However there is then a danger that the contact indicator will flicker as current will be detected sporadicaly. This will also occur if your carriages/wagons have lights or function decoders.
Flickering Contact indicators cause great confusion to TC…..the Train deduction system assumes the engine/trainset has left the block and a new unidentified engine/trainset has entered the block……..not good:twisted:
The solution is to change the reset mode so that the Contact Indicator re-sets 2 seconds after the last detection of current

There are alternatives but I think this is probably the best solution and certainly one that I have adopted
OPERATIONS
This is an introduction to one of the most powerful features of TC.
This is OPERATIONS tab. Notice from the drop down menu you can select from a comprehensive list of elements. You can select a specific element….a turnout for example…. and cause it to be activated the moment the indicator is turned on (or off….you select the operating state)
We will discuss System Operations in detail later but for now select [TRAIN OPERATIONS] and ensure the indicator OPERATING STATE is active ……Red
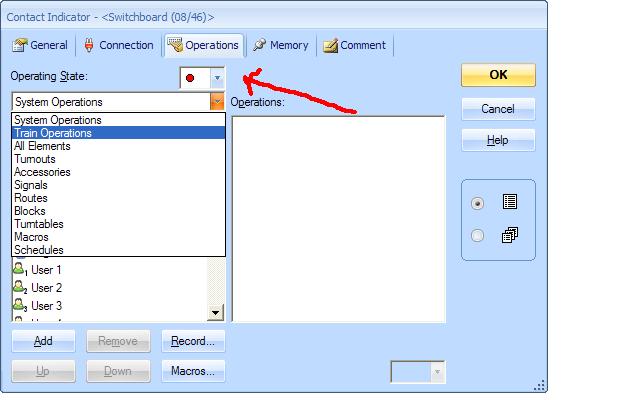
The drop down menu lists a whole series of operations your train can be directed to carry out when the indicator is activated

If you have sound you could cause the engine to whistle the moment it enters the block……there are some other controls we will discuss later which determine the length of the whistle
Here is an example to actually employ now on our test layout
Select [TURNOUTS]
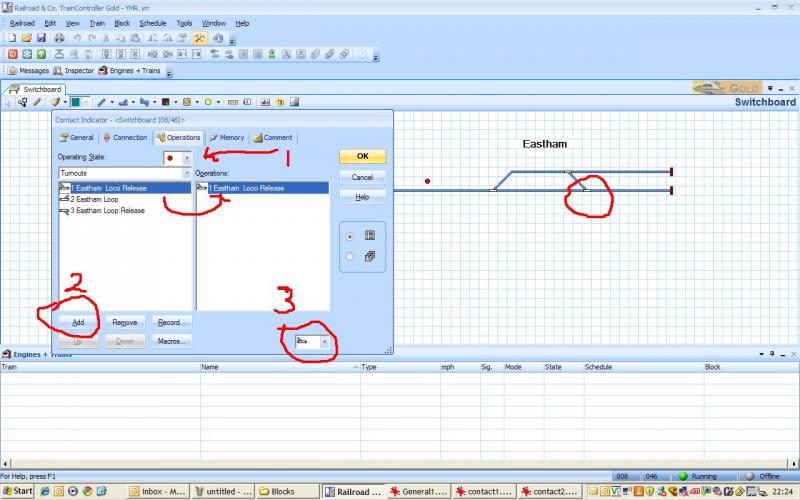
[1] Make sure the Operating State is Red
Select the first turnout from the list: 1 Eastham Loco Release ……the first one we installed
Note the list shows all the turnouts we installed
[2] Press [Add] and the turnout will appear on the right hand side under Operations
[3] Select the turnout in the list and then go to the box in the right hand corner and select the icon where the turn out is in the through or normal position
Now every time the indicator is activated the point will automatically be thrown…….cool eh?:thumbs
Test this on your trial layout by
Enter Operations mode
Set Point#1 to Reverse
Click on the Indicator…..it will turn Red……and
Point#1 will automatically switch to Normal.
This is an excellent example of where one would use Comments
Select the comments tab and make a note of the operation you have just set up.
N.B. The list isnt confined to one operation. Shortly we will be constructing lists with a number of operations
Use the add and remove buttons to edit the list and the up and down buttons to change the order in which the operations are executed.

1 guest and 0 members have just viewed this.