First Steps with RR and Co : Computor Control
Posted
#76437
(In Topic #3998)

Full Member
This thread is being transferred to RR and Co FAQs
SETTING UP A TRAIN SETThis will be a fairly short post before we start developing a run around routine.
One of the more significant changes in Version 7 Gold is the introduction of the concept of train sets…….a collection of carriages and engines (note the plural) that can be changed at will…….. as opposed to the more rigid system of trains used in previous versions of TC. Version 7 Silver continues with this legacy approach. It is perhaps one of the more significant differences between Gold and Silver.
What folows is how to set up a train set in Gold……it might be helpful if Geoff (was that a volunteer) posted how to do it in Silver before we actually start shunting.
Before we can create a Train Set we need to set up some specific Carriages or Wagons
From the main menu select [TRAINS] [TRAIN SET] [CREATE CAR]
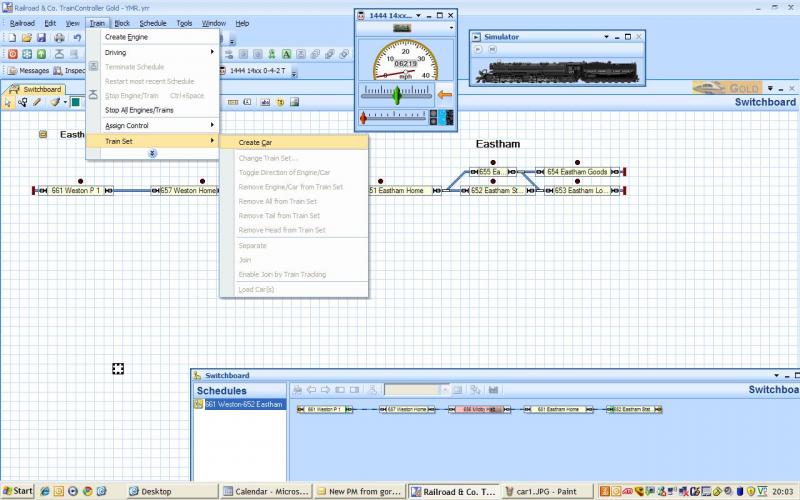
Notice how the rest of the Train Set Menu is greyed out……because we have not yet created any "Cars"
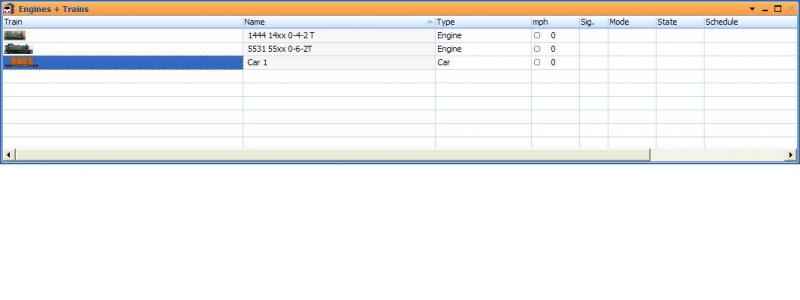
The Engines and Trains window appears with a new entry
Right click on the Car1 Icon and select PROPERTIES] [GENERAL]
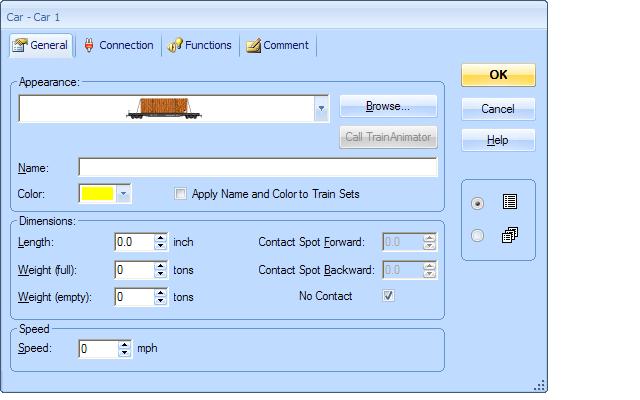
If we had ,for example, lights and a decoder in the "car" we would use the connection and function tabs but for now we just need to enter some data in the General Tab
Just as with Engines there is a drop down menu for appearance and you can choose the most appropriate icon from a fairly limited selection or you can set up your own using Train Animator…….which I have yet to do:oops:

Going through the options…..this is a two carriage set (Sorry about the GWR slant) hence the name…..I cant choose Brown and Cream so Brown will have to do. One keeps learning things with TC…..until I started doing this tutorial this evening I hadnt noticed the "Apply Namd and Colour" check box…….so my train sets have been named after the loco whereas this will be much clearer……as in real life the locos change less so the carriages
Length is important because TC uses this to calculate the overall length of the train set for Block management purposes. There are two carriages in this "Car"
Like the prototype they are set up forever so 2x 10 = 20".
If you are not going to change the composition of a trainset you dont need to set up all the individual components. I intend to have a couple of long coal trains and I will just set each of them up as one unit (plus the loco) with a length of 84" One is going from the mine and the other returning empties……..and here I think I will start playing around with weight
But for now I dont use the laden and unladen options in TC…..I will eventually but the learning curve is so steep I have focussed on the basics
Contact Points would be used if the car had a decoder or perhaps resistive wheel sets (more on this later) but not in this instance
Speed is an interesting feature…..you could set up a wagon with a vulnerable load and a low speed and when that wagon was included in a trainset……the train could only move at that speed. 0 mph is the default and means no speed limit
So now we have a "car" or Carriage set up we can connect it to a loco and create a Train Set
Make sure the Engines and Trains Window is active
Highlight the carriage you have just set up
In the main menu again select [TRAINS] [TRAIN SET]
Notice you have a few more options
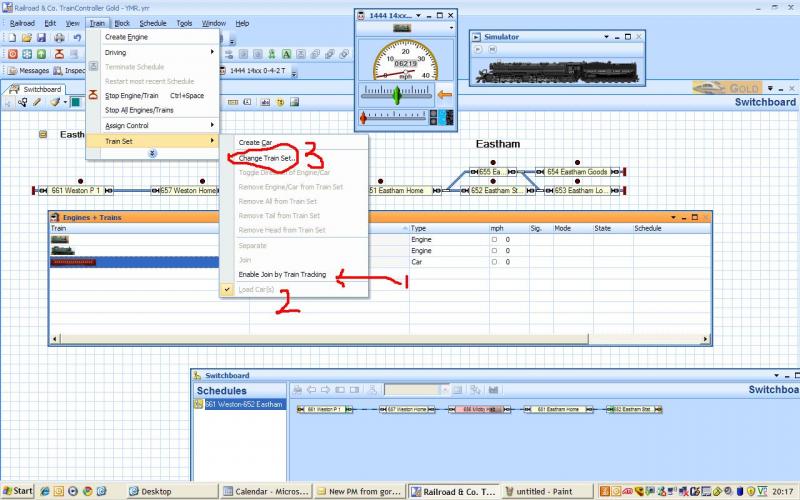
[1] "Enable Join by Train Tracking" make sure this is checked. Basically if TC tracks a loco into a block where there is a car or trainset it will automatically join it……we will show this later.
[2] " Load Cars" the default is for it to be checked……I havent used it yet but it is one of the functions you can employ. Run a schedule with an empty freight into a yard…. as an operation at the end of the schedule select [Load Cars] and ,assuming you have entered laden and unladen weights in the car properties, note the difference in performance.!
[3] Finally select [CHANGE TRAIN SET]
You can also access this menu by right clicking on a loco or car in the Engines and Trains Window
TC assumes that the item you have selected is the train set so it appears in the right hand window :

Once a loco or car becomes part ) a trainset it will no longer show as available for inclusion in another train set. The only way you can do this is to first remove (SEPARATE) the component from the original trainset before attaching (JOINING ) it to a new tran set
This can be done by menu or automatically as an OPERATION within Schedules etc. It is perhaps one of the most powerful of the new features in 7.0 Gold
Ignore all the buttons for now
Select one of the two available engines and make certain it is highlighted

Press [ADD]
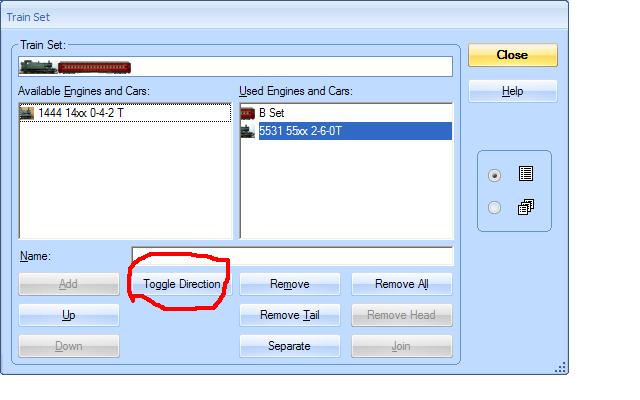
Notice the icon for the selected loco has now been linked to the carriage in the train set window. However the loco may not be facing in the right direction.
Use Toggle Direction to change the orientation ……but make sure the loco is highlighted otherwise all you do is flip the carriage! Failure to get this right can cause some unexpected results:hmm
Going through the other buttons:
Remove means the highlighted component is removed from the train set
Remove All means the train set is dispersed
There are currently only two components in this trainset…..and the last item is highlighted……so we can move it UP or select [Remove Tail] to remove it. If we select the first component then the Down and Remove Head buttons would be highlighted
Stating the obvious, perhaps, I use the Up/Down Buttons to make sure the loco is at the Head and in the case of goods trains the Brake Van is at the Tail
So having created our first train we are ready to send it on its way.
Use the Assign Train option to place in in Weston P1……remember to activate the contact indicator…..ensure all other contact indicators are inactive.
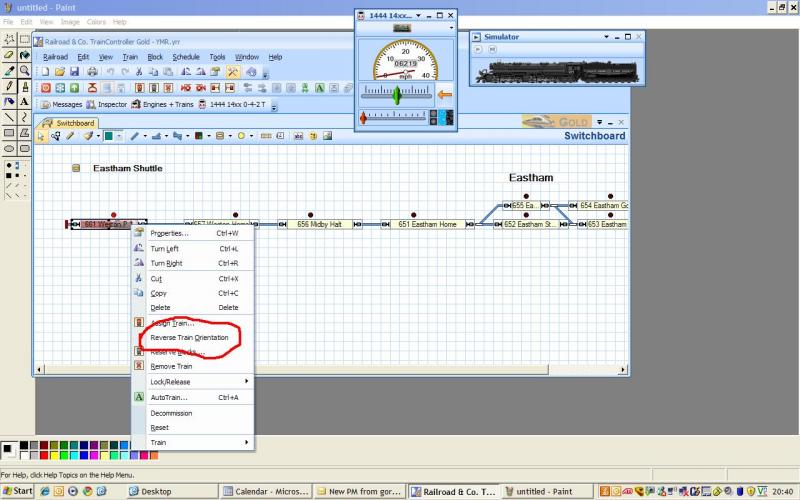
So this is where the train should be…….if its facing the wrong way…… right click on the block and select [REVERSE TRAIN ORIENTATION].
…..however if the engine is facing the wrong way you have to select the Train Set in Engines and Trains and then [TRAIN SET]
[ALTER TRAIN SET] [TOGGLE DIRECTION]
Next time we will run the shuttle but have the loco run around the train at Eastham before heading back
…………..meantime some homework:
[1] The block Ashby Halt is 40" long
The platform which is 20" long starts 5" from the left hand edge of the block
The train is 25" long (loco 5" carriages 20")
How do we stop the train in either direction so the carriages exactly line up with the platform?
Hint: A posted picture of the Block Editor will save a lot of words………….but remember other trains will go past the halt
[2] This is more creative………we need to expand Weston with a couple more platform faces, a loco spur and some alternative destinations so we can do loco exchanges and multiple schedules…….how do you want to do it?
Remember we want to work on signalling later
Regards from Vancouver

Posted

Legacy Member
Posted
Full Member
A couple of notes about the video
I have expanded the layout following Geoff's suggestions and created another train which does a shuttle. They can run simultaneously but I decided the video would be too long and I wanted to focus on the uncoupling
The three platform faces we now have are quite interesting…..for the recording the BSet returned to its departure platform but when I was testing it would quite often go to a different platform
So later this evening (during the hockey) I will post the tutorial explaining how the run around is done
Regards
Posted
Full Member
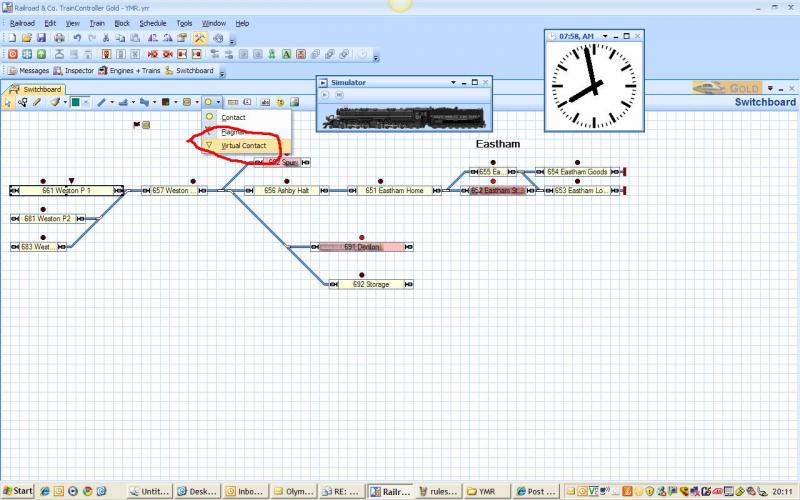
From the main Railroad Menu select [Window] and then the clock icon which shows the scale time
Immediately below it you can see the Timetable………….which is showing the scale time and date for my layout
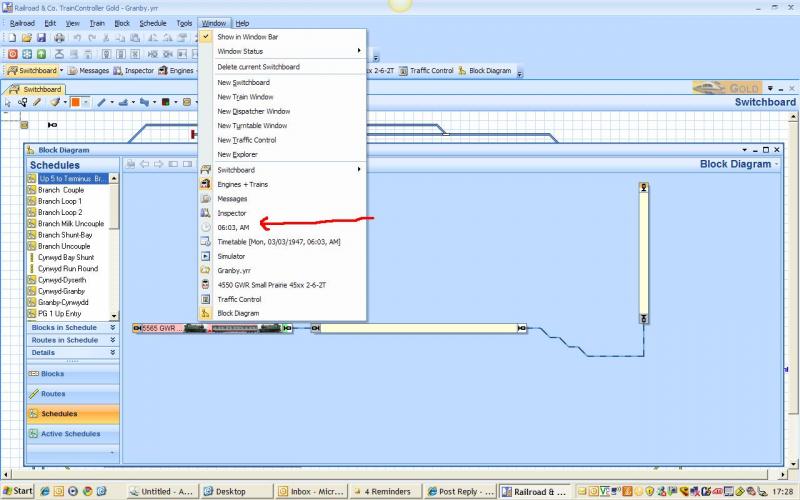
Like many of the RR&Co subsidiary tools the clock window can be floated docked or tabbed…….you access these options by selecting the inverted arrow to the left of the minimise icon
.
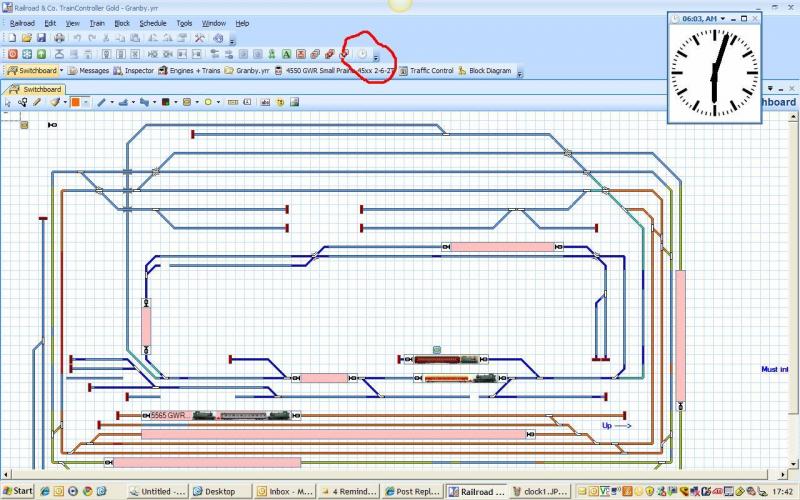
In case you wondered this is my layout not the tutorial…………the clock is in the top right hand corner…..currently it is [Off] You can toggle it on and off using the clock icon that I have circled…………..once you start with a timetable this is an important tool!
To set the time make sure the clock window is highlighted then on the main menu select [Edit] and then [Properties]
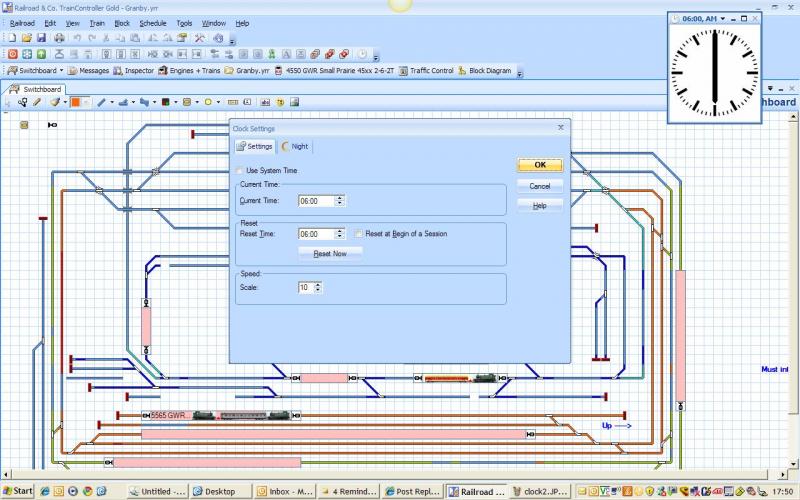
At the bottom you can set the clock speed……….the default is x 10 , which means that 24 hours real time would be compressed into just under 2 1/2 hours
In my brief experiments I am inclined to think this is a little too fast…….. x 6 may be better
You can adjust the scale time or reset it to a default time. You can have the clock automatically reset at the start of every session.
You can also select the scale date…..my layout is based in 1947 so I have started my clock on Monday 3rd March 1947
The [Night] tab enables you to set dawn and dusk so that lights will come on automatically during scale night time!
Having set up the clock you can now create a timetable which will automatically start the selected schedules according to scale time
Select [Time Table] from the Windows drop down menu
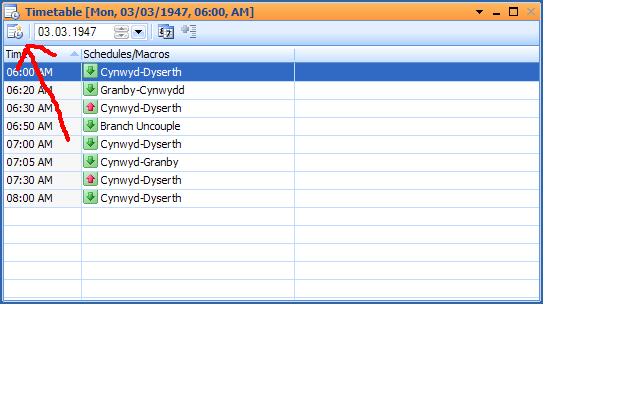
So this shows my first tentative timetable ……as I become more experienced I will update this section of the tutorial (and undoubtedly others as well!)
There are a number of options………some are less obvious……………… to set up a new entry click the arrowed icon.
To edit the new entry or an existing entry highlight and double click ……… the property dialog comes up
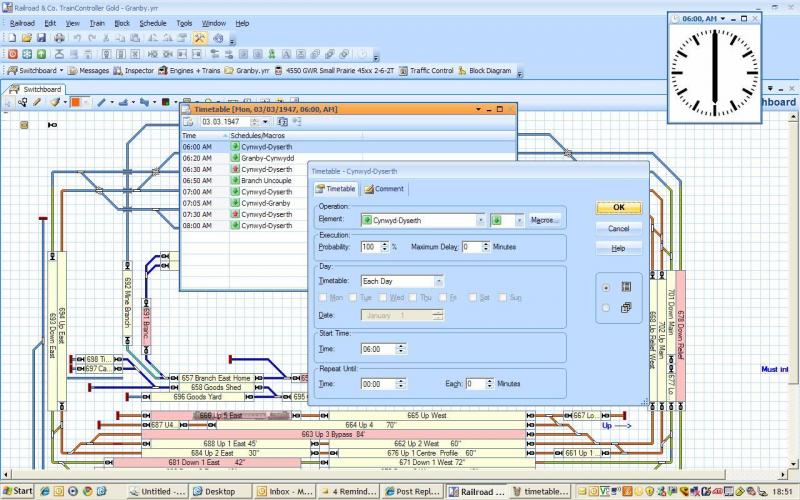
First you select the schedule and the direction in which it shall run. The macro button enables you to run other operations at specific times……the manual suggests church bells on a Sunday as an example.
One of the features of TC is the ability to run random schedules……The probability option relates to this feature.
Ian Morton has provided a very good example of the practical use of this optioni
[user=339]Ian Morton[/user] wrote:
The 'Probability' tab is indeed for random schedules - where trains are 'runs as required' or can run to different timings.
For example, I have a special scheduled, this has been set up to leave the fiddle yard at 08:30, probability 20% and then hourly until 12:30. The return departures are similarly set for 14:40 at 20% through to 18:40 and then 19:40 at 100%.
What happens in practice?
There is a 1 in 5 chance that the special will leave the fiddle yard at 08:30. If it does any subsequent attempt to despatch it from the fiddle yard fails which doesn't cause a problem, just a message in the message window.
If it doesn't leave at 08:30 there's a 1 in 5 chance it will at 09:30, and so on to 12:30. This gives a probability of the special running roughly 2 days in three within a four hour window.
The return is similarly set to run at a variable time, with the extra departure set at 100% to ensure that the train isn't left in the station at the end of the day.
The rest of the options are, I think, self explanatory.
As you can see from my timetable I am just beginning to explore the possibilities. I want to control the timetable fairly closely so I have not yet used the automatic options. All I am running right now is an Autotrain shuttle and the start of a B Set routine between branch and terminus.
I have to say the timetable is, like almosy all TC, very impressive. If the clock is running the timetable is inexorable and can often catch one by surprise! Hence my comments about remembering how to turn the clock off!
I am begiining to think that operating a timetable with a series of individually tested A-B schedules interspersed with shunting manouveres linked in a sequence may well be the way to go.
Next time……loco exchange at a terminus (there is a trailer of this on my switchboard!)
Edited to insert example of probability option
 Last edit: by John Dew
Posted
Full Member
If you are following this tutorial you may wish to add some new features to the tutorial layout in readiness for the loco runaround sequence and time table video I am preparing
You have seen some of these changes before but now is the time to put them into practice
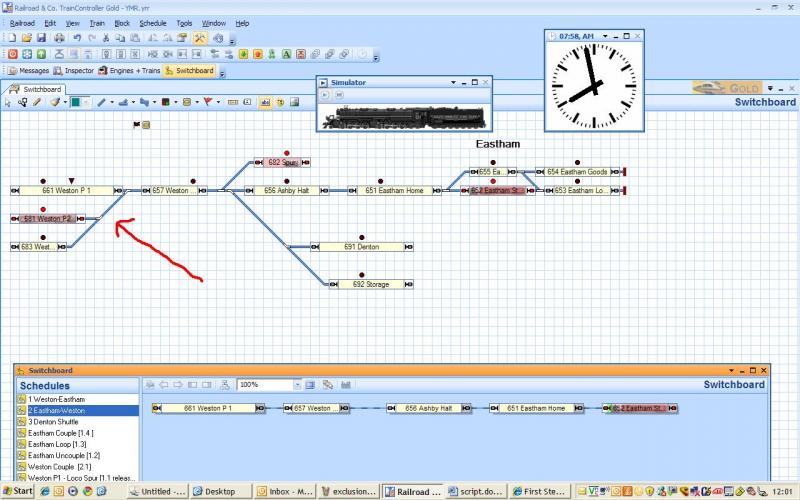
Starting from the left the terminus now has three Platform faces Weston P1, P2 and P3
After Weston Home there is a loco spur and after that a line heading to another branch terminus "Denton" and a continuation to a storage block which I thought that later we could expand to create more complex operations
At Weston you will see in P2 there is an autotrain that I have created, that runs as a shuttle between Denton and the Terminus………..the shuttle could originally go to any of the 3 platforms…..I wanted to experiment to see which Platform TC would choose……..typically, but not always, the nearest one, provided of course, that another train (the Eastham B Set) wasnt already at that platform .
However I had an interesting result when the B Set was at the terminus……………when I started the Denton shuttle it was the B set that went charging off to Denton
 …….not good there is no run around loop at Denton!
One quickly learns the importance of very precise instructions with TC
RESTRICTED USE OF SCHEDULES AND BLOCKS
This could, I suppose, be simply resolved by limiting the Eastham train to P1 and the Auto train Denton Shuttle to P 2 and P3
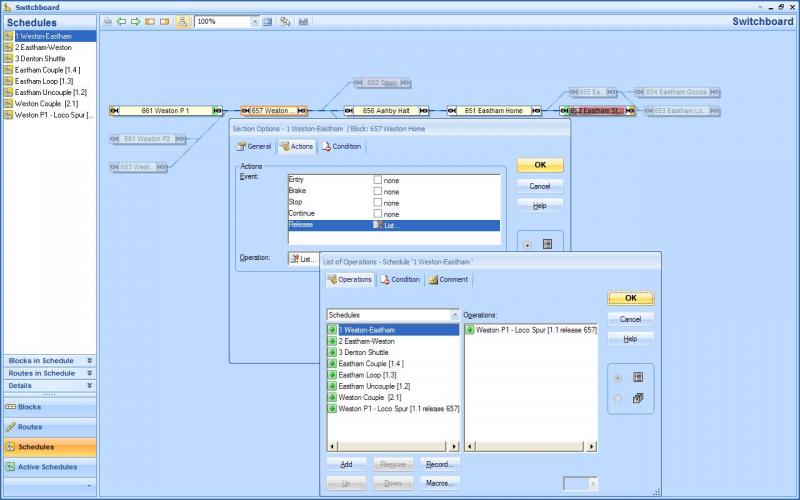
But with TC there are better ways……. by using the train tab of the Schedule Properties you can select a list of specific trains or locos that can operate that Schedule

In the left hand window are listed all the available trains………select the ones you want and press the add button and they will appear in the right hand window. Only those trains can now operate that schedule.
Note I have selected the Train Set, in this case the Auto train carriage and not the loco (the 14xx).
Now the auto train can use all three platform faces and there is no risk of another train set that happens to be in the terminus from being started by the shuttle
However todays homework is:
Define the outstanding problem and possible solutions
Limiting trains, in this way, can also be applied to specific blocks (select the train tab in the block properties). This is a very useful way of making freight trains use relief lines for instance
An additional option in Gold is the creation of Groups of train sets which can be specified instead of being obliged to enter a long list every time you want to fine tune a schedule or block.
This segment is a little ahead of its time……special request from a very keen student
 and I suspect I still need to do some more research so it will be edited later
TRAIN GROUPS
Click the Train Group button at bottom right of the train tab and then select New
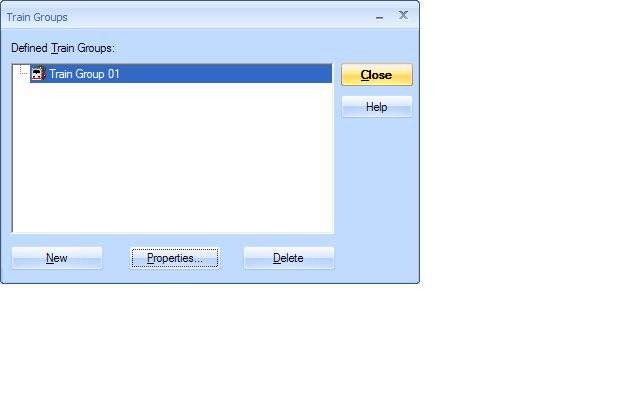
A new train group is automatically set up………….note the small generic icon that is used for all train groups. You can either double click on the entry itself or on properties
Select General and enter a relevant title…….Throughout TC I keep experimenting with naming systems to facilitate menu selection and keeping like items together……….its amazing how quickly the schedule list builds up
Select content
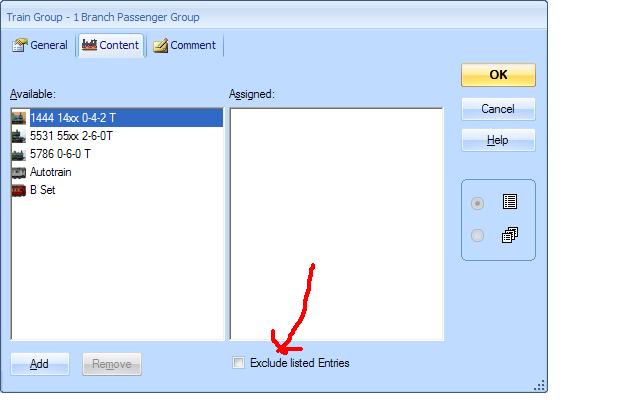
This is a standard TC window with add and remove buttons. All available locos and train sets are listed on the left hand side.
A train group is obviously a little redundant with such a small list………..but I have decided to set up a" Branch Passenger Group" selecting the B Set and Autotrain Train Sets
Note the arrowed box at bottom "Exclude listed Entries" . This appears to be a really cool feature because I can visualise a number of instances where it is easier to say……this group cant …………….rather than …..this group can
If you create an "excluded" list the icon has a red cross through it like so
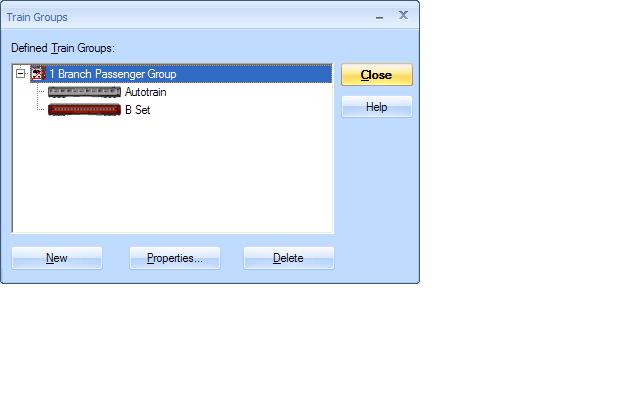
Notice that you can see the components of a train group by clicking on the + - button
The train group will now appear whenever you bring up the train tab
It will also be available for selection when you set up a second train group…………….thus you could have a master train group consisting of All Passenger Trains which was made up of subsidiary train groups…..Commutor, Branch, Express etc………….
The possibilities are truly unlimited :thumbs
Posted
Full Member
Posted
Full Member
First create a schedule from Eastham to Weston P1. There are a load of operations at the conclusion of Weston to Eastham, as there will be on the reverse, so it is easier to create separate schedules.
In real life (assuming Kaydee Magnets) place the decoupler so that when the rear of the longest loco( that will use P1) is central over the magnet its head will be about 4 " clear of the buffers
Adjust the stop and brake markers for P1 so that the loco will stop over the decoupler and make it schedule specific. Later when we take the autotrain into P1 we will put in another stop marker with appropriate conditions…..we wouldnt want the passengers from Denton to walk an unecessary 4"!
Bring up the properties for the Eastham-Weston schedule and then set up the following operations at the finish of the schedule

A long list……..with lots of delays…..I have found it is a good idea to give TC plenty of time to carry out instructions
The first segment is a replica of the Kaydee shuffle we used for the loco run around at Eastham. Secondly we want to move the uncoupled loco clear of the carriages into the 4" space we made earlier so that when the relief loco couples it will not recouple the old loco. This is not an exact science you have to fiddle around a bit
The final operation, which is partially obscured, is to start the schedule we are about to create.
Note that although the loco and carriages are physically uncoupled, as far as TC is concerned they are still one unit
Test the schedule works
Create a schedule Loco Spur-Weston P1 call it "Weston Couple"and add it to the operations shown above
Now the critical segment which caused me the most fret and I have to admit some of it is more by trial and error than my mastery or understanding of the logic.
We have to do the following:
[1] Get a loco to move into a block already occupied by a train set and loco
We do this by amending the rules for this schedule:
Change the Start Delay to 5 secs
Under Occupation of Blocks:
Check "Reserve Occupied Blocks" and then:
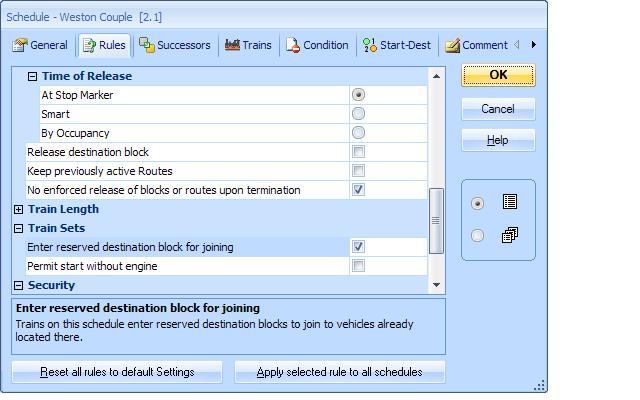
Note that there is " no enforced release of blocks or routes" and that trains can "enter reserved blocks for the purpose of joining"
Once this is accomplished we have to
[2] Get TC to recognise the Loco we have moved into the block when the sole contact indicator is already recognising the existing loco
First measure the distance from the start of the preceding block Weston Home to the start of Weston P1…..lets say it is 45"
Then select the accessory icon on the switchboard menu…..the one we used to set up contact indicators……but this time select
Virtual Contact
Place the Icon over the Weston P1 Block
A Virtual Contact is another really powerful TC tool and I am only scratching the surface of its potential uses. The manual has a couple of pages about it but here is a really practical application
Double click on the Virtual Contact and select properties……under General call it by the block name "Weston P1" now select Reference
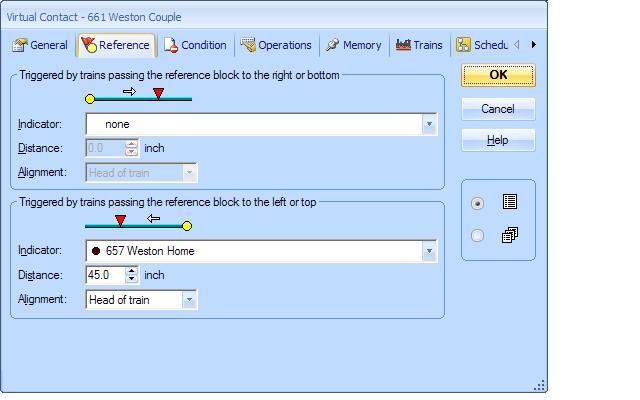
This tab determines how the virtual contact is activated………and you can see I have set it up so that it is activated 45" after a train physically activates the contact indicator in Weston Home………..in other words the moment a train moves from Weston Home to Weston P1 the virtual contact will be activated in the same way that a contact indicator is physically (electrically) activated and thus TC will recognise the movement of the loco from one block to the next
We dont want this to happen to every train so select condition

Specify the Weston Couple schedule as the only schedule which will activate the Contact.
We could assign Operations to the contact but do not need to do so in this instance
However we need to turn ensure it stays on long enough to carry out our coupling operation in Weston P1
Select Memory
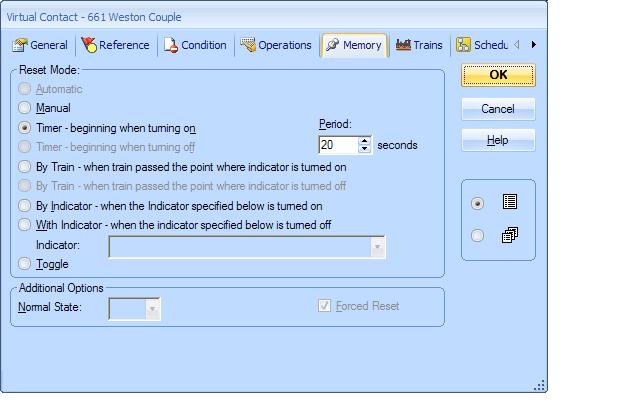
So the virtual contact turns off 20 seconds after the train enters Weston Home.
[3] Get the loco to stop correctly in Weston P1 so it couples with the carriages
Measure the distance from the entrance of Weston P1 to the rear of the carriages and add on an inch . We will use this to create a stop marker specifically for the relief loco……say 2"
Bring up the Block Editor in the properties for Weston P1 and create a 2"stop marker
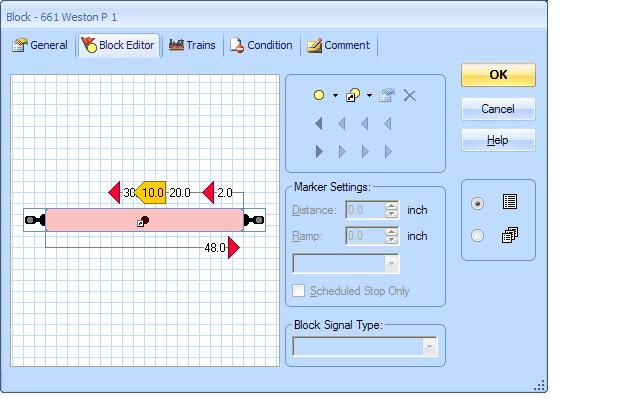
Double click on the new stop marker to bring up the properties
Bring up Memory

This ensures that the brake marker is only active while the virtual contact is active…..Although to be on the safe side I set up a condition that the stop marker only applied to the Weston Couple Schedule
The loco will enter the block and crawl forward gently hitting the rear of the carriages and thus coupling. In real life one would control the speed of the schedule and put a speed marker in the preceding block in order to achieve a smooth slow down.
This process assumes the locos dont vary in length by more than an inch or so and the same number of similar carriages are used. However additional schedules/markers will give greater flexibilty
[4] Bring TC in line with whats happened on the track
Bring up the properties of the Weston Couple schedule and under operations at the finish of the schedule :
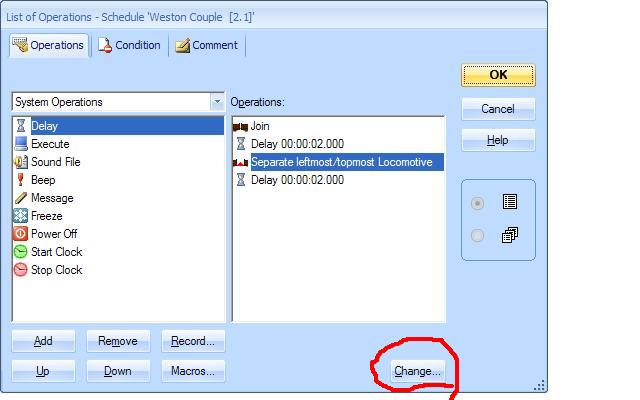
Notice that in the computor we "join" first even though we physically uncoupled first. This is fundamental to the way TC keeps track of things…….it knows a train set is in Weston P1 from the contact indicator, it knows the loco has entered the block from the virtual contact. By joining them in a single entity it is then possible to give TC very precise "separate" commands.
Initially just like in the run around select "Separate" from Train Operations then highlight it in the right hand window and select change

You can see just how precise these commands are. Once the operations are complete TC will accurately reflect and recognise reality…..a new train coupled to the relief loco and the old loco awaiting despatch to the shed or spur
You can now start the Weston to Eastham schedule without further ado and it will go off to Eastham and when it gets there start the run around routine you have perfected.
All that remains is to get the old loco to the spur….create a separate schedule Weston P1-Loco Spur…..standard rules and no special conditions right now.
There are a number of ways to start the schedule automatically although obviously you need to be certain the new train is clear……I chose to start it as a schedule specific property of Weston Home when that block is released by the Weston Eastham train
And thats it…..all the magic…..you now know how the lady was sawn in two :wow
Posted
Full Member
However having spent the last 2 days profiling and re-profiling locos I thought the following tips, based in some cases on bitter experience, are worth recording in this sticky
[1] SAVE REGULARLY AND OFTEN
I cant recall if I have mentioned this before……TC does not save automatically. It only saves when you click [yes] at the end of a session when you close it down
I was painfully reminded of this when having spent an hour re profiling a loco…….I went upstairs for a well earned beer……..returned about an hour later (well I had to have lunch) and found that my new dedicated (and sadly very sl——ow ) train room computor had received an automatic update to correct one (or more) of Mr Gates many unexpected errors and subsequently closed down:twisted: losing all my unsaved data……..moral ……..hit save regularly and often
[2] REALISTIC MAXIMUM SPEED
When I first started with TC I was very careful to enter the correct proto typical Maximum speed on setting up a new engine. Having set up and tested a number of schedules I now realise that on my layout it is unlikely that any loco will ever exceed 30 mph…….most have max speeds of 15-20 mph. It would need a very long un-interupted run to justify speeds in excess of 30 mph and,, frankly, anything running over a scale speed of 40 mph looks somewhat unrealistic..
So, when profiling, I am now setting a max speed of 30 mph and in the case of branch engines/shunters 25 mph. If one then adjusts CV 5 to ensure that at max throttle (speed step 28) the engine does not exceed max speed you can achieve a much smoother speed curve using all 28 steps
[3] SINGLE SPEED TESTS
First a disclaimer…..it must now be clear I am not a techie……………..I adjust as few CVs as I can and typically confine the changes to starting, mid and max voltage!
I think I have already described how useful speed tests can be when adjusting CV5 to match Max Speed. I use Train Programmer ($80 US) which means you only need a couple of key strokes to make adjustments………….previously I used JMRI but with Train Programmer I dont have to close down TC before making adjustments
Today I started doing single speed tests at both the Mid and Start Point and found it to be a much quicker way of establishing a smooth curve.
[4] COPYING ENGINE PROPERTIES
My apologies if I am stating the obvious but I only stumbled on this today. Somehow I screwed up ( I think it was driver error) and 2 locos that I profiled became inaccessible through TC…….the train window throttle would blank out and "System" would appear where the direction arrows are normally. The two engines would operate fine using the Lenz controller but not with TC
Tried all the usual solutions….rebooted TC, Lenz and finally the Computor……all to no avail
As a last resort I selected one of the engines (3202) in the train and engine window……pressed [Control C]…………….then I created a new engine, selected it and pressed [Control V]
The name of the new engine changed to 3202*………………all the detail that I had laboriously profiled (twice) was all there
I deleted 3202……changed the name of 3202* to 3202 and all was well!!!:wow
So thats a useful tip to get you out of a hole if something screws up……………..but if you have a number of locos to profile using the same chip (Pete and his Fairburns…..me with my 57xxs) it ocurred to me you could do a copy and possibly save a ton of work………you may only need to fine tune the brake compensation
Eventually I have to chip two split chassis Manors……I will let you know how I get on
[5] Importing Exporting Engine Properties
You can also use the export import options in the main train menu to transfer engine profiles from one layout to another……..this is handy to know if you have to redo your layout file for some reason or if you have more than one layout on which your engines will operate under TC……whether at home, a friends house or at an exhibition.
Thanks to Pete (Wogga) for discovering this :cheers
Last edit: by John Dew
Posted
Full Member
Once the post has been edited, to avoid confusion, I am deleting it from this thread
My apologies for any inconvenience as I slowly work my way through it
1 guest and 0 members have just viewed this.