Photoplus X3 Tutorial.
Posted

Full Member
Photoplus X3 Techniques By Simon Parkinson
Delete works in PS.
Phil

Posted

Site staff
Hi PhilDelete works in PS.
'Delete' deleted the picture and left the lasso on the screen, and then starts drawing a new polygon as soon as you move it.
Until you join it up enough (get the square) you don't seem to be to do anything.
Ed
Posted
Full Member
If i'm doing a lot of cutting out with PS I rarely use that tool because sometimes when nearly to the end of the selection the Polygon tool connects to a place you don't want it to and completes the selection, so you then have to start from scratch. Much better to use paths where they are saved similar to layers and you can see them all and their shapes.
Phil
Phil
Posted
Site staff
It doesn't matter where you move the mouse pointer it won't release from drawing the polygon until it completes. Then you can select edit - undo polygon selection.
Tried using they keys (Alt + E) to get at the menus before completing the polygon, but it's greyed out.
Annoying :hmm
Ed
Posted
Full Member
[user=1338]Ed[/user] wrote:
Phil
It doesn't matter where you move the mouse pointer it won't release from drawing the polygon until it completes. Then you can select edit - undo polygon selection.
That's the same with PS, but you can use the delete key to move backwards.
 Last edit: by Phil.c
Phil
Posted
Site staff

Posted
Site staff
Looking on the web it explains how to do cut outs with Cutout Studio, which is an option not available in the free starter edition.
Could be why once I start a polygon selection I can't alter it. Not full functionality.
Ed
Posted
Full Member
Looking at it the program will not allow you to just under one click as you say. The best solution is to carry on with the selection and then after you have finished all the rest of the selection and saved it go back and select the following:-

And then you can go back to the bit you ant to get rid of by selecting that anew and it will vanish from the selection.
Don't worry too much as the next tutorial will show you another way of making selections.
Posted
Full Member
If there is no editing with that tool it could be a pain with a time-consuming cutout.
Phil
Edit:- Cross Post!
Last edit: by Phil.c
Phil
Posted
Full Member
I have now downloaded the Starter Edition and it seems to have better functionality that the X3 edition until you try to use those features:roll:. It then suggests you buy the full version:twisted:. As I said before you could try holding out to see if you can get the full version for £9.99 as they have offered it to me at that price before.
The Paths tool would be my tool of choice, as the paths can be edited, but that is not available in the Starter Edition:sad:.
Also in the Full version of Photoshop I can use Quick Mask but this is not available in Elements.
So we will have to live with the workaround that I will post later.
Cheers
Simon
Posted
Full Member
I have now also downloaded GIMP and will be checking it out to see if that has all the features we might need.
I will post my findings soon, if it is good enough I will start a new thread to teach GIMP. I will though finish off the features I have started on Photoplus and all will not be lost as the tools work in a similar way in all Photo editing programs.
Cheers
Simon
Posted
Full Member
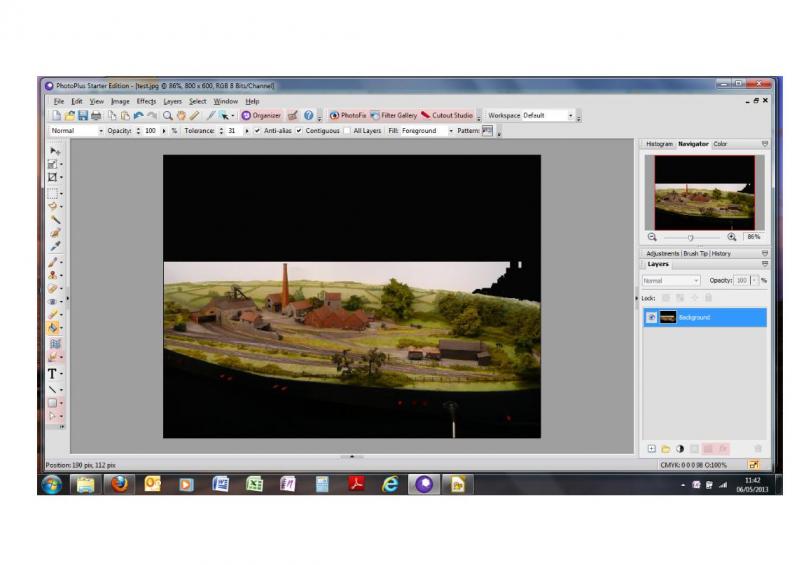
What we need to do first is get rid of the background and we can actually cheat here and just use the rectangular selection tool.
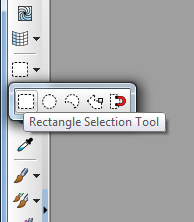
And start by clicking once at the top left of the picture and drag the mouse down to the right hand side and down into the sky as shown below.

Just click on Del key and the area will go white.
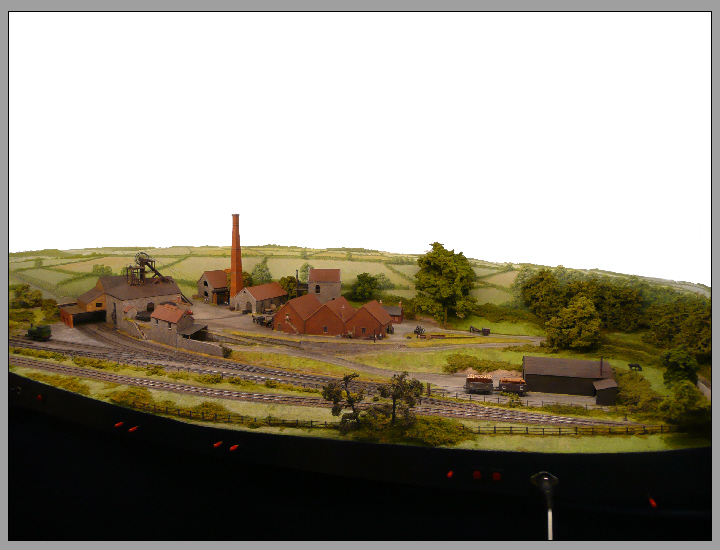
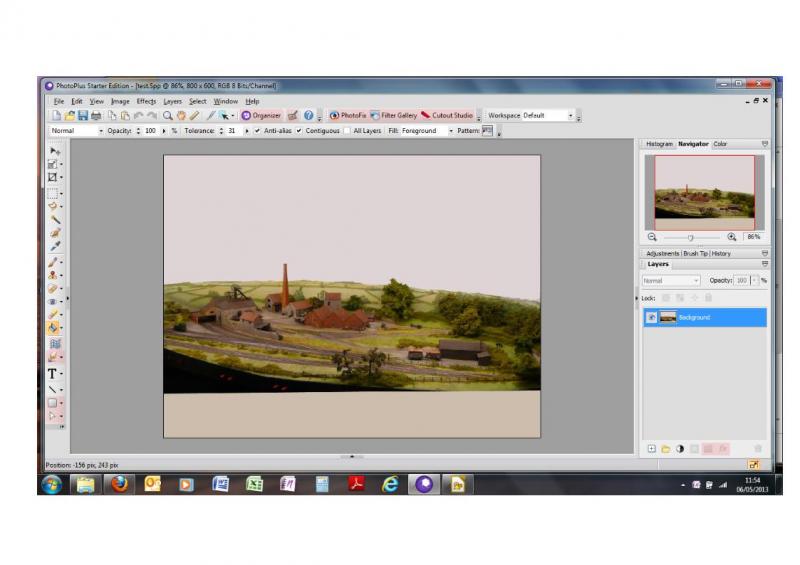
Now we need to clear the layout’s backscene.
For this we use the colour picker tool.

Then just click anywhere in the layout’s background away from the green fields and avoiding the chimney.
The result should look like the picture below.

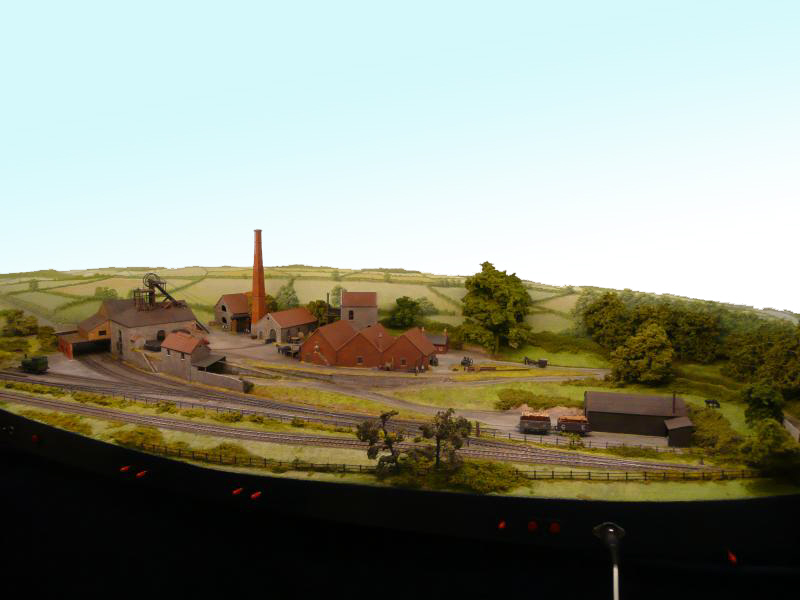
To get rid of the selection just click on the Del key. If you look closely at the right hand end of the picture you will see that not all of the backscene has been selected as shown here:-

We will use another tool to get rid of those sections. This is the Standard Eraser Tool.

This has a range of settings at the top of the Picture window as shown here.

The settings are from left to right – Brush: this is the type of brush, then Size: yes that is the size, Opacity: you can make a partial erase by altering this setting, Flow: I never alter this setting. For this exercise don’t alter any of the settings or change them to the values above if they are different on your computer.
If you zoom in on the lower right hand side of the sky you can now start to get ready to erase the remaining bits. Firstly we have to deselect the present selection. The easiest way to do this is a keyboard shortcut of Ctrl and D. Now you can practice erasing the remaining bits. You can let go of the mouse and start again as many times as you like. If you make a mistake and erase too much just use the keyboard shortcut of Ctrl and Z. This is an alternative way of making a selection of a complicated shape and I actually use it quite a lot in the Full Photoshop when the auto selection tools don’t do the complete job. It has the advantage that you can easily undo any mistakes if you notice them as you do them, by just clicking Ctrl and Z. Eventually you should end up with the result below.
Now we want to put a new sky in where it is white. Firstly we need to use the Colour Picker Tool again and click anywhere on the white. This will select the area we need to work on. We could then save that selection by going to Select – Store Selection.
Once we have the area selected we need to choose how to fill in the sky. We could just put in a solid colour but no sky is a solid colour. A clear blue sky will actually get whiter the closer to the horizon it gets. So we will use a Gradient Fill Tool. This is accessed by clicking on the Flood Fill Tool and then selecting the right hand option.

This will change the menu choices at the top of the window again.
To alter the colours to sky colours just click on the gradient that is black on the left and white on the right.
This will give you the following menu.

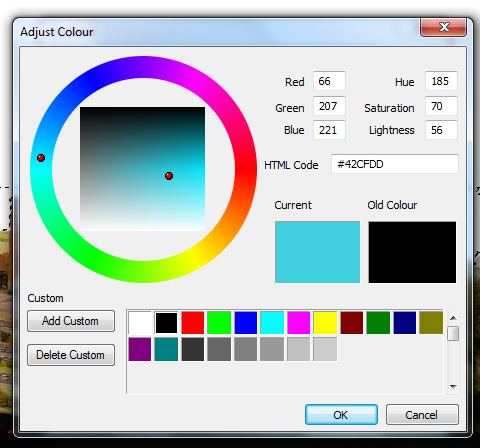
To alter the colours click once on one of the small cubes with a triangle at the top on the bottom of the graduated colour band. This will put that colour into the Colour box at the bottom left.

Click on that colour and the following menu appears.

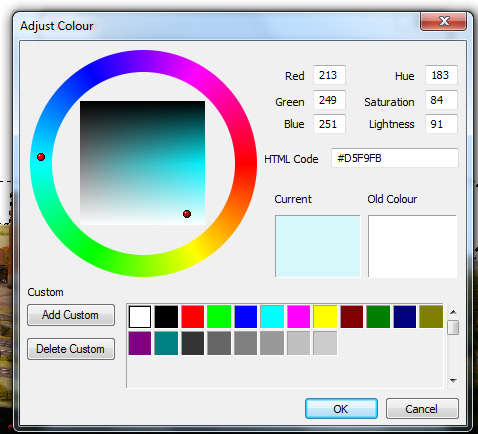
Now we need to choose a nice light blue you can either do it by moving the little red balls but I would recommend just putting values in the Red, Green, Blue boxes at the middle top. I have put in Red: 66, Green: 207, Blue: 221 as shown below.
Now click on OK and then Repeat the same procedure for the white and put in Red: 213, Green: 249, Blue: 251.
Then click on OK and OK in the Gradient menu.
Now we can use this gradient to make a sky gradient.
Now click once near the top of the sky and drag the mouse down, you will see a line appear, I recommend not just dragging vertically but use a small amount of horizontal movement as well. So you should get something like the following result.

So now your head is spinning.
Next time we will put a real sky in.
Posted
Site staff
The colour pickup tool seems to pick up the colour, but doesn't select any area.

For example, I can pick up the black colour below the layout and then paint it in.
I have got near by using the eraser tool, but it's difficult to get rid of the background without the very edge of the layout.
Ed
Posted
Full Member
You appear to be using the Starter Edition which has different buttons
 . You need to use the Magic Wand Tool
then click on the layout's backscene below the solid colour. This would select the backscene down to the green fields and around the chimney with just the far right hand edge not selected.
Good luck.
Simon
Posted
Full Member
Would "Fill" work with Photoplus with selection enabled and after selecting the colour with the eyedropper?
Phil
Phil
Posted
Site staff
Magic Wand works for me (eventually).
Serif have just offered the full package for £14.95 plus £40 worth of add-on's , but I don't really need a package like this, it's just a nice to have.
If I wait long enough they may pay me to take it!!
Ed
Posted
Full Member
Have been checking out GIMP and it seems to have all the features that allow the sort of photo manipulation that Phil has done on his photographs - such as putting steam in on a separate layer.
I will try to put together a tutorial on GIMP as soon as possible.
GIMP is free to download for both MAC and PC so will involve no spending of precious cash that should be spent on Railway Modelling.
I propose to have one Thread on the tutorial and one for comments/suggestions thus making it easier for anyone to follow the Tutorial at a later date.
Simon
Posted

Full Member
I downloaded it in anticipation of your tutorial but haven't been able to make much of it on my own
Regards,
Trevor
Trevor
Posted
Full Member
Things got a bit hectic and my health hasn't been good lately so I haven't been able to sort it yet. I have had a look and I must admit it is as user unfriendly as all the other high end Photo retouching programs.
I have got some pictures lined up and hopefully if the new tablets the Doc has prescribed start working, I might be able to do the tutorial soon.
Cheers
Simon
Posted
Full Member
Regards,
Trevor
Trevor
1 guest and 0 members have just viewed this.