Wye turnout
Posted
#222829
(In Topic #12157)

Full Member
Number 6 wye turnout in HO/OO code 100 rail
Hi All,Next up on the track building are a pair of wyes in HO gauge code 100 rail. My usual no-expenses spared methods of construction (El cheapo, make do, wing-it).
I use track plans from Fast Tracks, based on Ontario, Canada. Designed to conform to NMRA recommended practices, they provide RTG (ready to go) printable templates for a large range of turnouts in nearly all of the gauges. I use their supplies as well, CNC jigs excepted. Way to expensive for me, great if you build lots of the same turnout. Check their website for a comprehensive tutorial on track/turnout building. I'm just a very satisfied customer, no connection with the company.
Template printed, checked for accuracy, taped to a solid piece of ply. The required copper clad ties were fixed with doubled sided Sellotape, and rails cut to length and various sections removed with the Dremel and a grinding disk. I made a jig for grinding the angles with some wood scale ties. Rails attached using track gauges and rollers. Flangeways and frogs were set to 50 thou' with a bit of plastic strip.
Couple of points. The flangeways were bent after putting a small nick in the rail foot with the Xurons, and trimming-up with a triangular. The inside head was filed to give a compound slope at either end. The Point blades were also filed to give a compound slope and rounded ("rolled") after putting a very slight set in the end of the rail. Subtle, but it's essential for preventing derailments.
I take no credit for these tips, but they really are important to get right.
Nigel
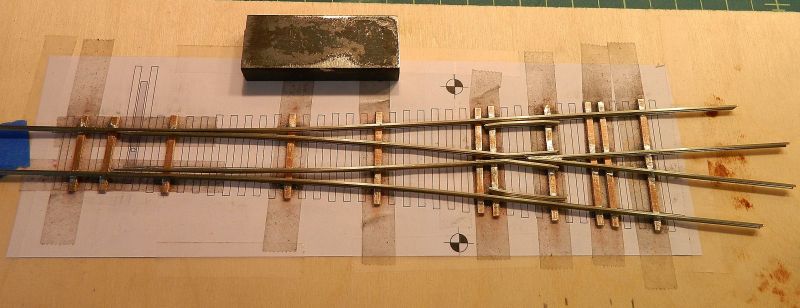
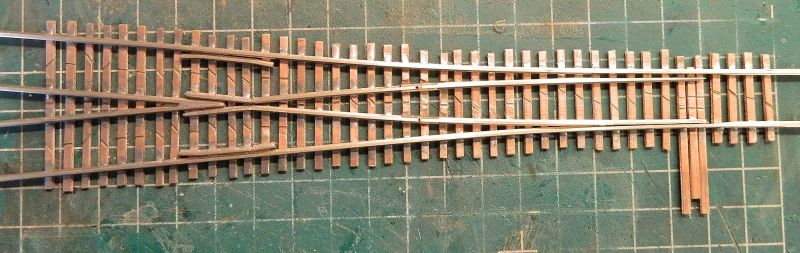
First photo shows the wye with the rails in place. Still to do is the throw bar and floating rail hinge. The big weight is, well, the big weight. I'm still debating whether to use wood ties or copper-clad ones for the remaining ties. Wooden ones will require sanding down, and attaching with contact adhesive. Copper clad will be a lot easier and quicker. I use ties from Clover House cut to about the right length with the Xurons.
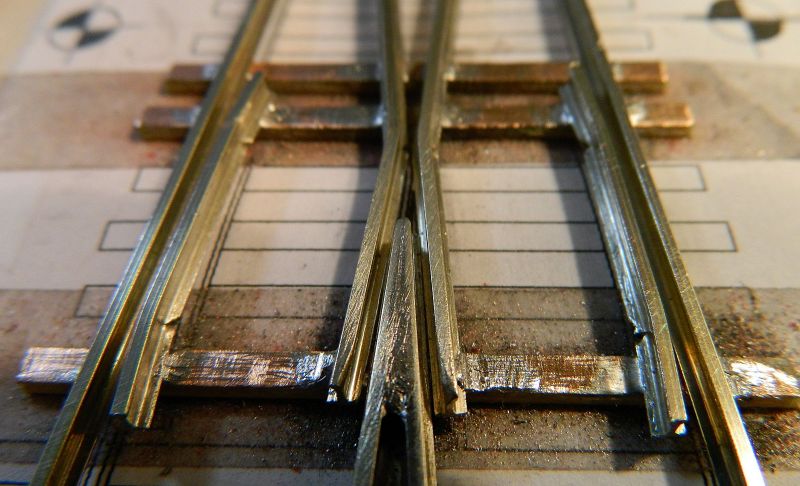
Frog flangeways with compound slope at the ends. This is done to ease the wheels into the frog.
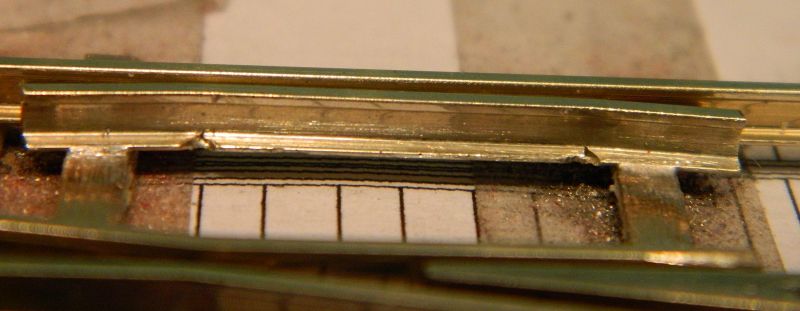
Running rail flangeways with V-shaped cut in the foot to allow bending without distorting the rail. You don't need to do this with Bullhead rail, only flat-bottomed rail.
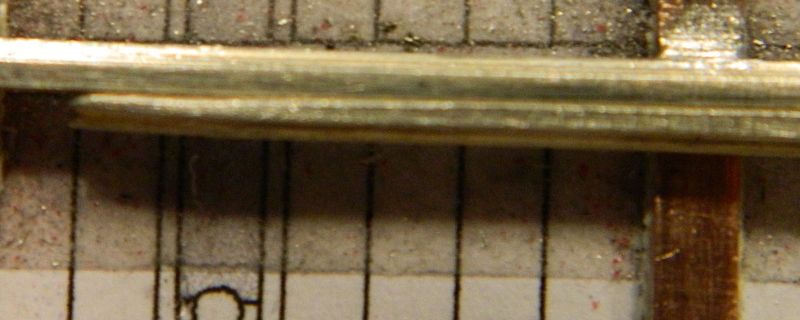
"Rolled" over slope to end of point blade. When attached to the tie bar the blade end will sit slightly below the running rail head.
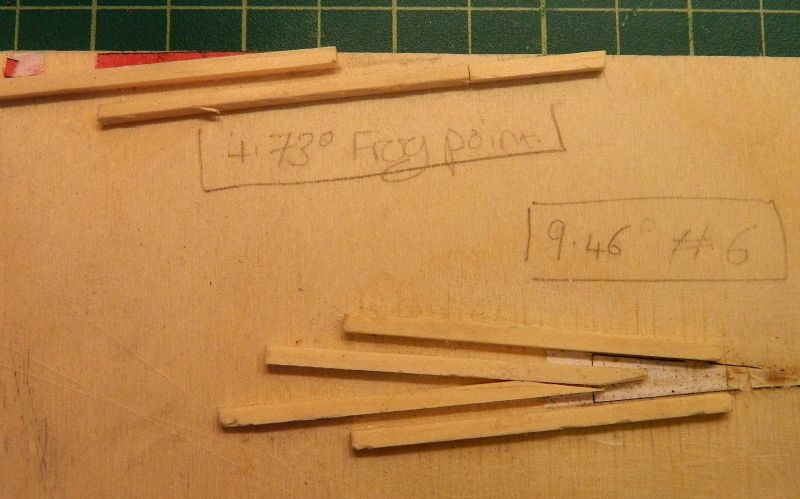
The jigs. Angles printed out on the computer (for a #6 frog 9.46°, for the blades 4.73°). Wooden ties glued in place with PVA glue. Buying CNC metal jigs for this is around $100 for the 2.This was about $0.05.
Save
©Nigel C. Phillips

Posted

Full Member
My treatment of the switch blade interface for straight stock rail was to file the switch blade so that it sits snugly in the rail web. The top of the switch blade is filed to give the wheels a gentle transition (in theory anyway). This looks to be what you've done.
John
John
Posted
Full Member
Seems to be very similar for NA models at least. Most people use Peco or Atlas in code 100 or 83 (and mostly insulfrogs). Prototype varies considerably - jogs, no jogs, planed blades, it's all there. Major difference is in the frogs and guardrails/wingrails. Much beefier for 40-ton-plus freight cars and 60 ton passenger cars with chairs to match. Not to mention 200 ton locomotives. Plus the switch blades often have reinforcing bars on the inside web.
Nigel

©Nigel C. Phillips
Posted
Full Member
I found this today:
Right-O-Way O Scale Parts and Machining
Some very interesting trackwork and reasonable prices too.
John
John
Posted
Full Member
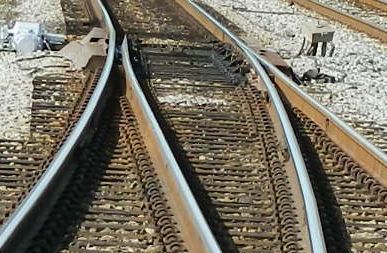
Sets there are. Plus the head of the stock rails are modified. There are at least 3 tie bars as well. See below for a close-up. That's probably 155 lb rail with heavy duty spikes and some hefty chairs on the blades (which are quite short), this is a heavyweight class-1 CSX route to the mid-west with 100 ton freight cars. Code 100 actually is pretty close (152 lb rail). I'll have a look at the site.
Next outing I'll see if I can get some close-ups of the points and blades.
Nigel
©Nigel C. Phillips
Posted
Full Member
I had a look at the site. Are you tempting me with "O"?
Coincidentally this morning I found a 7mm scale narrow gauge Wrightlines Bagnall 0-4-0 quarry locomotive lurking in one of the kit boxes. I bought this at least 12 years ago at a 7mm Narrow Gauge meeting in Burton-on-Trent. It's an old kit in white metal and brass. Bit of a basket case, no instructions, part-built and a box of bits and pieces which may or may not belong to the kit, and which may or may not be complete. The cab is definitely missing the roof and has several bits missing. Chassis looks OKish, the cylinders and pistons probably need rebuilding, and there is an open frame motor and gearbox and a set of Romford wheels. Getting any missing bits is going to be highly problematic. Do I want to do it? What a silly question.
Nigel
©Nigel C. Phillips
Posted
Full Member
John
John
Posted
Full Member
Silly question indeed, of course I'm trying to tempt you. 0 gauge needs more practitioners. That said, I think the ranks are growing due to Dapols 0 gauge efforts.Hi John,
I had a look at the site. Are you tempting me with "O"?
Coincidentally this morning I found a 7mm scale narrow gauge Wrightlines Bagnall 0-4-0 quarry locomotive lurking in one of the kit boxes. I bought this at least 12 years ago at a 7mm Narrow Gauge meeting in Burton-on-Trent. It's an old kit in white metal and brass. Bit of a basket case, no instructions, part-built and a box of bits and pieces which may or may not belong to the kit, and which may or may not be complete. The cab is definitely missing the roof and has several bits missing. Chassis looks OKish, the cylinders and pistons probably need rebuilding, and there is an open frame motor and gearbox and a set of Romford wheels. Getting any missing bits is going to be highly problematic. Do I want to do it? What a silly question.
Nigel
If you have prototype info on the loco you probably don't really need the instructions. I find that many missing parts can be made from scratch, you just need to know what they look like.
John
John
Posted
Full Member
It's a quarry engine, owners often modified them to suite the work conditions. Many Bagnalls were open, some had full cabs, others had veranda types. I'm more worried about the possibility of missing bits. I've had a small quarry cameo in mind for some time in 4mm narrow gauge, perhaps a change to the "senior" scale is called for. I just don't have the space, and with a gaggle of granddaughters whipping up enthusiasm in the face of the competition is proving hard.
Nigel
©Nigel C. Phillips
Posted
Full Member
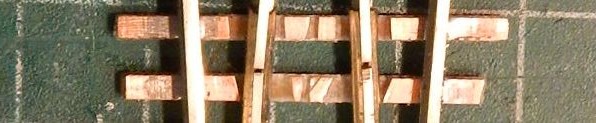
Wrapped up the construction of the wyes this afternoon, all that remains are some isolating rail cuts for the frogs and wiring to DCC standards. Only point of note are the shallow depressions in the copper clad ties to accommodate the rail joiner hinges between the point blades and the closure rails. Rail joiners were soldered to the point blades, loose fit in the closure rails.
An enjoyable bit of work, 2 wyes for around $5 each.
Nigel
©Nigel C. Phillips
Posted

Inactive Member
Are you planning cosmetic work (chairs, spikes, etc)?
Max
Port Elderley
Port Elderley
Posted
Full Member
Thanks. This is for the modular club layout, where we play roundy-roundy, so no. Plus it's code 100, all the Proto87 gear is for code 83, 70 and 55. Some rail plates and scale spikes would look good, but the code 100 rail foot is too big. Most I would do is some cosmetic spikes.
I'll go to town on the code 70 for the home plank.
Nigel
©Nigel C. Phillips
1 guest and 0 members have just viewed this.