White Metal Kits
Posted
#223582
(In Topic #12198)

Full Member
Why you should solder, not use epoxy
Hi All,I've a separate topic about rebuilding a Bagnall Quarry 0-4-0 (Wrightlines) from a box o' bits. This kit comprises substantial lumps of white metal. The previous owner's attempt at building it made use of 2-part epoxy for some of the structural components. I've posted this warning separately because it shows one of the issues with white metal and expoxy.
The pictures below show why whenever possible solder should be used. The front buffer and beam just fell off when I was soldering in some slide bars.The failure of the epoxy joint is interesting, one side is bright white metal, the other side has sheared from the white metal and has a nice coat of oxide (it's part of the brass chassis). Unless the white metal is bright, free of oxidation and is clean and grease-free on all surfaces the epoxy jopint will fail, often sooner rather than later. The natural oils on your pinkies are sufficient to compromise the joint. Wear disposable gloves (which you should anyway). The joint needs to be cleaned immediately before epoxying up (emery down to bight metal, wash with cheap dishwasher, good rinse hot with water, final rinse with 99% IPA, let dry). Solder is a bit more forgiving, the flux and heat takes care of any light oxidation and grease.
Nigel
Two slide bars forward, one buffer beam back.
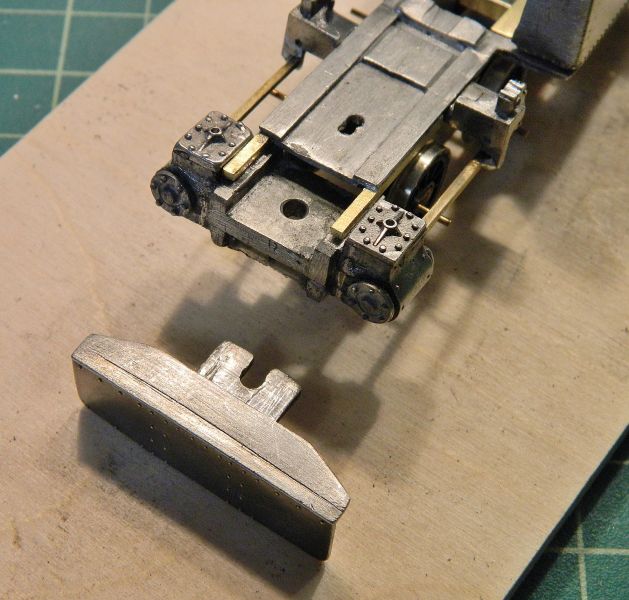
Half an epoxy joint.

The other half. Nice and bight where the epoxy pulled off the oxide coating. There is a positive side to this, at least I can put the coupling hook casting on properly (through the central hole).

SaveSaveSave
©Nigel C. Phillips

Posted

Full Member
Solder every time for a good bond - I don't believe epoxy actually bonds anything you have to slather enough on to enrobe the parts.
If you are going to use glue for smaller non structural parts, a good CA works very well I think and it does bond.
John
John
Posted

Full Member
I`m not going to be able to solder every white metal part with my Pug loco and although there are many `superglues` available
I`ve had very good and reliable results with this one…………… for whitemetal

John
Twobolt John
Posted
Full Member
Well the instructions did say it could be assembled with CA, epoxy or solder. Any good (and fresh) CA is fine, but the same caveat applies - it has to be bright metal and grease/oil-free, otherwise you will be gluing to metal oxides, not metal. Many of the early kits used white metal with a relatively high lead content, hence the oxidation (which forms lead oxide and then lead carbonate, that dusty grey coat). Newer kits use white metals with less or no lead, and are less prone to oxidation. I use Bob's Industries 5-15 second CA, which I don't think is available in the UK. CA is not good for anything where there are shear forces in play, so anything subject to motion-related stresses or lateral knocks should probably be soldered. I've stopped using 2-part epoxy as CA works just as well in most applications. It helps with CA if the surface area is increased via the use of a 200 grit.
One trick I use for making sure things like chimneys and domes stay put on curved surfaces (where it is difficulkt to soldr because all that metal acts as a very efficient heat sink) is to find the center point, and drill a hole in the base of the chimney/dome to take a piece of 40 thou' P/B wire. Corresponding hole in the smokebox/tank/boiler, the P/B wire is glued to both with CA, as well as the joint from the curved surfaces. Protects against lateral (shear) forces. With any luck the wire will be accessible from inside and can be soldered up after bending to conform to the innder surface. I'll be using this approach for the attachment of the coupler casting, rather than that piece of white metal it comes with. I'm a bit worried about the rest of the castings that are attached to the brass chassis, some P/B pins might be required. It's either that or a month in paint stripper. I'll need to grind that epoxy off, looks like it's the big knife or "Dremel Time" again.
Nigel
©Nigel C. Phillips
Posted
Full Member
I was going to say that if you have two pieces where shear is a concern, drilling and pinning with wire will strengthen the joint. However, you hit on that in the 2nd para.
John
John
Posted

Full Member
A truly helpful and salutary warning here chaps. However, I've enjoyed following the Bagnall 0-4-0 rebuild and as a direct result, have ordered a temperature controlled soldering station and then remembered that DCC Concepts offer a range of well researched solders, so have an essential range, together with some new flux on its way as well. Wow, I might even enjoy soldering now!
Now I'm aware that joints of old epoxy built white metal kits will probably fail (okay John, WILL eventually fail) and I have just one such kit, an ex-Taff Vale U1 finished in GWR unlined green, which I built over 35 years ago, so I know that I really should sink it in a Nitromors bath and start again.
Anyway, invaluable advice guys and many thanks for getting at least one old dog to learn a new trick! Thank you.
Onwards . . . :)
Bill
At 6'4'', Bill is a tall chap, then again, when horizontal he is rather long and people often used to trip over him! . . . and so a nickname was born :)
Posted
Full Member
Been meaning to try the DCC Concepts soldering stuff but still have a goodly stock. I find that non acid fluxes (I've tried a few) work on all the solders I have.
Clean workpiece, hot iron and don't hang about.
John
John
Posted
Full Member
Never tried the DCC range except for their silver, Carr's do the equivalent and I can get them California avoiding airmail shipping costs. DCC Concepts no clean organic flux is great, works with everything. White metal soldering also responds well to zinc/phosphoric acid flux. Needs a wash afterwards though.
If you get a temperature controlled iron, as John says get one with real-time temperature feed-back. After a bit of playing around, I ended up with 230° as appropriate for this model. I've already mentioned it, but use a bit of scrap from the kit and make sure you have it hot enough to melt the solder fast and get it chasing the flux but not hot enough to put a hole in the casting. Low temperature solder is funny stuff, you will often have to cut off small pieces and lay them over where you want to solder. Then go in with a hot iron. With that K's kit you just got you may have to resort to welding.
Old epoxy fails, it's just a question of when. The 5-minute stuff fails quite quickly, the old 12-24 hour epoxy is made of sterner stuff but goes brittle with age.
If you have to give the model the paint-stripper treatment, use a small fine-mesh sieve big enough to hold the engine and fine enough to trap the parts. It saves taking the S-bend apart to find those detail bits that went down the sink with the gooey stuff when you rinse the stripper off. Bin there, dun that.
Nigel
©Nigel C. Phillips
Posted
Full Member
Isn't there a tee shirt for that?If you have to give the model the paint-stripper treatment, use a small fine-mesh sieve big enough to hold the engine and fine enough to trap the parts. It saves taking the S-bend apart to find those detail bits that went down the sink with the gooey stuff when you rinse the stripper off. Bin there, dun that.
John
John
Posted
Full Member
Exactly what went through my mind when I was writing it. If there isn't one there should be.
Nigel
©Nigel C. Phillips
Posted

Full Member
Posted
Full Member
Excellent stuff it is too…… I no longer use anything else for whitemetal as well as the odd brass items where you need to keep the temperature low…
John
Twobolt John
Posted
Full Member
The 70° solder is strictly for white metal, if you want to stick brass on using this solder the brass has to be tinned. The 100° one works with white metal and brass without tinning. If the white metal is a large lump or has a high melt temperature it's also possible to use 145° solder.
Nigel
©Nigel C. Phillips
1 guest and 0 members have just viewed this.