Track crossings
Posted
#221746
(In Topic #12096)

Full Member
45° crossing in HO, single crossing double tracks
Bit more progress on the modular HO layout. One of the features I would like to include in the track plan is an interchange between 2 railroads. These were where 2 railroads (or more, up to 5 are documented) would interchange freight cars, and ranged from a simple siding holding 1-5 freight cars all the way up to a large exchange yard capable of handling hundreds of cars. Many interchanges were located where one (or more) railroad actually crossed another one.This was often on the flat, with the tracks from one railroad crossing another at ground level.The module standard for track is code 100, so my choice of RTR crossings is limited to Peco (which are diamonds rather than crossings), Atlas and Shinohara. Peco and Atlas code 100 crossings have ties/sleepers that resemble nothing ever found on a real railway, and Shinohara are expensive and difficult to find. So…why not DIY, as I would have to butcher RTR ones anyway to get them to fit? Game on!
Fastracks (handlaidtracks.com) have some nice downloadable templates for crossings in a range of angles, I decided that a 45° crossing angle would suit, so that was the hard bit done. Next was coming up with a track plan that would actually allow exchanges, I think I have it but it may get changed as I go along with the build. I'm currently in the middle of cutting and soldering-up the various rail units that go into a crossing - 14 in total for each crossover. More of that in the next post.
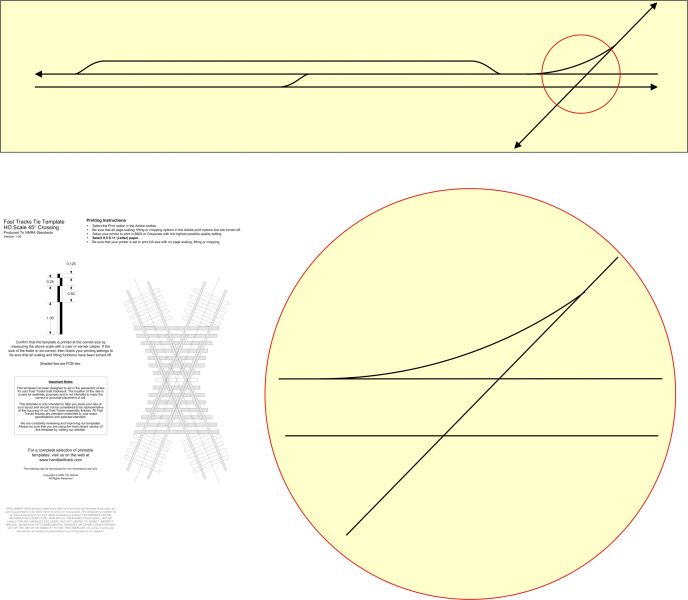
Track plan and template from Fast Tracks is shown below. Double main lines run horizontally (in this the Great Northern), diagonal is the Milwaukee Road or CNW or both (single track, like most of the rail network in the US). The directional arrows for the double track are notional, trains run on whatever is convenient, normally dictated by the ruling gradients.
Overall length of the plan is 8 feet, so it takes two 4' modules. The bottom of the diagonal is at the edge of the module, so it's not going anywhere. The aim is to have a short train coming in from the back off a short staging module, drop its freight cars in the siding, and go back from whence it came. Still thinking about this one, a third track parallel to the 2 main tracks heading west would be feasible as there is sufficient space, and that would allow trains to rattle through the 2 crossovers. Might be worthwhile adding a standalone DC sound module activated by IRDOTs or reed switches for that.
I'm building the 2 crossovers as one unit that will be dropped in. Looks like I'll have to treat each one as having 2 frogs, so maybe two double frog juicers will be required.
Nigel
Save
©Nigel C. Phillips

Posted

Full Member
John
John
Posted
Full Member
Thanks. They're easier to build than a conventional turnout (no blades to file) or diamond crossover, and I built a small jig to help get the angles correct for cutting/soldering (22.5°, 45°, 67.5° and 135°). Difficult bit was finding a protractor, I had to resort to CorelDraw. There are 2 easy ways to do it, after having gapped everything (8 gaps per crossing, probably difficult to see from the Fast Tracks template).
First is 2 frog juicers per crossing. Wire up and forget.
Second is manual switching as used for turnouts. Caboose Industries is probably the cheapest. Although that bag of Peco solenoid motors with inbuilt switches doing nothing looks tempting. Forget to change them back though…
The larger issue is that the crossing probably needs to be controlled such that trains on the main lines are not running across when there is a train on the single line. Which could get interested when the operator of the main line train is on the other side of the layout chatting with an exhibition visitor and the train is merrily proceeding along at 50 mph (scale) towards the crossing. Followed by another 15 seconds later. And another…Multiply by 2 as there are the same number of trains on the other main line track. I'll probably have 10 seconds to get a short train across. Probably best when there is only one train running on the main lines. Lunch break and coffee/tea breaks.
In real life the crossing would be protected by interlocked signals. And in an ideal world all of the locomotive decoders would have asymmetric DCC ABC. Unfortunately not all decoders have this. Lenz Silver/Gold, ESU V4 and Zimo (recent) do. I could use this on the crossing line though with my own locomotives. There are other approaches that start to get complicated very quickly (separate power booster, switchable DCC/DC sections). KISS applies to exhibition layouts. And especially to modular ones where tail-chasing is the norm.
Nigel
©Nigel C. Phillips
Posted
Full Member
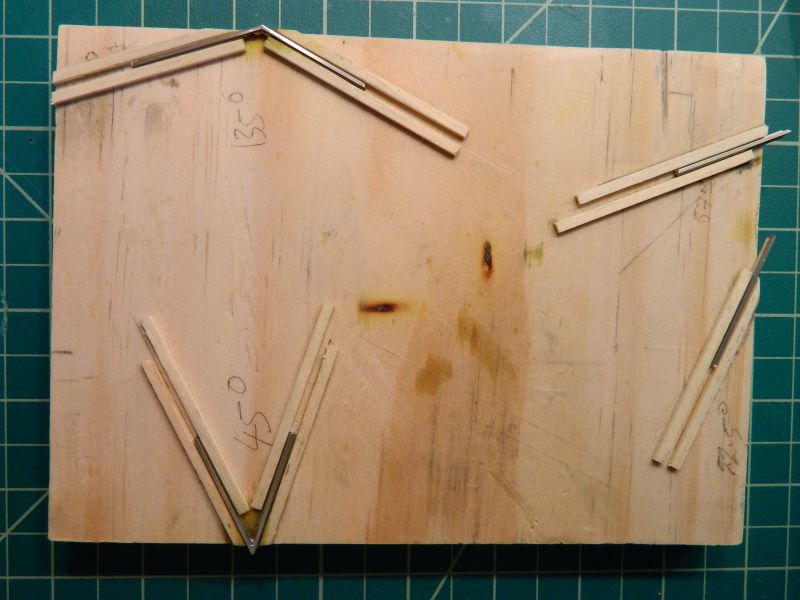
Most of the bits have been soldered together ready for assembly on the template. I thought the following photo's might be of interest to anybody building turnouts, frogs, crossings, crossovers, point blades, etc.
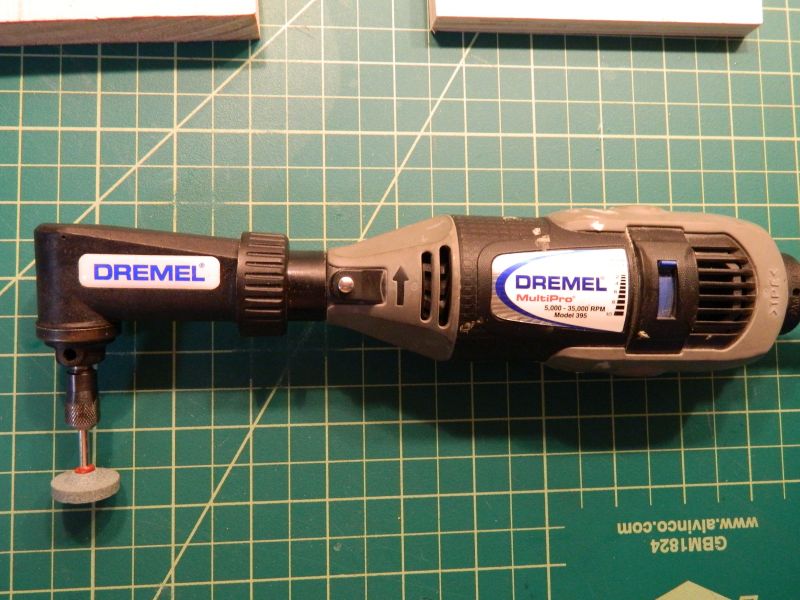
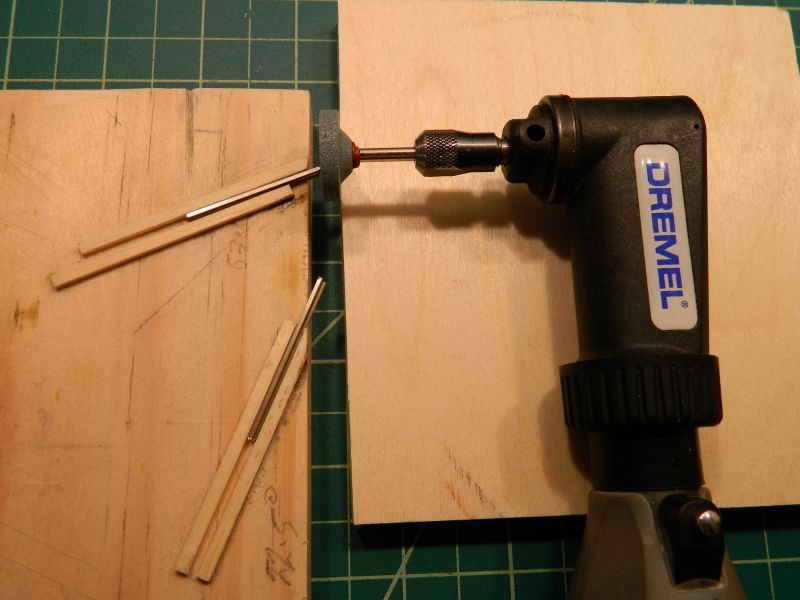
A 45° crossing requires rail joins at 45° and 135°. This means beveling the ends of the pieces to be joined at 22.5° and 67.5°. Tough to eyeball using a regular file. As I have a lot of pieces I made a jig to hold the rail pieces while the beveling was done using a Dremel with an angled extension head and a carbide grinding disc. I also made a jig to hold the pieces in place while soldering-up.
Photo 1 shows the jig. Nothing fancy, solid wood base, bass wood strips at the correct angle. Took 10 minutes to make. RHS for grinding the bevel, LHS for soldering-up. Angles marked just in case. Cost? About $0.25.
Next photo shows the Dremel and angled head with the carbide grinding disc. Useful attachment for getting as close as possible to vertical cuts in rail with a cut-off disc, as well as making accurate angled bevels with a grinding head.
Next photo shows the way in which the angle is made. Staged shot, I don't have 4 hands. It's easy to eyeball the the head parallel to the edge of the board and at 90° to the flat. The rail is held in place from the top with a piece of wood (figure pressure). Fingers directly on rail not recommended, that metal gets hot. Note scorch mark.
Next photo shows the fruits of an hour's labor (beveling and soldering). The diamond was an experiment, I won't be using it. It's easier using 2 x 45° and 2 x 135°.
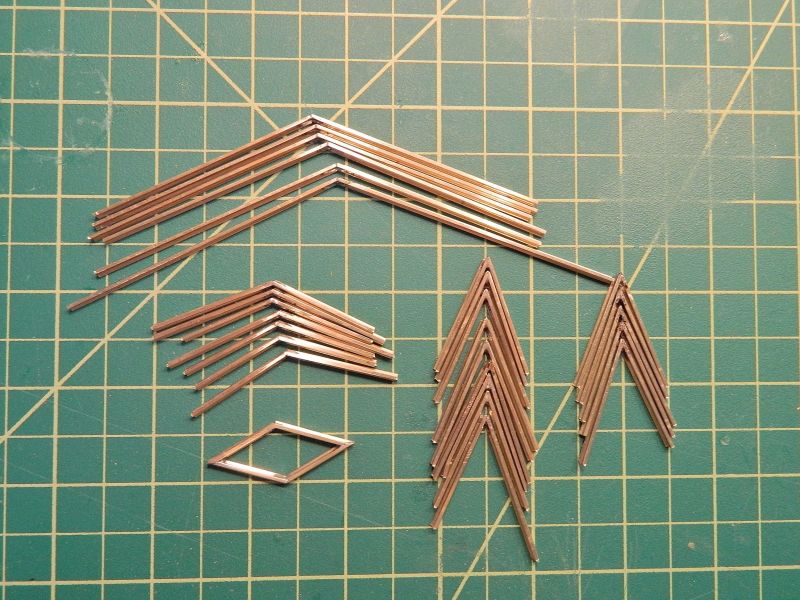
Last photo shows the 45° crossing templates joined together. Needs a bit of work on the tie spacing, but it will do the job. Couple of pieces in place, you get the idea. Hatched ties are copper-clad, open are wood (or in my case plastic). The aim is to have copper-clad running all the way through both crossings.
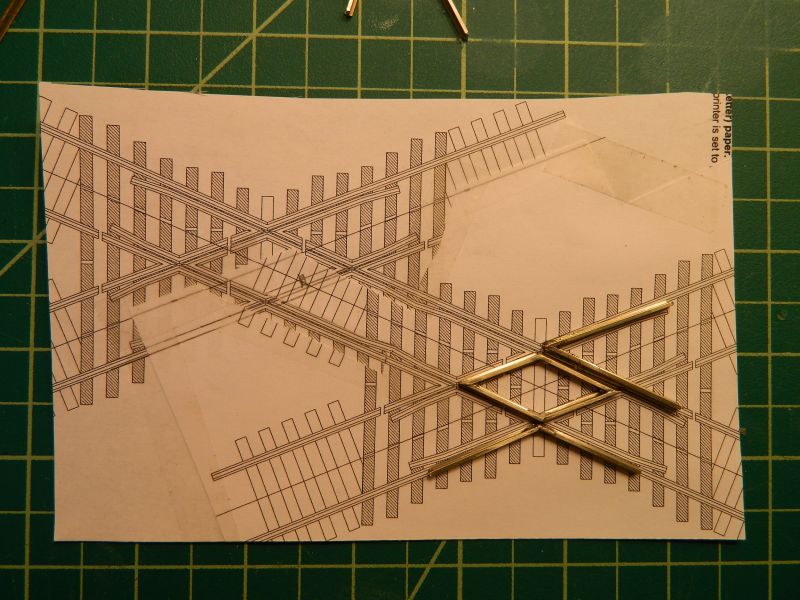
Next up? Copper-clad cut to size after calculating appropriate distances.
Nigel
Save
©Nigel C. Phillips
Posted

Inactive Member
Max
Port Elderley
Port Elderley
Posted
Full Member
Thanks. Amazing what you can do with a Dremel. No milling though, the internal shaft is not up to it and the rpm is too high (and the torque too low). As soon as this one gives up I'll get a new one that fits into the mini-drill press accessory.
I've done a few trial runs with switch blades, seems OK. Same goes for frogs, although the angles are interesting (#6 frog is 9° 32' or 9.53°, which means bevels of 4.765°).
Nigel
©Nigel C. Phillips
Posted

Site staff
Ed
Posted
Full Member
Picked up 20 pieces of new old stock code 100 N/S rail at a show last week, lurking on an On30 vendor's table. Bit of haggling (they always seem shocked over here when you make an offer), end result was 60 feet of rail for $10 (if I bought new track for the rails it would be closer to $65). Should keep me going for a bit. I recon these will cost around $3 each with the copper-clad.Expensive bit will be the fog juicers.
Nigel
©Nigel C. Phillips
Posted
Full Member
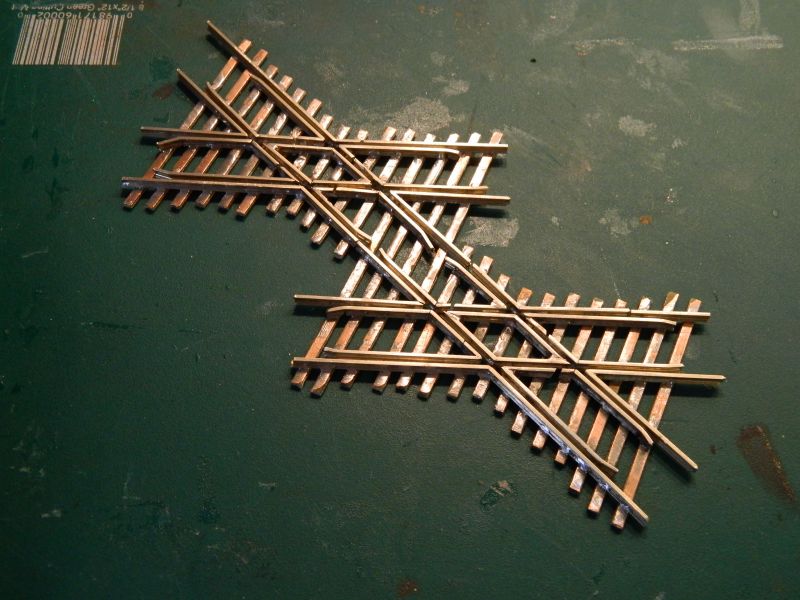
Finished the 45° double crossing, sat back and admired it, tested rolling stock through the 3 roads, all good, no derailments or tight spots, just about to start cutting the remaining insulating gaps and doing the wiring, and then it was one of those "dear-oh-dear" moments. It's back to front (single crossing track should have been right to left). Followed by an "oh my giddy aunt" moment. I need an angle of 30° to keep the single track on the board. It's 45°. Well, it was fun building it. I'm sure I'll find a use for it one day. I ordered a couple of Atlas code 100 30° crossings, came Saturday, bit of fettling on the ties and they will look fine.
Onwards and upwards, I need a couple of #6 wyes for the interchange yard.
Nigel
©Nigel C. Phillips
Posted
Full Member
John
John
Posted

Site staff
But it does look very nice…..
Ron
NCE DCC ; 00 scale UK outline.
NCE DCC ; 00 scale UK outline.
Posted
Full Member
John
Posted
Full Member
Thanks for the comments. Lot of fiddly soldering in this one compared to a regular turnout. Keeping a straight rail run to gauge the others off was an exercise in patience.
Keeping a sense of humor is crucial in this hobby. My 4mm scale plank/layout is code 75 EM gauge, my US plank/layout is code 70, this one is code 100 and doesn't fit on the module layout. it's an orphan! I think I'll frame it and put it on the wall, just a small reminder to measure thrice…and make sure it's the right way round.
The wyes are proving a relaxing build compared to this one.
Nigel
©Nigel C. Phillips
1 guest and 0 members have just viewed this.