Jeff's (SRman) work bench and projects
Posted

Site staff
Wasnie me, a big boy did it and ran away
"Why did you volunteer ? I didn't Sir, the other three stepped backwards"
"Why did you volunteer ? I didn't Sir, the other three stepped backwards"

Posted

Full Member
Not sure Colin ? Ive just done a quick cross reference on this thread and a backup taken on 31st May and all posts line up number wise. Jeff has two threads running, one for his layout and one for his work bench, and has posted to both. Not sure if you've maybe crossed threads ? :hmm
You're right. by chance both Jeff's topics were up to p44, that threw me when I went to the latest post alert having visited his other topic only an hour before. Silly old me.
Posted
Site staff
Wasnie me, a big boy did it and ran away
"Why did you volunteer ? I didn't Sir, the other three stepped backwards"
"Why did you volunteer ? I didn't Sir, the other three stepped backwards"
Posted

Full Member
I used to build Parkside kits and will have to get back into them.
Barry
Shed dweller, Softie Southerner and Meglomaniac
Posted

Full Member
Are you sure you looked at the same topic, Colin? I have two main ones running: one is this one for my workbench, the otehr is about the layout 'Newton Broadway' and its construction.Wot jus 'appened?
Jeff, you just seem to have had a whole load of posts vanish in last hour or so. I was just looking back at how much you'd achieved and "poof", next alert of a new post and they'd gone. Bizarre.
All that hard effort vanished, nothing now between 21 Feb and 1st June and numbering has all changed. Matt ???
Colin
Jeff Lynn,
Amateur layabout, Professional Lurker, Thread hijacker extraordinaire
Amateur layabout, Professional Lurker, Thread hijacker extraordinaire
Posted
Full Member
Nice work Jeff and an inspiration to those of us who shy away from kits 90% of the time.
I used to build Parkside kits and will have to get back into them.
Barry
Thanks, Barry.
Parkside kits are generally very easy to build, with just a few exceptions. They are a good place to start, and being quite inexpensive, are not too much of a loss if you get it wrong.
Jeff Lynn,
Amateur layabout, Professional Lurker, Thread hijacker extraordinaire
Amateur layabout, Professional Lurker, Thread hijacker extraordinaire
Posted
Full Member
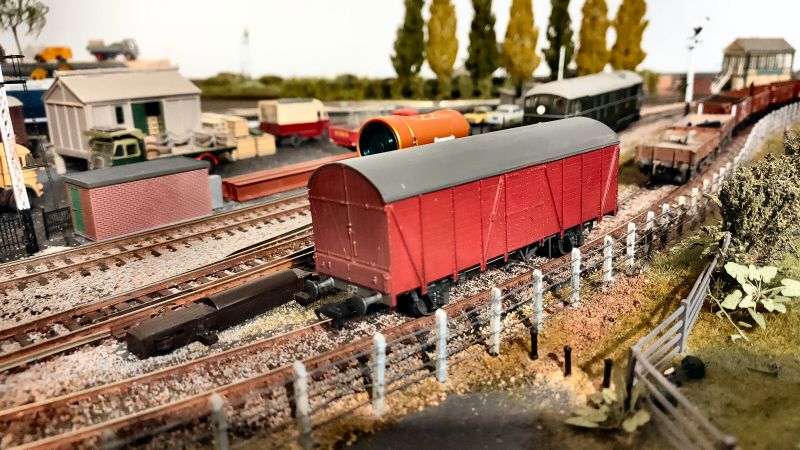
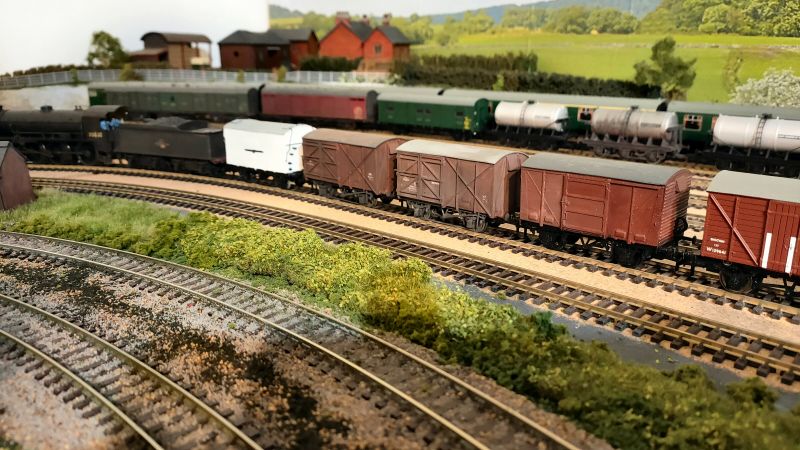
Also, newer pics of the previous two wagons I was building. First, the ex-GWR gunpowder van, then the BR 12T fruit van. Many of the other wagons in the photos are also kit-built, including the 21T mineral wagon (Parkside), ex-LNER trestle wagon (Parkside), and ex-SECR 'dance hall' brake van (Cambrian kits) in the first photo, and the ex-GWR Mica B (Parkside), and Palvans (also Parkside) in the second.

 Last edit: by SRman
Jeff Lynn,
Amateur layabout, Professional Lurker, Thread hijacker extraordinaire
Amateur layabout, Professional Lurker, Thread hijacker extraordinaire
Posted
Full Member
The class 30 was a much earlier project: a Hornby first release with the eggshell cab window surrounds painted out and yellow warning panels added, plus a full renumbering. This one had to have its chassis block replaced because of the metal rot.
Another much quicker project was to update an early plain green 4 CEP unit with yellow cantrail bands added for the first class portion of the composite coach, and number '1' door insignia added - (one '1' on the other side got damaged so I'll have to replace it. It is seen here in the middle unit of a 12 CEP formation.


Jeff Lynn,
Amateur layabout, Professional Lurker, Thread hijacker extraordinaire
Amateur layabout, Professional Lurker, Thread hijacker extraordinaire
Posted
Full Member
Jeff Lynn,
Amateur layabout, Professional Lurker, Thread hijacker extraordinaire
Amateur layabout, Professional Lurker, Thread hijacker extraordinaire
Posted

Full Member
As an aside, how do your kit-built wagons run ? I've built a few in my time - an enjoyable hour or so spent doing them, but I've usually found they're not good runners. Could be to do with my inability to get the wheels perfectly installed or, in the case of open wagons particularly, the lack of weight with nowhere to add extra.
'Petermac
Posted
Full Member
Weight plays a big part in the rollability and stability of wagons. With open wagons there is a choice of putting a weight on the floor and covering it with a load, or putting as much weight as you can fit within the underframe mouldings - liquid lead of its equivalent is useful here. With vans, I tend to add a piece of sheet lead roughly 3/4 of the floor area (I'm not scientific enough about this to actually weigh the piece!).
I also make sure the wheels will rotate freely, if necessary filing or removing parts of the brake shoes to make sure they don't foul the wheels and act as (well!) brakes.
I should add that I have some much older Ratio wagons I made decades ago, and they need work - in fact, because their chassis have suffered a bit of damage over the years, I have ordered some new Parkside chassis to put under the Ratio bodies. I replaced the plastic wheels with metal ones a while ago, but they really needed top hat bearings added as well. The new chassis will have those.
I was quite pleased with the weathering effects I achieved with the pair of mineral wagons I built.
Last edit: by SRman
Jeff Lynn,
Amateur layabout, Professional Lurker, Thread hijacker extraordinaire
Amateur layabout, Professional Lurker, Thread hijacker extraordinaire
Posted
Full Member
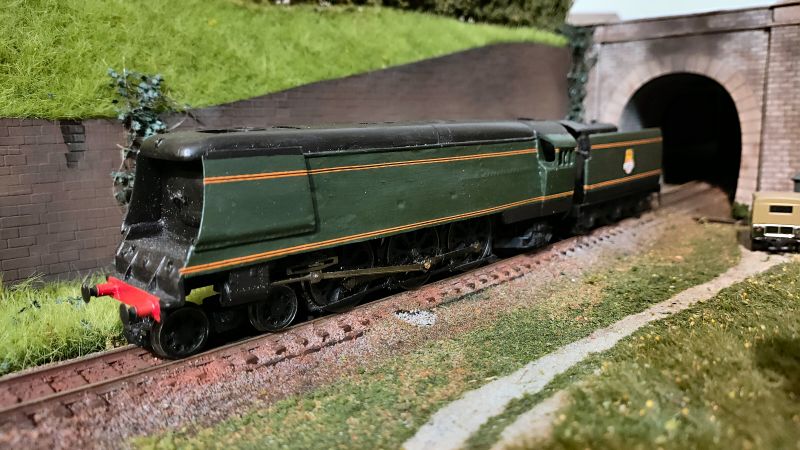
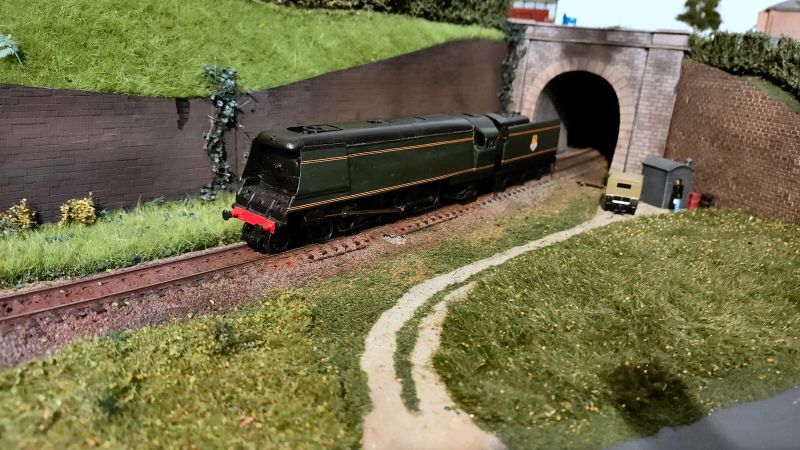
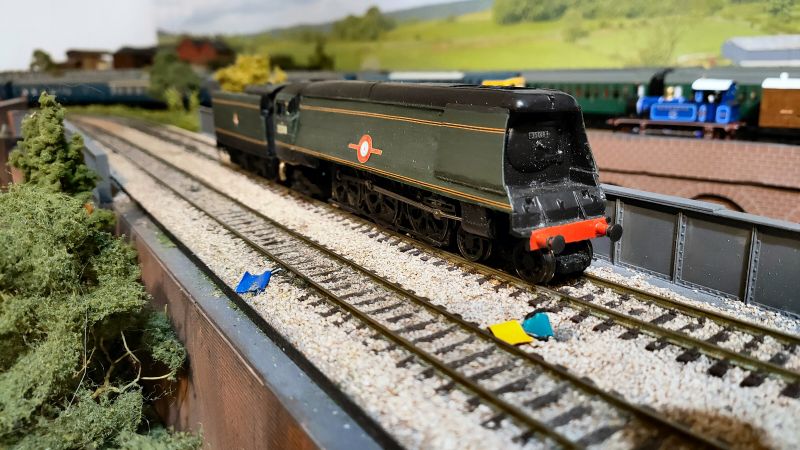
I have repainted it with the correct post 1954 BR green (previously it had GWR green), and spent yesterday evening putting the lining on, then added the crests on the tender this morning. It will remain unnumbered and named for the time being: I had allocated 35029 'Ellerman Lines' to it, but 'Ellerman Lines' spent a large proportion of its life with a shorter 5100 gallon tender, so I will have to revise that plan as the tender I have is a 6000 gallon version. These 6000 gallon types were originally allocated to all of the 3rd series MNs, but tenders got swapped around fairly quickly.
It is still a little rough in places, but starting to look the part, now.
Amusingly, I have a few duplicate names and numbers between original and rebuilt MNs, as a form of 'before and after' models.

Jeff Lynn,
Amateur layabout, Professional Lurker, Thread hijacker extraordinaire
Amateur layabout, Professional Lurker, Thread hijacker extraordinaire
Posted

Full Member
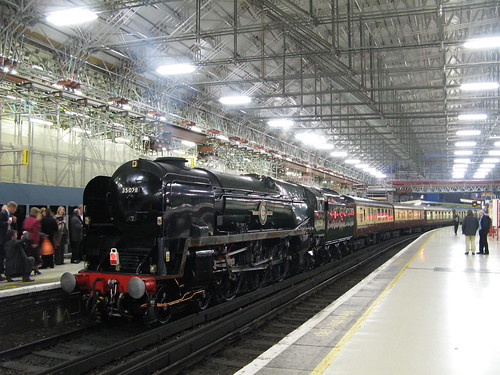
Nice model you have got. I celebrated my 50th birthday with a tour behind 35028!
london (49)
Cheers,
Claus
www.flickr.com/photos/ellef/
Claus
www.flickr.com/photos/ellef/
Posted
Full Member
The last train I rode on in Britain at the time my family left for Australia was a steam hauled boat train to Southampton. It was pulled by a rebuilt Bulleid pacific, but I couldn't see properly in the dark what type it was, or its identity - at 10 years old, I couldn't just wander up and get separated from my family.
'Clan Line' is a possibility for this model. I have the Hornby rebuilt version as 'Clan Line' as well.
I did manage a ride behind another Southern locomotive in 1986, with N15 777 'Sir Lamiel' hauling the 'Scarborough Spa Express' from York to Scarborough, a pure coincidence as the 'SSE' was randomly hauled by a number of steam locos. I saw it a few days later coming out of York with 46229 'Duchess of Hamilton' at the front, looking absolutely magnificent in maroon in full sunshine - this was prioer to her being rebuilt with the upturned bathtub body.
Last edit: by SRman
Jeff Lynn,
Amateur layabout, Professional Lurker, Thread hijacker extraordinaire
Amateur layabout, Professional Lurker, Thread hijacker extraordinaire
Posted
Full Member
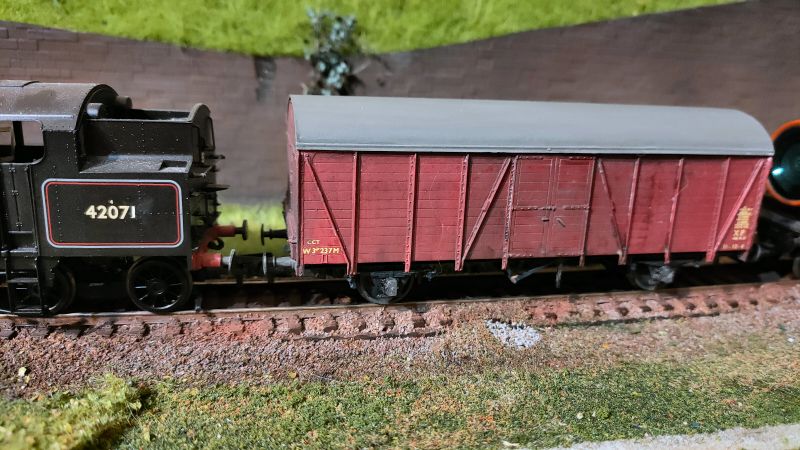
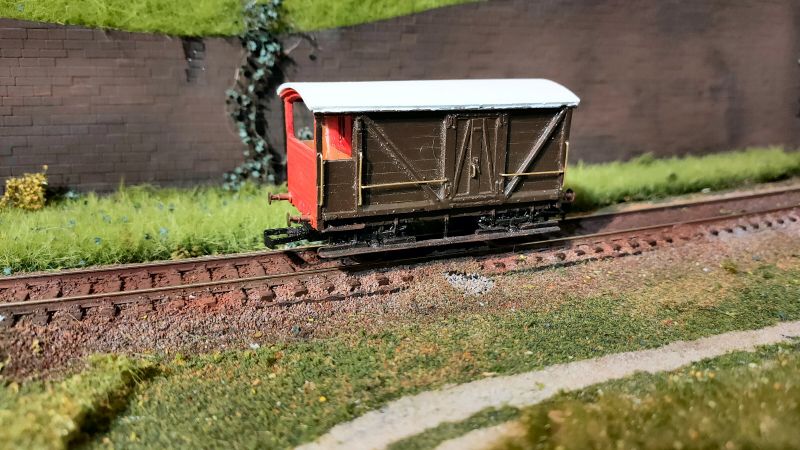
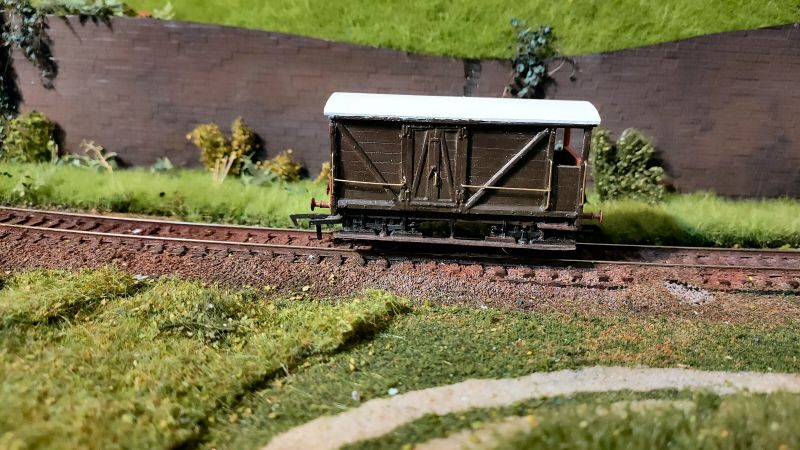
Also visible is one of the Southern vans I have been refurbishing. One received a new Parkside chassis, the next received the old chassis after I had rebuilt it and repaired damaged brake gear and added brass bearings, and the one in the photo was a Dapol unfitted van, which now has a vacuum cylinder added and tie bars fitted between the W-irons. I really want to remove the very thick handrake levers, and replace them with much finer Parkside spares from the sprues in the chassis kits, but removing the Dapol versions is going to be tricky.

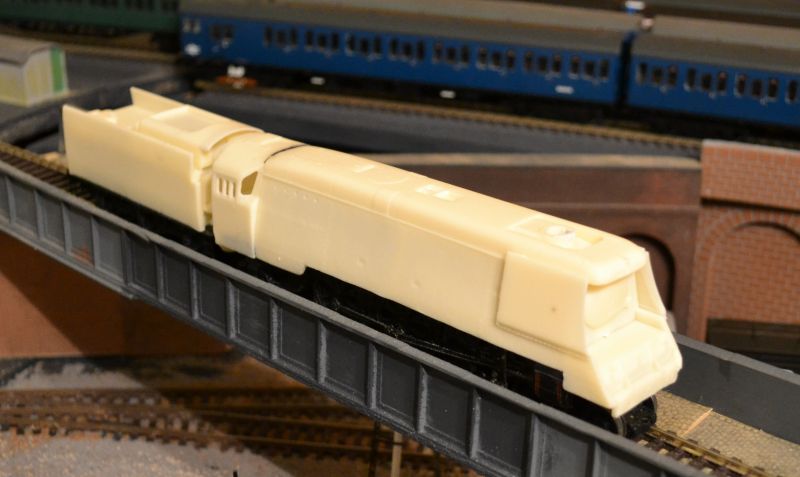
Also on the workbench is the resin Merchant Navy, 35018 'British India Line', now fitted with its nameplates and smokebox number plate from Fox Transfers. Still to do: reduce the depth of the cabside windows, and glaze them and the spectacles, and add the firebox/ashpan castings.
Last edit: by SRman
Jeff Lynn,
Amateur layabout, Professional Lurker, Thread hijacker extraordinaire
Amateur layabout, Professional Lurker, Thread hijacker extraordinaire
Posted
Full Member
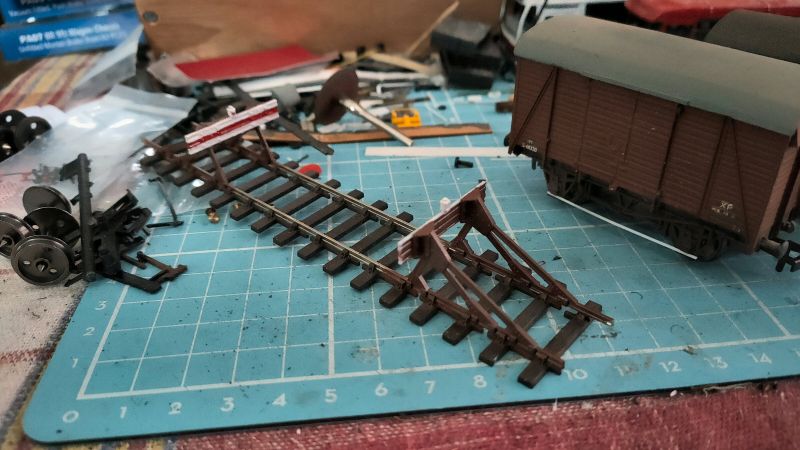
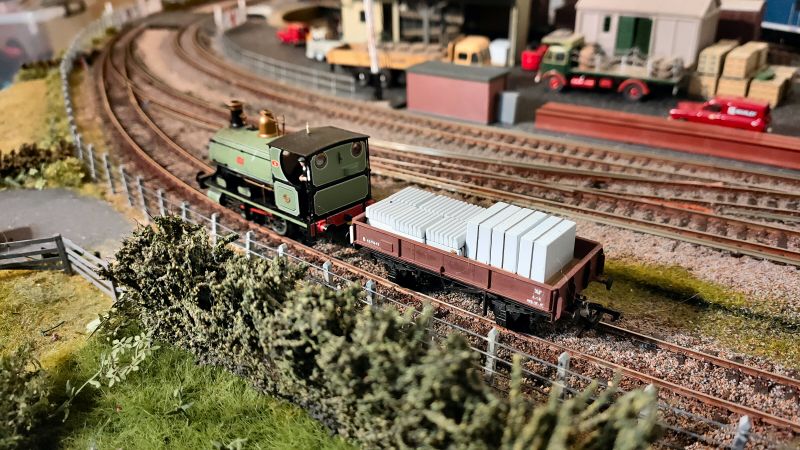
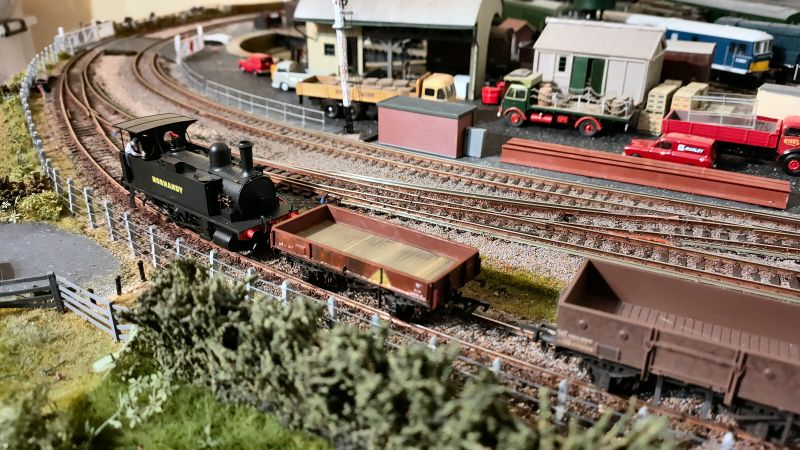
Continuing with the Parkside wagon kits I bought at a BRMA meeting, I wanted an engineers' wagon suitable for transporting pre-cast concrete items (as beloved by the Southern Railway and beyond). It needed to have drop sides to allow pallets to be loaded from the sides, and the 13T Medium (Medfit) wagon fitted the bill admirably, particularly as they were general revenue earning wagons that got taken into engineers' use, often with little more than the odd patch of paint and a letter 'D' added to the running numbers. The kit is seen here with the Peckett 0-4-0ST, and had to have a piece of plastic card cut to replace a part that pinged off into the carpet somewhere, never to be seen again. I have added transfers, but it is not yet quite complete for painting and weathering. The concrete loads are from Base Toys. I suspect I have overloaded the wagon a bit! I added lead sheet cut to fit into the various recesses in the underframe, but it was still a little light, overall, so the load also adds some necessary weight for good running.
The Peckett has a Hattons 3D printed crew, which paint up really nicely. However, when I went to show a recent visitor how it looked, the fireman had obviously had too much, and was lying on his back. I have rescued him and glued him back upright. The Hornby Pecketts have a weakness, and that is the plastic roof-mounted whistles are very vulnerable to damage. I have replaced a couple before on other Peckett models, but this one was broken off almost flush. I had a Markits LNWR/LMS style turned brass whistle in my boxes of spares, and thought that this would suit perfectly. I cleared the remains of the old whistle with a file and drilled a new #77 hole for the replacement to fit into. It will still be vulnerable to knocks, but should not break off like the plastic ones did.

Last edit: by SRman
Jeff Lynn,
Amateur layabout, Professional Lurker, Thread hijacker extraordinaire
Amateur layabout, Professional Lurker, Thread hijacker extraordinaire
Posted
Full Member
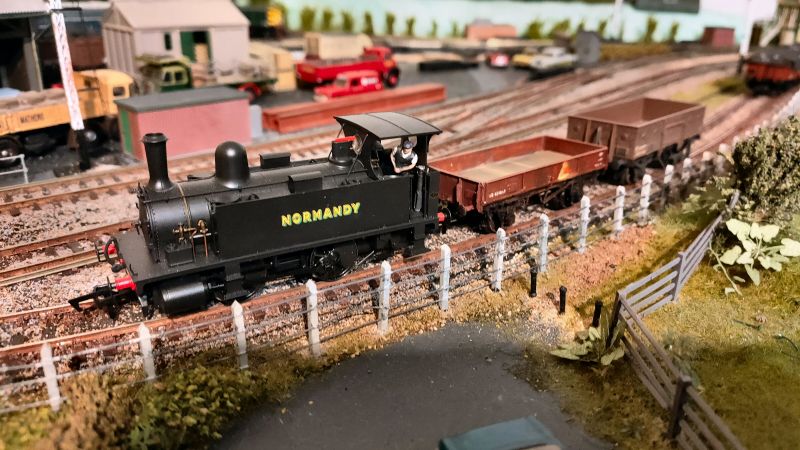
The Dapol B4 0-4-0T also has the Hatton's 3D printed crew.
Jeff Lynn,
Amateur layabout, Professional Lurker, Thread hijacker extraordinaire
Amateur layabout, Professional Lurker, Thread hijacker extraordinaire
Posted
Full Member
I resoldered every piece of wire bridging the rails towards the heel end, then added more bridging wires across the crossing "vees" at the toe end, including one where I pared away the sleeper webbing. I then added a fillet of solder into the "vee" in the middle of the point, just to be sure there was maximum electrical transmission where it was needed.
After replacing the point in its location, and screwing the wire ends back into the various terminals, using the Tam Valley dual frog juicer, I ran the Heljan 07 shunter through from the heel end into the siding. It hesitated slightly where I had previously had the problem, but it continued through the point to the siding without prodding or poking, or any other assistance.
On a completely different track (pun intended!), I have had a Smallbrook Studios resin LSWR D.1541 brake van on my workbench for quite a long time now. It has received a great many coats of satin white paint on its roof in that time, and the rest of the painting was all but complete, so it was really awaiting the fitting of handrails and transfers. Handrails have now been done, and were painted brown shortly after the photos were taken.
If I get a move on, I may actually have it finished before the Kernow models arrive on my doorstep.
Jeff Lynn,
Amateur layabout, Professional Lurker, Thread hijacker extraordinaire
Amateur layabout, Professional Lurker, Thread hijacker extraordinaire
Posted
Full Member
Also in the photos is the 13T Medfit wagon, on which I have overpainted the green triangles with a better shade of green, which means I'll have to "restore" some of the rust again.


Jeff Lynn,
Amateur layabout, Professional Lurker, Thread hijacker extraordinaire
Amateur layabout, Professional Lurker, Thread hijacker extraordinaire
Posted
Full Member
My solution was to solder an extra length of phosphor-bronze strip at a reverse angle to extend the reach of the pickups. The photo shows this better than I can in words. It has been cranked to an exaggerated angle for clarity.
Last edit: by SRman
Jeff Lynn,
Amateur layabout, Professional Lurker, Thread hijacker extraordinaire
Amateur layabout, Professional Lurker, Thread hijacker extraordinaire
1 guest and 0 members have just viewed this.