Jeff's (SRman) work bench and projects
Posted

Full Member

Next jobs are to do the other side, add the bangers to the solebar sides, fill any minor gaps in the floor of the wagon, then glue the sides on and lastly paint it all … after repeating all the previous steps for the second wagon! I'll probably do one in early black and the other in the slightly later olive livery, then weather it all down again.
Jeff Lynn,
Amateur layabout, Professional Lurker, Thread hijacker extraordinaire
Amateur layabout, Professional Lurker, Thread hijacker extraordinaire

Posted
Full Member


 ​
​The lighting was poor so I turned the flash on on the phone camera for the first two shots. None are ideal but they'll do for now, to show progress.
The rail load is actually made up from the steel rails that came with the first issue of that magazine everyone was talking about a little while ago: I bought four for the cheap coaches, so had four pieces of straight track. Of course, I will paint the rails before sticking them in properly. The Sleepers will also be cut off their runners and used elsewhere (maybe even for the second wagon!).
 Last edit: by SRman
Jeff Lynn,
Amateur layabout, Professional Lurker, Thread hijacker extraordinaire
Amateur layabout, Professional Lurker, Thread hijacker extraordinaire
Posted
Full Member
Getting the new lights working was easy. Fiddling around trying to find the windscreen I dislodged and pulling the light units out again to clear the misplaced black-tack were what tested my patience a little!!
At this stage I still have the original headcodes but I may try to improve on these later.


Jeff Lynn,
Amateur layabout, Professional Lurker, Thread hijacker extraordinaire
Amateur layabout, Professional Lurker, Thread hijacker extraordinaire
Posted
Full Member

Jeff Lynn,
Amateur layabout, Professional Lurker, Thread hijacker extraordinaire
Amateur layabout, Professional Lurker, Thread hijacker extraordinaire
Posted
Full Member
Cheers
Neil

Posted
Full Member
After several attempts, where I had tail lights at the no 1 end and either all, or no lights at the other, I pulled it apart and started again. This time only the tail lights at the number 1 end didn't work, which is probably due to the cab contacts not sitting quite right. I'm not too worried about that, to the point that I might even disconnect the over bright tail lights from the other end as well, next time I take the body off!
It ran perfectly every time, it was just the lights that defeated me! Anyway, once it was OK on DC, I inserted a cheap Hattons decoder and tested with that on board, then refitted the LokSound decoder and speaker.
Then I repaired the small cracks in the body from the original chassis expansion.

Then I moved on to the Lima class 31 004 that I had previously detailed up and shown here. I was not happy with its Lima motor's running characteristics on DCC and managed to score a cheap Hornby RailRoad class 31 (R3067). The chassis swap is straight forward as both bodies fit either chassis. However, the Hornby model is a little bit of a hybrid of characteristics from earlier and later days of the type, and the chassis lacks the fairings around the buffer beams and below the cab ends. I filed the detail on the Hornby chassis smooth and cut and shaped some fairings from plasticard, using the D5513 and the Lima chassis as guides. While these are not quite exact, once painted blue they will give the right character to the model.
At the stage shown in the photo, I am leaving the solvent to set properly before filing the lower parts of the buffer beams to match the sides. I also forgot to file those little pointy extensions back a bit so the outer surfaces are inboard of the main fairing, which should continue the straight line angled up towards the cab doors. That will be corrected when I remove the body later.
I have also removed the BR arrows and cab numbers so I can repaint (patch painting) those areas and renumber and decal to represent an early blue example from the later batch, which means BR arrows on each cabside and pre-TOPS numbers on the bodysides behind the cab doors. It will most likely become 5539 or 5555, both of which are from the later blue star series, both with the green livery style number typeface, and both without the 'D' prefix, in or around 1969 and 1970.

Last edit: by SRman
Jeff Lynn,
Amateur layabout, Professional Lurker, Thread hijacker extraordinaire
Amateur layabout, Professional Lurker, Thread hijacker extraordinaire
Posted
Full Member
Cheers
Neil
Posted
Full Member
Looking at the photo of the green one, I really must redo the numbers - you can see the angle I have got them on very clearly there!
Jeff Lynn,
Amateur layabout, Professional Lurker, Thread hijacker extraordinaire
Amateur layabout, Professional Lurker, Thread hijacker extraordinaire
Posted
Legacy Member
reg
Posted
Full Member
I have seen pictures of BR blue locomotives with crooked numbering but never green ones, possibly because they used transfers for the blue ones but painted numbers on in earlier days. Could anyone confirm that thought?
London Transport had all sorts of templates for their bus transfers so they were applied consistently and straight to all types of bus. Presumably that also applied to the trains. BR didn't seem to have quite such a rigorous approach when it came to their stock in blue days.
Last edit: by SRman
Jeff Lynn,
Amateur layabout, Professional Lurker, Thread hijacker extraordinaire
Amateur layabout, Professional Lurker, Thread hijacker extraordinaire
Posted
Full Member
I have slowly been repairing this damage using plasticard and filler and a pair of Bachmann sprung buffers. Repairing the damage was relatively easy but touching up the pre-weathered paintwork took a little bit of fiddling, particularly as my BR locomotive green was a slightly yellower shade than Hornby's original paint work. I have used washes of dark earth and one of the Humbol black wash enamels to try to match the effects as closely as possible. I think I have managed to get pretty close to a realistic effect while closely matching the original.
A touch of red paint on the buffer shanks blended them in.
I topped it off with a layer of real coal to complete the job.


Sorry about the poor quality of the photos: all were rattled off quickly on the mobile phone between jobs.
Last edit: by SRman
Jeff Lynn,
Amateur layabout, Professional Lurker, Thread hijacker extraordinaire
Amateur layabout, Professional Lurker, Thread hijacker extraordinaire
Posted
Full Member
I added the buffer beam cowls as shown in my previous entry a few posts back. Then, after filing the lower cowl shapes down to clear the couplings, I removed the numbers and central BR arrows, which also entailed removing a bit of the paint work. Fortunately, Humbrol/Hornby's BR blue acrylic paint is a very close match for the Lima shade so I was able to patch paint.
Once I complete the weathering, the patches won't be noticeable anyway.Here I have not only painted the cowlings and the patches, I have also started weathering the roof and below solebar levels, but not the main body sides yet, as the replacement transfers have to go on before weathering.

Then, I applied the new transfers from Fox (the BR arrows) and Cambridge Custom Transfers (numbers). I have deliberately used the old-style numbers, minus the 'D' prefix, because in the early days of the blue livery, many of these locomotives received the 'wrong' style - it was supposed to be the new Rail alphabet style. The CCT numbers come as pre-made up numbers for a range of diesels. The number I chose, 5528, wasn't on the sheet but I was able to combine parts of two pre-made numbers, 5547 and 8128. Doing it this way makes it easier to align the numbers and keep the whole number straight.


There is still a little bit to do. Blue star coupling codes over the buffers, a little more weathering is needed on the sides and roof, and a coat of satin varnish (sides) and matt varnish (roof, bogies and underframes), plus I STILL haven't added the handrails that go on top of the gangway door bulge, and the little 'ears' for the windscreen washers. Edit: And replace the missing handrail that I knocked off earlier in the task!!Overall, I am pleased with the effect so far, and the running is so much better with the Hornby chassis.
Last edit: by SRman
Jeff Lynn,
Amateur layabout, Professional Lurker, Thread hijacker extraordinaire
Amateur layabout, Professional Lurker, Thread hijacker extraordinaire
Posted
Full Member
I have reapplied the missing number and added blue star coupling codes on the ends. I revarnished the roof area using a Testors lacquer, which tends to dissolve any paint layers beneath it if one dwells on the spot too long, leaving one or two spots that need re-weathering.
For the first photo my phone camera somehow decided to turn the flash on (I always leave it turned off) so, while it is not a good photo as such, it does cruelly highlight any errors or omissions in my modelling. In this case it has picked out the bright yellow plastic interior of the body, so it looks like I'm going to have to source some cab interiors and paint the insides of the body too.

These next shots show it in a better light (no pun intended but it works!!) and I think it has come up looking OK.


Looking at the front end, I need to do a little weathering around the doors and seams, flooding a little black wash into them to eliminate the slightly plasticky look.
Last edit: by SRman
Jeff Lynn,
Amateur layabout, Professional Lurker, Thread hijacker extraordinaire
Amateur layabout, Professional Lurker, Thread hijacker extraordinaire
Posted
Full Member
The lights include separately wired marker and tail lights at each end plus a cab light. The sound decoder is an ESU LokSound with only four external functions for five lights. I wired the nose-end marker lights (i.e. the headcode disc lights) and cab-end tail lights together, auto-reversing with just the tail lights at the nose end, so that's two functions used.
The marker lights at the cab-end are wired to the aux 1 output, F11 on the decoder.
The cab light is wired to the aux 2 output, F12 on the decoder.
To run with the nose end leading there is no choice in having the tail lights showing at the cab end if the leading marker lights are lit. Other than that, leaving F0 on but hitting reverse so the cab-end is leading results in the nose-end tail lights coming on; pressing F11 turns on the cab-end marker lights. Turning F0 off leaves the marker lights on F11 turned on but means there are no tail lights showing, for use when in multiple or hauling a train.
Overall, I believe I have achieved the maximum versatility/best compromise from having five lights on four available functions.
The class 20 has been lightly weathered and actually has a cab swapped from another disc headcode model where I had modified the side windows from the original Bachmann recessed sliding ones to being flush mounted but fixed. It was renumbered to D8058 with the earlier style numbers (as per a photo of the real locomotive).
The lighting kit came from an eBay seller under the name of Stickswipe, who was also very helpful.


Last edit: by SRman
Jeff Lynn,
Amateur layabout, Professional Lurker, Thread hijacker extraordinaire
Amateur layabout, Professional Lurker, Thread hijacker extraordinaire
Posted
Full Member
The techniques used on this one were simply to use thin washes. My usual colours for this are Humbrol coal black (#85), dark earth (#29) and rusty browns (#100 or #133), and sometimes a bit of leather brown (#62) as well. I have also recently acquired some of the weathering washes so have been experimenting with those too.
However, having said all that, I chose to use only a few of those for this project. For the roofs I used the Humbrol dark grey wash, which came up quite nicely. Buoyed up by the success of that, I tried the dark brown wash on the underframes and bogies. This was less successful as it dried very glossy, in spite of my having mixed and shaken the jar well.Next was a wash of Humbrol #66 over the bogies, underframes, equipment, buffers and beams, and inner ends. I also did a very thin wash of the same along the lower body edges.
After that was a thin wash of a colour I hadn't used for weathering before, a Revell dark reddish brown #84. Again this was done over all the same areas that had had the grey (except the previously done roofs). I also used this colour in less thinned form for the brake blocks and brake rigging. Again I applied a very thin, tapered wash up the lower sides to the waist moulding, thinning the colour right down to almost non-existence at the waist mouldings.
I also carried the very thin washes up the yellow ends to the waist level jumper sockets.
The effect is quite good and I am not inclined to do too much more to this one. I did apply slightly thicker grey #66 to the step boards under the doors to emulate where people's shoes scuff them.
The trick with all these washes is to build up the colour in layers, rather than applying it all at once.


I noticed that the driving motor coach body was not properly seated at the inner end and fixed that up after these photos were taken.
Jeff Lynn,
Amateur layabout, Professional Lurker, Thread hijacker extraordinaire
Amateur layabout, Professional Lurker, Thread hijacker extraordinaire
Posted
Full Member
I used the usual weathering techniques and colours (much the same as the 2 BIL in the previous post but with heavier weathering on the vehicle sides) but wanted to try a patchy effect on the roof. My attempts at that failed so I ended up repainting the roof with Humbrol #66 but thinned it towards the edges, allowing a little of the previous colour to show through.
This is pretty close to the final result - I think I am happy with the overall effect.


I must do this with a few more of the SR style CCTs/PMVs/Van Cs!
Jeff Lynn,
Amateur layabout, Professional Lurker, Thread hijacker extraordinaire
Amateur layabout, Professional Lurker, Thread hijacker extraordinaire
Posted
Inactive Member
Your railway is looking nice and busy as well.
Hows life in Aus these days on the railway front.
regards,
Derek.
Posted
Full Member
Progress on the railway goes in fits and spurts of activity. I'm in no hurry, although as I keep accumulating more stock I keep reminding myself that I should make an effort to get the upper level running.
Every so often I have to turf some stock off the layout as it gets more and more congested!!
We're now heading for Summer and a longer holiday over Christmas and New Year (I get school holidays now), so if it isn't too hot, I hope to get a bit more serious building work done then.
Jeff Lynn,
Amateur layabout, Professional Lurker, Thread hijacker extraordinaire
Amateur layabout, Professional Lurker, Thread hijacker extraordinaire
Posted
Full Member
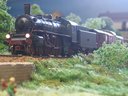
I posed the two Hornby 4-wheelers with a Bachmann ex-SR 'N' class 2-6-0, 31860, I weathered many years ago. Both vans have been weathered using the same techniques.


Last edit: by SRman
Jeff Lynn,
Amateur layabout, Professional Lurker, Thread hijacker extraordinaire
Amateur layabout, Professional Lurker, Thread hijacker extraordinaire
Posted

Banned
Cheers, Gary.
1 guest and 0 members have just viewed this.