Jeff's (SRman) work bench and projects
Posted

Full Member
For some reason the Zs seem to have remained moderately clean, judging from all the photos I can find, although those cab side windows seem to have become almost opaque very quickly indeed.
Jeff Lynn,
Amateur layabout, Professional Lurker, Thread hijacker extraordinaire
Amateur layabout, Professional Lurker, Thread hijacker extraordinaire

Posted
Full Member

Jeff Lynn,
Amateur layabout, Professional Lurker, Thread hijacker extraordinaire
Amateur layabout, Professional Lurker, Thread hijacker extraordinaire
Posted
Full Member
 thumbs:thumbs
Terry
Posted
Full Member
I hope I haven't bored everyone with the blow-by-blow account of this one.
:cheers
Jeff Lynn,
Amateur layabout, Professional Lurker, Thread hijacker extraordinaire
Amateur layabout, Professional Lurker, Thread hijacker extraordinaire
Posted
Inactive Member
That blow by blow account will help other,s if they decide to have a go at loco building.
Thanks.
Derek.
Posted
Full Member
The resin parts are all packed individually in separate resealable plastic bags, all contained within a larger resealable bag.
I purchased four of these kits from Smallbrook and their Michael Rayner was extremely courteous and helpful, even when I asked question s that were already actually answered on his website (the scrolling wasn't working using Google Chrome so I didn't realise the info was there!).
I have taken a couple of quick snapshots, showing two of the kits partially assembled but unpainted and a third one in its component pieces.
From left to right: LSWR 18 ton road van to D. 1542; 20 ton LSWR goods brake to D. 1549; and the almost identical Metropolitan Railway 20 ton van (in pieces). The latter comes with optional duckets as they were removed in later life. Not shown is the LSWR 10 ton goods brake to D. 1541 that I also bought.


I don't envisage these kits taking long to finish properly but at the same time, I won't be racing through them as I did with the SR Z class locomotive - I was on school holidays then!
Jeff Lynn,
Amateur layabout, Professional Lurker, Thread hijacker extraordinaire
Amateur layabout, Professional Lurker, Thread hijacker extraordinaire
Posted

Full Member
I'm curious to see how the underframe and brake gear/rigging is treated.
John
John
Posted
Full Member
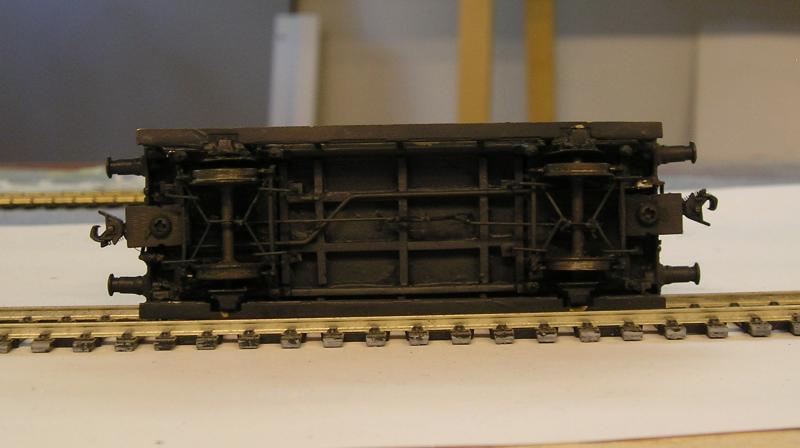
The brake blocks are moulded in line with the wheel treads as part of the rather complex one-piece underframe moulding.
I do like to model complete trains so having acquired the various R-T-R pre-grouping locomotives and a good many private owner and pre-grouping operator wagons, I realised that there was a dearth of suitable R-T-R brake vans. Hornby did an LBSCR brake van a fair few years ago and I have one of those in LBSC livery and two in SR livery, but no one seems to have done any others.
There are some suitable kits of varying complexity, with the LCDR/SECR one from Roxey being by far the most complex I have done myself. The Cambrian 'Dance Hall' vans are nice but date from near grouping time (I have built two of them as they were in BR days). These Smallbrook Studio kits seem to fit the bill well too, being reasonably easy to build and reasonably priced for what are cottage industry items. I believe there are some brass kits for some of the same vans available too but the manufacturer escapes me right now.
Jeff Lynn,
Amateur layabout, Professional Lurker, Thread hijacker extraordinaire
Amateur layabout, Professional Lurker, Thread hijacker extraordinaire
Posted
Full Member
I agree, there has been a shortage of RTR brakes, although, for me, Bachmann are due to release a pair of ex MR brakes soon.
I have a few kit built brakes as well.
John
John
Posted
Full Member
If I can discern any detail in the photos I have of the LSWR vans, I'll try to fake a few brake components (rigging, V-hangers, etc.). At that time they were all unfitted, of course, so no vacuum cylinders or pipework.
Jeff Lynn,
Amateur layabout, Professional Lurker, Thread hijacker extraordinaire
Amateur layabout, Professional Lurker, Thread hijacker extraordinaire
Posted
Full Member
As for brakegear, here's a pic of a Chivers LMS brake that I did ages ago. The kit had no underframe detail so I scratchbuilt it:

I got the layout from Essery's LMS Wagon Drawings (there are 2 volumes), which is an invaluable resource. I reckon brake gear was pretty much similar across the companies since form usually follows function. I used the Mainly Trains brake gear etches for yokes and clasp brakes. Note the vacuum pipe, this van is through piped (stand pipes painted red) - no AVB but the guard would have control of the train's brakes. Manual van brakes would be actuated from the center of the van via a wheel and worm gear that would act on the gubbins in the middle. Safety loops were simply brass wire.
John
John
Posted
Full Member
:thumbs :thumbs :thumbs
Jeff Lynn,
Amateur layabout, Professional Lurker, Thread hijacker extraordinaire
Amateur layabout, Professional Lurker, Thread hijacker extraordinaire
Posted
Full Member
The class 450 was produced using a Bachmann class 350/1 with slight modifications and Electra Railway Graphics vinyl overlays (see earlier in this topic for more details if you are interested). I have now fitted legomanbiffo's sound (from DC Kits). At this stage I have only a single round 4 ohm speaker fitted with no sound chamber but I have a few ideas to improve on this - the biggest problem is lack of space. The initil start up has the air compressor going and pantograph contacting the overhead, so that bit isn't appropriate for the third rail only class 450 but I can live with that!

The other project was to add the LEDs to my class 73, which had previously had Howes' sounds fitted some time ago (it's still an older LokSound v3.5). Bryan of Howes pre=programmed the Aux 1 output for some random flashes and sounds attached to functions F10 and 11. The locomotive has a completely repainted Lima body with a few extra details (correct jumper cables for a 73/0, for example) mounted on a much newer Hornby DCC-ready chassis. I do need to add a small shield where the LEDs project down through the chassis just above, and inside of, the bogie frames at the unpowered end.

 Last edit: by SRman
Jeff Lynn,
Amateur layabout, Professional Lurker, Thread hijacker extraordinaire
Amateur layabout, Professional Lurker, Thread hijacker extraordinaire
Posted
Full Member

Jeff Lynn,
Amateur layabout, Professional Lurker, Thread hijacker extraordinaire
Amateur layabout, Professional Lurker, Thread hijacker extraordinaire
Posted
Full Member
After grinding away a bit, Western Talisman has completed a circuit of the outer radius facing in one direction without derailing but failed when turned around 180 degrees. This means I am on the right track (a pun??) but more work is required. Once complete, I'll paint and weather the filed edges to disguise them and blend them back in.


Jeff Lynn,
Amateur layabout, Professional Lurker, Thread hijacker extraordinaire
Amateur layabout, Professional Lurker, Thread hijacker extraordinaire
Posted
Full Member
The real class 92s used a very similar body shell to the 60s and after examining the 92 shell and 60 chassis, I decided that it would fit, provided I removed the PCB. I also found after test fitting that I needed to grind a little metal off the two metal 'towers' along the edges f the chassis block - only about 1 millimetre was removed.
The body shell, cab interiors and lighting blocks fitted very neatly , with a small amount filed off the mounting spigots and spacer moulded on to the clear plastic lighting blocks..
Next I have had to remove the class 60 fuel tanks, compressors and battery box mouldings, then cut off the class 92 electric equivalents file down those to fit the 60 chassis. I fitted one of the choke mouldings (I think that's what it represents) to fit over the metal ridge on the chassis (also ground down a bit). The other bits still await filing and fitting but I have made good progress, considering I only started this on Christmas Day and it is now Boxing Day!
I have to rewire the beast but that's not difficult. I intend reusing the small PCB with resistor and diode from the class 92 but if that doesn't work, I have plenty of resistors suitable to wire each end's lights separately to the decoder white and yellow wires.
Here is a photo posed on the temporary workbench. I'll post one of the chassis separately next time and of the finished product when it is done.
I have already added the etched tunnel rings and will shortly be ordering the Shawplan BR arrows and Charles Dickens nameplates.
I'm looking forward to having a class 92 model that will actually run very smoothly and haul trains that suggest the 5,000-odd horsepower available on third rail!

Jeff Lynn,
Amateur layabout, Professional Lurker, Thread hijacker extraordinaire
Amateur layabout, Professional Lurker, Thread hijacker extraordinaire
Posted
Full Member
I wired the chassis back up, initially for a quick test on DC power, which involved tack soldering the feed wires to the brush wires. It ran perfectly, so the next step was to wire in a decoder. I chose a TCS M4 that I happened to have lying around. While I am only using two functions at the moment (for the headlights), it leaves the way open to improving the lighting later with separately worked tail lights or cab lights, if I so choose. One correction from the last post: the PCB I referred to did not, in fact have a resistor; it had two diodes and the actual lighting is provided by incandescent grain of rice bulbs. This meant I could discard the PCB completely from this project and wire the lights directly to the decoder.
The presently unused purple and green wires were left intact and secured out of the way. The blue, yellow and white wires were also tacked temporarily out of the way and the red and black wires were shortened and connected to the track pickups and the orange and grey wires were similarly shortened and connected to the brush feeds. I removed the capacitor at the same time. The decoder was secured to the top of the can motor with a piece of double-sided thick tape that also acts as an insulator. I tested again on the programming track, and it all read properly. Address 9222 was allocated (for 92 022).
A quick track test proved it ran very sweetly indeed. You can also see the shiny bits where I ground the height down a little.

After that test, the lights were wired, noting which way the locomotive had run, so the white wire was connected to the forward bulb and yellow to the rear, with the blue common return connected to both.Photo with lights on at the forward end:

… and photo with the light off so you can see the wiring a bit better.

The body was clipped back on and it had its first run around the layout, minus couplings.


The lighting is fairly crude and is crying out to be improved … later! The whole cab is illuminated at the moment when the headlights are turned on, as are the tail lights in white. It works as well as I had hoped, though and that's the main thing.
There are still a few minor things to do. I did fit couplings immediately after the last photo. It could do with some handrails on the ends. The cab interiors need painting, which would also reduce the lighting effect. The body is still sitting about 0.5mm too high on the chassis.
I made a small error with the undergear and stuck one small bit on the wrong side so will fix that later too. I suppose my only other problem with it is that I cannot tell which is the front (for DCC operation purposes)!
Told ya it was a quickie project!

Last edit: by SRman
Jeff Lynn,
Amateur layabout, Professional Lurker, Thread hijacker extraordinaire
Amateur layabout, Professional Lurker, Thread hijacker extraordinaire
Posted

Banned
Nice bit of grafting and a great project for the break. As or figuring out which end is the front for dcc, why not just weather one end and not the other, or place a driver and observer in the front end and only a driver in the No.2 end.
Cheers, Gary.
Posted
Full Member
I have now painted the undersides of the cab mouldings with black, and the outsides of the rear bulkheads with light grey enamel, and that has considerably reduced the light bleed into the cabs. I'll extract the mouldings next and paint the interiors, which should improve things further still.
Jeff Lynn,
Amateur layabout, Professional Lurker, Thread hijacker extraordinaire
Amateur layabout, Professional Lurker, Thread hijacker extraordinaire
Posted
Full Member


Jeff Lynn,
Amateur layabout, Professional Lurker, Thread hijacker extraordinaire
Amateur layabout, Professional Lurker, Thread hijacker extraordinaire
1 guest and 0 members have just viewed this.