Jeff's (SRman) work bench and projects
Posted

Full Member
Jeff Lynn,
Amateur layabout, Professional Lurker, Thread hijacker extraordinaire
Amateur layabout, Professional Lurker, Thread hijacker extraordinaire

Posted
Full Member
http://yourmodelrailway.net/view_topic.php?id=10667&forum_id=10&jump_to=191166#p191166
 Last edit: by RFS
Robert
Posted
Full Member
I chose to use 3 amp circuit breakers even though mine is a 5 amp system. I figured that no single circuit of the layout will be required to carry the full 5 amps. The Underground tracks will have a maximum of three powered units or locomotives on each track, so I may even lower the threshold to 2 amps - I'll certainly be experimenting further, anyway! :)
Jeff Lynn,
Amateur layabout, Professional Lurker, Thread hijacker extraordinaire
Amateur layabout, Professional Lurker, Thread hijacker extraordinaire
Posted
Full Member
I have identified one short section of wiring that may need a little beefing up to make things work a little quicker and more reliably but overall it seems to be OK.
Maybe the idea I expressed earlier will work better - using 2 amp breakers instead. I'll have to buy a couple and try them out.
Jeff Lynn,
Amateur layabout, Professional Lurker, Thread hijacker extraordinaire
Amateur layabout, Professional Lurker, Thread hijacker extraordinaire
Posted

Full Member
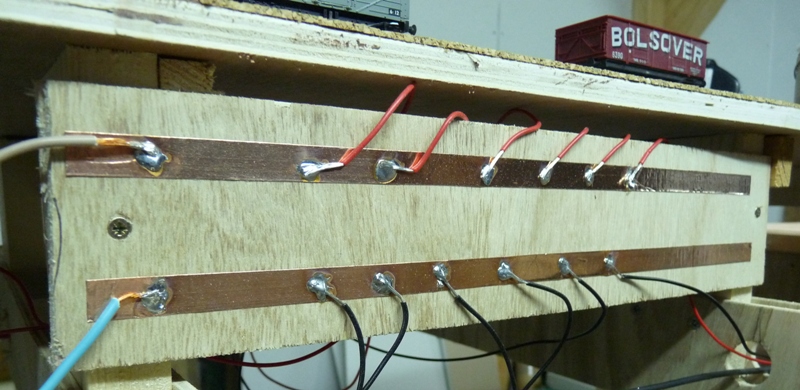
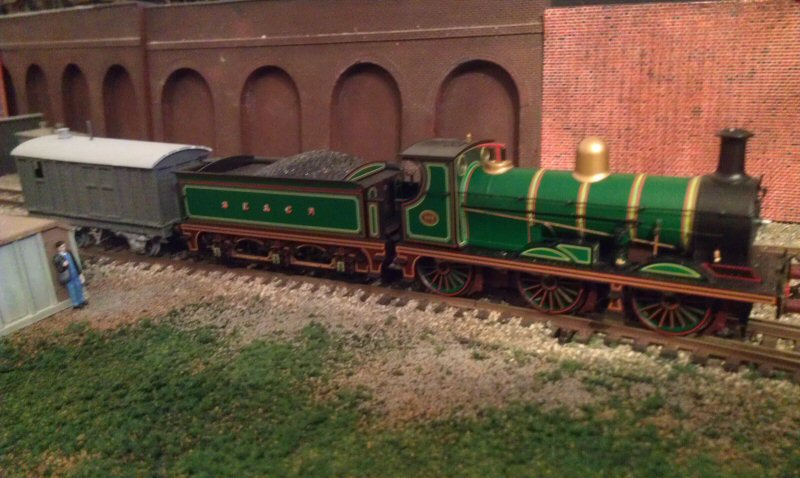
I currently use a system of twin copper tapes to feed the tracks on each baseboard with the inter-board connections being 1.5mm household cables.
The "in" cables are shown here on the left. The "out" to the next "tape junction" are yet to be added. Track feeds are the thinner (16/0.2) black and red wires.
You'll note my "link" wires are well colour coded …….it's just what I could lay my hands on at that moment.:oops::oops::oops:
'Petermac
Posted
Full Member
What is more, they didn't just send me the necessary parts to repair the existing damaged bogie, they sent the whole bogie assembly. What wonderful service!
The process of swapping commenced - I had already fitted the new bogie in place when I thought to take the pictures, so the first one is actually of the damaged bogie.

The chassis with its top circuit board and plate removed (four small screws, one of which I dropped even with a magnetised screwdriver!). The wires have been resoldered and protected with heat-shrink tubing.


The top plate/retainer added back to the top of the bogie tower, after lightly oiling the gears.
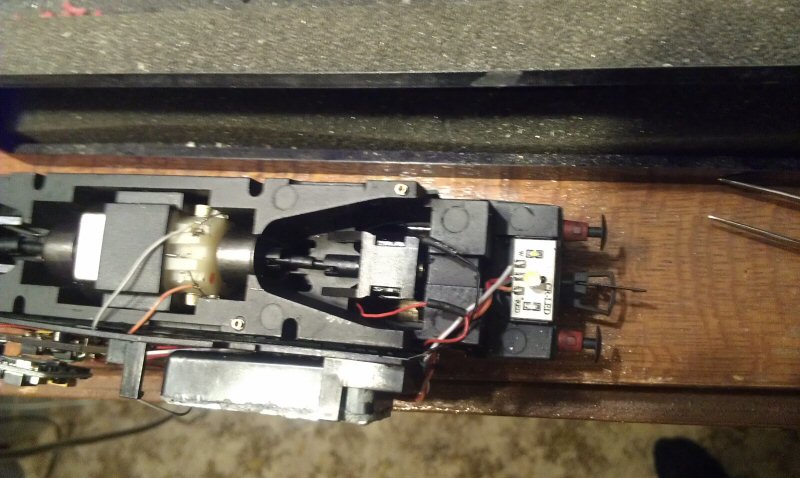
After testing on the programming track to ensure all was well, it is back in servce, as good as new.
Last edit: by SRman
Jeff Lynn,
Amateur layabout, Professional Lurker, Thread hijacker extraordinaire
Amateur layabout, Professional Lurker, Thread hijacker extraordinaire
Posted
Full Member

Jeff Lynn,
Amateur layabout, Professional Lurker, Thread hijacker extraordinaire
Amateur layabout, Professional Lurker, Thread hijacker extraordinaire
Posted
Full Member
Did Toby give you a decent report afterwards ? ;-)
'Petermac
Posted
Full Member
Agnes (SWMBO) is quite jealous that she can call him to come in until she's blue in the face but the moment I get home, he'll trot in quite happily.
Jeff Lynn,
Amateur layabout, Professional Lurker, Thread hijacker extraordinaire
Amateur layabout, Professional Lurker, Thread hijacker extraordinaire
Posted
Full Member

Jeff Lynn,
Amateur layabout, Professional Lurker, Thread hijacker extraordinaire
Amateur layabout, Professional Lurker, Thread hijacker extraordinaire
Posted
Full Member
The solution was actually quite simple. The compensated unit rocks on a single piece of wire threaded through the cradle mounted on the underside of the wagon and the separate cradle carrying the 'W' irons and the wheels and springs. I removed the wire (it was only lightly glued in place), and removed the wheel/axle/'W' iron cradle assembly. I then used a drill the same size as the wire and hole in the wagon mounted assembly and drilled the holes upwards towards the floor, elongating them into slots by a little less than 1mm - this was by trial and error to get the ride height just right.
Once that was done I reinserted the wire through the two assemblies and all was well.The other thing I did was to give the whole body a quick spray of grey undercoat, followed later by a thin coat of Humbrol blue-grey #79 as a base coat, to be followed by more thin coats of the same colour, before the final coat or two of the proper SECR grey can be applied.
I still have to sort out the brakes and brake gear. I have found the diagrams in the instructions almost incomprehensible, together with the brass 'wooden' brake shoes being too thin to be convincing, so I am going to rethink the brake blocks altogether, probably using plasticard, before I nut out the brake rigging.Here are the progress shots; please remember that the colours are by no means final.

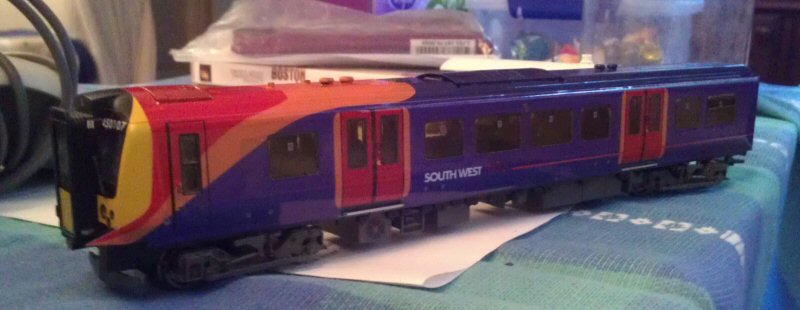
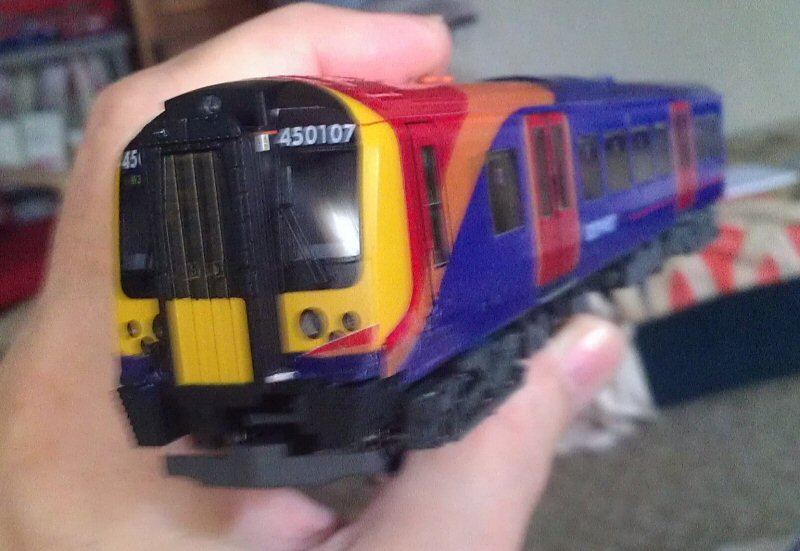
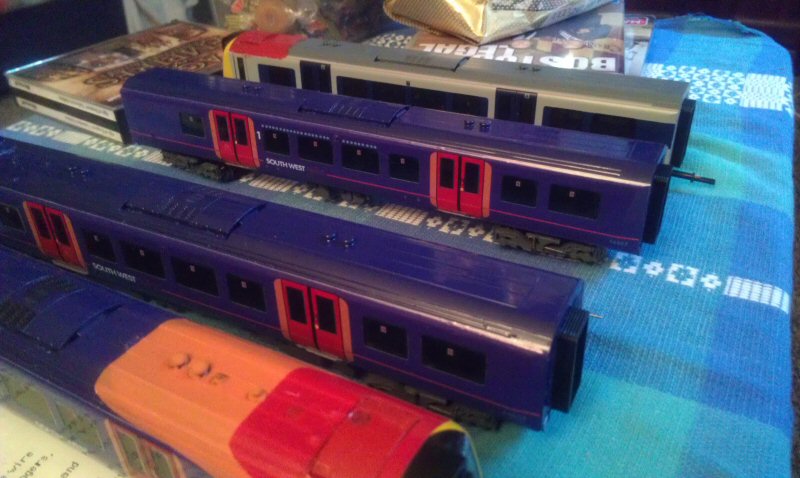
Additionally, the vinyls to convert a Bachmann class 350/1 into a SouthWest Trains liveried class 450 arrived last week. This morning, I did a little preliminary painting on the first driving coach of the Bachmann class 350.
I have also removed the pantograph and associated insulators and conduits/bus bars from the relevant coach, Some holes will require a small amount of filling before painting but as I won't be using the vinyls here that can be done at any stage of the conversion process. I noted from photos of that coach in Modern Locomotives Illustrated that one of the underfloor modules appears to be absent when compared to the 350. I would assume that it was the AC high voltage step-down transformer and equipment. This was a rather nicely moulded separate fitting on the model and was easily levered out with a small flat-bladed screwdriver.
The vinyls come with panels to cover the pantograph well, the red and orange flashes on the roof and include a red panel for the driver's cab air conditioning unit. I decided that I would actually paint the drivers aircon unit red and dispense with the vinyl panel for that. I have also decided that I will paint the roofs, ends and skirts (above the underframes) blue. The photos show the first thin coats of red and blue. These are still very thin and do not necessarily reflect the final colouration of the panels.
The vinyls themselves may be seen on Electra Railway Graphics' website at http://www.electrarailwaygraphics.co.uk/ .Photos are of only the first coach at this point.


I don't know how rapidly I will be able to progress with this project but I will take photos at each stage - hopefully slightly better ones than these!
Last edit: by SRman
Jeff Lynn,
Amateur layabout, Professional Lurker, Thread hijacker extraordinaire
Amateur layabout, Professional Lurker, Thread hijacker extraordinaire
Posted
Full Member
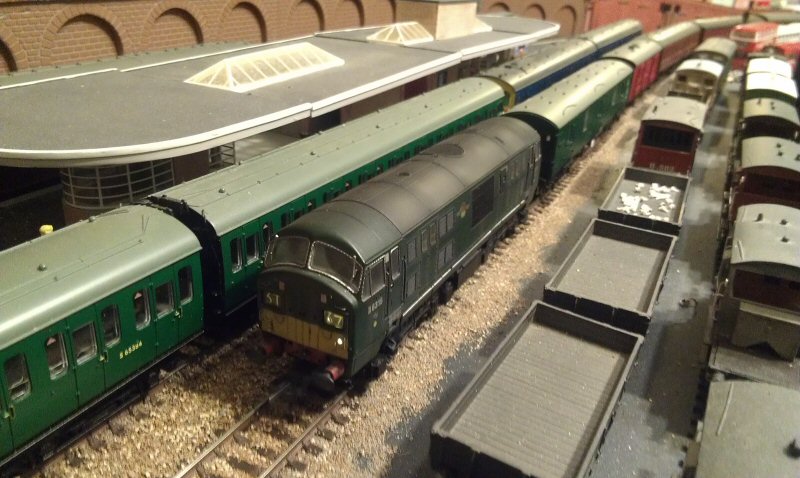
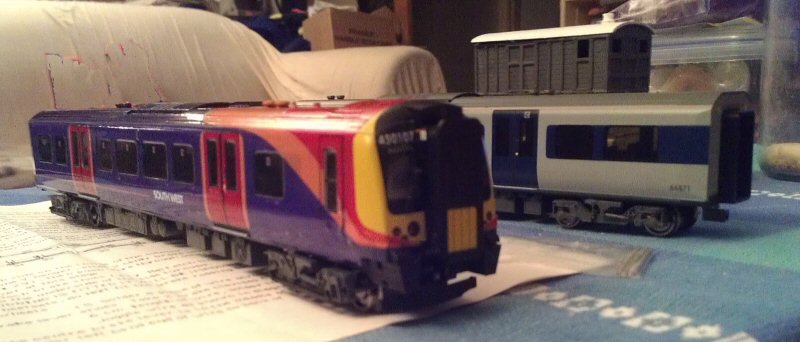
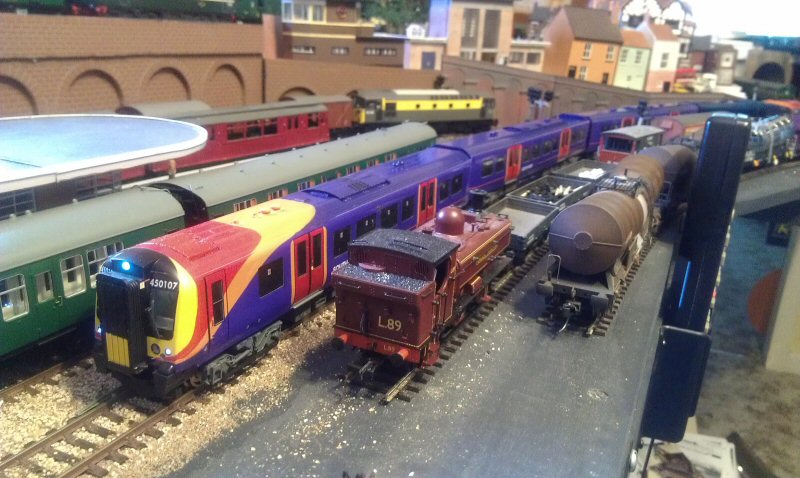
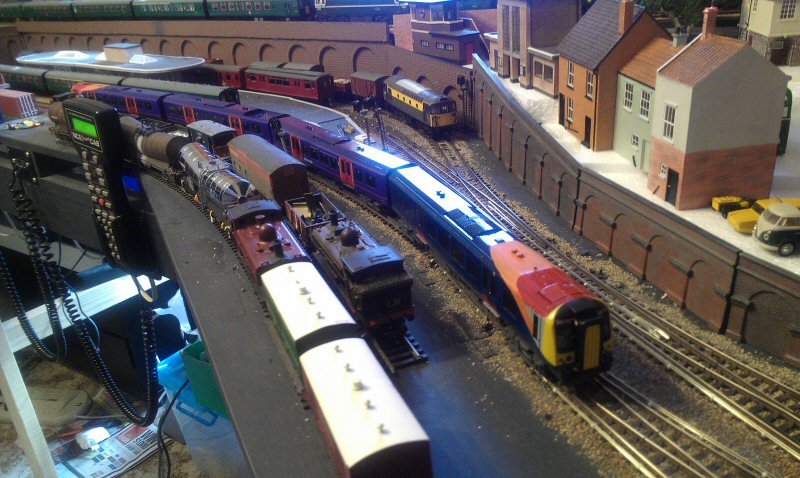
Also visible in the upper photo is the recently repainted Dapol track cleaner which was in Hatton's dark grey and white livery but is now in simplified BR blue and grey livery.
Jeff Lynn,
Amateur layabout, Professional Lurker, Thread hijacker extraordinaire
Amateur layabout, Professional Lurker, Thread hijacker extraordinaire
Posted
Full Member

Still to be added are the footboards and brake gear, the latter being particularly frustrating for me as I can't make head or tail of the instructions! In addition, I don't like the etched brass 'wooden' brake shoes so I think I will have to use them as templates to cut them out of 40 or 60 thou plasticard with wire mounts. Even so, if I don't get this spot on, those full-length footboards will hide a few discrepancies (or short cuts!!).
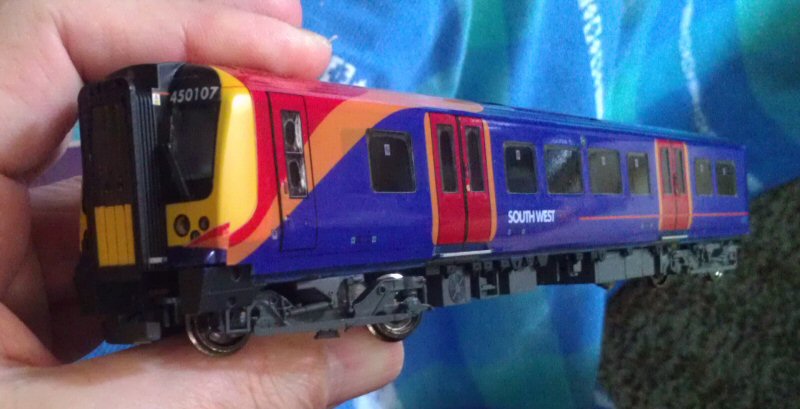
I have also now added the first vinyls to the Bachmann SouthWest Trains class 450 (ex-Silverlink class 350/1). I was a bit stuck for the right shade of blue to match the SWT blue on the vinyls so as a preliminary undercoat for any exposed edges, the inner end and the roof I used a Revell dark matt blue, then followed it with some Precision Paints First Group 'Barbie' blue, which has turned out to be an almost perfect match for the vinyls.
I also pre-painted the leading end of the roof with red and orange to roughly correspond with the Stagecoach 'swoops' so that the holes in the roof vinyl overlay where the vents go through for those colours would match.
I have applied the first vinyls to just the one side at the moment so I could assess which edges need to be pre-painted on the other coaches.The instructions say to apply the roof flashes first so I did that carefully, then added the unit numbers on the cab end, over the windscreens. While I was at it, I added a destination over the relevant windscreen.
There are a few small air bubbles present and I may try the previous method used for Electra Graphics to smooth the vinyl over any raised detail, that is, I'll try the hair dryer heat on it to see if I can improve things a little. Overall though the effect is quite good. From normal viewing distance I think it looks great.One other thing I will be altering though is that front end sweep of the orange and red: the ERG version is set too low so will be cutting it off at the corner and hand-painting the remainder. The red stripe should intersect the lower part of the tail light and there should be a band of blue across the bottom of the cab front (already painted earlier when I did the roof, in fact!).
Last edit: by SRman
Jeff Lynn,
Amateur layabout, Professional Lurker, Thread hijacker extraordinaire
Amateur layabout, Professional Lurker, Thread hijacker extraordinaire
Posted
Full Member
Fixing this will entail a little hand painting although that's not too bad to do. The ERG vinyls take a lot of the drudgery out of doing this livery. For completeness, I will also have to add some red stripes around the inner ends to continue the lower body stripes.
Edit: I took a quick (rushed!) photo of the corrected angle and position for those front stripes. There is too much orange showing still but it gives a better idea of what should be.

As can be seen, in daylight the 'Barbie' blue is slightly different but it's as close as I will get to being correct for now. I think it is better than leaving the roof in the dark grey it left the factory with, and likewise at the inner end it is better than leaving the light grey.
Jeff Lynn,
Amateur layabout, Professional Lurker, Thread hijacker extraordinaire
Amateur layabout, Professional Lurker, Thread hijacker extraordinaire
Posted
Full Member
If the latter, how do you work out where to place them all so accurately …………..:roll::roll::roll:
'Petermac
Posted
Full Member
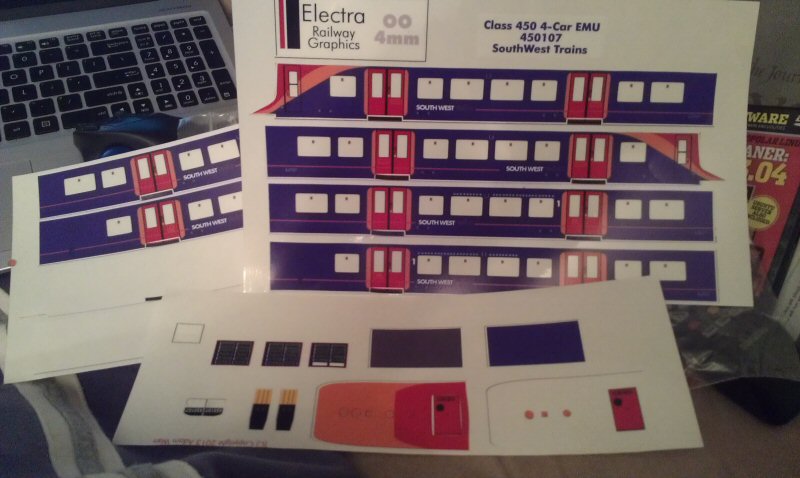
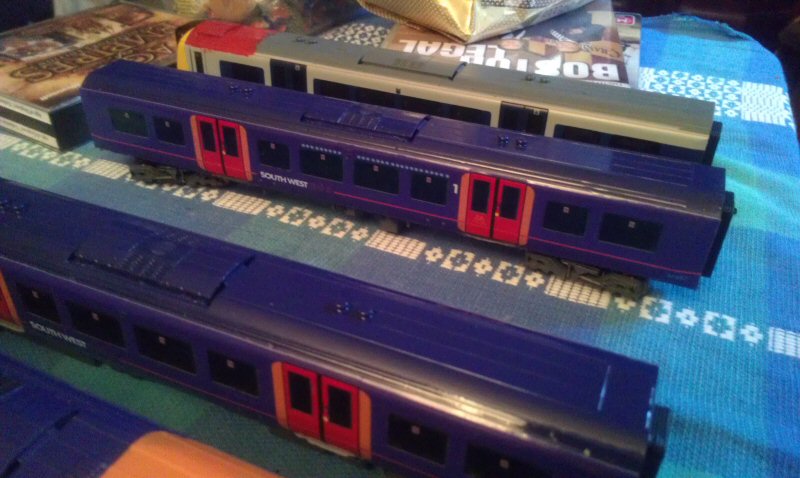
It includes the one-piece side overlays for four coaches (the missing pair from the photo are the ones I have already used, of course!), the roof red and orange flashes, pantograph well blanks, gangway door covers, unit end numbers and a heap of destinations in dot matrix style. The vinyls are actually clear so the windows go straight over the existing ones on the model and include the interior stickers ('no smoking' and the like), all pre-cut and self-adhesive so they only have to be peeled off the backing sheets.
Incidentally, I have now done the second side on the first coach. It went on more quickly than the first (practice makes perfect!), although I think I may have stretched it ever so slightly so that the windows on the second set of doors didn't quite line up perfectly and the last two side windows had the tiniest amount of the factory colour showing at the lower edges. The discrepancies are very small and won't show when in service on the layout, especially as the underlying colour of the doors and window surrounds was dark blue anyway.
Last edit: by SRman
Jeff Lynn,
Amateur layabout, Professional Lurker, Thread hijacker extraordinaire
Amateur layabout, Professional Lurker, Thread hijacker extraordinaire
Posted
Full Member
I have added a little of the 'Barbie' blue along the bottom edges of the sides, retouched the 'swoop' stripes around the front and touched up the black on the 'buffers' and gangways. The stripes are sill very rough and the vinyls require trimming around the tail lights but it is taking shape.
That isn't a stain or patch on the sofa behind; I doctored the photo to remove a distracting red and blue bag on the sofa!
Jeff Lynn,
Amateur layabout, Professional Lurker, Thread hijacker extraordinaire
Amateur layabout, Professional Lurker, Thread hijacker extraordinaire
Posted
Full Member
My back has been healing slowly so I can spend longer per session at the workbench but I am still only dealing with one coach at a time. I have been painting the whole coach with a thin coat of dark blue as a primer coat (the driving coach used a Revell colour but all subsequent ones are using/will use Humbrol #15. This is followed by a coat of the 'Barbie' blue on the roof and ends and lower solebar panels.
I have now realised that the red of the doors stops a little short of the footboards so I will be painting the door bottoms red before applying the next vinyls and will have to do the existing two coaches as well.
Anyway, here are two hurriedly taken photos of the pair done so far. I do still have to redo the pantograph well and file, patch or fill the holes left over from removing all the 25kV equipment.

Last edit: by SRman
Jeff Lynn,
Amateur layabout, Professional Lurker, Thread hijacker extraordinaire
Amateur layabout, Professional Lurker, Thread hijacker extraordinaire
Posted
Full Member

 ​
​And another two with the vinyls now applied to the third (composite) coach. I scraped the existing "first class" wording off the windows with a wooden cocktail stick before applying the vinyl sides. I have also altered the line of the red swoop on the existing driving car plus added a bit of red at the bottoms of all the passenger doors.
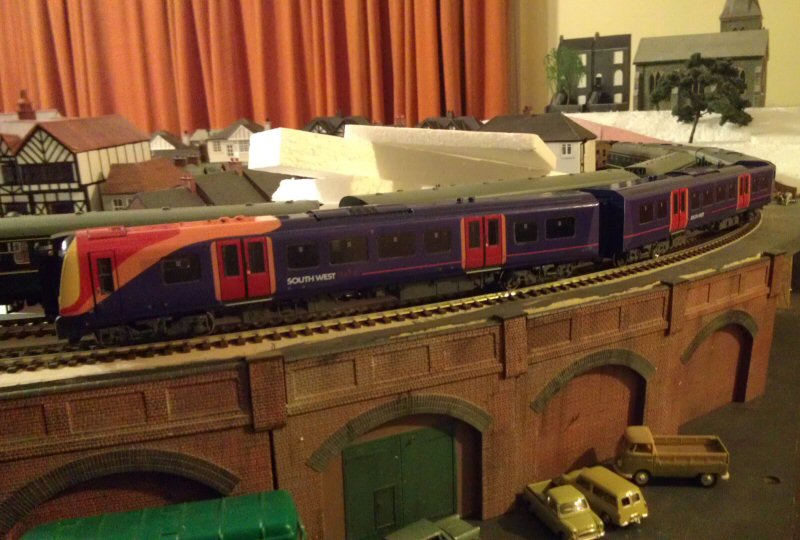
One driving coach left to do then I can take a few photos of it in service as a complete four-car unit. I will see about filling and patching the holes in the pantograph well in due course.
Last edit: by SRman
Jeff Lynn,
Amateur layabout, Professional Lurker, Thread hijacker extraordinaire
Amateur layabout, Professional Lurker, Thread hijacker extraordinaire
Posted
Full Member
I have also tweaked the swoops a little on the other driving coach, angling the orange (or tan, as Stagecoach prefers!) so that more blue shows up over the leading pair of passenger doors. I have also now cut the striping clear of the tail light, using a sharp scalpel.
Only some 'Barbie' blue to paint on now (EDIT: not forgetting to add the black on that gangway end too) and the last coach will be ready for its vinyls to be applied. I'll have to do the same to the striping/swoops at this end too.
Last edit: by SRman
Jeff Lynn,
Amateur layabout, Professional Lurker, Thread hijacker extraordinaire
Amateur layabout, Professional Lurker, Thread hijacker extraordinaire
1 guest and 0 members have just viewed this.