Dean 0-6-0 Outside frame goods
Posted
#244204
(In Topic #13490)

Full Member
Messing around with a Keyser kit
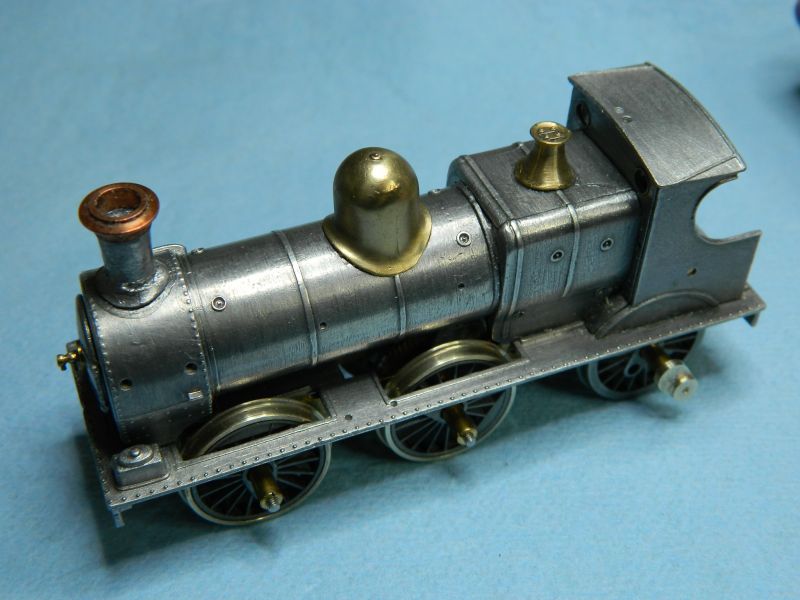
Hi All,This project was started quite a few years ago, and has been gathering dust ever since then. Onward and upward, time to clear the shelves of projects and get them on the rails.
The locomotive in question is a Keyser white metal kit of a Dean 0-6-0 outside frame goods locomotive. Considered to be a cut above Triang/Hornby when it came out, and the detailing is still good by today's standards.Rumor has it that some RTR outfits actually used Keyser kits when making their moldings. I'm sure that never happened. Although that was told to me by a Banbury bloke who knew a bloke who worked at the K's foundry. Gossip of course. The wheels in the kit and the motor are both rubbish, straight into the bin they go.
So what abot the prototype? This was a class of 20 0-6-0 tender goods engines with double frames, under-slung springs (class 2361), and built in 1885-1886. Direct descendant of the Armstrong Goods. Keyser chose to do one with a Belpaire boiler, no superheat, which probably dates the protoype to somewhere around 1900-1920. The box said "Dean Goods" - nobody is perfect. This class should not be confused with the Dean Goods 0-6-0, class 2301, built contemporaneously with the 2361 class. Dean (an aficionado of double frames and an extremely conservative CME) wanted to make sure the new-fangled single frames would be up to the job. They were. There are several pictures of this class running on the BCDR local pick-up goods, Packer of Chipping Norton, Photographer extraordinaire of matters relating to the railway, seemed found of them.
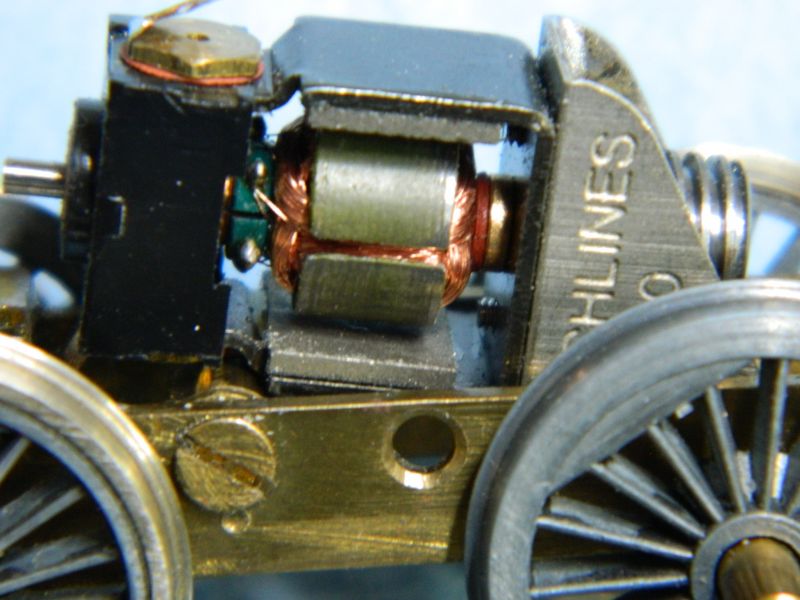
I had already converted the frames to EM gauge by the simple addition of some brass washers at the ends of the spacers, and have had it running with a Branchlines motor and gearbox along with I think a 50:1 gear. No compensation on any wheels, that may come. Not too sure about that motor either, feeble magnets but there is not much room available. I had also used a mix of modern Markits/Romford wheels (insulated) and old half insulated ones. I found some insulated Romford wheels of the correct diameter in the spares, so they will get put on. EM axles, extended axle extensions and "Deluxe" outside cranks are all from Markits. They look the business, as opposed to the run-of-the mill regular outside cranks. Markits axle design solves the issue of quartering without any effort.
,
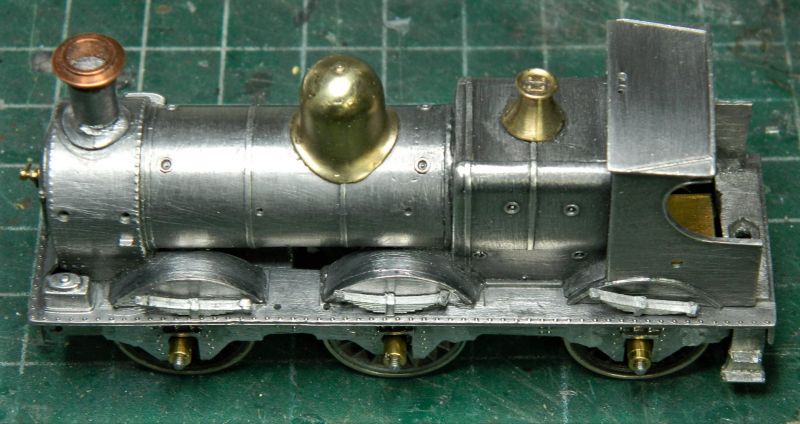
The body has been given a scrub with a fine brass brush. The chimney is the original casting with a new brass capuchon. Poor casting with a void on the bottom, I'll use some epoxy mixed with white metal dust to fill that in. The dome and valve cover are also in brass and replace the original white metal castings. Not quite sure where they came from, Branchlines probably.
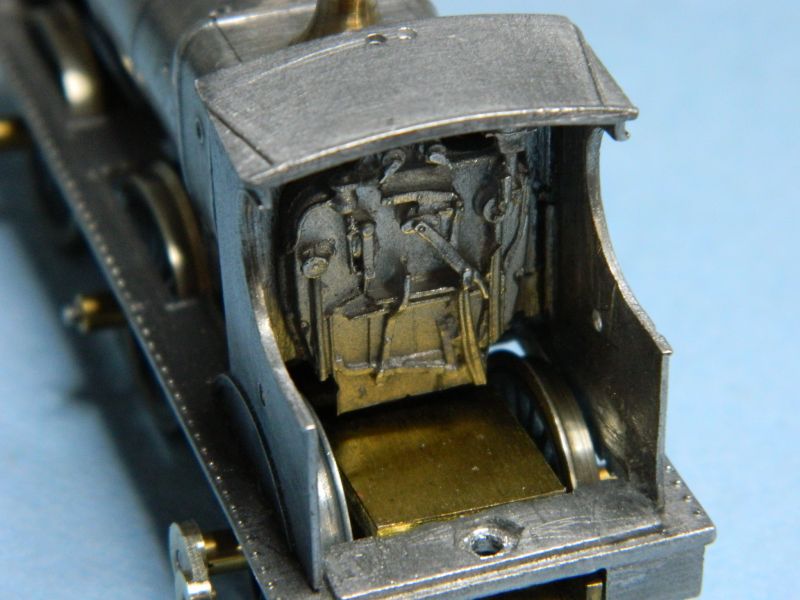
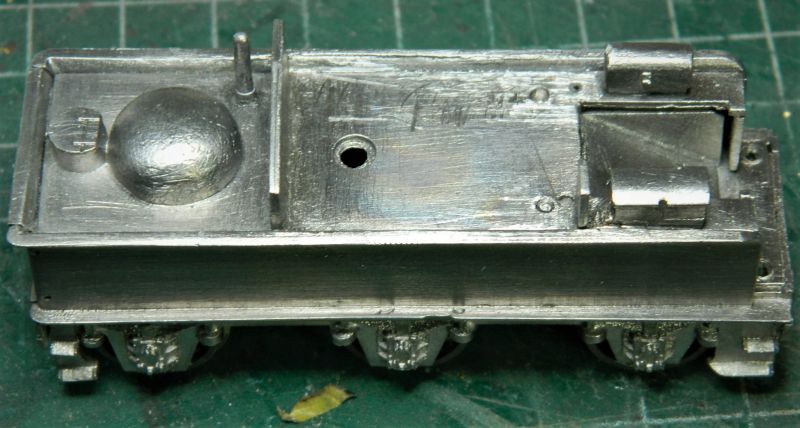
No splashers fitted as yet, the wheel wells were designed for OO gauge, and have been enlarged out. Still thinking about that one, along with the splashers inside the cab. Truth be told the plates are probably not wide enough. Ahh, the joys of 4mm scale, OO gauge, and EM conversion modeling. Plus some casting shrinkage (Keyser kits can be 5-10% smaller than the prototype). Good job I'm not doing P4! The back head casting was not in the kit, it is an Alan Gibson Workshop "Small GWR" white metal casting. That will be fun to detail. "Steady hand there lad!" No back head would mean a bigger motor and flywheel, but it's a bit obvious sitting in the middle of the cab whirring around like a banshee. Nobody seemed to worry about itsy bitsy details like this back in the day.
The outside frames are an issue. They are a tad too fragile (wavy in the wind castings), although nicely and correctly detailed (I counted the wivets, both sides), and will need some brass plate reinforcement on the back, and when the lower springs are attached it will be very tedious to remove the wheels (PITA tedious in fact) as the cranks and extended axles will have to come off. More thinking required on this one. I found some GWR whistles and some handrail knobs in the spares. I might even have a number plate somewhere (2370 would be nice). Came across a packet of Maygib sprung tapered Dean buffers as well. Plus a water scoop for the tender.
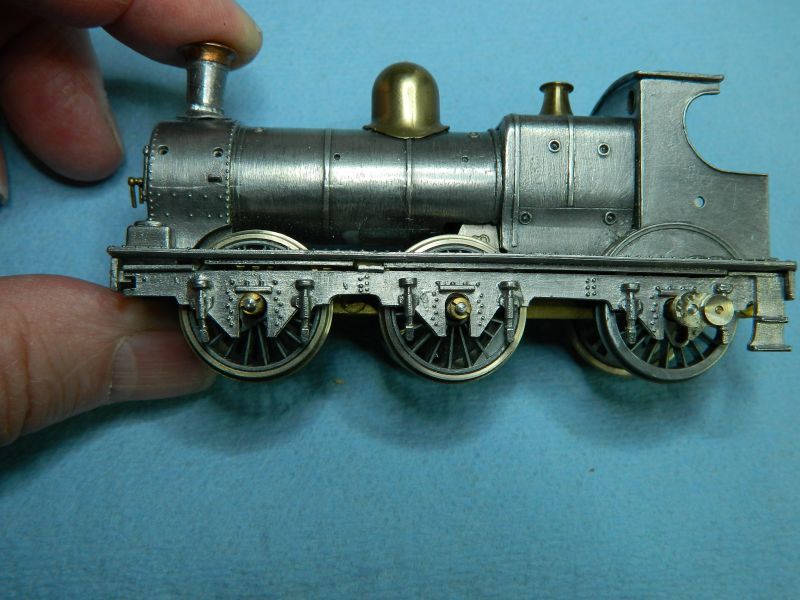
So here are some photos of the current state of play. More on the tender and the continuing engine build to come.
One day back modeling the GWR and it's already fun, fun, fun.
Nigel

©Nigel C. Phillips

Posted
Full Member
Looks good Nigel. :thumbs I still have nightmares about trying to build K's locomotive kits. I wonder if anyone actually managed to complete one without having to resort to substituting most of the parts. What a revelation when I discovered Wills' loco kits. Better in every way.
Terry
Posted
Full Member
Thanks. I do like the challenge. The white metal bits are not too bad, including the details , usually very little fettling is required. I have had worse from some of the old Wills. The motor, even the Mk. 2, is useless, and the wheel plastic after all these years just crumbles. What I do like about the design are the frames. Basic they may be, but robust, no soldering, OO to P4 gauge with the right washers, and square.
With a decent motor/gearbox and replacement wheels they run fine, even with DCC. Of course having the motor in the cab is an issue today. Cardan shafts to a motor in the tender would be one possibility of course.
Nigel
©Nigel C. Phillips
Posted
Full Member
Hello Nigel.
A K's model of which I was particularly fond was the loco sand wagon (Great Eastern possibly?). There was something about the look of the shed like apex roof which appealed to me. Easy to build and quite heavy, being all white metal of course.
Regards, Terry.
Posted
Full Member
Oh well back to the asylum
Posted
Full Member
Old molds never die, they just lose definition and develop flashing.
Nigel
©Nigel C. Phillips
Posted
Full Member
Yes, I knew Ray Rogers in of The Loco Shop in Kenley. He used to smoke whilst working in the shop so it was usually quite smoky. He was a nice gent (ex-policeman) and was always happy to chat. I once considered scratch building a Brighton Terrier and he kindly gave me, at no cost, various whitemetal mouldings which he had left over after his models went to Roxey. Of course, I never got around to building the model. RIP Ray.
Terry
Posted

Full Member
'Petermac
Posted

Full Member
Michael
Posted

Full Member
Sorry to have to see your sugar cane plank go so soon, but great to see you back with 4mm GWR and what a great start with such an interesting loco build.The outside frame GWR designs are full of 19th century character and you are bringing the old Keyser kit to life with skill and obvious joy, as you are having so much fun!
I've also admired the outside frame locos and was lucky to find a 1076 Buffalo 0-6-0 pannier tank by Gibson, now residing with a few others in the loco build box and am looking forward to getting to grips with it when its time comes round.
Thank you for bringing a huge smile to my face with your first post and bon couage with the continued build. I'm watching withn great intertest :)
Best,
Bill
PS Very clear photos

 Last edit: by Longchap
At 6'4'', Bill is a tall chap, then again, when horizontal he is rather long and people often used to trip over him! . . . and so a nickname was born :)
Posted
Full Member
Thanks for the comments. Much appreciated. Keyser kits usually go together without problems, wheels and motor excepted, it is when you go from OO to EM or P4 that the fun starts. Although the same can be said with Bachnann or Hornby RTR conversions.
Fiddling with the chassis last night I realized I had a see-saw. Hmm, sez moi, that ain't proper. Out with the micrometer. Two of the oldest wheels are 21mm in diameter, 4 of the not so old are 20.65-20.70mm in diameter. An "Oh dear, well I never" moment. There looks to be just enough meat on the the older pair to take it down to the diameter of the other 4, if the rim stays attached to the spokes in the lathe. I can but try. If not the hunt is on for some wheels.
My suspicions about the width of the running plate were well founded. Clearly designed for OO. I could widen the plate, but that means widening the cab, buffer beams, tender…Nah.
Not a lot of room twixt springs and wheels. More fettling. Luckily there is a fair amount of meat in the springs, out with the file tonight. I recon a #10 turnout might be ok. And a minimum 60" track radius.
In the mail last week was a partially completed, brass scratch build of a Taff Vale 0-6-2, 4mm scale, P4 gauge, with a fully compensated chassis. Prototype was built just before amalgamation, the model is of the Swindonized version, pretty much fine-scale. More rivets than you can shake a stick at. Should be fun. P4 to EM chassis rebuild, make some hornblocks (that will definitely be interesting), source some wheels, I have a Mashima motor and gear box somewhere, source a Belpaire boiler backhead….
The Buffalo kit is still available, I really fancy doing the broad gauge convertible one. As well as the Dean single 2-2-2 convertible. That needs a complete model plus a spare body and some rear wheels.
Nigel
©Nigel C. Phillips
Posted
Full Member
Bit more progress.
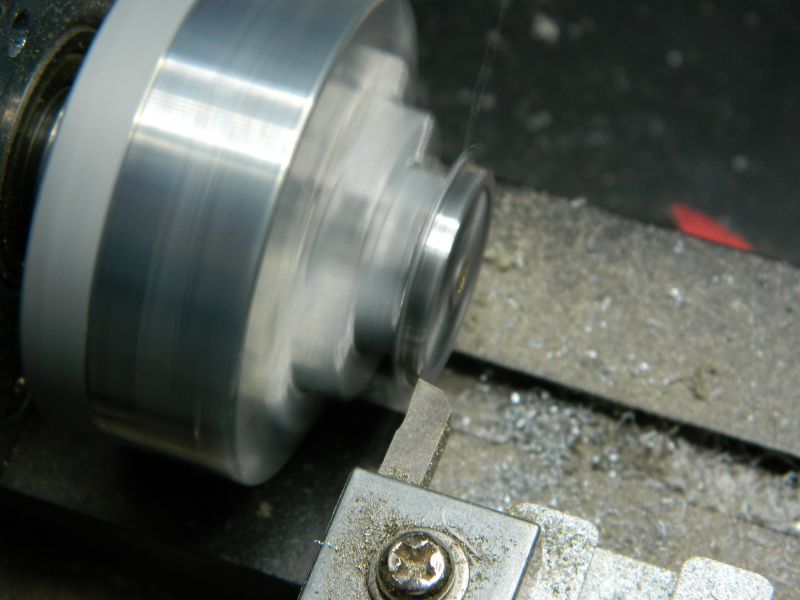
The diameter of the 2 oversize wheels was taken down on the lathe to correspond with the other 4. Only one tread came off, back on as a friction fit, dab of Loctite or CA will keep it in place. Phew, a big sigh of relief!. Markits production is erratic at the moment, getting this diameter wheel was going to be difficult. The lathe is a cheap one from Amazon, shoe box size, accurate enough for this sort of work. Soft metal or plastic, definitely not for steel or cast iron. I need to find a milling attachment to make some hornblocks. The rims on Markits/Romfords drivers are nickel silver (the center is I believe ZAMAC/MAZAC), I finished off with some #800 then #1000 grit. Took the rims down a tad as well. Pictures show the lathe as well as a rim being reduced. No more seesawing.

.Next up were the wheel splashers. Fiddly, as I had increased the hole in the running plate to accommodate the increase in gauge from OO to EM. The gaps will be filled with 2-part epoxy and white metal dust. (I keep a bag of this made from scrap white metal). The 2 holes are for some grab bars, they will need filling and the bars moving out a bit.

Nigel
©Nigel C. Phillips
Posted
Full Member
In spite of slowly progressing on the engine body, the issue of attaching the under-slung leaf springs and still being able to get the chassis and wheels off still remains a vexing challenge. Trial fitting showed that there was very little space between the wheel rim and the back of the leaf springs, one of the consequences of going from OO to EM. Just getting the chassis out will mean disassembling the outside cranks, the axle extenders and the wheels. And trying to not knock the spring supports off, which snap as soon as you look at them. Plus any brake gear I put in has to be removed as well. Hmm. Must be a better way.
Sauntering through Russell's book on Great Western Engines it struck me that I would be better off doing some relatively minor body modifications (cab sides and sand boxes) and coming up with an Armstrong Class 388, with the leaf springs on the running plate. This will mean new springs in brass as they are quite different to the ones in the kit. Lots of variations in the class, for example the top feed clacks, coal rails on the tender, dome height, sand boxes, etc, so the Dean basic body works well. It will need a new tender, the one in the kit is too wide for the springs. The City class one works well, so it looks like I will need a Dapol kit and a chassis. Or even better a tender from the Bachmann City class.
The first photograph shows what the kit is meant to look like (photo reversed, hence the funny number), the second is of the Class 388 Armstrong Goods fitted with a Belpaire boiler in 1913 (Belpaire boilers started to be fitted around 1902). The class was built between 1866 and 1876 and several were still running up to the early 1930's. Better time frame for me than the Dean version. With a non-Belpaire boiler I could be back in the 1870's. That's a thought to ponder.
Nigel
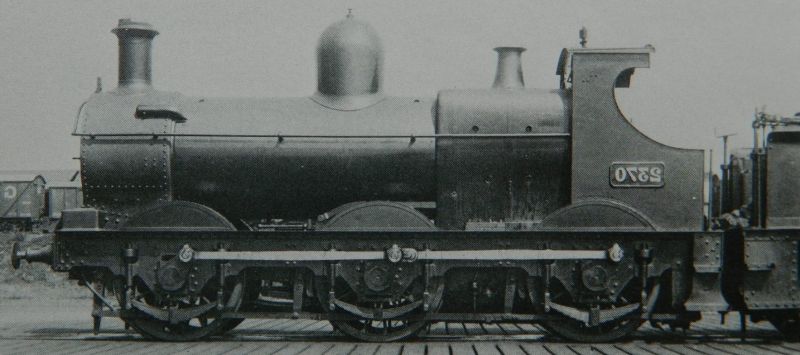

Photos taken from J.H. Russell, 1988, OPC: A Pictorial Record of Great Western Engines, Volume 1. Used in the interests of education and research.
©Nigel C. Phillips
Posted
Full Member
Well, the leaf spring supports are gone (Dremeled!), and some brass ones are on order. Photos show a mock up of the footplate springs using the ones that came with the kit.
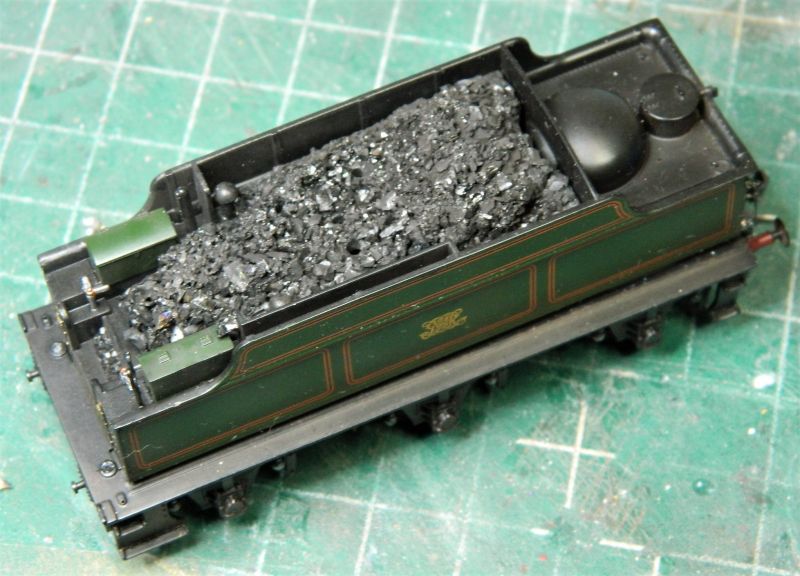
The tender. A very solid lump of white metal with ancient Romford wheels that are inserted and removed by pulling the sides apart. That can only be done a few times before fatigue sets in. The wheels are sound and in good condition. Soldered body construction (looks more like I welded it given the thickness of the parts). No frames or brakes.
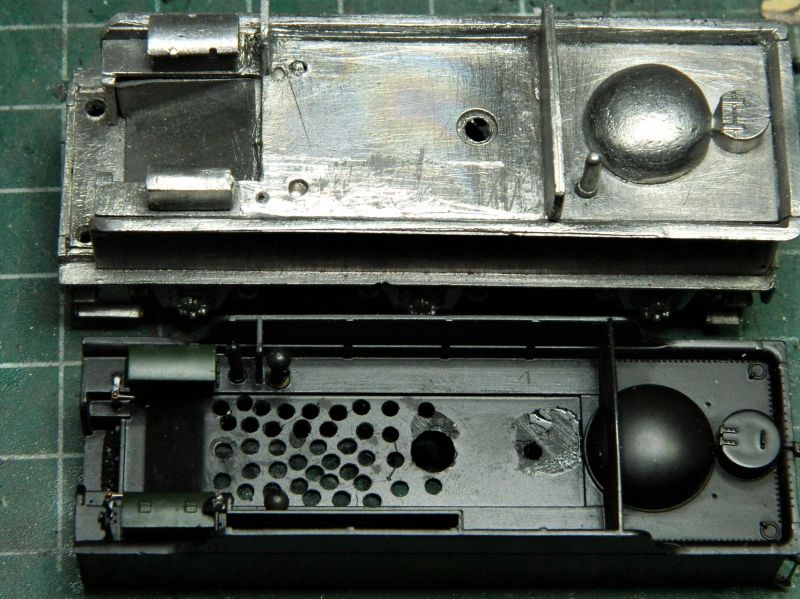
I found the Bachmann City tender, slightly more modern looking than the one in the kit. I think I will backdate it to running plate leaf springs and some coal rails. Brakes will need slight modification with an outside rather than inside frame. Weighs a lot less than the K's effort, and given the limitations on the size of the motor probably a wise move. The wheels are currently OO gauge, split axle design, that will need changing to EM gauge. There is room to do this, but fettling will be required. I might be able to use the current plastic bit in the middle of the axles with spacer washers or spacer rod inserts, if not I will use the wheels from the K's tender. In which case I will have to change the electrical pick-up arrangement. Needs new brake and water scoop standards as well, and the hand rails at the front end are missing. Bendy wire time. The holes in the coal were for when this had a speaker inside.
Interestingly the tender is slightly wider than the K's one. The practice when this happened in real life with narrower engines was to flare out the cab side plates.
Nigel


©Nigel C. Phillips
Posted
Full Member
The representation of the leaf springs above the axle boxes was removed with the Dremel and a plastic specific cutter, tidied up with 100/320/400/800 wet and dry. I have some O-scale rivet transfers that will be used to replace any details lost. Not sure about that peg arrangement for the coupler bar either. Some thought required on that one. Kadees without the pins probably.
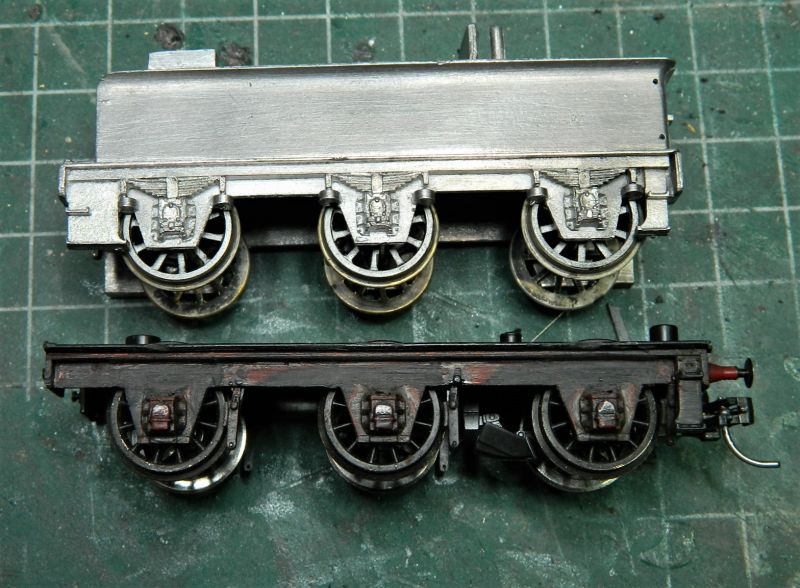
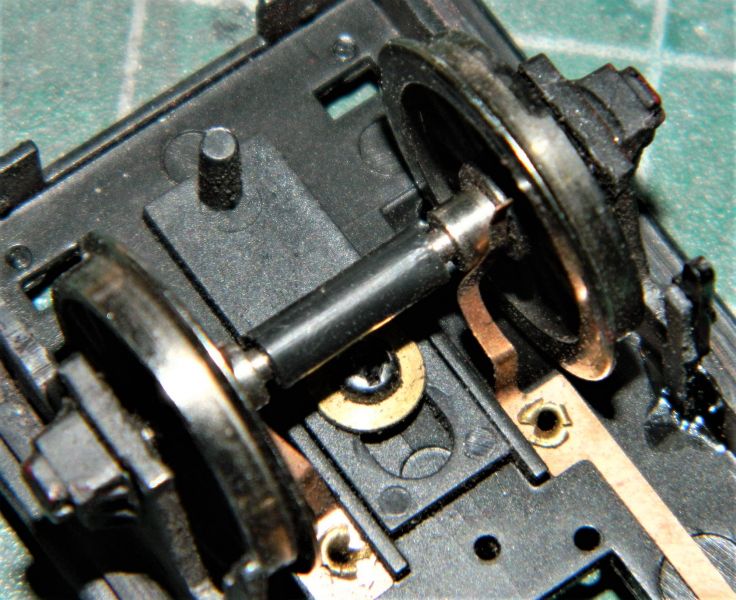
The wheels were moved out to EM gauge, no fettling of the body required. PITA to get them out, the mounting for the NEM coupler and the front steps had to be removed. The front steps need replacing anyway, I have some white metal ones that are more in keeping with the protoype. I used small brass rod spacers inside the axle carrier to keep the gauge It looks like Bachmann scaled the body and brake detailing to 4mm without narrowing the body, the brake shoes could do with moving in a tad, but that will make them it more difficult to get the wheels out. Two brake shoe supports came off during wheel removal, now back on with strengthening pieces of styrene behind to keep them in place. See the second photo, RHS. I will do that for the other two. Note the electrical pickups on the stub axles. The City is a 4-4-0 design, so pickups were installed on the tender and the engine. (The ones on the engine are very problematic, as this the connection between the engine and tender, one reason I stopped using it as a locomotive).
The tender body will need lots of riveting on the sides (quite prominent from the photographs), O scale transfers again. The current paint job will have to go. The coal plate on the water dome will need moving forward to give some space for the return water feed pipe.These tenders had the guard warning bell on the right hand side, that will have to be a scratch built one.
Nigel
©Nigel C. Phillips
Posted

Full Member
Cheers,John.B.:thumbs
Posted
Full Member
Funny, I was just thinking I need to get it finished. Drivers are currently the big issue.
Nigel
©Nigel C. Phillips
1 guest and 0 members have just viewed this.