Waddlemarsh
Posted

Full Member
Somewhere SW of London. Somewhen before today

As layouts develop so sweet spots for photography arise. I may have discovered one here.
The photographer gets a cheery wave from the driver.
In other news I have managed to source fine brass rod for the fence top-rail and this is awaited. More Dart Castings have arrived to allow completion of the halt including large “running-in†name boards, plus gradient posts for placing as one of the last things of all

Posted

Full Member
'Petermac
Posted
Full Member
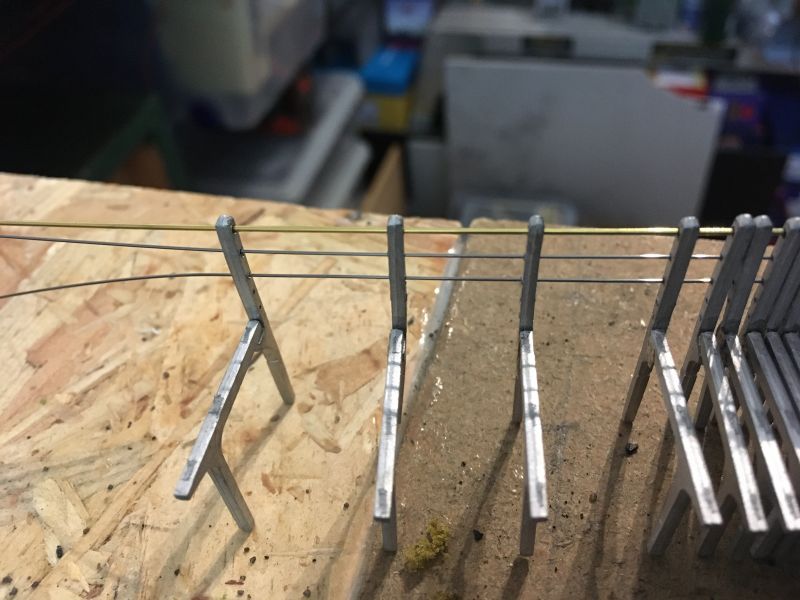
The top rail is 0.7mm brass which helps with stiffness and represents the steel tube used on the prototype. The wires are No.6 piano wire (0.4mm) and the posts are the drilled-out Dart Castings.
One video and two stills show work in progress. The stills illustrate the partially-wired posts then the same with an unfinished platform panel placed on them as it will appear when complete.
https://gwiwer.smugmug.com/ModelRailway-1/Waddlemarsh/n-w7M85z/i-wdjXkDq
 E
E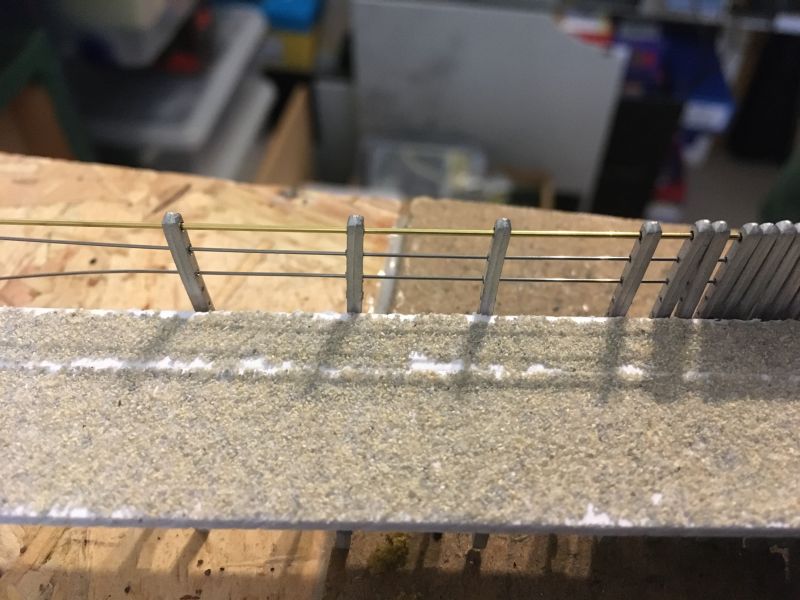
 Last edit: by Gwiwer
Posted
Full Member
Posted
Full Member
It's certainly going to look good when it's done. :thumbs
'Petermac
Posted
Full Member
Posted
Full Member
"Bon chance" as we say here ………………………….
'Petermac
Posted
Full Member
And to ease the frustration of the occasional stubborn one where the wire just doesn't want to go through and insists on a re-bore of the hole. The holes are all fine - it's just the wire being fussy!!!
Posted
Full Member
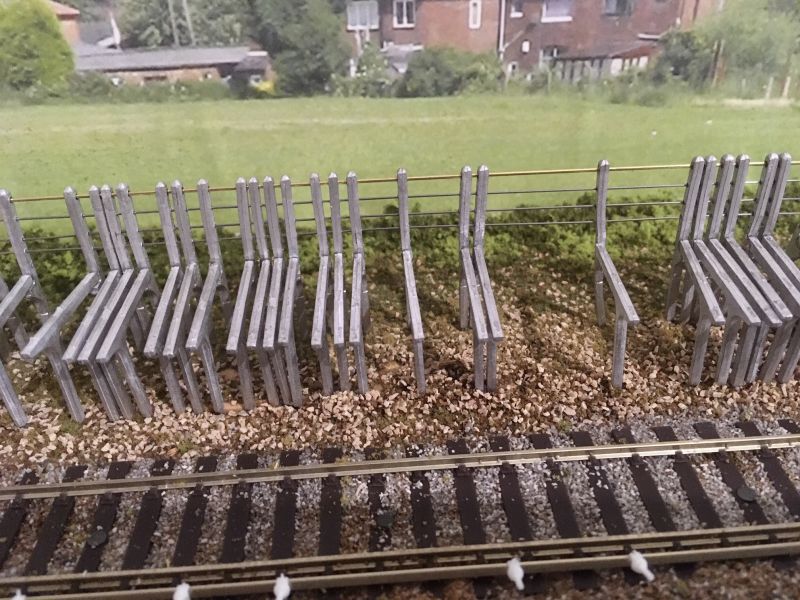
Thank you. The wires and brass rod are significantly over-scale but the finest I could locate. I wouldn't want to work with anything less as there may not have been enough resilience and strength in the materials to cope with the inevitable stresses of construction. Another school of thought was to just have the posts and not the wires on the grounds that they are in reality quite fine anyway and cannot be represented at anything close to scale. That to my mind would look worse than over-scale fence wires.I finally understand the shape of them! They really do look the part, they are worth the effort.
Posted
Full Member
Both platform fences have been fully strung. It wasn't as easy as I hoped and one required a partial second attempt. But they are done.
I threaded the brass rod through the top first as that gives some rigidity. It does bend quite easily as I discovered and the first run had to be replaced when it took on more bends than could be readily straightened out. I then threaded the piano wire through the lower three holes. The first series of posts had four holes drilled for this wire as there are that number of blind dimples on the castings. Examination of prototype photographs from along the Sussex coast shows that only three strands of wire were used plus a steel tube along the top. So three strands of piano wire and one brass rod it is.
Again the first set was a bit of a learning experience and I tried to thread one wire through the top holes then turn it back on itself to feed through the middle. To no avail as it wouldn't pull through and a couple of the castings broke as I applied a little too much pull. Luckily there are some spares. So each wire was cut to just over the required length and fed through individually.
The legs are not yet spaced correctly; the photos show the castings as wired up but they will be spaced at 27mm intervals matching the "concrete" platform slabs.
Before I can position the legs I had to cover the bare boards with a little ground material. Much easier to do that first than to try brushing it in afterwards! So both sides now have ground cover along the platform areas. The backscene took up a little PVA and shows crinkles in the pictures but should dry flat overnight. Also present are a couple of lengths of conductor rail with "pots" slid on but again not yet correctly spaced. These should be fitted to every fourth sleeper but as Peco has too many sleepers for correct scale I shall fit them to every fifth. That should look OK, if not spot-on for accuracy, and avoid an "overpotted" look.
I still have to prove the electrical issues across the crossover are resolved - probably a job for this weekend - and have also had to remove the signal from its position at the Up end of the platform site as it needs to be farther along to squeeze in a four-coach length platform. Space was always going to be very tight but this can just be achieved. Only just. As with most things on Waddlemarsh it will be with a couple of millimetres to spare!

Posted
Full Member
The recalcitrant crossover still isn’t working as it should. Hands-on assistance would be helpful but means, currently, that anyone willing to help would need to collect the unit from me, examine and hopefully rectify it elsewhere then return it. We are not in a position to offer hospitality indoors.
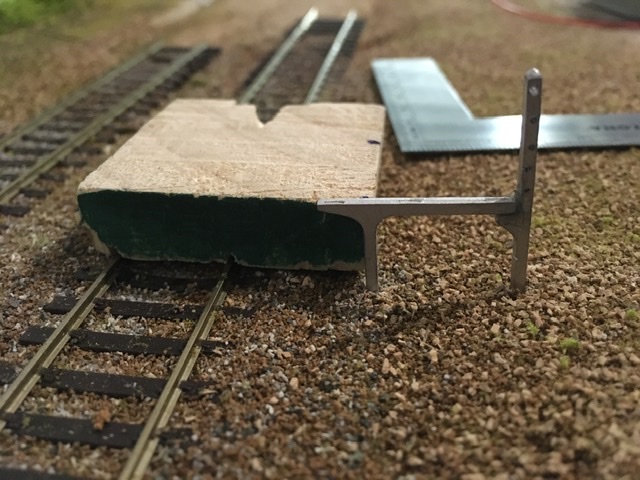
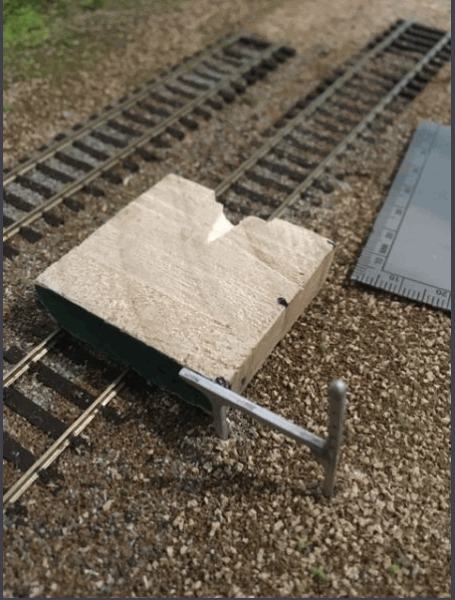
The next phase of station-building requires accurate positioning and levelling of the assembled legs.
For this purpose a block of scrap was formed into a fitting jig. Two grooves were cut for the rails, the block was then cut to height to ensure correct platform spacing from and above the running rails and drill marks were measured out for the next step. Which is boring more holes. Approximately 200x1.5mm. Quicker with the power drill but less destructive and more accurate with the pin vice.

Last edit: by Gwiwer
Posted
Full Member
'Petermac
Posted
Full Member
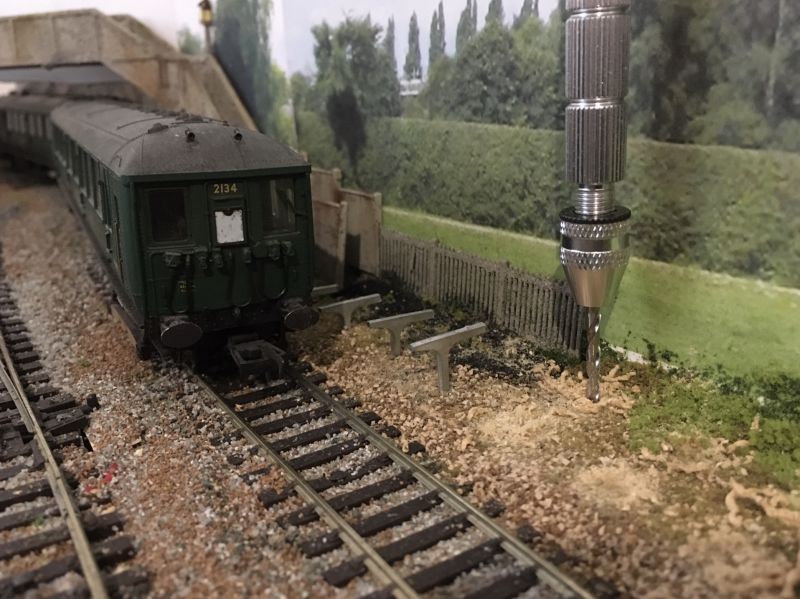
A start has been made on the 200-odd holes required for the platform legs. It's slow progress but it is slowly advancing. There are a couple of spare legs in use as testers to prove the spacing is correct. On the Up side where the footbridge feeds the halt from the housing estate there is very little space and the pin-vice is almost up against the back-scene. That makes it hard to turn never mind the thought of using a power drill! I couldn't get a drill in there if I tried.
Each platform end will have three legs of reducing height to support the ramps; that at the base of the footbridge will also be a reduced width in order to accommodate the footpath access behind it.
Compromises happened in real life. East Worthing, which was built in this concrete halt style, has a short steep wooden ramp, just a plank really, beneath Ham Road bridge where there is insufficient space for a standard one.
The platform width will now be 30mm not the 27mm which my calculations suggest is true scale. This allows for the greater amount of lateral "slop" found on models compared with real trains and which must be allowed for when building structures such as station platforms.
I'm sorry if the images display sideways for you. I cannot rectify this. They have been processed, rotated, saved and everything I can do but this site insists on them being displayed in landscape format. I have also had to re-format the text multiple times to remove stray "space" and [] formatting characters which insist on displaying until removed manually. That is one of the reasons I seldom post here these days; the forum software seems incompatible with Mac products.
Edit: screenshot of the correct orientation

Last edit: by Gwiwer
Posted

Site staff
I've taken the Liberty of re doing your two photos and saving them into my Gallery.
Option 1, I can re do the links in your posts, displaying the Images from my Gallery
Option 2 you can re do the links in your posts displaying the Images in my Gallery
Option 3 you can download the re done images from my gallery, re upload them to yours, and if all ok with orientation, re post them in your posts. Then I can delete from my gallery so they remain under your control.
The only copies I now have are the two in my gallery
HTH
Cheers
Matt
Wasnie me, a big boy did it and ran away
"Why did you volunteer ? I didn't Sir, the other three stepped backwards"
"Why did you volunteer ? I didn't Sir, the other three stepped backwards"
Posted
Full Member
In the end I took option 4 - screenshot the images and upload in the correct orientation.
Now back to making little holes!
Last edit: by Gwiwer
Posted
Site staff
Wasnie me, a big boy did it and ran away
"Why did you volunteer ? I didn't Sir, the other three stepped backwards"
"Why did you volunteer ? I didn't Sir, the other three stepped backwards"
Posted
Full Member
Good option lol, must VERY theraputik making all them there holes :thud. :thumbs

Posted

Full Member
Good option lol, must VERY theraputik making all them there holes :thud. :thumbs
Do you know how many holes it takes to fill the Albert Hall yet Rick?
Crack on that man,
Bill
At 6'4'', Bill is a tall chap, then again, when horizontal he is rather long and people often used to trip over him! . . . and so a nickname was born :)
Posted
Full Member
No. But I believe there were four thousand in Blackburn :cool wink[user=2080]Barchester[/user] wrote:Good option lol, must VERY theraputik making all them there holes :thud. :thumbs
Do you know how many holes it takes to fill the Albert Hall yet Rick?
Crack on that man,
Bill
Posted
Full Member
'Petermac
1 guest and 0 members have just viewed this.