Penhayle Bay
Posted
#182820
(In Topic #10311)

Full Member
A popular layout back on YMRC
Six years ago I first joined YMRC and began what became a very active discussion on my layout.The earlier story survives here http://yourmodelrailway.net/view_topic.php?id=3075&forum_id=21
Suffice to say now that Penhayle Bay has returned to YMRC having gone from strength to strength over the past couple of years.
This remains my first and only completed layout. It is now approaching ten years old since the first boards were built, and a few trial trains ran, back in 2005 though little else happened until the following year. More projects are at various in-build stages but Penhayle Bay has proven enduring and popular way beyond what I ever thought possible and continues to take up most of my modelling time.
A very quick background.
The assumption is that the GWR main line took a north-westwards turn at St. Austell and ran via Newquay to reach Truro. Just west of Newquay lies the small resort / fishing village of Penhayle Bay. Next stop along the line is a rural junction at Treheligan where branches from Ponsangwyn (freight) and St. Agnes (passenger and freight) meet the main line.
The locations are freelance but heavily inspired by actual scenes and places around Cornwall and west Devon. If you put them on a map Penhayle Bay would be where Crantock is and Treheligan at the hamlet of Rejerrah. The timeframe is also flexible; I run trains representing anything from 1960 - 2000 which thus incorporates a little steam though mostly diesel.
It is home from home for me and I have pleasure in presenting once more for your enjoyment some of my work.


As I always have been I am more than happy to discuss any element of the layout, operation and workbench techniques as I also do my own weathering.
 Last edit: by Gwiwer

Posted

Full Member
:thumbs
Jeff Lynn,
Amateur layabout, Professional Lurker, Thread hijacker extraordinaire
Amateur layabout, Professional Lurker, Thread hijacker extraordinaire
Posted

Full Member
Keep it coming Grey Beard. :)
Phill
Posted
Full Member
Cheers
Neil

Posted
Full Member
Spring maintenance is well under way on the layout. Treheligan station is being renovated with distorted platform surfaces levelled out and new lighting fitted.
More or less everything else is good to go though I always sprinkle some new greenery around every year and the top layer of beach sand gets renewed. There can't be many layouts where the sea gets dusted before an operating session!!!
As it always has been Penhayle Bay remains DC operated with four independent electrical circuits. Insulfrog points and a single isolated joint see to it that nothing shorts out nor moves unexpectedly. The goods yard now has its own little controller tucked away at the far corner rather than being run from the main panel as it's too far away from that to safely shunt wagons.
Over the years more and more lighting has slowly gone in. Station and street lighting in supplemented by LEDs in some of the houses and the pub and the loco shed is about to have its first pole-mounted lights installed.
I've seen a superb night scene with pin-pricks through the back-scene with LED "stars" shining through; as I sometimes run at night using only train and station lighting I might investigate that as an option for a future upgrade as well.
Posted
Full Member
This year it is the turn (again) of the platforms at Treheligan station which were last attended to two years ago.
The construction is Wills sheets over balsa. These had distorted slightly at the ends in the heat and due to small pockets of air trapped beneath them in the building process. After removal of the structures the surfaces were rubbed back to a more acceptable surface and finishing with household filler to level them as far as I can in the outdoor environment.

This enforced a need to scribe the gaps between pavers in the filler. Once done the platforms received a rough undercoat (left) before being treated to a new application of blended colours to represent stone pavers and of course the restoration of the white edge marker line (right)

The technique for achieving this finish

is one I have now used three times on these platforms. A mix of suitable colours is used randomly to ensure adjacent slabs don't look the same and there is variety rather than uniformity of colour. I use a mix of Woodland Scenics and Jo Sonjas colours,
Once dry the job is rubbed lightly over with an old T-shirt to blend and take the very top off the colour. I then dust a mix of pale and mid brown weathering powders across the surface, worked lightly with a 1" paint brush and then again rubbed lightly with the T-shirt.
The result has a slight sheen to it and can look different depending upon where the viewer is standing.
New lighting and a new down-side platform building will now go in and allow the former down-side shelter to be shifted to the up-side doubling the length of sheltered platform there.
Posted

Full Member
'Kev
Posted

Full Member
By the way WOW what a great layout
Posted
Full Member
Jimmy the water is built up in a multi-stage process summarised as follows:-
1. Acrylic paint applied to the baseboard, in my case a blend of blues and greens darkening as the "water" deepens and using browns in the two rivers one of which appears above beneath the viaduct.
2. A light rub over with an old clean T-shirt to take the very top off the paint and blend it just a little.
3. Seal all the edges with Plasticene or similar.
4. Mix and pour a layer of "Magic Water" available from http://www.unrealdetails.com
4. Mix a second pour of "Magic Water" with a tiny amount of blue / green paint mixed thoroughly into it; this will suspend pigment in the water and give an impression of depth. Magic Water dries glossy and cannot be sculpted.
5. On top of the Magic Water apply Woodland Scenics "Water Effects" which is a viscose liquid squeezed from a tube and which can be sculpted. It also dries less glossy.
6. Water Effects is then teased up to form waves, ripples or whatever you want. Wave crests tend to stay "milky" rather than drying clear.
7. Apply a warm white paint (I use Jo Sonjas white base acrylic which is "warmer" than their Titanium White for example) using the blade of a scalpel or - with care - the edge of a razor blade. This paint is only touched onto the crests of the water and the blade then drawn back to create the foaming and rippling seen on the finished work.
For harbour work you can half-submerge a buoy or channel marker or even old junk as you build up the water. Colour the water as you wish but I would use greens and browns, possibly a tiny amount of black. When adding pigment to water products less is more - in a pour to cover the area of sea in the photo above I used only two spots about the size of a pin-head.
If you intend to include boats (or, in my case, people) in the water then do so after the initial pour and add later pours around them. That allows them to float in rather than on the water. One of my fishing boats was actually placed on the first pour then pushed 2mm forward into the wet second pour which created a lovely bow wave!
One further tip is that I usually mist the sea with the water spray before taking pictures as it adds that final watery glint!
Last edit: by Gwiwer
Posted
Guest user
Great modelling. Every frame is a winner. I must admit my bias to anything with a class 22 in it though. I have two in BR a Blue and 1 in green I think. They look even better when dirtied up.
I'm awaiting the release of the Class 29's from Dapol which I believe will be December. These loco's have so much character to them.
Keep up the good work. A pleasure to view.
Toto
Posted
Full Member
:cool:
Jeff Lynn,
Amateur layabout, Professional Lurker, Thread hijacker extraordinaire
Amateur layabout, Professional Lurker, Thread hijacker extraordinaire
Posted
Full Member
Could you make a profit selling all those uniquely patterned T-shirts afterwards, Rick?
:cool:
Come to the market on Sunday Jeff and find out ;-)
Almost completed both platforms now - the pavers are all done and the white lining almost complete. It would have been done tonight as well but the paint began to clag on the brush and the need to cook dinner overtook the urge to keep going

Last edit: by Gwiwer
Posted
Full Member
I must admit my bias to anything with a class 22 in it though. I have two in BR a Blue and 1 in green I think.
Keep up the good work. A pleasure to view.
Toto
Cheers.
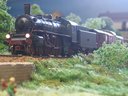
There are currently four 22s here, two each in blue and in green. They have proven very reliable and have clocked up relatively high runtimes.
So for those who like such things here's a few views of them at work


Posted
Inactive Member
Your railway looks the business and I do like those weathered loco,s.
regards,Derek.
Posted
Full Member
The entire corner section from the viaduct down through the cutting and around the farm has been refreshed with a good clean and a sprinkle of fresh greenery.
It's always difficult taking photos of this area as the layout passes an opening window and therefore cannot have a back scene. It then comes around the curve onto the open end (a former lift-out but now a permanently fixed board) under which the visitor is required to duck to enter the viewing area.
That section has no back scene on either side though I have a cunning plan to create a clip-on board for photographic effect only.
The couple visiting the stone circle have been restored to their rightful places within this scene - right on the corner of the board - which has been cleaned and tidied

The track has been cleaned and the vegetation refreshed with careful application of a little more greenery. The synthetic material fades outdoors over time and benefits from a new sprinkle every so often.

An overhead shot showing some the area worked on in the past few days, and a piece of the brick window ledge which supports this corner of the layout.

Cleaned and refreshed farm scene with, apart from the cows and horses, two dogs, eight hens, one rooster and one cat present.

For the first time in several years a full complement of bee-keepers and hives is present. Some time ago my wife, Sharon, borrowed two of each for an art project and I've finally got them back!

The vegetable garden is as productive as ever and the piggery just as crowded. Again this view shows just how close to the edge the scene is.

Finally looking the other way along the sheep fields and towards Darras Viaduct. There are slightly fewer sheep here this year; by contrast the rough ground of Prys Moor below the church (which is next to be refreshed) will feature more sheep than before.

Last edit: by Gwiwer
Posted

Full Member
Last edit: by Barneybuffer
Always try to look on the bright side of life!
Barney
Barney
Posted
Full Member
In several of those shots there is also evidence of spot reballasting. Just as on the real railway a little extra is sometimes needed here and there and isn't weathered to the same extent simply because it's newer.
The new stuff will get a light weathering in due course but will remain lighter in colour than the existing ballast.
Posted
Full Member
The roads have all been resurfaced and the white lines restored. The pub scene and surrounding fields have been refreshed with a dust over and a little new greenery.
The outside table is an item I've been trying to find for a long time. I finally tracked down exactly what I was after at the RM Web Live event in Coventry recently. This is a Metcalfe "Mini-Kit" item containing two straight bench / tables and a round one with a selection of umbrellas.
There isn't really space for an umbrella outside the pub but the other two tables will go to the beach scene and have their umbrellas up for the summer.
These are card kits which are very quick and easy to construct. The laser-cut pieces are clean and are simply stuck in pairs back to back then assembled. As I've had trouble with slugs munching card before I have also applied a weathering powder to this table to see if it makes any difference, It improves the aged look from the printed card somewhat.


The accumulation of dirt on the front of the pub, seen here in close up, had me in two minds. Do I clean it all off or do I leave it with that slightly unkempt and "used" look. I've chosen the latter.

Posted

Site staff
Just my thoughts, but the bench might look better on the grass next to the silver/grey hatchback.
I've seen lots of pubs right on the road that have just the odd bench round the side as a sort of token beer garden.
Leaving the dirt on the pub looks great, very realistic. I think you're right not to clean it :thumbs
Ed
Posted
Full Member
Just in time for our first really warm night of the season and everything is ready at Penhayle Bay.
The sands have been refreshed and dusted with a new top layer which has also been slightly stippled this year rather than being left smooth. Everyone seems to be at the beach enjoying the warm night. The new beach tables (items two and three from the pub table kit) are in place umbrellas and all.
The open-top bus has made its first runs of the season which I consider to run from the weekend before Melbourne Cup to the weekend after Easter.


Swimming and surfing after dark isn't a good idea - no-one can see if you get into difficulties. This was taken with the overhead lights off and the sea sprayed with water to enhance the glints.

1 guest and 0 members have just viewed this.