OO Gauge - Latton Fields
Posted

Site staff
Branch Line - Roundy, roundy with some shunting
It's really odd to think if I hadn't broken my wrist I'd still be messing about with a two level layout, wouldn't have changed the lift-out section to hinged, and probably wouldn't have changed to DCC :hmmAnyway, back to the plot…
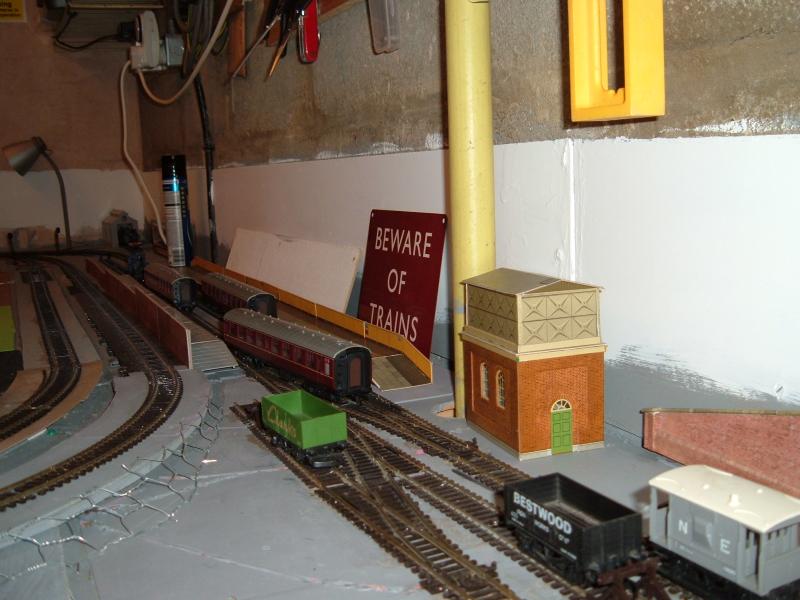
Embankment running past Latton Fields up to Puffers Green.
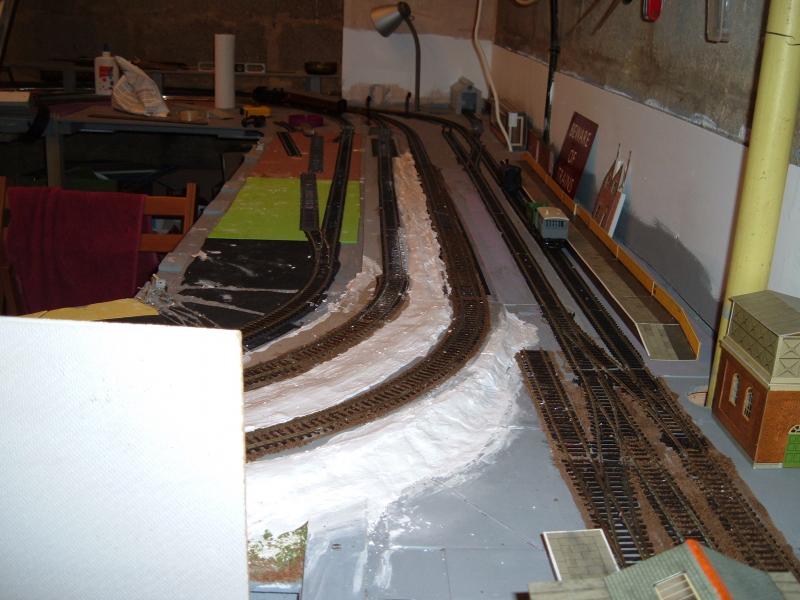
Apologies for the pictures, but the light in the garage is pretty awful this time of year. OK to see, but not very good for photography with a small, cheap digital camera.
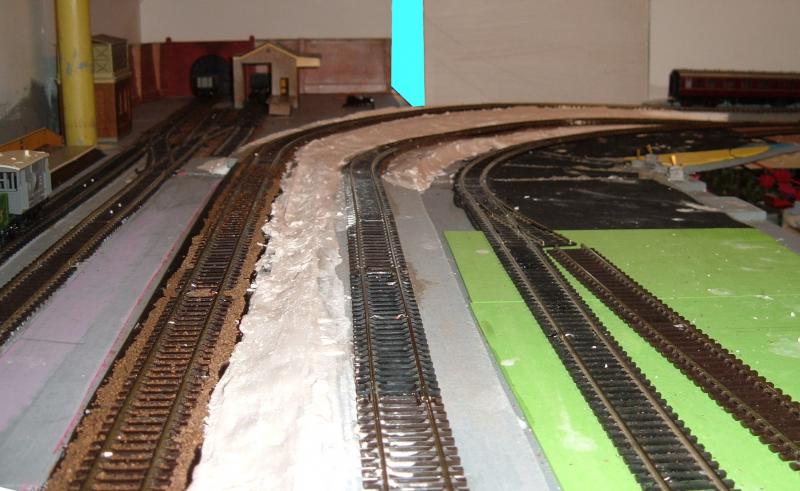
The snow has come early to Essex this year.
..and I didn't make it up, there is a place called Puffers Green.
https://www.google.co.uk/maps/@51.7641886,0.1227594,3a,22.4y,356.22h,80.19t/data=!3m4!1e1!3m2!1sQdg0rKAXlfe-bJCcZ8TwXg!2e0
(Note to self, using masking tape before messing about with Plaster of Paris, especially when you've started ballasting track :oops: )
Ed

Posted
Guest user
Your cracking on there. I will be using plaster bandage so I'll be watching for some hints etc.
Cheers
Toto
Posted

Banned
You are definately cracking on with the layout and I like the variation in track heights. :thumbs
One tip when casting plaster is to cover the track with 2" wide masking tape. It is a pita to clean all the plaster up after it has set solid between the sleepers and in the rail profile.
Cheers, Gary.
Posted
Guest user
I'll do the same when the plaster bandage comes out to form my embankments at the warehouse side of my layout as well as elsewhere.
Great idea..
Posted
Site staff
I used the 'J cloth' equivalent (forget what they're called in Oz) from 'Every Little Helps' economy range cut in to small strips.
Soaked them in the Plaster of Paris and then covered the chicken wire.
Don't know what the plaster bandage is like, but I think it's similar to Plaster of Paris and 'goes off' pretty quick.
First time I did some I made too much and it was going hard before I had a chance to soak all the cloth strips, so some got wasted.
All part of the learning curve

Ed
Posted

Full Member
The layout is coming along nicely.
Oh, and don't worry about the SuperQuick building it looks fine. I have read so many times that starting simply and then building your skill set is the best way to go!
BRMA #1370
Mareeba, FNQ, Australia
Mareeba, FNQ, Australia
Posted
Banned
Hi Toto
I used the 'J cloth' equivalent (forget what they're called in Oz) from 'Every Little Helps' economy range cut in to small strips.
In Oz we call them 'Chux'. But there are the cheaper versions availalble, to which I used on Linden Ford and Continuous Loop.
As for mixing plaster, small batches only, no more than say a 3/4 - 1 cup in volumn at a time. I always overlap my plaster dipped cloth by 1/3, eventually the covering will be quite strong. Than I follow up with a slurry of plaster put on with a 1"- 1 1/2" brush, then smoothed over with my finger when 3/4 set. Once all set and dry, an application/wash of water based acryllics are painted over to depict the earth colour or road colouring, in case the flock/static grass/gravels/soils comes adrift.
Cheers, Gary.
Posted
Site staff
Hi AndreasI understand the problem of your 0-4-0's stalling on the Hornby diamond crossings. I have gone ahead with some decoders with stay alive from DCC concepts to overcome this same problem and also points which may need more scrupulous cleaning!
The layout is coming along nicely.
Oh, and don't worry about the SuperQuick building it looks fine. I have read so many times that starting simply and then building your skill set is the best way to go!
I was thinking of 'stay alive' or TCS 'keep alive' but someone on here mentioned they can cause problems and of course there isn't a lot of space inside a Hornby Pug, which means a permanently attached wagon/tender.
Think it's a case of whatever suits the particular layout best.
Ed
Posted
Site staff
Hi Gary[user=1338]Ed[/user] wrote:Hi Toto
I used the 'J cloth' equivalent (forget what they're called in Oz) from 'Every Little Helps' economy range cut in to small strips.
In Oz we call them 'Chux'. But there are the cheaper versions availalble, to which I used on Linden Ford and Continuous Loop.
As for mixing plaster, small batches only, no more than say a 3/4 - 1 cup in volumn at a time. I always overlap my plaster dipped cloth by 1/3, eventually the covering will be quite strong. Than I follow up with a slurry of plaster put on with a 1"- 1 1/2" brush, then smoothed over with my finger when 3/4 set. Once all set and dry, an application/wash of water based acryllics are painted over to depict the earth colour or road colouring, in case the flock/static grass/gravels/soils comes adrift.
Cheers, Gary.
It's funny how fingers are sometimes the best tool instead of brushes.
I found a wet finger the best for smoothing the plaster by accident.
I've got some water based brown paint for the general earth colour, but what do you suggest for a general rough grass area.
I don't want it look like a bowling green, but also not too long grass using 'static grass'.
I've tried some hanging basket liner on a test area, but I think it's going to be too long and I've got some green scatter which would probably look too short.:hmm
Ed
Posted

Inactive Member
I blinked and you started doing scenery……..Crikey!!!….you`re moving along at a pace Ed!!!
:cheers Gormo
 Last edit: by spurno
"Anyone who claims to have never made a mistake, never made anything!!"
https://sites.google.com/site/greatchesterfordmodelrailway/home
https://sites.google.com/site/greatchesterfordmodelrailway/home
Posted
Site staff
Can't always get out in the garage due to other commitments and the weather.
The plaster also takes a while to dry if it's fairly thick and of course what I plan to do is not always what gets done.
Ed
Posted
Banned
I've got some water based brown paint for the general earth colour, but what do you suggest for a general rough grass area.
I don't want it look like a bowling green, but also not too long grass using 'static grass'.
I've tried some hanging basket liner on a test area, but I think it's going to be too long and I've got some green scatter which would probably look too short.:hmm
Ed
Burnt umber is towards the red end of brown, whereas raw umber is the yellow end of brown. For under the grass, I would probably go for raw umber.
I actually used a mix of 'raw umber' and 'burnt umber' to cover the plaster, on Linden Ford. Where there are roads etc (to be), a wash of watered down black is good. The black will dry much more like very dark grey.
After all this had dried, I applied a coat of neat PVA, followed by a dusting of fine soil, sieved over the top from a fine mesh tea strainer. See the pick here : http://yourmodelrailway.net/view_topic.php?id=12116&forum_id=21&page=2#p213052 Once this had dried, the excess was hoovered up, then another application of PVA, followed by flocks/static grass etc.
The series of pics in the link above, will tell the story. As they say, 'a picture is worth a thousand words…' ;-)
As for the hanging basket liner, glue it down, allow it to dry, then rip it up. This may need trimming in places to lower the height. I have noticed that hanging basket liner is used more for wild grasses or brambles (where they are covered with various flocks/foam).
Do a few test pieces to determine what works best for you.
Cheers, Gary.
Posted
Site staff
While your there another question, what did you do for the general goods yard area on Jacks Corner.
Black/Grey fine scatter quest:
Ed
Posted
Banned
http://www.chucksballast.com.au/
Both these were applied in the same manner as I have on Linden Ford. I have also used Chucks Ballast product 'Filth' a well on Linden Ford, which is a super fine 'real' ballast dust.
Cheers, Gary.
ps. time to hit the hay ;-) zzzz !
Posted
Site staff
From the above pictures you can see the mains power lead hanging down and going through the baseboard. This will be rerouted or disguised in some way, but how to disguise the yellow gas pipe had me a bit stumped (and it's flaming annoying me every time I go in the garage).
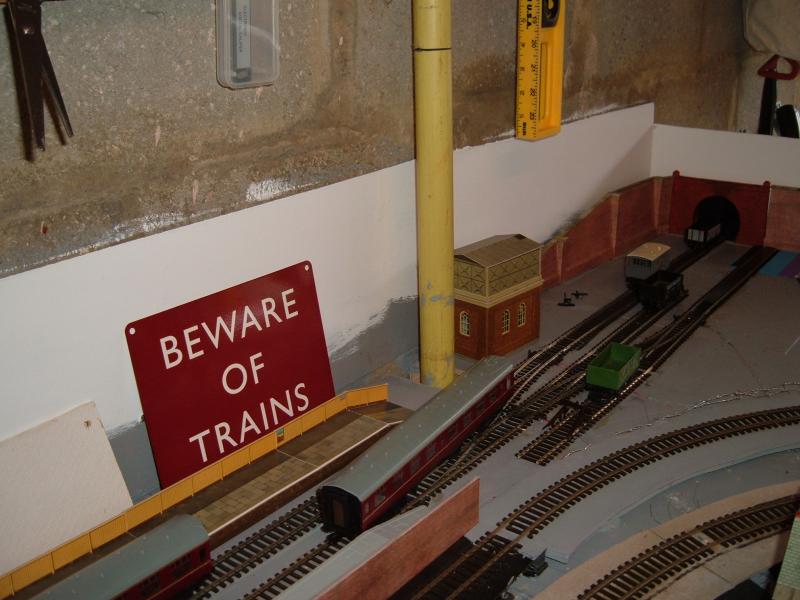
I originally thought a water tower would do it, but as you can see it's not tall enough.
Then I thought disused bridge abutment and have some foliage growing up from the deck. So I put the cardboard inner from a paper kitchen towel roll around the pipe and cut up some bits of cereal packets. (Not in Toto's league, my mock-ups really are mock-ups).
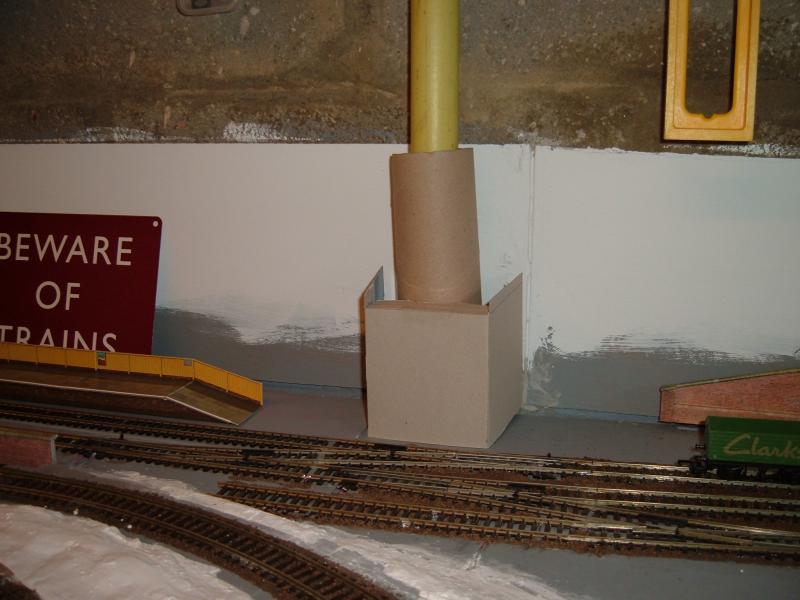
Then I thought, how about a skew bridge, as long as when sitting at the controls I can see the goods shed and the points for the run around loop.


Yes? no? ………………… suggestions ?
I quite like the idea of some sort of plate girder road bridge coming from behind the station and disappearing behind the backscene for Puffers Green.
Of course in my fictitious world, Puffers Green is some miles away from Latton Fields.
I thought I'd ask if anyone has any other bright ideas, not that I think much will get done now with the darker evenings and dropping temperatures.
Before anyone suggests rocky outcrop, it's supposed to be a semi-suburban sort of area somewhere in East Anglia. (Excuse for ex LNER and early BR Eastern Region).
You may also notice some more cereal packet mock-ups in the last picture which is to do with station buildings, but I'll come back to that later on.
Ed
Posted
Inactive Member
Makes a scenic break and as you say you can still see whats happening.
Your railway is coming on at a good pace.
Cheers,
Derek.
Posted
Guest user
If it's in the country, then why not some kind of silage tank. Not sure how it would be blended in but You do have a lot of space around with which to place some associated structures.
Take the immediate surrounding area and try and define a general purpose. It may help you ( and others ) to come up with meow sim editions.
One thing, it's coming on great.
Cheers
Toto
Posted

Full Member
Maybe in a bit late, but I also add PVA to the plaster mix (I pre mix water and PVA - weaker than for ballast probably approx 3 parts water 1 part PVA and a dash of burnt umber acrylic paint), and use paper towel or J cloths (depends whats in the kitchen at the time), means any chips or knocks show a pale earth colour.
Paul
Posted
Site staff
It's a bit 'fits and starts' but I'll get there and there's no rush.
Hi Toto
See where your coming from, but it's too near lineside to be anything other than a bridge or railway related structure.
I acquired a large funnel shaped measuring type jug today, which would have made a fantastic modern style water tower. There's one a couple of mile up the road. But I'm not modelling modern image and they weren't around in 1960.
Now if I did do a road bridge it would be a good excuse to obtain a Greenline routemaster bus model, or an RT :hmm or are my dates wrong?
Ed
Posted
Site staff
Hi PaulHi Ed
Maybe in a bit late, but I also add PVA to the plaster mix (I pre mix water and PVA - weaker than for ballast probably approx 3 parts water 1 part PVA and a dash of burnt umber acrylic paint), and use paper towel or J cloths (depends whats in the kitchen at the time), means any chips or knocks show a pale earth colour.
Paul
Think my biggest problem at the moment is the weather.
It's taking ages for the plaster to dry out fully.
Reckon it will be OK once painted but going with your PVA thoughts, I suppose I could give it a quick wash of diluted PVA once dried to give a more robust surface.
Ed
1 guest and 0 members have just viewed this.