Newton Regis, it'll never be finished, hopefully!
Posted

Full Member
A GWR journey through the 1920s and 30s
Hi Douglas,I was hoping someone else also had a soft spot for these older vehicles and yes, Jack Jones’ van could still be seen plying it’s trade in the 50s and the Springside kit is reasonably easy to find at a sensible price. Like you and most everyone else, I’ve also had a tendency to stockpile kits, but only when the price is right, which often precludes Ebay, so there are numerous other white metal road transport kits slowly moving up the queue for the assembly shops.

Today saw the interiors completed, bodies assembled (sans roofs) and mostly in primer. The very small and fiddly bits like lights, number plates, horn, etc will only be fitted after painting, so I’ll clear the decks tomorrow and set up the paint shop and get the colour on, always dependant on my ‘other essential jobs’ list. That’ll be the one I don’t write down myself, but manage to knock one or two things off every week to ensure continued modelling time.
Happy days,
Bill
 Last edit: by Longchap
At 6'4'', Bill is a tall chap, then again, when horizontal he is rather long and people often used to trip over him! . . . and so a nickname was born :)

Posted

Full Member
The vans are coming along very nicely - are you going to airbrush them of hand paint ? Whichever, I'll be watching with a great deal of interest.
At present, I don't have time for "fun" things - changing my insulfrog points is taking up all my spare time - and nearly crippling me as well - I didn't realise how inflexible I've become over the last few years ………………..
Once my track is done, I'll be swatting up on your threads again and maybe even having a go at some whitemetal vehicles so make it comprehensive please………………..!!
'Petermac
Posted
Full Member
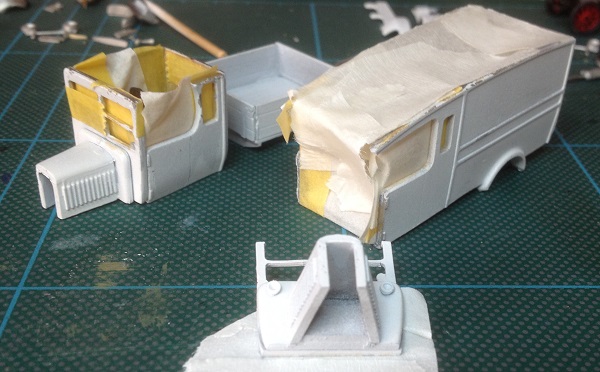
As you wanted ‘comprehensive’, here goes. I’ve now primed both van and truck and to check for things to attend to, I placed the sub-assemblies onto the rolling chassis and resorted to close up photography to show up the defects.

Driver Jack Jones had to receive a very quick splash and dash of touch up paint, since my masking managed to let some primer get in to give a thin layer of snow over him and he was not impressed!
Defects needing attention: a little tweak to the chassis to get that front nearside wheel on the ground, sand back the front bulkhead side profile for better fit, touch up the primer (my fault for handling prior to paint curing) and gentle sanding to the centre lateral windscreen frame for correct shape. The reason for the split windscreen, is that in the 1920s, windscreen wipers were still to be fitted to most vehicles, so the windscreen had an opening section, or sections, to allow the driver to see who he was running over. Jack Jones has many a tale to tell.
The above comprises four assemblies placed together, ie, rolling chassis, main body, front bulkhead/engine and finally the roof. The roof is actually a very good fit all round, but will need to be held in place when the glue finally is applied to achieve that fit. Elastic bands at the ready!
Each sub-assembly will be sprayed separately and then fitted to the chassis, due to the need to facilitate more careful than before masking of the cab interior. The primer is Tamiya fine surface primer for metal or plastic and I used the white because of ease of achieving a good finish to the upper cream of the bodywork.
I’ll touch up the primer this afternoon, then leave to mask and spray tomorrow, when the paint is fully cured.
The other reason for keeping sub-assemblies separated until the end, is that they are easier to work on, especially when if you need to take them apart if not aligned correctly. It’s amazing how they fit so well as the glue goes on, but then look as if they fell over a cliff the next morning. I know this!
More soon,
Bill
Last edit: by Longchap
At 6'4'', Bill is a tall chap, then again, when horizontal he is rather long and people often used to trip over him! . . . and so a nickname was born :)
Posted
Full Member
Do you mask off future glue lines when you spray the sub assemblies or scrape them clean afterwards ?
If you scrape them off after spraying, is there any risk of chipping the paint you intend to keep ? I'm assuming you do clean them up to ensure the glue sticks to metal rather than paint and also, glue has a nasty habit of damaging paintwork ………………………….. :roll:
Silly little practical questions really but I do wonder about these thingsplus, wherever possible, I try to let others make the mistakes first ………………I'm actually a moral coward ………… :cool wink
'Petermac
Posted
Full Member
However, the final assembly will require a slightly different approach, as I want an as near perfect and unblemished paint finish, which of course will subsequently be weathered to hide any blemishes, whether there or not!
To aid this however, the continuous flat top of the chassis has been left unpainted and as with the bases of all the sub-assemblies, will receive a going over with a fibre glass pen and alcohol wipe to ensure a clean metal to metal surface for gluing. Then there is the roof which locates snugly and also helps lock everything in place. I will just have to pay careful attention to the vertical junction between main body and front bulkhead, to avoid gaps. I can also add shims to level up, if necssary.
It's all good fun and hopefully will turn out okay. We'll see soon!
Best,
Bill
Last edit: by Longchap
At 6'4'', Bill is a tall chap, then again, when horizontal he is rather long and people often used to trip over him! . . . and so a nickname was born :)
Posted
Full Member
Anyone familiar with this kit might note that the van’s top window frame member is absent. This was a serendipitous modification, as it was broken off with even my gentle handling. However, the roof fitted so much better without it and you couldn’t see it anyway with the roof overhang (necessary due to the absence of windscreen wipers), that I haven’t bothered to refit it.
I had to remove the van driver and seat to be able to mask off the interior and whilst the truck cab windows are masked, I’ll pop the roof on instead of masking paper and secure with a few dabs of UHU.
So at last, this morning, after a quick check on the masking tape, the compressor was set to 24psi and starting with the lightest colour first, on went several mist coats of GWR cream to the upper bodywork of the delivery van. I didn’t bother to mask the lower edges of the colour, since the brown would easily cover the slight cream overspray as easily as the white primer.

Being enamel, this will now have to cure for at least 24 hours before I mask and spray the brown finish to the lower half, which will also entirely cover the front bulkhead / engine cover assembly and mudguards.
Soonish(ish),
Bill
Last edit: by Longchap
At 6'4'', Bill is a tall chap, then again, when horizontal he is rather long and people often used to trip over him! . . . and so a nickname was born :)
Posted
Full Member
I've read of people using so many "recommended" pressures that I'm totally at sea with it all. My airbrush sits in it's box gaining anitque value ……………………..
'Petermac
Posted
Full Member
Initially, I forgot to check the pressure, assuming (never assume) it was as I left it last time and I had paint spatter with the test strokes, indicating too low pressure and sure enough, it was at 15psi, so I upped it to 24, to give good atomisation of paint (for enamel from my own experience). This means thin mist coats are possible and in turn, faster drying times, which is what I need to enable me to get on. I'll still need to wait 24 hours for the paint to cure though before proceeding.
I’m using enamel because that’s what I have for the correct GWR colours, plus it’s what I’m used to and I don’t get problems often associated with airbrushing rapid drying acrylics. The pressures can be the same for both enamel and acrylic, but fine acrylic mist coats are dry pretty much as soon as they reach the workpiece, potentially causing havoc blocking the airbrush tip. That’s another reason why I prefer enamels, as well as the colour depth and workability when weathering.
Generally, most modelling airbrush pressures are in the the range of 15 to 25psi. Exceptions, naturally occur, for example to give a spatter weathering finish (low pressure) or streaking effects (high pressure).
There is no big secret, just a little practice and adventure and a good quality airbrush of course, which I know you have, together with a common sense approach to cleaning, which as I’ve outlined in previous posts does not take very long!
Best,
Bill
PS, Just for a bit of added fun, I’ve just checked this morning’s workpiece and noticed that the right hand side of the van has attracted a fibre stuck right where I don’t need it! Fixable of course, but not until the paint settles down. I need to put a cover on the spray booth in future.
Last edit: by Longchap
At 6'4'', Bill is a tall chap, then again, when horizontal he is rather long and people often used to trip over him! . . . and so a nickname was born :)
Posted
Full Member
I gues you're probably right in that the rapid drying times of acrylics make them difficult to spray. I wonder if their thinners contain some kind of retarder …………………?
'Petermac
Posted
Full Member
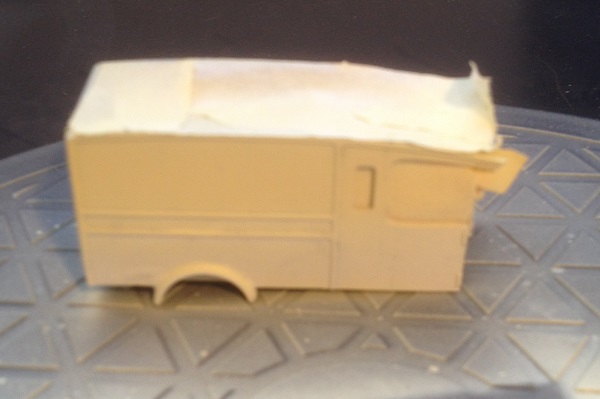
I put the brown on yesterday and left it well alone until a couple of hours ago to harden and have since been enjoying a long G&T following the unveiling.
So here it is still wrapped up . . .
. . . and after the tape came off . . .

The sub-assemblies are just plonked on the chassis and the fit will be just fine when correctly positioned and permanently fixed. Fortunately, just a couple of touch-ups required.The step in the brown / cream junction is prototypical, with the lower cream panel carrying some of the signage, although I think I need to extend the brown over the lower cream beading.
Running boards next.
Bill
At 6'4'', Bill is a tall chap, then again, when horizontal he is rather long and people often used to trip over him! . . . and so a nickname was born :)
Posted

Full Member
Michael
Posted
Full Member
Now I expect to see your signwriting skills - of course you won't be cheating by using transfers ……………..

Did you do the truck at the same time ?
'Petermac
Posted

Full Member
Phil
Posted
Full Member
Don’t worry about that sharp line Michael, as I’ll just move it up a bit, probably!
Besides the mud guards /running boards and the remaining small parts, I’ve some other finishing touches to add Phil, but am not rushing things, as daily life never leaves me to modelling for long and I’m also clearing the end of my workshop in readiness for the railway room.
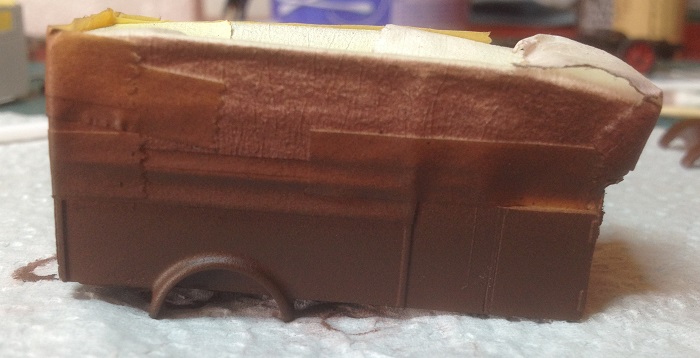
You were asking Peter, if the pick-up was painted at the same time as the parcels van. At the time of masking both vehicles, I hadn’t a colour in mind, but thought I might spice it up with a vivid splash of colour. However, I still hadn’t decided when spraying the van, so slept on it and when reviewing paint available to me this morning, spotted something a bit radical, so sprayed it on this afternoon and will see how it’s turned out tomorrow.
Fingers crossed then, more soon,
Bill
At 6'4'', Bill is a tall chap, then again, when horizontal he is rather long and people often used to trip over him! . . . and so a nickname was born :)
Posted
Full Member
'Petermac
Posted
Full Member
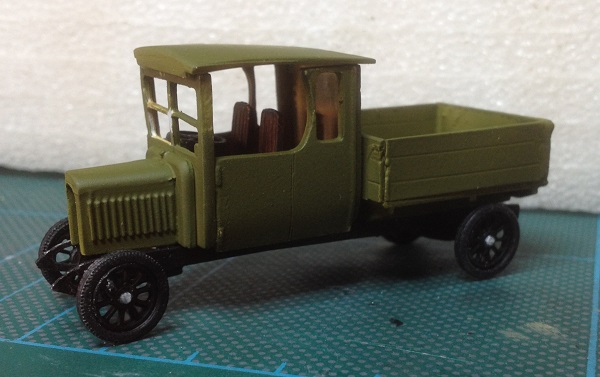
Still a few things to finish, including removing the tape from the rear window, which I’ve only just noticed!
I suppose some may think that if some Great Western modellers don’t paint things cream and brown, they’ll resort to green and black. Hmm, that’s not a bad idea!
Sunny here, so off to cut the grass and release two forgotten water butts from the undergrowth round the back.
Happy Saturday everyone,
Bill
At 6'4'', Bill is a tall chap, then again, when horizontal he is rather long and people often used to trip over him! . . . and so a nickname was born :)
Posted
Full Member
Michael
Posted

Full Member
Posted
Full Member
However, I’ve come to a halt with the trucks, as I’m waiting for a delivery of clear gloss floor sealer, which I’ll spray on as a perfectly flat, clear gloss finish to take the decals. As this is only available in the USA and Canada, I’ve ordered a lifetime supply, but need to wait before I can progress.
In the meantime, I’ve started on a new build for the branch line and here is a taster of what should be a straightforward build.
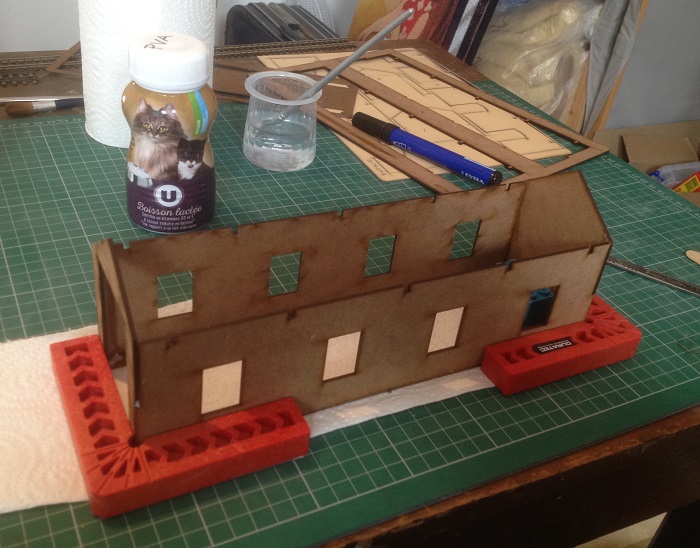
This is a laser cut MDF kit which I saw in Hattons’ pre-used section some while ago at a no-brainer price, so I snapped it up thinking it will be useful sometime, which indeed it is. Only tools used so far are all in the photo, which should pretty much suffice for the entire build, although the kit includes a generous quantity of rubber bands and wooden clothes pegs!
The real challenge will be getting it to look less kit built in the finishing stages, so weathering will be the key. Fingers crossed as usual.
Keep safe,
Bill
Last edit: by Longchap
At 6'4'', Bill is a tall chap, then again, when horizontal he is rather long and people often used to trip over him! . . . and so a nickname was born :)
Posted
Full Member
I’ll get going again soon in rationalising the workshop and storage inside, so I can build the 6x4 metre inner man cave within the man cave, but not before we get over our gîte classification inspection next week. So a load more redecoration and repairs still to do and I’ve been packing away my temporary workbench and spray booth from one of the gîtes ☹, although have set up another desk elsewhere 😊, which enabled a little modelling today.

Progress will be slow though until I finish the redecs / repairs.
Keep safe,
Bill
At 6'4'', Bill is a tall chap, then again, when horizontal he is rather long and people often used to trip over him! . . . and so a nickname was born :)
1 guest and 0 members have just viewed this.