Johns 7mm Layout
Posted

Full Member
Nothing ventured, nothing gained. The copperclad I use is 0.068", 1.7mm. Wrong width for UK O scale though (1:48 not 1:43.5, 6.35mm not 7mm to the foot). Thinner ties mean less ballast. I just shim 12" long sections rather than mess around with individual ties if I'm looking for a decent ballast height. Not applicable to the latest effort, the timbers will be for the most part buried.
Mount Albert Scale Lumber O scale ties are 3.7mm thick unfinished, On30 are 2.5mm thick unfinished. The strip wood (bass wood) comes in a whole range of different sizes, e.g. 6"x8" O scale in 16"long pieces. Based in Port Dover, Ontario (now part of Fast Tracks). Cheaper on the postage than from the UK.
Nigel
©Nigel C. Phillips

Posted

Full Member
Learning that C&L is not what it was and now run by just one man so I'm not confident about that. We'll see what transpires.
I'll post more pictures soon.
John
John
Posted
Full Member
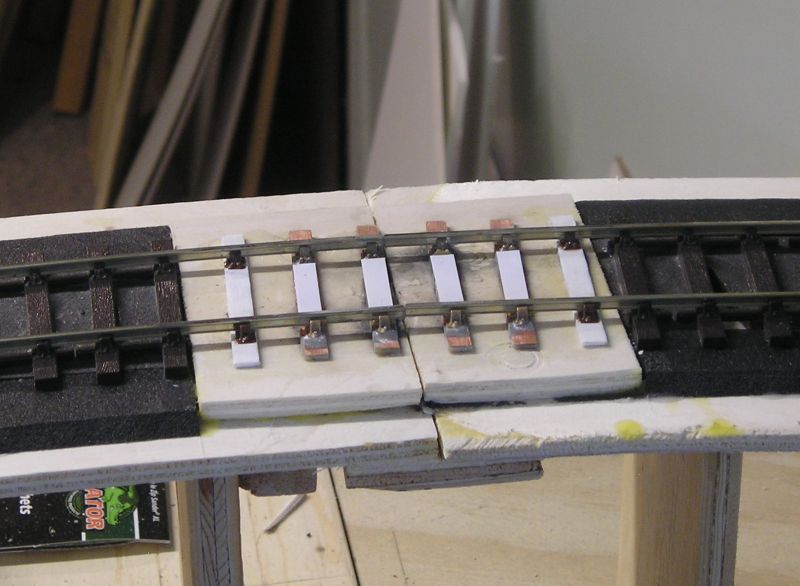
Here's a join that I finished this morning:

Those are C&L cast brass chairs on copper clad sleepers. These are eyewateringly expensive :shock: but look good.
My initial thought was to use 3 CC sleepers but given the cost of the brass chairs and the tedium in fettling them to fit I ended up using Evergreen strip for sleepers and plastic chairs.
My first try at positioning the sleepers was terrible so I spent a bit of time this morning repositioning them to give a more convincing spacing.
In my estimation, glue alone isn't strong enough to hold the track in position when someones woolly jumper snags a rail end. I got myself some small screws yesterday and screwed the end sleepers down. Better I think. Despite countersinking, the screw heads are still a bit proud so I'll grind them flush later.
My second join went better after lessons learned from the first:

Same idea as before. My point with this picture is to illustrate my method of spacing the boards slightly apart using card while laying track over the join. A Dremel cutting wheel will make short of the rails but so often you end with an unsightly gap because it is difficult to get the wheel perpendicular. Referring back to the first picture, you will note that the rails are tightly together.
I'm making this up as I go along.
John
 Last edit: by Brossard
John
Posted

Inactive Member
Max
Port Elderley
Port Elderley
Posted

Full Member
I always use a piercing saw these days, a little more effort but much more controllable than a cutting disk.
Regards Rob
Posted
Full Member
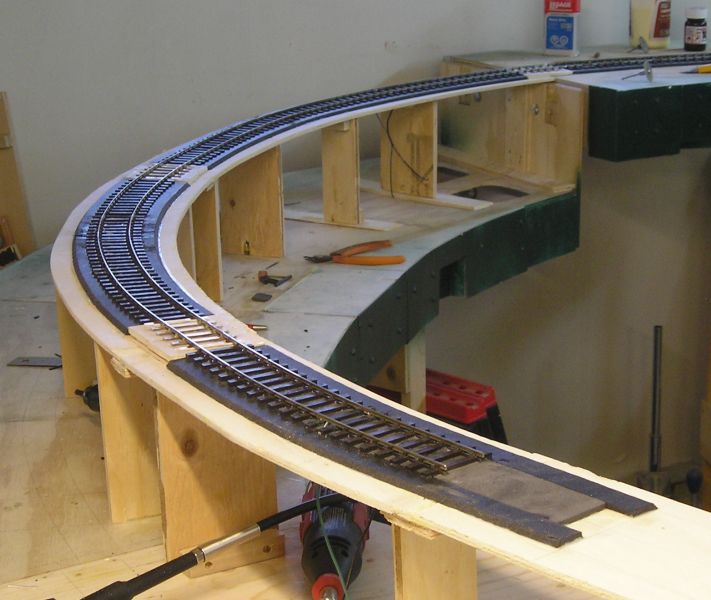
After this, I think I'll go back and do the wiring proper by pulling boards out and setting them on their sides - I don't do the lying on your back thing.
John
John
Posted
Full Member
I hear you on the not lying on your back bit John, wrong time of life for that…You're probably right Rob, but so far so good. I was working on the last curved bit today, it really is exhausting. I've been doing about a yard/meter a day.
After this, I think I'll go back and do the wiring proper by pulling boards out and setting them on their sides - I don't do the lying on your back thing.
John
Regards Rob
Posted
Full Member
Neat. There are thinner cutting off blades than the ones in the Dremel range. A right angle head for the Dremel allows much more control and gives almost 90 degree cuts (better than a piercing saw, which only works when making turnouts - the jaws would have to be about 2 feet long for what you are doing). Have you allowed for the coefficient of expansion of the rails? You seem to be working to tight standards here.
Nigel
©Nigel C. Phillips
Posted
Full Member
You are right about things being tight and it did occur to me. When I pull the boards for wiring I will file the rail ends to give me about 1mm gap. The rails are not fixed to the chairs so they should move when required.
John
John
Posted
Full Member
Yes, there is a slight hump at the nearest joint. Odd that because the others seem to be flat. Must have a closer look.
Droppers are all in so next step is to put the wiring in under the boards. If I wire everything up to this point, I can actually run something so that's exciting.
A note on the board joins that I so laboriously worked on:
After grindin g the screw heads I was left with a terrible mess so I decided to disguise things by gluing on some 0.010" Evergreen strip, this looks a whole lot better. I can sand the sleepers to blend in.
Here's a shot of the fiddle yard turnout:
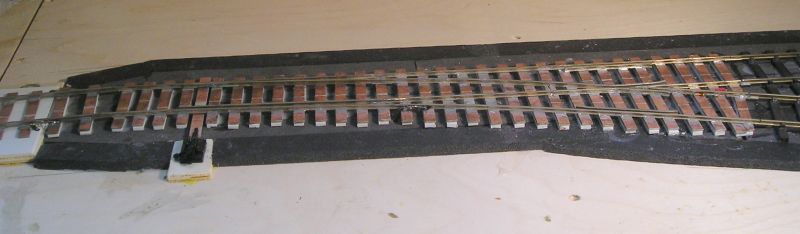
I've installed a Caboose Industries turnout throw switch. The throw lever has electrical contacts so it will change polarity.
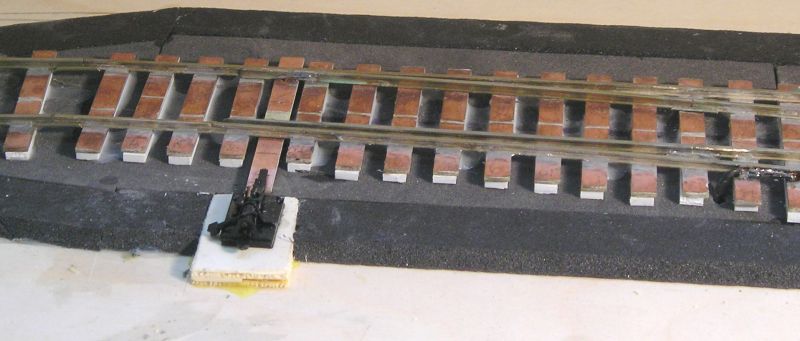
A bit closer showing that the switch will throw the blades the correct distance. It was a question mark since the switch is designed for H0.
…and in the other direction:

I'm happy to have that done. The instructions weren't very clear (or else I'm thick).
John
John
Posted
Inactive Member
Max
Port Elderley
Port Elderley
Posted
Full Member

I connected up a DC controller and was able to run the Jinty on all tracks. It even traversed the turnout without trouble proving it both electrically and mechanically. My only concern is that the electric terminals for the turnout switch under the board are quite flimsy. We'll see what reliability is like as we go.
John
John
Posted
Full Member
I've also been finishing up DCC sound installations:

Here's my modest loco stud. The terrier belongs to a friend who is laid up in a care home. He told me to use it so I will install sound shortly. It is plain DCC now.
John
John
Posted

Full Member
Marty
Posted
Full Member
I just completed curve Mk 2 today. The original curve had several problems which included a smaller radius in one section than I wanted. The biggest issue for me was those plywood blocks at the baseboard joins. They were close but not quite the right height. In addition, the noise changed as trains went from foam to ply.
I made up some trains and ran them forwards and, critically, backwards through the curve. My concern was the specter of buffer lock (although in practice I can't see trains being propelled, with the exception an Autocoach train), but everything works well.

When propelling the buffers compress very nicely but don't come anywhere near disengaging. The curve rad. is 4' 6". Notice the 3/screw link couplings. This is kind of a dream come true for me after struggling with couplings on 4mm stock for all those years.
I made a couple of tools for uncoupling:
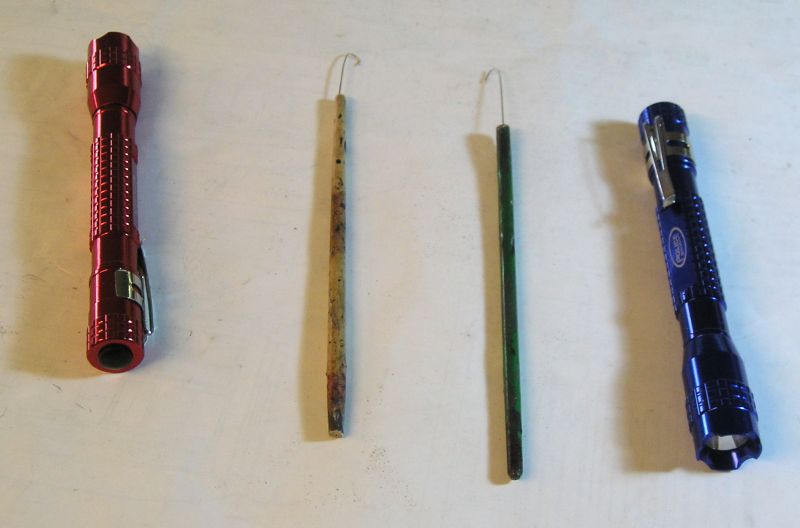
These were made from old brush handles and bent 0.5mm NS wire. Took about 5 minutes. I'll let my buds have a play with these to see what they think. I think the wire should be thicker, maybe 0.032". A big impediment to using these things has been lack of light. I bought some torches from Walmart which are really bright. I'll look for something better because the pushbutton (seen on the left) is difficult to press one handed.
John :chicken
John
Posted
Full Member
Here's where we got today:

From the 3 way turnout throat we have an engine shed road, station road, bay road, cattle dock road, goods warehouse and coal merchant road.
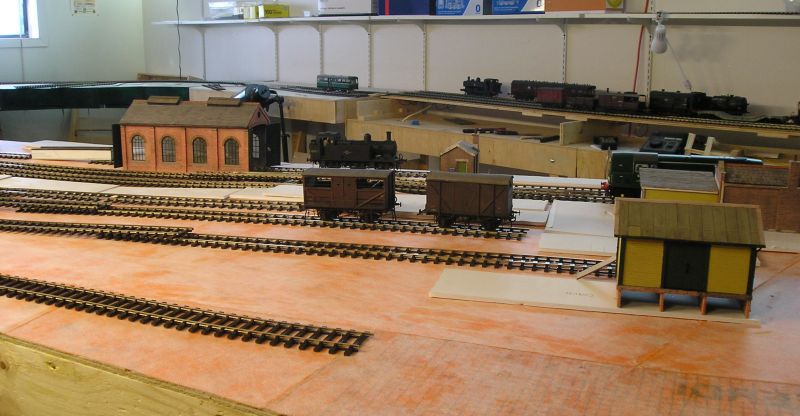
Looking across the layout. The sector plate is in the distance.

Looking from the end of the layout. Track planning is hard work.

Next job is to get some radius templates done and see about defing turnout radii for flowing track.
John
John
Posted
Full Member
You have a suitably suitably impressed helper there. Looks familiar…
Nigel.
©Nigel C. Phillips
Posted
Full Member
John
John
Posted
Full Member
Not much sign of any work being done…
Nigel
©Nigel C. Phillips
Posted
Full Member
John
John
1 guest and 0 members have just viewed this.