A Final Curtain Call for Westown-Heathfield
Posted

Full Member
GWR OO Gauge - 1930's rural Somerset - Winter 1937
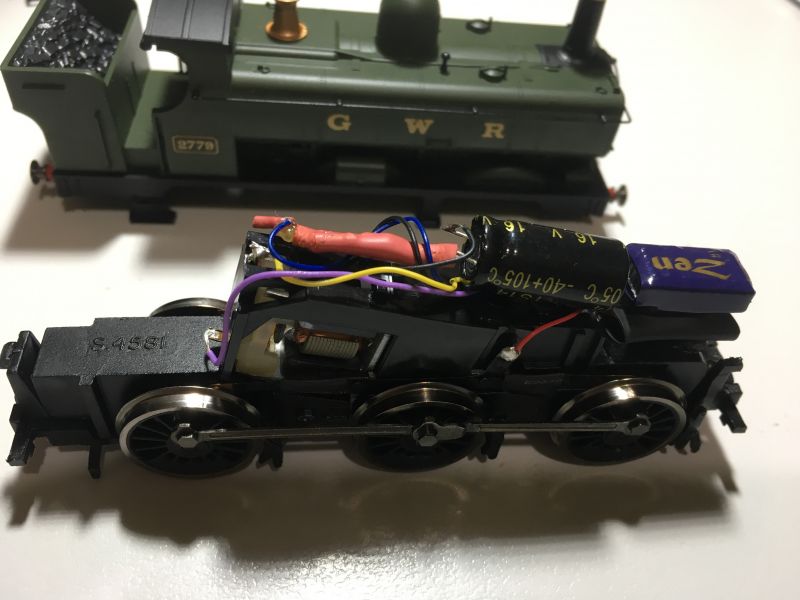
Class 2721 Dean Pannier tankThis recent Hornby release was a Christmas gift last year. An interesting addition to my collection of 0-6-0s that I figured would be a good "Guinea Pig" for some weathering experiments.
But first it needed my routine DCC + SA treatment, nothing out of the ordinary but worth capturing here for reference. I need to replace the decals to shirt-button or "Great Western" to suit my time period and make that coal load look more realistic but is a good runner given the modest price bracket.
I'd appreciate any feedback on refinements that might improve the model from it's basic form, aside from crew (that's on the list!)
 Last edit: by Colin W

Posted

Full Member
Improving the Hornby 2721 class. Not a particularly accurate model, but there are not that many open cab panniers models around unless you go kit build.
RCTS volume V has some details. 2779 has an enclosed cab (date?), and had pannier tanks and superheating from 1928 (latter later removed). If you want an open cab in shirt button days you should probably renumber. Or not worry.
Springs as built were vertical on top of the running plate. Later changed to underhung except for the rear wheels, which still had the springs in the cab (c.f. Dean Goods).
Sand boxes at the front are probably too small. The rear ones were in the cab (poorly done). Crew legs will need chopping.
Tool box position looks ok for a latter rebuild. Moveable feast, check photos.
Brake rods were on the outside.
Chimney is suspect.
Needs lamp brackets on running plate.
Some had top feed at various times. Check photos.
I found the issue with the model I had was that the small 3-pole motor ran poorly under DCC (Esu mini, sound, with the speaker in the bunker). From my notes: I replaced the chimney, the safety valves, the toolboxes, added lamp irons, real coal in the bunker, hacked the cab sand boxes so the crew stood between them, added a proper dart on the smokebox. Cosmetic brake rodding outside the wheels, and new guard irons at the front. Replacement vacuum pipes, buffers and couplers/hooks front and back. Kadee fine scale coupler at the rear. Would have cost less to build a kit :roll:.
Nigel
P.S. Not an easy EM conversion (doable but a lot of work), hence no longer with me. My notes are quite illumination on this. It ran OK through live and dead frogs without capacitors.
©Nigel C. Phillips
Posted
Full Member
Thanks for the detailed breakdown of issues. Your comments sent me back to revisit the excellent article at GWR.org.uk on the development of pannier tanks and I can see what you mean.
For whatever reasons it's been a regular so presumably popular Hornby release, there are 25 models according to the MRDB dating back to 1982, all from the same tooling I guess. Since it's not important to my setting, I'll stick to Plan A and use for experiments with weathering techniques and various detailing as per your suggestions. It can be an "extra" in the background setting with odd duties in the goods yard. One interesting minor detail that is included is a molding of a furled cab tarpaulin which could be replaced with an opened one.
Last edit: by Colin W
Posted
Full Member
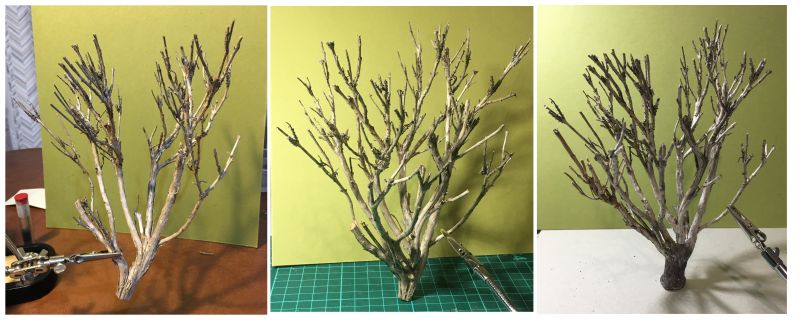
The recent accident that split a tree (post #74) prompted me to go back and finish some more outstanding jobs in the tree department. My favourite source of tree structures is Lavender wood, I've had a good supply bleaching and drying off during last summer and from these found a good starting point (1st photo).
I've lined the shots up so the changes can be followed. 2nd photo shows addition of 2 further main leaders as I complete the vase shaped tree structure.
Photo 3 shows some minor tweaks and additions but I can still see some pieces that need shortening. The trunk has been extended to accommodate a mounting pin using some air drying clay.
Last edit: by Colin W
Posted
Full Member
The Collett Goods doing some 'moonlighting' by pulling the 'Beetle' Cattle Van and a rake of Collett 57' Bow ended corridor coaches while the locals wait to cross, biding their time. This is a view from a different angle towards the tunnel and the Quantock Hills that I've not taken before. I wanted to give 2251 a good workout today pulling a decent load and this combination was near to hand for the job.

Meanwhile back in the real World, with summer fast approaching I've a mad rush to get current projects finished off before everyone descends on us for Christmas plus more and more time is spent on my gardening and other activities.
Posted

Full Member
Class 2721 Dean Pannier tank
I'd appreciate any feedback on refinements that might improve the model from it's basic form, aside from crew (that's on the list!)
Hi Colin,
I knew I'd seen an article on this loco somewhere and have just found it salted away in an old file, so here it is. Hope it is of some interest:
Swansea Railway Modellers Group - Detailing Hornby's Ancient Open-cab Pannier
Best,
Bill
Last edit: by spurno
At 6'4'', Bill is a tall chap, then again, when horizontal he is rather long and people often used to trip over him! . . . and so a nickname was born :)
Posted
Full Member
that sounds all very interesting, the sort of thing I had at the back of my mind when the latest reincarnation apeared last year.
Much appreciated.
Colin
Posted
Full Member
Hi Bill and Colin,Colin W wrote:Class 2721 Dean Pannier tank
I'd appreciate any feedback on refinements that might improve the model from it's basic form, aside from crew (that's on the list!)
Hi Colin,
I knew I'd seen an article on this loco somewhere and have just found it salted away in an old file, so here it is. Hope it is of some interest:
Swansea Railway Modellers Group - Detailing Hornby's Ancient Open-cab Pannier
Best,
Bill
Add leaf springs on running plate if backdating to pre-1930's. Otherwise it needs a closed cab.
I checked my shopping list. It definitely would have been less expensive to buy a kit, bonus would have been a decent motor/gearbox with a flywheel, better looking wheels, and a realistic chassis. :thud
Nigel
Last edit: by spurno
©Nigel C. Phillips
Posted
Full Member
The 2721 is a nice enough representative model of an open cab pannier and while I might eventually convert my own, I'll be building my ancient Alan Gibson kit for the similar Class 1076 Buffalo pannier first, accurate to the extent of my ability and research.
Best,
Bill
At 6'4'', Bill is a tall chap, then again, when horizontal he is rather long and people often used to trip over him! . . . and so a nickname was born :)
Posted
Full Member
Rule 1 applies of course. To most people outside of the wonderful world of GWR panniers it all must seem academic. Just another tank engine where the basic design was kept for 100 years. I always go by the 3 foot/1 meter rule - if it looks right job done.
Nigel
©Nigel C. Phillips
Posted
Full Member
Just one more photo, now that I've resolved the issue of the many fragile "dangly bits" on this model. To recap, the hanging central steps and four foot steps at the corners are all supplied molded in very fine PS to keep them near to scale and as a result break off at the barest touch once assembled. No way could I see this working for me so the issue has been parked, pending a solution.
Advance 2 months and for the footsteps I settled on using soft steel pins (from an old hair brush, the sort with plastic balls on the end of each pin) for the down rods. Bent to shape, and mounted with the aide of 1mm holes drilled though the Sole bar to enable more robust gluing.
For the steps to the central doors I didn't fancy a complete rebuild and instead settled on making the fixing to the underside of the sole bar very slightly flexible, so as to withstand modest force without snapping. The glue I used is a 100% PU (Polyurethane) that sets to a hard rubbery consistency, not dissimilar to the tack you find on the back of new credit cards to attach them to the letter. So far this seems to be very effective as long as you first roughen the smooth PS molding to enable a better take by the PU adhesive.
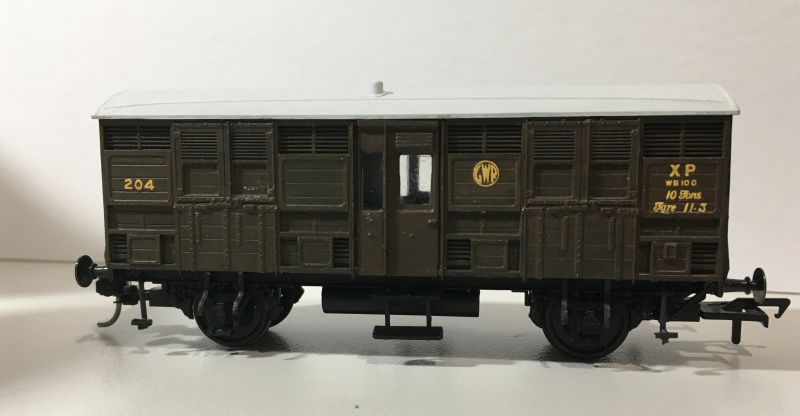
Presently, it has one Kadee to enable shunting and one tension lock coupling for connection into passenger trains. I've not yet sorted out how I'm going to organise couplings to link my XP wagons with mainline stock. Maybe the locos and front Coach will also need to be fitted with Kadees for simplicity? That's another reason it's first outing was pulled by a Collett Goods.
Progress elsewhere on W-H has slowed to a crawl as the garden takes precedence during the warmer months and I turn my attention to watering, weeding and keeping Possums, Lorikeets and straying Fruit Bats away from my various fruits.
Posted

Full Member
……………………………………………………………………..
Progress elsewhere on W-H has slowed to a crawl as the garden takes precedence during the warmer months and I turn my attention to watering, weeding and keeping Possums, Lorikeets and straying Fruit Bats away from my various fruits.
You should be so lucky !!!
Here, our priorities are fleecing all the plants that can't stand severe frosts, lagging outside taps and watering systems plus trying to keep nuisances like mice from coming inside where it's warm, wild boar from looking for succulent roots in our grassland, rabbits from eating everything showing the slightest tinge of green and, more annoyingly, "stink bugs" from getting into every conceivable nook or cranny they can find to over-winter. We don't have many possums, lorikeets or, thank heavens, fruit bats in this part of Europe !!

Last edit: by spurno
'Petermac
Posted
Full Member
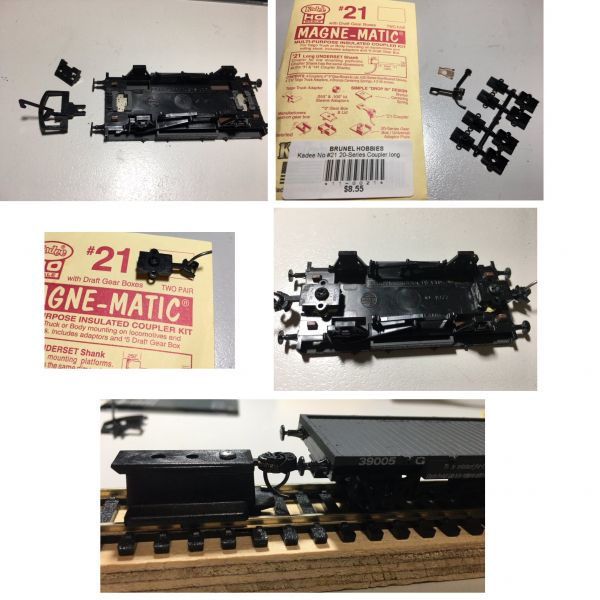
I wanted to capure the steps taken to fit Kadees to an unfriendly old-fashioned style of wagon chassis. Nothing new I know but just a very helpful reminder for myself when I find another 40+ year old Airfix wagon for W-H.
The 5 steps shown in the photos are:
1) pulling off the old snap-in coupling and sawing off the support mounting structure. Once you've done one of a style the rest are just cut / filed back to the correct height.
2) I chose the #21 Kadee because this has a 10mm arm and I have tight curves on W-H. There is a small "Gear Box" assembly that holds the spring plate and coupling arm in place. Kadee give you lots of bits for all sorts of possible installations but the ones I needed are shown here
3) Using the 2-56 screw as a former, the bits are assembled and the lid glued on with CA.
4) the gaps in the chassis floor were filled with Milliput and the Gear box assembly held in place with the now shortened 2-56 screw that was just pressed in. I'm hoping this will make any future maintenance easy by just unscrewing the gear box
5) Test on the height gauge, spot on first time! Well I did have a template as this was the second Airfix I'd converted
Posted
Full Member
Those of you following Sol’s excellent “00 Gauge - Devan and Summersett V4†topic may have seen his recent post #238 about the Short Circuit protection he uses with his NCE Controllers.
I’ve an NCE PowerCab but have been put off by various degrees of difficulty (costs and logistics) from buying the NCE short protection kit which with 6 sector modules, is 5 times overkill for my needs. So, Sol's home-built unit caught my eye and I set about the task.
Sol has given me a great deal of help “offline†on this project when I hit some snags, all of which guidance I’m very grateful for. Not everything is fully resolved but at least now a short does not reset the Controller and bright lights appear on my Control panel to catch the user's eye.
.
Details of the circuit wiring are in Ron’s post. I needed to downsize the Globe to 10W 12V to keep the current under the 1A threshold of my smaller unit. For reasons not yet understood the available rectified voltage will not drive my buzzer so I’ve settled for now using LEDs.
The unit I built has some merits (IMO) having been cobbled together from almost all recycled materials, excluding the Festoon Globe.
- A UK style switched Power Board was cut down to give me a built-in on / off switch, cable input, tie and screw fittings plus a tidy framework. The old incandescent lamp holder did nicely as a spot for my LEDs.
- A UK fused plug supplied me with the fuse holders that I could widen to hold the Festoon Globe.
- On an old power board I found a full wave Bridge rectifier circuit already correctly wired up, just snip out and tidy up for use here
- Some recycled LEDs from wherever.
Last edit: by Colin W
Posted

Site staff
:thumbs
Ed
Posted
Full Member
As I posted earlier, the Short Protection I'd built was working but something was not right. The DC Output Voltage from the Rectifier was fine but the current it delivered was a mere trickle and the reasons for this not clear. The frustration of this was that I could not drive a buzzer, one of my key requirements to alert the youngsters to turn off power to the track, should a short occur.
With the same circuitry working fine on Sol's NCE ProCabs, I set about doing some diagnostics and then trials to track down the problem here.
Step 1 was to replace Standard Diodes in the Rectifier with Schottky Diodes which are better suited to high frequency AC applications. I held high hopes as the theory made very good sense but the practice was a different story. Still no buzz!
Step 2: my good friend and resident expert on matters of electronics suggested a last hope, try a smoothing Capacitor across the DC output. It (470uF 16V) worked like a charm, the DC output jumped up about 0.8V and there is now enough current to drive both the buzzer and 3 LEDs.
Step 3: I swapped back the original Diode Rectifier and that also worked fine.
A few short tidy-up steps and the Short Protection is now fully complete and working perfectly; a good way to end Friday 13th!
Posted

Site staff
As I said on the e-mail to you, my basic diodes work OK without a capacitor , so I guess it must be the differences between Power cab & Power Pro command stations.
Ron
NCE DCC ; 00 scale UK outline.
NCE DCC ; 00 scale UK outline.
Posted
Full Member
The challenge was there in the subtitle of this topic, “what can be done in a modest space?†Well, I’ve learnt a lot in my 7 months here and one is that my heading was well chosen. 12 of my layouts would fit in Mr Miltenburg’s planned “Going large…â€, and likewise in many others' settings. So, what we lack in size we must try to make up for with creativity and now the sunny Spring bliss seen in Posts #1 and #7 feels a long time ago.
As the days shorten there is a chill in the air:
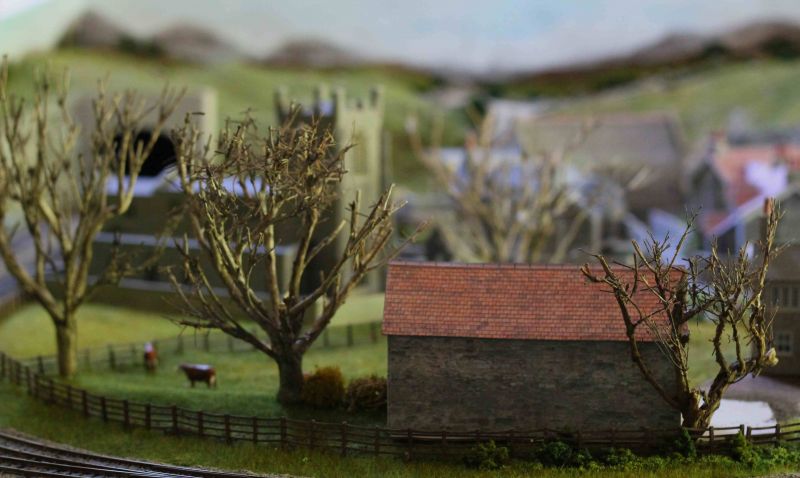
Heathfield; a layout with changing seasons and this is the first of a few winter photos.
Help has arrived today with C & S sleeping over, they were delighted to see the new look wintry scenery and ideas for other additions were flowing fast.
Building trees without foliage introduces new challenges and discoveries, of which more later.
Last edit: by Colin W
Posted
Full Member
'Petermac
Posted

Full Member
I am a firm believer that large is not always better - that sets me a challenge to make my layout look as good as you and others do with a smaller footprint. I've gone large because I am a Meglomaniac!!
Have a great Xmas and prosperous New Year
Barry
Shed dweller, Softie Southerner and Meglomaniac
1 guest and 0 members have just viewed this.