A Final Curtain Call for Westown-Heathfield
Posted

Full Member
GWR OO Gauge - 1930's rural Somerset - Winter 1937
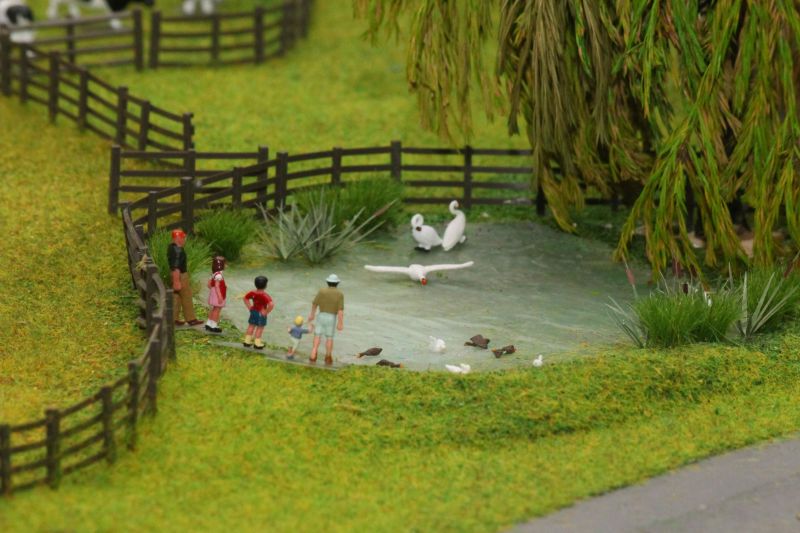
Heathfield River and Village PondI'd been planning something on this topic and after reading "Headmaster's" recent posts on water it seemed an appropriate time.
regarding the following pics:
Making ripples; it depends on the 'water" material you're using but I've managed something I was happy with using both clear silicone sealant and the (IMO poorly named) Woodland Scenics E-Z water.
With the silicone I just laid it flat over the entire area then overlaid thin polythene film which I knew I could peel off later. Quickly, while still mobile I pressed in the required ripple contours using a suitable template. When set after a day I peeled the PE film off. You can see the result in photo 1 below. It looks better to the eye and I'm often getting favourable feedback on it.
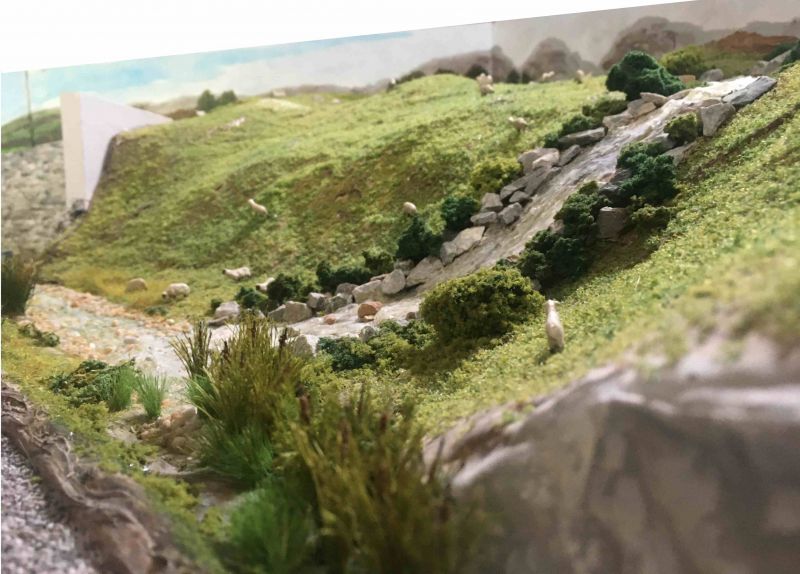
I also used it to represent a rapid running creek bed and there used a disposable fork to draw in the textures. Silicone is good for this as acrylic paint doesn't wet it so separates into tiny drops when roughly brushed on, ideal for a tumbling stream alongside the track.
With the E-Z water, I wanted to model a stream running steeply down hill. Again the fork trick worked very well to build in textures but this is not a material I found very friendly at all. It yellows quickly at the high melting temperature, is hazardous when hot so I took great care using heavy leather gloves and it sets super fast.


 Last edit: by Colin W

Posted

Site staff
Ron
NCE DCC ; 00 scale UK outline.
NCE DCC ; 00 scale UK outline.
Posted
Full Member
Christmas saw Westown-Heathfield getting a very good operational workout with the new Short Protection doing a fine job when the Operations called for by the Operator (grandchild) were beyond the abilities of YT to keep up with the action. Usual scenario was a forgotten point change until too late! "Grandpa - keep alert!". Another benefit was I didn't feel the need to be down in the railway room at all times that locos were rolling.
With the dust settling after most of our visitors have left and with the heat outside at scorching levels I've returned to finish my winter Scenics Project
One annoyance is that my back-scene remains resplendent in the bright colours of Spring while the mood elsewhere has turned decidedly chilly. We even have snow on the peaks over Heathfield. But the way I've made the back-scene I never envisioned a replacement and for simplicity I'm trying to build a suitable overlay to retain the existing structural elements.
Spring

Now with about 1.5m to paint it should keep me occupied for a while.
Posted
Full Member
With young help on hand progress has been rapid, the village end of the back-scene is nearing completion, a simple overlay between embankment and sky that works quite well when you compare with "Spring" in the previous post.

All the fine detailing of the many trees along the sky line were completed by young C during her extended stay here
Last edit: by Colin W
Posted
Inactive Member
Cheers
Evan
Posted
Full Member
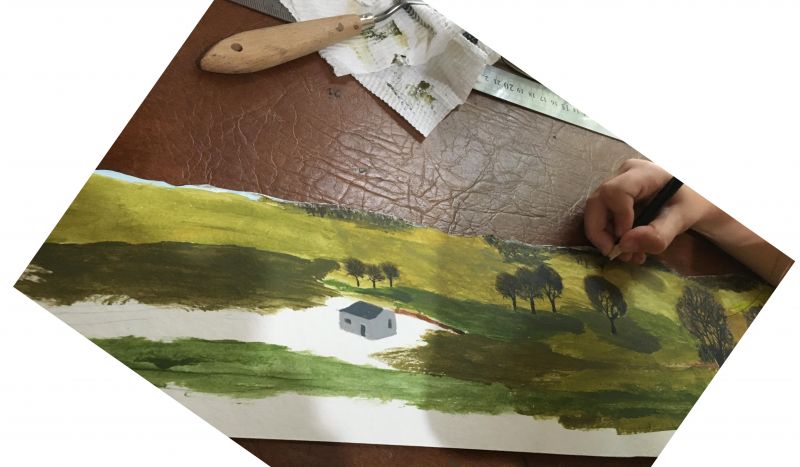
My young helpers C&S spent an enjoyable 10 days with us; we're now recovering!
In this shot, C is continuing work on the back scene from the earlier post which has come together very well thanks to her deft touches working on the finer details.
Feeling a little left out, S was looking for her own project and she's shown here and in the inset finishing off a pair of winter hedgerows for me. First applying the PVA to the base, then some green flock, then some dark brown wood shavings. The overall result was as good as I could have done myself. It probably was the longest time she sat still the entire stay!

Posted

Full Member

It would avoid us thinking "child slave labour" if you'd post a photo of their contract of employment and payslip ………………..

'Petermac
Posted
Full Member
#1 neat idea but they don't come cheap and are decidedly high maintenance for such youngsters, e.g. a babycino every morning when I make my coffee (but I do draw the line at including a marshmallow)! Movies, a visit to "France Soir" for dinner etc. Are you up for it???Lucky you Colin - if you hire them out and they'd like a trip to France this winter, I could do with some hedges for Maxmill ………….. :roll:
It would avoid us thinking "child slave labour" if you'd post a photo of their contract of employment and payslip ………………..
#2 interesting point as we'd been reading a kiddies illustrated "Oliver Twist" just the previous night and there were no rumblings about them slaving away in a Workhouse :cool:.
Posted
Full Member
Another visit from C&S yesterday and both were keen as mustard to get into some more modelling. While C continued detailing our back scene, young S wanted to make another hedgerow but this time by herself. A smaller section was chosen and it seemed a good time for me to capture the various steps we use.
Photo 1 shows the raw materials deployed:
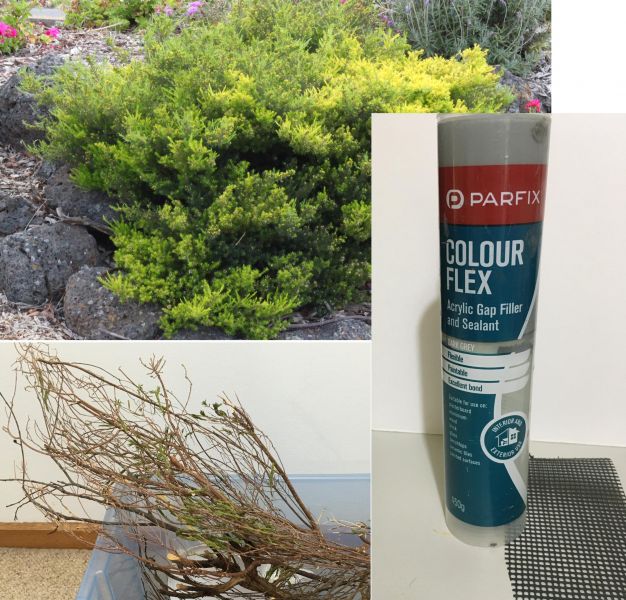
Previously harvested lower branches from our 'Golden Diosma' (Coleonema Aureum) which has masses of near perfect ultra fine branches once it's dried off. My stock, mostly dry is shown in the tub. In addition just some simple Polypropylene Mesh and a tinted acrylic sealant.
S had great fun unaided snipping up all the branches to length, once the size had been agreed. She cut the mesh to shape to fit the recess in the embankment together with a brief lesson on "measure twice - cut once" (probably forgotten now, we shall see!) Then we used a suitable heavy slab of flat glass; squeezed out a generous blob of sealant, overlaid the mesh and inserted the cut branches.

The branches can aligned after 30-60min when the sealant partly cures, then scraped cleanly off the glass the following day once fully cured. All that remains for the girls' next visit is the final detailing.
The final shot shows the earlier Hawthorn hedgerow work (L) and latest sample (Ctr) both in place. King James I pulls some Collett 58' Bow Ended Corridor stock up the mainline.
In this photo we can see the near complete winter back scene overlay, hedgerows and in the far rear a first glimpse of the elusive Westown. The plan was that Town and Country, constrained by my 2.4m long modelling space would be physically adjacent but mostly seen separately when viewed from the front. Here's a test, the outskirts of Westown just get a look in behind the mostly rural view.
Separate note to self; the "stone" bridge was a very early crude effort before I discovered the marvels of DAS. A rebuild is on the list of current year jobs.
Last edit: by Colin W
Posted
Full Member
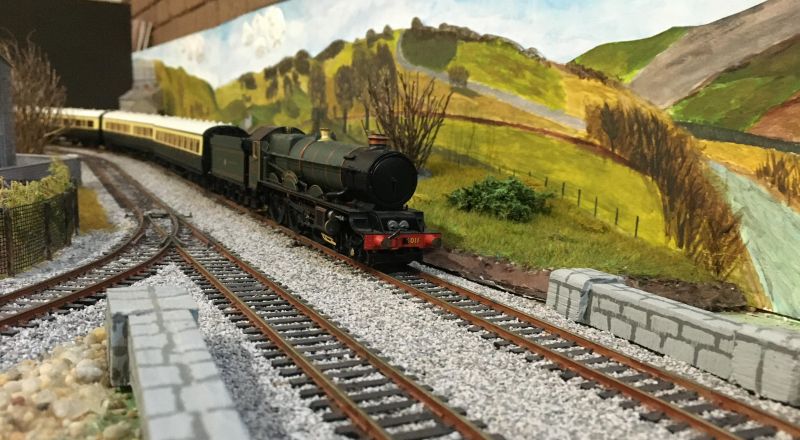
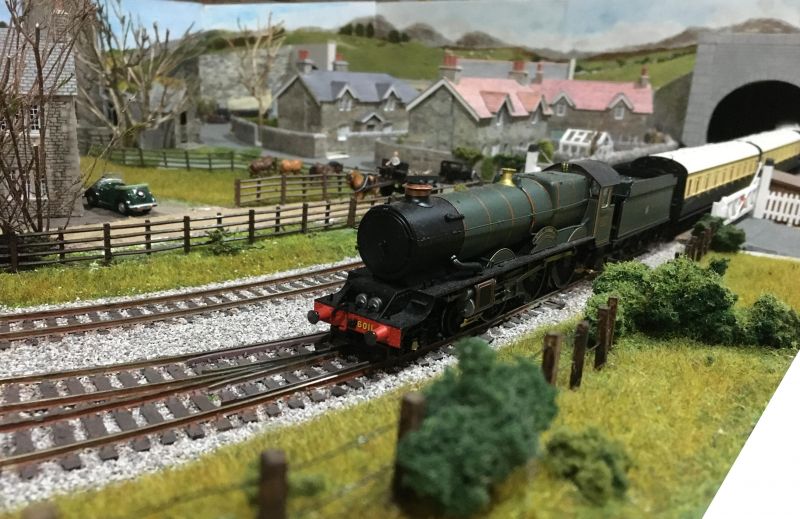
There's a school of thought that when it comes to the GWR King there's no such thing as too much of a good thing. Here 6011 steams through Heathfield at full bore, some lucky folk escaping winter to the English Riviera perhaps?
Meanwhile on to more practical matters, I'm turning my mind to how to cope with an ever expanding collection of stock. W-H is barely big enough to run decent sized trains, let alone have space for a fiddle yard so what's to do?
Some time ago I saw a neat cassette design and I'm looking to come up with something similar. They don't need to be ultra robust as they'll only travel to/from layout to a storage "wheelie" that can slide under the baseboard. The bigger challenge is the access point to the layout. For that we must come to…. (drum roll) "The Big Reveal". So far there's just been a hint of where Westown fits in to my setting. More will be revealed next time.
Posted
Full Member
There is only one access point where I can load / unload stock from the layout and that is beyond Westown Station. The little that we can see here of the town nestles in the northern 55cm of the available 240cm length of the W-H layout so little surprise that it's not featured so far here. There's barely enough room to squeeze in a 2 platform Station and nearby Engine Shed (oh for a "bit" more space!)
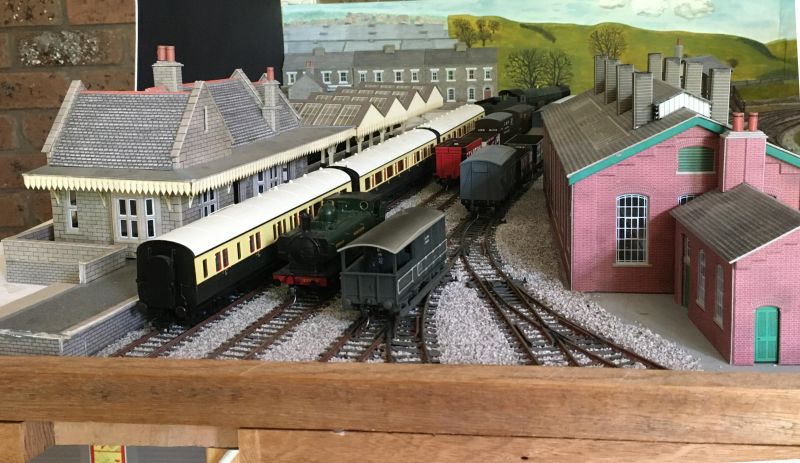
Platform 1 sits behind the island canopies, Autotrains (with Rule 1 applied liberally) and other local services leave from there, as at W-s-M . Likewise Platform 2 nearest us is presumed to be a through line but with many services originating here and heading back to the capital. Space restrictions prevented there being a down line with its own platform. Despite all these limitations it still reminds me of my trainspotting days down on Platform 2 at W-s-M, where you might find that the afternoon return "The Merchant Venturer" was being pulled by a King Class if you were lucky.
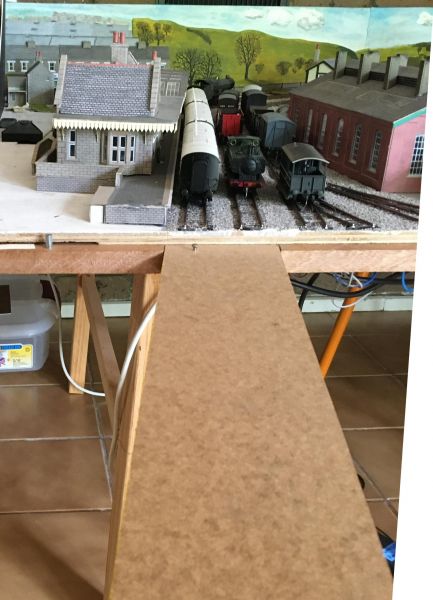
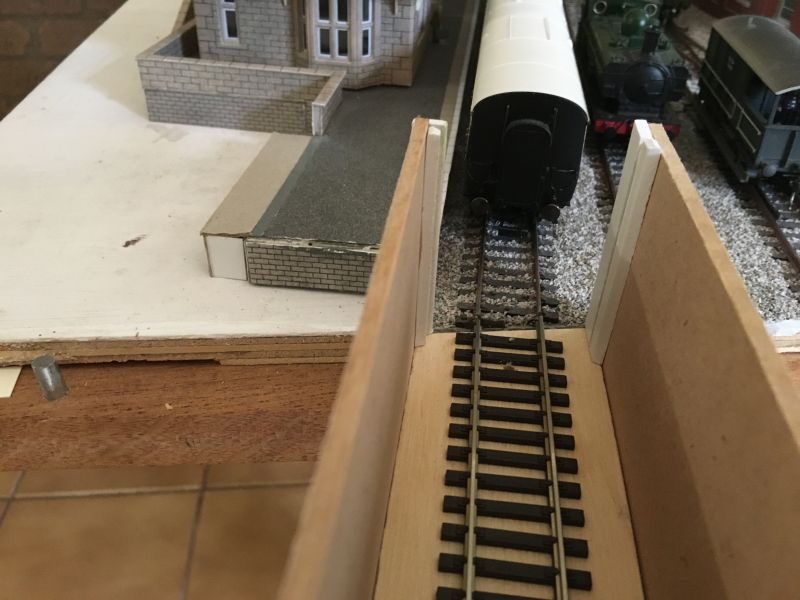
Moving on to practical matters, the cut out at bottom left allows a support plank to be inserted flush beneath the base board so that cassettes can sit flush with the baseboard surface and tracks as shown below:
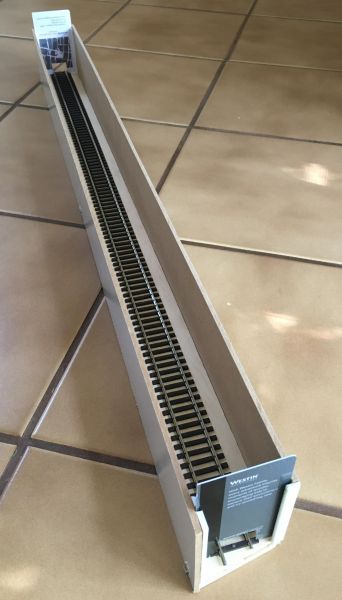
My first trial cassette is not wired, just storage for a rake of 3 * Collett 58' Bow ended corridor coaches. My idea for the storage has little new, drawing from the excellent Mark I and II designs of Nickwood on Much Murkle as he described them here:
Latest https://tinyurl.com/w4aphou
Original https://tinyurl.com/sxgxuu6
This first one was a hybrid of the two, no need for the robustness for a layout on the move. Just cheap and easy to make and use.
The Basic Cassette Design
12mm plywood base and 3mm coated MDF sides.
PECO Flex 100 track
Nick has developed a neat design for the ends, allowing exit from either so that stock can be rotated and a drop-down gate to hold stock in place in the cassette. As his end structures are overkill for me, I built simple plastic card inserts that can be easily lifted in/out.
Alignment with the layout track is via a simple screw fitting, and the stock is ready to "download"
finally we see the filled cassette ready for removal.

Last edit: by Colin W
Posted
Full Member
What do you mean by "alignment to the track is by simple screw fixing" ? Are there wires attached somewhere or does it sit on "powered" screw heads ?
The station looks cozy. :thumbs
'Petermac
Posted
Full Member
Sorry, that's not very clear at all is it!That's neat Colin and all you need really.
What do you mean by "alignment to the track is by simple screw fixing" ? Are there wires attached somewhere or does it sit on "powered" screw heads ?
The station looks cozy. :thumbs
What I meant was I align the cassette track with the layout track by way of the screw head in the support timber and a corresponding sized hole in the cassette. This prevents any movement sideways or back and forth once the screw head is engaged in the hole. So far it's worked perfectly well and is quick to connect up. Will see how it goes or if I need something more robust.
The screw head can be just seen in the 2nd photo near the edge of the layout. I wanted something simple so thought I'd try this before designing anything more complex.
Regarding power, for storing rolling stock the cassettes are unpowered. I'll use the "Maradonna" or "Hand-o-matic" method to load and unload. Stock can always be backed up to near their final position.
I will need to connect power to cassettes for locos. That's next on the agenda.
Posted
Full Member
Will you have some means of avoiding wear around the screw head "socket" on the cassette or don't you see that as a problem ?
'Petermac
Posted

Full Member
On my old Yarslow layout where I used double-ended cassettes and cassettes that joined together, I found that it was best to build the cartridge and then lay the track on it without fixing down the exit ends. Once the cassette had been put into position on the layout, the final 3 inches or so of track was fixed down onto it. That way, I had perfect alignments.
You have probably discovered or bettered this method but I thought I would throw it out there.
Barry
Shed dweller, Softie Southerner and Meglomaniac
Posted

Full Member
Neat. Not sure about slotting a cassette into a screw head though. Hardwood or metal dowel/peg ?
Nigel
©Nigel C. Phillips
Posted
Full Member
thanks for the comments. There are a few issues that limit my options here, as ever I'll do it right next time.
Firstly all the lines coming from Westown are laid and ballasted, the Goods yard extension (not yet shown) was laid by using continuous track and cutting each fixed track (6 in total as shown in 1st photo) in situ for correct alignment of them all. This precludes doing the same for the cassettes.
The main challenge is getting the locating hole in the cassette floor positioned in exactly the correct spot if drilled from measurements, remember the end is angled which raises the bar (for me).
My solution was to drill a very fine hole right thru the screw hole in the support plank so that when a new blank cassette floor is correctly positioned (minus the screw), I can use this fine hole as a guide to drill upwards marking the correct spot on the cassette.
So, to get alignment for a new cassette I followed these steps
- Remove the aligning screw in the plank
- Bring the blank cassette base up to the cut end of the layout and align as required,
- Drill the alignment mark in the bottom of the base
- Drill out with 9/32nd drill and then light countersink to create the mounting hole
- Replace locating screw and test the floor for fit
- Bring up the track and align with the layout
- Carefully mark and fix with a 1mm track nail at the junction then further along the cassette
- Once in partly in place the rails can be wiggled to create a very close rail gap.
- Cut off excess flex track at the other end flush with the edge
- Rotate the cassette and repeat the early steps to create the second locating hole
Last edit: by Colin W
Posted
Full Member
I'm lazy - I would have got the cassette in position and clamped down, then just drilled straight through between the sleepers and into the baseboard with a 1/4" /6mm bit. Followed by a steel pin or wood dowel.
One suggestion that addresses the issue of electrical connectivity is to use spring loaded metal clamps fixed to the board either side of the cassette position and simply slide it in. Connect through the springs. Not my idea. I would use crocodile clips on wires from the track to some studs on the sides of the cassette. Simple and known connection.
Nigel
©Nigel C. Phillips
Posted
Full Member
1. fine for 1 cassette but I couldn't see an easy way to do more once locating pin is firmly in place.Hi Colin,
I'm lazy - I would have got the cassette in position and clamped down, then just drilled straight through between the sleepers and into the baseboard with a 1/4" /6mm bit. Followed by a steel pin or wood dowel.
One suggestion that addresses the issue of electrical connectivity is to use spring loaded metal clamps fixed to the board either side of the cassette position and simply slide it in. Connect through the springs. Not my idea. I would use crocodile clips on wires from the track to some studs on the sides of the cassette. Simple and known connection.
Nigel
2. Agreed, that's my plan to connect to studs or the like on the cassettes
Posted
Full Member
1 guest and 0 members have just viewed this.