Members Monthly Project - March - Complete
Posted
#115888
(In Topic #6034)

Legacy Member
Project only here please. No comments.
I have moved the February Project and renamed it as because of it's comprehensiveness and ongoing input it has spread into March.If Perry is ready and available then it's time for his tutorial on Scratchbuilding.

Posted

Full Member
Sorry, I missed the previous posts.I have moved the February Project and renamed it as because of it's comprehensiveness and ongoing input it has spread into March.
If Perry is ready and available then it's time for his tutorial on Scratchbuilding.
Would you rather I wait until the current one is finished, Bob?
I don't mind either way, but I don't want people to feel there is too much too keep up with by having two projects running at once.
I'm ready to go and have my project designed. :thumbs
Perry
 Last edit: by Perry
Due to cutbacks, the light at the end of the tunnel has been switched off.
Posted
Full Member
I intend to try to show how easy it is to start scratchbuilding, using a minimum of materials and tools.
I will try to explain some of the simple techniques I would use in a small project.
You will need a small amount of 1mm plastikard, plain white is fine, some microstrip, solvent and/or tube glue, a craft knife and a steel ruler.
I will mention any other things we will need as we go along, but there shouldn't be much.
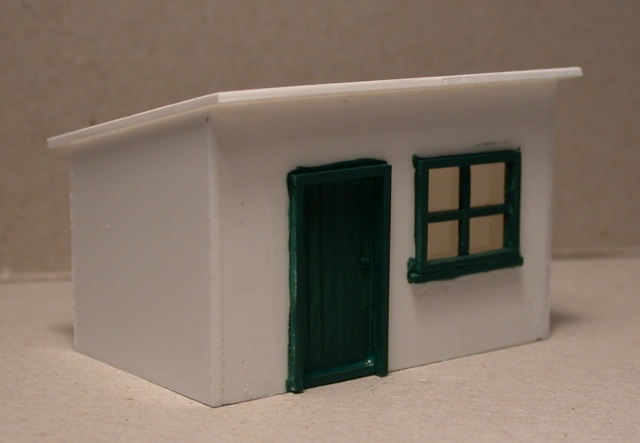
This is an example of what we're going to build. The exact size is for you to decide, although I will state dimensions of parts. The finish is also yours to decide. Wooden planks, concrete, whatever you choose will be OK.
Here is what I'm going to build:
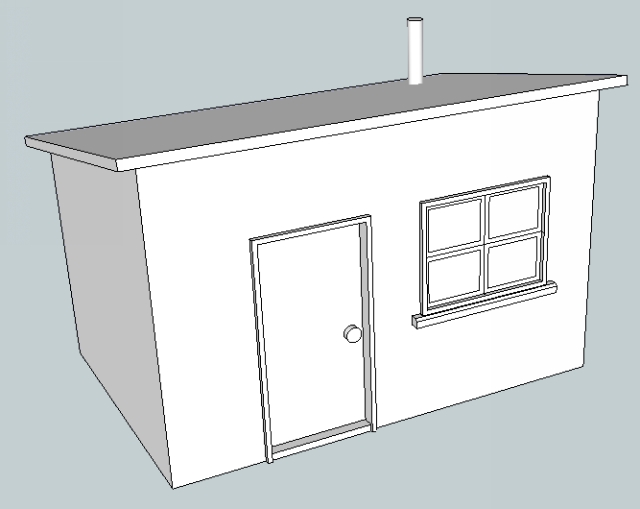
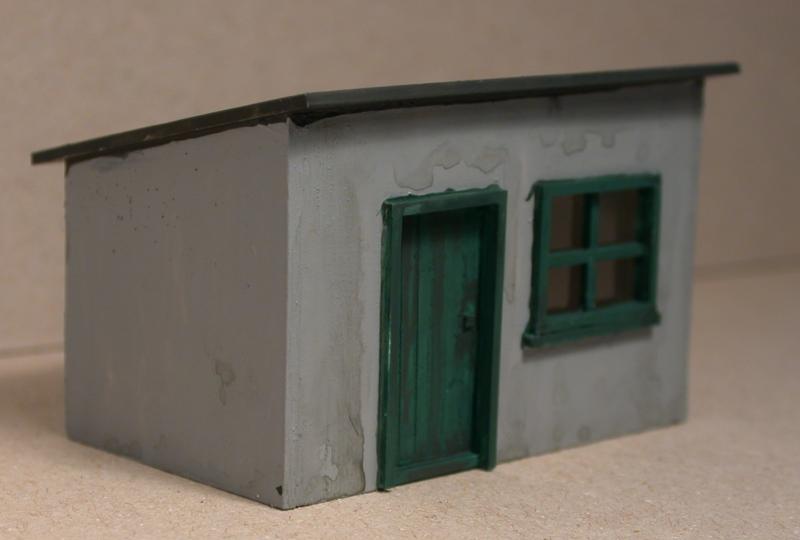
As I said, you can choose your finish, but here is an example of what it might look like:

I have prepared these illustrations using a free computer program called Google Sketchup 8. It's a wonderful tool for designing structures and helping you figure out how to build them. It can help identify where you might run into a problem long before you get to cutting the parts out of plastikard.
You can download it here: http://sketchup.google.com/download/gsu.html
There are lots of tutorials on the internet. It's not a hard program to learn and I highly recommend you get yourself a copy.
Perry
Due to cutbacks, the light at the end of the tunnel has been switched off.
Posted
Legacy Member
Posted
Full Member
People have commented over the years on the accuracy of the fit of the parts on my models. Part of that accuracy comes from practice, which I can't teach you, but what I can do is show you a few of the little hints and tips that make it easier.
I did say this was going to be a 'basic' scratchbuilding project. Well, I'm really taking it back to basics, starting here, with how to measure and mark out plastikard.
Supposing you want to mark off a measurement of 27mm along one side of a pice of plastikard. Lay the plastikard on the cutting mat, push the ruler against it, grab your pencil and scribble a mark on the material. Right? Wrong. There are a couple of problems with this.
1. The position of your ruler makes a difference, of which more in a little while.
2. For anything other than very rough marking out, never use a pencil. The lead of a pencil is much too wide to give an accurate line and it doesn't hold it's point for more than a few seconds.
Always use a knife or a sharp steel point for marking out. The knife can mark entire lines or points and the steel point can be used for pricking locations such as the corner of window openings. Remember that plastikard is cut by scoring with a blade, then snapping the material off, so mark very lightly if it is not where a cut is eventually going to be made, otherwise you may weaken the material.
*************************************************************************************************
Let's deal with the position of the ruler first. If you place the ruler between your body and the workpiece, so that you are leaning over it with your knife, you can't really see where the point of the blade is with sufficient accuracy.
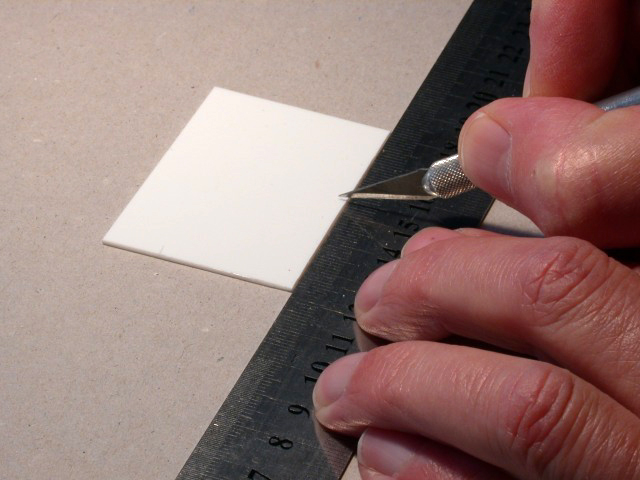
It will be difficult to mark the material, depending on it's thickness, because the edge of the ruler is in the way. In trying to 'rock' the blade over the edge of the ruler, it's easy for inaccuracies to creep in.
All you need to do to remedy this is to move the ruler to the far side of the workpiece.
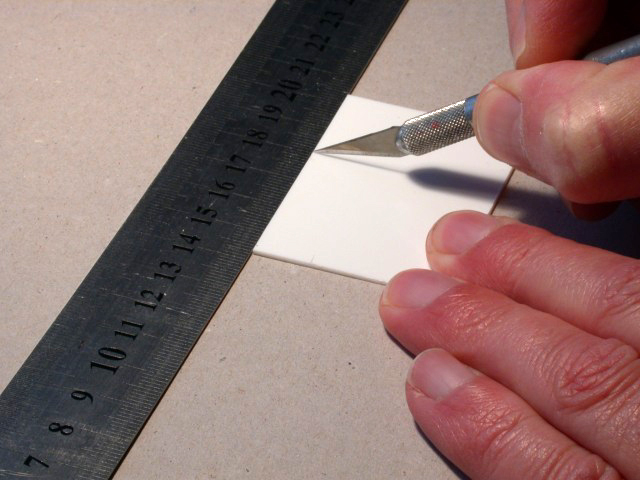
Now you can see exactly where the point of the blade is against the ruler. It is then easy to mark off the exact measurement you want. In fact, this method makes it simple to work to 0.5mm accuracy should you wish to do so. I have been known to work to 0.25mm or thereabouts, by placing the knife point at what I call a 'thick' or 'thin' millimetre mark; just over or just under a mark, but not far enough along to be 0.5mm.
We'll deal with point-marking when we start to build the hut.
Before the next instalment, it would be handy if you can beg, borrow or steal a small try-square for marking and checking right-angles, and a piece of glass. Glass is my favoured work surface for assembly, because it's nice and flat and most glues and adhesives won't stick to it.
Perry
Due to cutbacks, the light at the end of the tunnel has been switched off.
Posted
Full Member
You can cut all the main parts from a piece 105mm x 67mm (a little less than 4 1/2" x 2 3/4") if you lay it out carefully, but you may wish to start with a piece a little larger to allow for waste when squaring up, of which more later.
These are the parts we will need:

Ignore the door and window at this stage.
Here is the way I have set it out, but you can choose to do it differently if you wish. You could use offcuts instead of one single piece, for example.
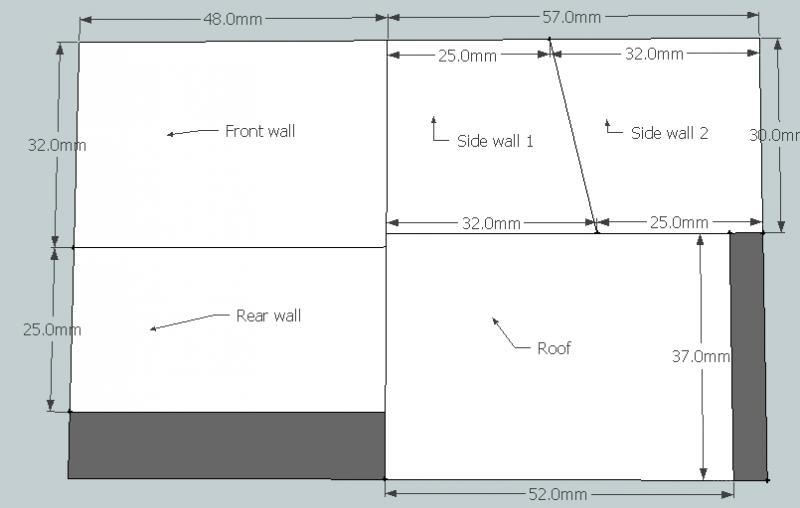
The dark grey areas are the waste pieces which can go into the 'bits box'; never throw anything away. :thumbs
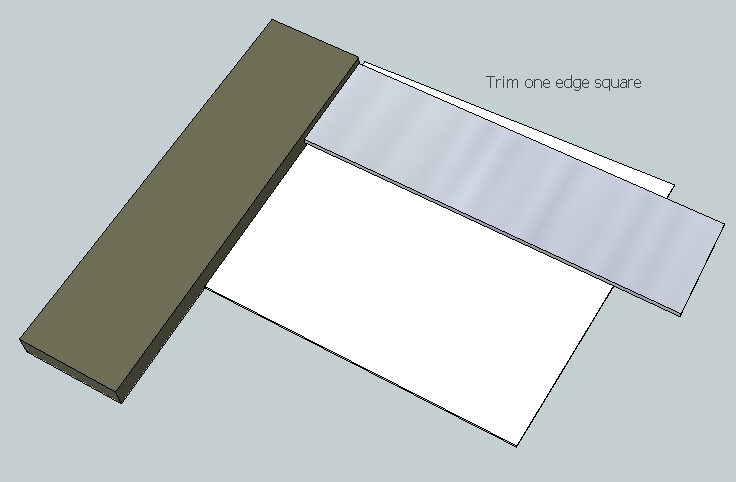
Before we start marking and cutting, we must make sure we have a straight baseline and a square corner to work from.
Check with your steel ruler to make sure you have a straight edge on the plastikard. If you don't, score along the ruler with a sharp knife, then snap off the waste piece.
Then place the stock (the handle) of your try-square against the edge you have just checked or straightened. Move the blade of the try-square up to the top and see if the plastikard is square.
If it's not - and the chances are it won't be, even on a new piece of plastikard straight out of the packet - then mark it along the top of the try-square blade and snap off the waste piece.
Now, before you do anything else, mark the right-angle you have created with pencil so that you know which one it is.
This really is important, as once you've moved the plastikard around on the bench once or twice, you will almost certainly lose track of which corner it was! Other corners may look like right-angles, but might be slightly off, in which case so will all your measurements be if you use the wrong one.
You should now have ready a piece of plastikard big enough to cut all the main parts out of. Refer to the cutting plan above. I would suggest, for the purposes of this exercise, that we take the top left-hand corner of the cutting plan as being our right-angled corner. All our measurements will be made from this point of origin.
OK. That's enough for today. Despite not having achieved a lot in the actual build, we have laid some solid ground-work which will stand us in good stead for later. Tomorrow we will mark out and cut the pieces.
Perry
Last edit: by Perry
Due to cutbacks, the light at the end of the tunnel has been switched off.
Posted
Full Member
Using a sharp pointed knife blade, and setting the ruler against the plastikard the way I demonstrated above, mark off the dimensions you require.
A little tip here to make it easier; if you are going to measure (for example) 37mm, hold the ruler so that the odd 7mm mark is at the edge of the material, then you can place your knifepoint at the appropriate ten-millimetre mark which is usually a larger mark to 'aim at'.

If your eyesight is anything like mine, trying to make certain my knifepoint was on the correct millimetre mark would be a nightmare.
Now try it this way:

The 'odd' 7mm of the 37mm required is set at the left hand side of the ruler. The knife blade then goes at (in this example) the 14cm mark; much easier to see. :thumbs
It may seem a bit strange at first, but it is now a technique I use almost exclusively when marking out. The only thing you must bear in mind is that you need to count the correct number of whole centimetre divisions - three in this case.
To mark and cut the plastikard, make a tiny nick into the surface of the card at your chosen measurement, just pushing the knife point in enough to leave a small mark in the surface.
Make another similar mark at the opposite end of the line you are going to cut, remembering to measure only from the two square sides.
Once you have your pair of marks, carefully put the point of the knife blade into one them and slide your steel ruler up to it. Without disturbing the ruler, move the knife point to the other mark. Then slightly move the ruler so that it's also rests against the blade at the second mark. Re-check that it hasn't moved from the first mark - do it with the point of the blade. If both marks are aligned with the edge of the ruler, draw the knife along to make the cut. You should be able to feel the point of the blade enter the two marks you made. This is a good check that the cut is accurate.
For the hut project it's quite possible to make all the cut marks at once before separating any of the parts. Don't press too hard with the knife. You don't need a deep furrow. All this will do is raise a 'burr' on either side of the cut line which in some cases will need to be removed prior to assembly of the parts. I'll tell you how to do that later.
OK. Let's assume you've marked out and made all your cuts. Gently bend the plastikard away from the cut surface, moving your fingers along the line as you bend it. It should snap easily and accurately along the line. The finished cut does depend a little on the type and quality of the material you are using. For example, I find I get a better, cleaner result with 'Evergreen' plastikard than I do with the cheaper stuff that I buy in bulk. I'm using some cheap stuff for this hut and the cuts are not as perfect as I would expect using a higher grade plastikard.

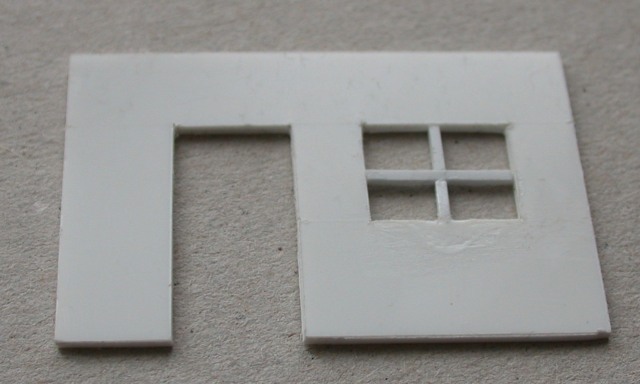
So here are the parts I cut out. The two pieces of scrap have gone into the bits box for recycling.
I have done a dry assembly of the parts using the try-square to make sure it all fits together. The parts are held together with pieces of masking tape.
Note that the end walls fit inside the front and rear walls.

If you don't do this there will be problems with fitting the roof.
That's enough for now. I can't believe how much I've written on the simple subject of measuring and cutting out. :shock:
Perry
Correction: Thanks to Stu, an astute observer. :shock:
The end walls fit OUTSIDE the front and rear walls, as in the photo above, and not inside as I stated. My apologies. :oops:
Last edit: by Perry
Due to cutbacks, the light at the end of the tunnel has been switched off.
Posted
Full Member
Before we start, take a close look at the parts you have cut out.
Depending on the sort of plastikard you are using, one face might be much shinier than the other. If that is the case, the shiny side goes inwards. In other words, the less shiny side of the material is what you’ll be painting on later so that needs to be to the outside.
As we marked out and cut all out parts from our square sides, the various pieces should all themselves now be square (yes, OK, except the sloping tops of the end walls).
That means that we should be safe to mark out the door and window openings from any of the sides. I suggest that you choose the bottom and one edge and do all your measuring from there.
Make sure you have the front wall piece; it’s the taller one.
Using the ruler the correct way, mark in the lower position of the door. Mine is 10mm from the left edge and is 11mm wide. The door opening is 23mm tall. Mark it out very lightly with the point of the knife.
The top of the window is aligned with the top of the door, just to keep it simple.
The window opening is set in 6.5mm from the right-hand side and is 14mm wide and 11mm deep.
If you have laid it out accurately, you will also have 6.5mm between the window opening and the door opening.
From the left there should be: 10mm wall, 11mm door, 6.5mm wall, 14mm window, and 6.5mm wall. This totals 48mm – the correct width of the wall.

I’ve purposely made some of these measurements a little ‘challenging’ to encourage you to work accurately. There is no reason you can’t shift the window left or right to a whole millimetre mark if you would feel happier to do that though.
When you have the door and window openings marked out lightly with the knife, prick the top corners of the door opening and all four corners of the window with a sharp metal point. This will help locate the tip of the knife blade when we actually cut them out. I use an old pair of compasses for this job.
Making sure you have a sharp blade in your knife, begin cutting the window opening. Line up your ruler by placing the tip of the knife blade in the prick-marks, as you’ve done before, checking each end before starting to cut. Don’t press too hard. Several light passes with the knife are better than a deep gouge. Don't try to go right through the material. Always try to cut so that your ruler is on the ‘good side’ of the part you are making. That way, if the blade should slip, it will go into the waste piece and not into the part you want.
Don’t worry if you nick the plastic outside the corners a little. The window frame will cover this later.
When you’ve been around the outside of the window, also cut corner to corner. This will make the removal of the waste piece easier.
Once the four sides and the cross cuts have been done, gently start to flex the plastic back and forth in your fingers, putting slight pressure on the centre of the window opening. Do it from both sides until you feel the plastic beginning to split. With care you should have four nice little triangles of waste fall out, leaving a nice clean window opening. Keep the triangles. We will use them later.
Now cut out the door. You don’t need to cut corner to corner this time, unless you feel you want the practice.

The opening should need very little in the way of trimming, but if the plastic hasn’t parted cleanly, as it sometimes doesn’t, a light stroke or two with a small file will sort it out. Don’t overdo it, or your lovely square openings won’t be square for very long!
That's all for now.
Perry
Last edit: by Perry
Due to cutbacks, the light at the end of the tunnel has been switched off.
Posted
Full Member
I chose some 0.040†x 0.040†(1mm x 1mm) microstrip for this. Laying the front wall face down on a sheet of glass, I cut a piece of microstrip long enough to fit across the inside of the window opening. Aligning it by eye, I secured it at each and with a tiny amount of solvent, applied with a small brush.
The reason for doing this on a piece of glass is that I can be sure that everything is laying flat. If I press the glazing bar down onto the glass, I know it’s going to be flush with the face of the front wall. Also, any excess solvent won’t stick to the glass.
Next, a shorter piece of microstrip was cut to fit between the lower edge of the window opening and the horizontal glazing bar we just fitted. This piece is about 4.5mm long, but is cut over-length and the trimmed gradually to fit. This is also secured with solvent.

The upper part of the vertical bar is cut and fitted in the same way. You can see the cut bar indicated by the knife blade.
We can now turn our attention to the door.
Cut a piece of 1mm plastikard about 18mm x 25mm. This will fit behind the door opening. Using a suitable metal point, not too sharp this time, score some grooves parallel to the longest edge to represent vertical boards forming the door.
Don’t forget these huts were often fairly neglected and repairs were often done hurriedly or not at all, so don’t worry if your scored lines are not perfectly aligned.
Here it is just laid in place, prior to gluing up:

After fixing the door in place, another piece of 1mm x 1mm material is glued across the bottom edge forming the rain strip.
A tiny piece of microstrip, cut off during the trimming of the glazing bars, is fixed in place to represent the lock box.
Now we need to frame the door and window. Under normal circumstances, I would probably have chosen a slightly different size of microstrip for this, but in an effort to keep cost to a minimum, I’m going to make them from the same 1mm x 1mm material I used for the glazing bars and door strip.
First, cut two ‘door posts’ the same height as the door opening, Do this by laying the strip over where you want to put it, ensuring that it is lined up with either the top or the bottom of the door opening – it doesn’t matter which – then lightly mark the length of material required with your knife blade. Don’t try to cut it. Lift it away from the model and apply gently finger pressure near to where you marked it. It should snap off cleanly, even if you can barely see the mark you made.
Repeat this for the other side of the door, and then make a third piece to go across the top. Marking it to length on the model is better than trying to do it by measuring it first.
Now do the same with four more pieces to frame the window.
Finally, one more piece cut a little wider than the window frame is fixed beneath to represent the window sill. Again, with the option of using different sizes of microstrip, I would have chosen something slightly better, but I know that beginners, at whom this is aimed, won’t necessarily have a stock of many different sizes at their disposal.
So, here is our finished front wall:

I'm sorry about the change of colour. The weather suddenly changed dramatically and I had to put the light on!
I would suggest that you now paint your window frame so that it will be dry in time for us to glaze it. If your door and/or door frame is going to be the same colour, you might as well paint that too.
When all the solvent is thoughly dry we will be glazing the window and carrying out the main assembly.
We're nearly finished!
Perry
Last edit: by Perry
Due to cutbacks, the light at the end of the tunnel has been switched off.
Posted
Full Member
After making sure all the parts were dry, I cut a small piece of transparent plastic and glued it behind the window with ‘Anita’s Tacky PVA Glue’. Any PVA glue should be OK for this, or alternatively, the transparent material can be fixed in place with thin strips of adhesive tape if you prefer.
Making sure that you have the glossy side of the wall upwards (if you have glossy-sided material), take the rear wall and lay it flat on your sheet of glass. Place the correct end wall upright against the blade of your try-square and slide the rear wall up to it. Apply solvent to the join and hold everything in alignment for a few seconds until the solvent has ‘grabbed’.
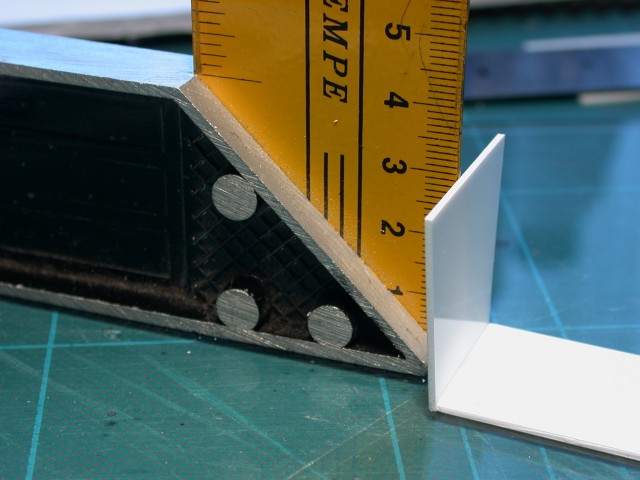
Remember the little triangles of waste we saved? These should have some 90-degree corners that we can use as braces. Glue these inside the corners, near the bottoms of the walls. The roof will secure the tops!
Assemble the other end wall the same way.
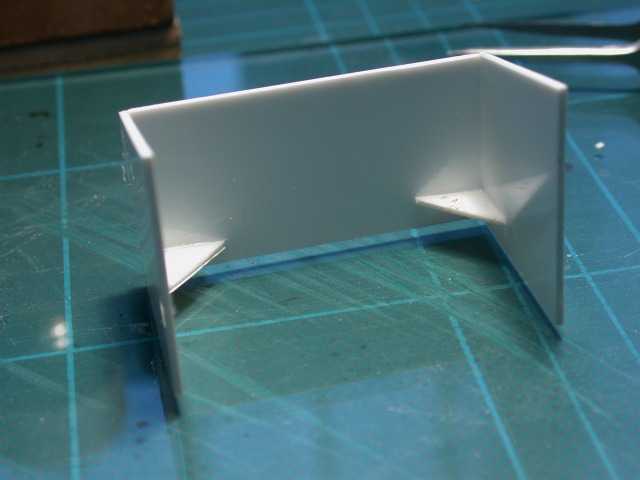
Because the front wall no longer has a ‘flat’ face; it has frames glued to it, we can’t just lay it face down on the glass and attach the other walls. I attached two triangular braces to it, one each side, and when they were dry, dropped the front wall into place and temporarily secured it with masking tape. Once some solvent had tacked it in place, I removed the tape and finished applying solvent inside and out.
Lastly, the roof was attached by laying it (shiny side up) on the glass, positioning the upturned wall assembly onto it and fixing it in place with solvent. I scribed two lines across the roof, from back to front to represent roofing felt.
I (literally) slapped some paint over the completed model just to round off the build. Obviously you may wish to take a lot more care with the paint job than I have done here. It may well get repainted and weathered properly when it goes on the layout.
That's about it. :thumbs You can add more detail if you wish, such as a chimney as if there's a stove inside. You could build one with the door partially open. Hang some fire buckets on the end wall, etc., etc.
This was a scratchbuild at a very basic level, but having said that, all scratchbuilds are done in a similar manner. It's just that the steps have to be repeated many times.
So I'll draw this thread to a close, but will be happy to answer any questions about it on it's sister thread.
Perry
Due to cutbacks, the light at the end of the tunnel has been switched off.
Posted
Legacy Member
1 guest and 0 members have just viewed this.