Going large - building large layouts
Posted

Full Member
Michael

Posted
Full Member
Cheers Pete.
Posted

Full Member
Buildings and scenery is not really my thing - I just copy others. Yarslow is an operators layout but that doesn't stop me trying to make it look pretty :cool:
The warehouse/engine shed is a very old kit and the brick embossment is very shallow so its very hard to give it a mortar wash and then "flat brush" a brick colour over the top. I have had about 3 goes at it so far and whilst its not brilliant, I think its the best I am going to get.
The loading shed is the amalgamation of about 3 buildings from a book. The Slaters roof is made up of individual strips cut from a sheet. I have done about 10 rows and needed a break before doing the remaining dozen. Hopefully it will be worth the effort.
A colleague at my MRC builds in framers card and the boiler house is my first ever attempt. Based on the Metcalf version I used on the old Yarslow layout, its slightly wider and deeper but the floor plan with the indented entrance is a straight rip off. The card is hot glued together and I am told that impact adhesive will stick the brick sheet to the outside walls.
What you dont see are the experimental bits - card hot glued together, brick sheet stuck to a blank piece of waste card etc. I have always made little test pieces of things from track laying to ballasting, stock weathering, trees etc and so it makes sense to do the same for buildings. Colours come from a number of books and magazine articles I have although I confess that I often substitute paint colours if I have not got the exact right shade. All my paints are Humbrol acrylic - I am yet to venture into the world of Vallejo although I know that they are probably better paints and may have a wider pallette range.
Shed dweller, Softie Southerner and Meglomaniac
Posted

Full Member
I do like the buildings- applying tiles a strip at a time is indeed mind numbing but I think you will find it well worth all the time spent.
I will be interested to see how the hot glue bonds Slaters sheets to card. I have tried assorted adhesives but not the glue gun. The problem I find is that unless I laminate a couple of layest of card a single base card can bow and breaks the bond- which is tiresome! :sad:
Best wishes
Posted
Full Member
I will be interested to see how the hot glue bonds Slaters sheets to card.
Hi John
I seem to have confused folk. The hot glue is used to stick the card building together. I use the contact adhesive to fix the plastic sheet to the card.
For those who thought I had missed a trick…………
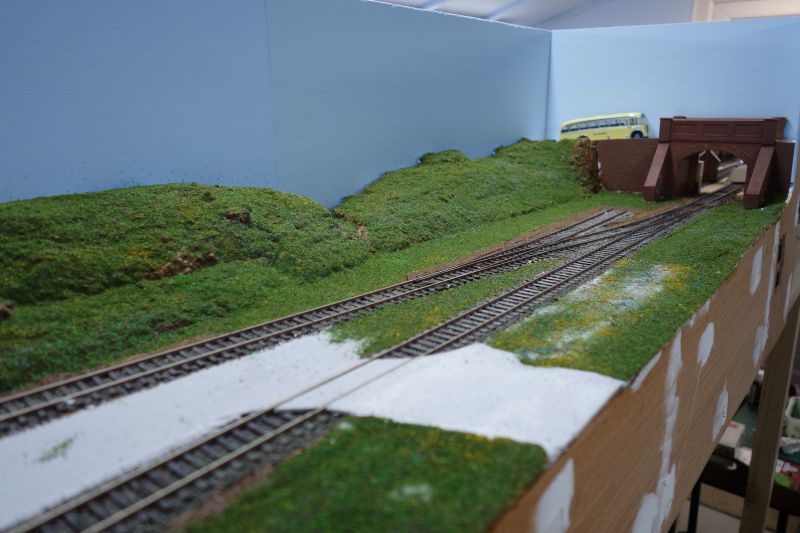
I have been doing some greenery stuff today - a base layer for the static grass and clump foliage etc that will follow before I add trees and bushes and stuff. I am carefully following the scenic exploits of Richard at Everard Junction (YouTube) who makes it look really easy!! Having got the base layer on, I couldn't resist putting a bus on the bridge

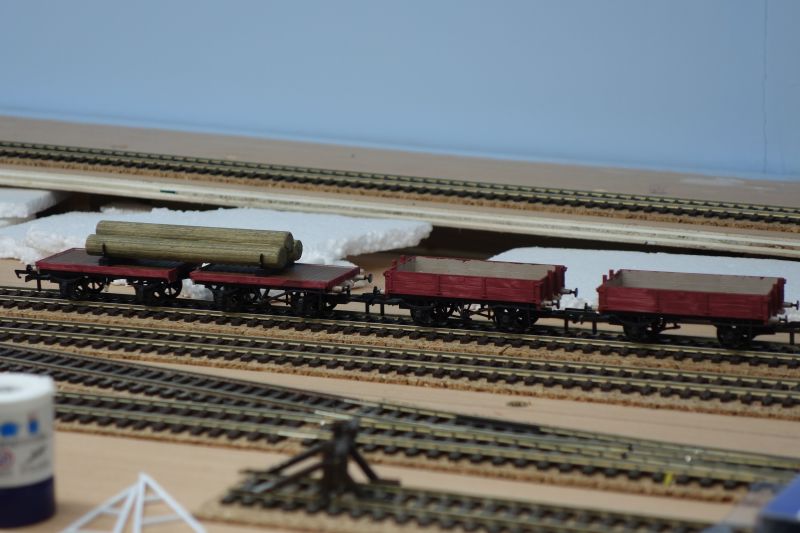
My PW wagon set got a first coat of paint - the often forgotten Gulf Red used by BR for their service fleet for a brief period during the time of my layout. The colour is recorded in various colour photos all of which make it look different but here, I have used Humbrol #73. This is enamel. I have been using acrylics for so long - if I say that I am a Granddad and I last used enamels when my kids were young, you'll get the idea. A second coat and some detailing is required before I find some transfers.
The Gulf Red is a lovely colour and I should repaint my Dapol Grampus wagons (supplied in bauxite but too late for my layout) but there are 10 of them and I honestly can't be bothered!
Bashing on……..
Shed dweller, Softie Southerner and Meglomaniac
Posted
Full Member

I finished the roof before doing the greenery so here is a photo a bit out of sequence. The roof of strips is evident here - left to dry for a couple of days under a heavy weight as I read somewhere (on here?) that MEK continues to work and can warp stuff. When fitted, the roof tiles will sit neatly over the triangular side pieces - it looks ugly in this shot as its just resting on the top. The two white triangles are Plastruct roof supports I made up to put under the centre of the canopy.
Having made this structure, I am doubting the architectural validity of it - what's holding the brickwork up on the ends? I will have to modify the building to make more sense before I get too much further
 . My current thinking is to cut the bricks off and put up some wooden canopy valencing, supposedly supported by ironwork on the inside and thus hidden.
Thereafter, I need to add gutters and downpipes and perhaps some steps down from the loading platform at this end.
I told you I wasn't any good at buildings!!……….
Shed dweller, Softie Southerner and Meglomaniac
Posted

Full Member
 Last edit: by Passed Driver
Staying on the thread Kevin.
Posted
Full Member
I would hapily claim Rule 1 but where the thing is just wrong, it needs sorting out. Today, I took a saw to it and as it stands, it has no sides. for the canopy! I am experimenting with a knife and drill to make some valencing - vertical planking with pointy ends and a decorative hole near the bottom. I can see it my minds eye!
Bashing on…….
Shed dweller, Softie Southerner and Meglomaniac
Posted
Full Member
God forbid (according to my wife) that I should think of myself as anything other than another ordinary bloke trying to make his train set as enjoyable as possible. Mrs M is many things and brutally honest is one of them - she would be the first to slap me down if I got above my station!!!!! (apologies for the pun which I only noticed when reading that back)
Like many of us, I am my biggest critic. I would love to make something that was as big as Pete Waterman's empire, as complete as Pendon, as beautiful as anything Luke Towan or Chris Nevard produces - BUT it ain't gonna happen. I know that but it doesn't stop me trying. Yes, I make a mess of things or do something stupid - and often I am too close to it to realise - hence the gravity-defying brickwork on the factory loading bay. I rely on you good folk pointing such things out to me, knowing full well that any comments will be polite, well balanced, timely and certainly not personally vindictive. That's why I joined and that's why I stay.
Keep throwing the rocks guys, I'm all ears :doublethumb :doublethumb
Shed dweller, Softie Southerner and Meglomaniac
Posted
Full Member
I've done the same thing. I'm scratch building a warehouse and ended up with a brick wall hanging in mid air, unsupported. Just yesterday I found a Plastruct girder and ran it along underneath said wall so It doesn't look so ridiculous. I'm not good at this sort of thing so I'm pleased with how it's going so far. I might even start a thread and subject you lot to my efforts.
Cheers Pete.
Posted
Full Member
Staying on the thread Kevin.
Posted
Full Member
Staying on the thread Kevin.
Posted
Full Member
Sorry but I know nothing about such "modern" things as BIL's. Had it been a J39, I might have been able to help
Can I suggest that you ask the same question on your "Plank" thread - someone is bound to have some knowledge and can give you advice.
Glad to hear that you are up and about again. Don't forget to keep us up to date with developments on your modelling.
Barry
Last edit: by Barry Miltenburg
Shed dweller, Softie Southerner and Meglomaniac
Posted
Full Member
Staying on the thread Kevin.
Posted
Full Member

So having said that I am no good at scenery, I submit the above as a progress report. I have added static grass (4/6mm) to the branch in patches. leaving some of the base cover on show. Over this, I will add fences, clump foliage, trees etc in due course. I also have to get the airbrush out to weather the track. I will have to do something with that gap between the running line and the siding! The platform top also needs adding and I will have to make a decision on those signals - the old Hornby versions are really just for show but I could consider losing the bases and seeing how they look. The buildings for the factory should be finished in the next couple of weeks. The horrible join in the backscene will be sorted - its on the list!!!!
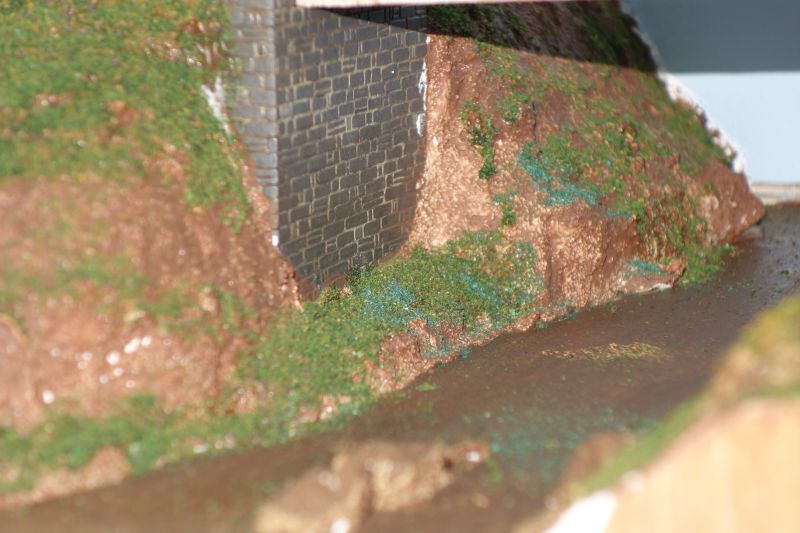
Here is the stream before a bit of static grass was added to the small shelves in the rocks. The rocks themselves will be painted grey and then dry-brushed with light grey/white. This is a technique I have used before in making wargaming scenery. The stream base will get a few coats of varnish, leaving the rocks in mid-stream with a green tint and a "wet" look if I can get it right. I will NOT have a fisherman or a bloke in a boat

This a wargame scenery piece I made a while ago - the base is MDF with clump foliage and lumps of plaster painted grey, dry brushed as above. This is the look I am going for in the stream scene.
Bashing on………
Shed dweller, Softie Southerner and Meglomaniac
Posted
Full Member
Michael
Posted

Full Member
Well that is a very solid start to the landscaping, Barry and clearly a good plan for its development. I'm looking forward to the river…. I have the Creek to do, but have still not plucked up the courage to do the "pour".
Michael
I, too, look forward to the river. Like Michael, I have a (Wombat) Creek to do!
Cheers,
Claus
www.flickr.com/photos/ellef/
Claus
www.flickr.com/photos/ellef/
Posted
Full Member
I’d recommend a test pour before the main one if you can, but my main piece of advice is be prepared with a hot glue gun to plug holes… resin will find them. I destroyed a t-shirt on my sea pour as I was dripped on while trying to seal a hole!
Posted
Full Member
Posted
Full Member
Staying on the thread Kevin.
1 guest and 0 members have just viewed this.