Going large - building large layouts
Posted

Full Member
Staying on the thread Kevin.

Posted

Full Member
The A3 sized panel is a 3mm metal plate over-printed with BR(NE)R Orange and white lettering. 3 heavy coats of Games Workshop Satin Varnish were sprayed on (its wonderful stuff if a tad expensive) after the holes had been drilled. The varnish will provide some level of protection from the inevitable abrasive wear. The positions of the holes were printed on as well.
This panel cost me less than a decent coach (about £45) and I consider that to be a bargain.

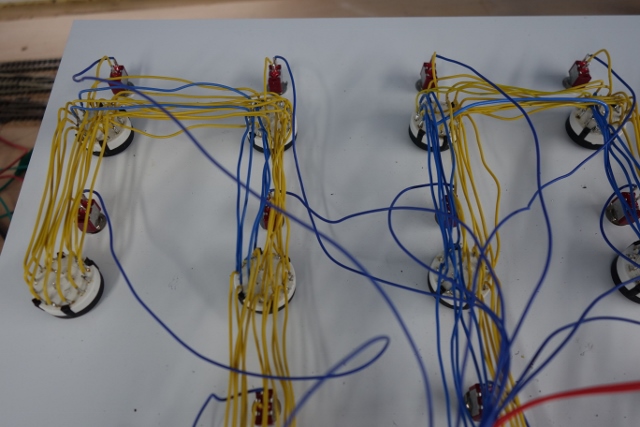
This is the reverse with my (as neat as possible) wiring linking all the "A", "B", "C" etc pins together. The use of 2 colours of single strand wire was caused by an irritating shortage of one colour. The long blue wires link the controllers with the switches that isolate the rotaries allowing them to move without interfering with other controllers. The sections and controllers all use a common return which will run using 32/0.2mm wire around the layout via 3 "STOP" switches (see the top picture bottom right). These will break the common return circuit and therefore act as a Panic button if required. They are located on this panel (for Yarslow), on the Storage panel at at the PW Yard panel beside the door.
A short but successful testing session last night was followed by much celebration as this pivotal panel went live - temprorarily soldered to the tag-strips where the sections and controllers meet. I was able for the first time to run a train from the branch loco shed, through the junction crossover (using Up2 and Down2), through the Yarslow yard and into the PW sidings - all on one controller. Rotary switches set the sections to controller C, levers operated points and it suddenly felt as if I had a proper layout, not just a collection of tracks on boards!!
Bit of a hang-over this morning so a quiet day but tomorrow, Mrs M travels South for a few days (friend's father's funeral) and I will devote the time to building the peninsular ready for the branch and Trinity Square.
Bashing on……..
 Last edit: by Barry Miltenburg
Shed dweller, Softie Southerner and Meglomaniac
Posted

Full Member
Did that price include all the lettering and rotary switches Barry ? If so, even more of a bargain.
Pleased to hear it's not just pretty but works too. :thumbs
'Petermac
Posted
Full Member
The price covered the metal sheet, the orange and white printing and the crosshairs printed on for the location of switches. Behind that was the time taken to convert my A3 sketch and drawing into something that the printer could understand - I guess that's what Graphic Design is about. I produced a sample of the rotary switch lettering full size and specified the dimensions between switches. Paul at the GD shop recommended some fonts and sourced the colour from links that I gave him showing BR(NE)R photographs. We had a long discussion on the merits of relying on old photos and cine film given the treatment of colour by the older emulsions. In the end, I gave him my pot of Humbrol Railmatch paint for NE orange as a start point.
The rotary switches, SPSTs and knobs were eBay purchases - all from UK suppliers on principle. They may well be made in China but at least a UK trader has had a penny or two out of them. Electronic switching is relatively cheap - in all the years I have been modelling, I have never thought that this stuff was expensive - just more difficult to source now that we have lost Maplins!! Total cost of the whole thing was probably less than an Oxford Rail J27.
Barry
Last edit: by Barry Miltenburg
Shed dweller, Softie Southerner and Meglomaniac
Posted
Full Member
Staying on the thread Kevin.
Posted
Full Member
Getting things done is about making a list and then working through it
I make lists when its cold and dark and raining and all I want to do is sit indoors with a warm cup of tea.
My lists change frequently as I think of little jobs to do - they all go on the list however small.
I plan ahead by acquiring all the things I need to do the jobs in hand - sometimes I need to buy something, sometimes I have to research something or find a picture in a book.
When I get to the shed, I break out the list and start working straight away.
My layout is just a load of little jobs - and there are plenty more to do! - but I only think about 2 or 3 for now.
My present list is;
- tidy up floor space to make some room
- plan out timber framework for the branch and terminus peninsular
- cut timbers for above and construct baseboard.
- cut and fit some 3x1 for the window reveal which looks untidy (I might do that when the chop saw is out making baseboards)
- cut some ply to make some cartridges - needs to be done outside so if the weather is decent and I am finishing other jobs I will do this
- add some varnish/paint to the various bare control panels - when I need a break from cutting things!!!
Most important - don't do a job thats not on the list - that is getting sidetracked and is a waste of energy and time.
[I authored a collection of Time Management tips into a publication for the Corporate bank I worked for some years ago and habits like "lists", "focus", "planning" etc just stick!!]
Barry
Shed dweller, Softie Southerner and Meglomaniac
Posted

Full Member
Mind you I do worry a little about the shade of Clockwork Orange you chose…Brunswick Green would have been much more restful on the eye!

:pedal :pedal
Best wishes
Posted
Full Member
Best wishes Kevin
Staying on the thread Kevin.
Posted
Full Member
………………………………………………….
Mind you I do worry a little about the shade of Clockwork Orange you chose…Brunswick Green would have been much more restful on the eye!………………………………..

But the title says it all John - "Going Large" - this isn't some sleepy little West Country backwater where they had time to polish the shiney bits on the locos, this is REAL railways earning proper money !! ;-) :cheers
'Petermac
Posted
Full Member

So I made a start this morning on the peninsular which will carry Trinity Square and the branch line. The first section was built on the floor but the rest will be added in situ. Note the Master Cab Control Panel sitting on a blanket for safety, well away from the power tools!

Having got the first section screwed into place, I switched my attention to the branch. The line will sit some 3 inches above the rest (to get over the main line at Middle Junction) and so I will mainly adopt an open frame approach here. The cross supports will carry track risers which will hold the baseboard. Nearest the camera is the position for the traverser which will be built in to the framework.
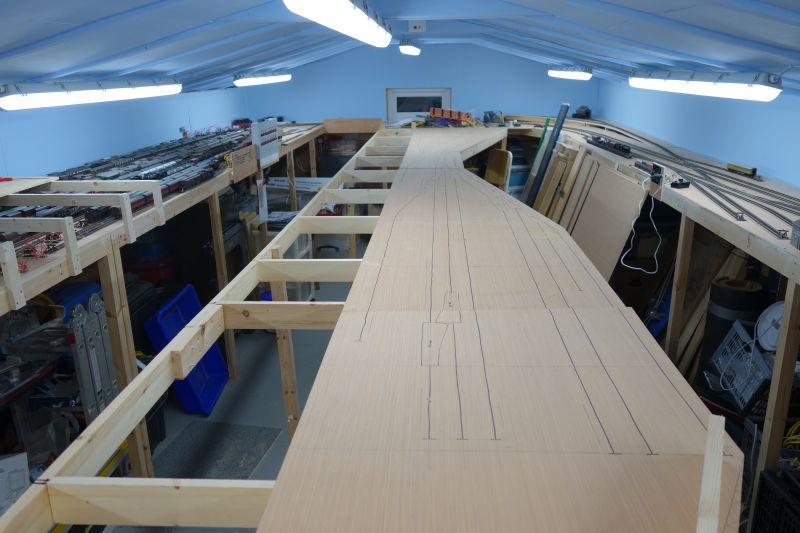
By knocking-off time, I had the framework built and a limited number of legs in place. Tomorrow I will add further legs. At the moment, the whole thing is a bit "lively" as it is only resting on about 6 legs. Once they are screwed to the frame, I might have to add some cross bracing.
This is the first time that I can see the whole layout in place and get a good feel for the space available for operators - not too bad as it happens! The branch is only 14 inches wide (although 19 feet long!) so I will be looking at the track plan and, perhaps, simplifying it a bit. The traverser exit is also much nearer the front of the baseboard than I thought so a bit of a re-think at Butterbump & Mumby may be required.
Saves me from being bored!!!
Bashing on……………
Shed dweller, Softie Southerner and Meglomaniac
Posted
Full Member
Staying on the thread Kevin.
Posted

Full Member
Posted

Site staff
Ron
NCE DCC ; 00 scale UK outline.
NCE DCC ; 00 scale UK outline.
Posted
Full Member

Today I cut the baseboards for the thin-but-long branch, set on plywood risers with 2"x2" cross supports (helps at joints). This is the view from the traverser end with Butterbump & Mumby at this end and Blowick Lane at the other end. The names have emerged in recent weeks - the area was, according to the old OS maps, called "Yarborough". I didn't know this until a few days ago and, of course, it sits perfectly with "Yarslow".
The tops are not fixed down yet as I will do all the tracklaying and wiring with the boards free. I also need to fit the traverser and may need new drawer sliders as the site is narrower than the original installation. The sliders sit proud of the front of the baseboard by about 1/4 inch and although this does not sound much, I can guarantee that I will walk into it!!
Note that the raised baseboards allow some contouring and allow the scenery in the front of the track to drop. The very narrow bit will be a bridge over a stream. The station designs have also undergone a few changes - every few days in fact!! I ended up with a single siding at this end and a pair of sidings (including one for Roe Boxes) at the far end. The sidings face opposite directions so that shunting at one end does not interfere with the station at the other.
Bashing on……..
Shed dweller, Softie Southerner and Meglomaniac
Posted
Full Member
Excellent Barry. I am so envious of all the space you have. The branch at a slightly higher level looks to be full of operational promise.
It will be interesting to see how you spend your time when operating alone. I find myself spending more time running trains to and from the branch more than any other part of the layout
Best wishes
Posted
Full Member
No, I'm not jealous.
No, I'm not impressed.
No, I would not like all that lovely clean space for my layout. (is that an oxymoron ?)
Your trains will be so long that by the time one has passed your viewing position, you'll be sick to death of counting wagons/coaches.
'Petermac
Posted
Full Member
Glad you hate it
Barry
Shed dweller, Softie Southerner and Meglomaniac
Posted
Full Member
:cheers
'Petermac
Posted

Full Member
Excellent Barry. I am so envious of all the space you have. The branch at a slightly higher level looks to be full of operational promise.
It will be interesting to see how you spend your time when operating alone. I find myself spending more time running trains to and from the branch more than any other part of the layout
Best wishes
"It will be interesting to see how you spend your time when operating alone". - Indeed, alone with a Bar Fridge!
"I find myself spending more time running trains to and from the branch more than any other part of the layout" -
I great take comfort in these words, that's ALL I can will be able to do on U-H.
Colin
Last edit: by Colin W
Posted
Full Member
The solo operating side of things has been reflected in the timetable (actually a schedule) - essentially a series of moves like "shunt branch freight", "Ordinary passenger train arrives at Yarslow" - punctuating a flow of trains that just run round the circuit. The idea is that I set one or two trains on the circuit (trains that dont stop at Yarslow like E/F/H freights or Express passenger) and then carry out the shunt, run the branch passenger etc etc. When I have finished the shunt (or whatever), I park the circuit train(s) and then either run another one or leave the circuits free so that I can cross a train over the main lines etc.
The timetable/schedule covers a Week Day, a Saturday and a Sunday offering different services of course. The idea is that I will run Weekday, Weekday, Saturday, Sunday, Weekday etc.
The actual timetable is based on an amalgamation of S&DJR and M&GNR WTTs that I have for the 1950's and 1960's. My line is a secondary route with a secondary holiday destination so S&D-like in that its a route from A to B with not-a-lot in between and MGNR-like with the holiday traffic. Trinity Square with its commuter trains is a total indulgence but, hey, Rule 1 applies…..
Incidentally, just before Xmas, I am hosting a "Blokes mince pie and trains" morning for the chaps from my MRC. By then I hope to have the branch running so can offer main line, PW yard, Yarslow yard and branch controllers. A chance to see how the layout/space holds up with a few people in it.
I think it was Dr R Hendry who described his O gauge loft layout as "..being like a WW2 British tank - designed to hold 5 but comfortably accommodates 3".
Barry
Shed dweller, Softie Southerner and Meglomaniac
1 guest and 0 members have just viewed this.