white metal kit
Posted
#223224
(In Topic #12179)
Full Member
motor connection
hi, i am building a Jouef white metal kit, ( its my first), and have a diddy snag. On the chassis assembly, sits the drive cog, and i have to glue a brass drive on the end of the motor. It does not appear to want to mesch, as i would like. Are these things shaped, so to speak, eg, do they have to interlock a special way, as once its glued, i am in dickies meadow. The motor is at 45 degrees, and its hard to dummy run, as brass cog, flies off spindle. thanks. john
Posted

Full Member
Presumably you can dry fit the chassis with the crown drive wheel on the axle, then use a dab of contact adhesive like UHU, Bostic, etc for a temporary fix of the brass pinion gear to the motor shaft to see if it meshes correctly. You can always shim the motor to fine tune the fit. Then simply remove the brass pinion, clean up and superglue.
Hope it all works well.
Cheers,
Bill
At 6'4'', Bill is a tall chap, then again, when horizontal he is rather long and people often used to trip over him! . . . and so a nickname was born :)
Posted

Full Member
Are the worm and gear handed? If the gear has its cogs at an angle you have to make sure the worm matches.
What glue are you supposed to use to get the worm on the motor shaft? Don't use CA, it will not tolerate the shear forces and will fail very rapidly. One of the Loctite ones (there are 2 types, semi and totally permanent, don't use the latter) would be advisable. It's runny stuff, if it gets in the worm gear interface it's goodbye..
Most of use are used to gears and worms with locating machine screws, personally I would not use any gear or worm that has to be glued on. Flywheels at a pinch, but it's better to knurl the shaft and have a friction fit with those.
Is this a K's kit? The comment about gluing the worm rang some alarm bells (Keyser made white metal kits for Jouef). If so the motor, cog and and gear are not worth working on, bin them and get a set from Branchlines or Markits. Most of the K's motors are glued together, the worm and gear meshing is highly problematic, the holes are not concentric…(bitter experience from a dozen or so K's kits). I would get some decent wheels as well (Romfords for example), the originals will fall apart (if they haven't already).
Any chance of a photo?
Nigel
©Nigel C. Phillips
Posted
Full Member
Posted
Full Member
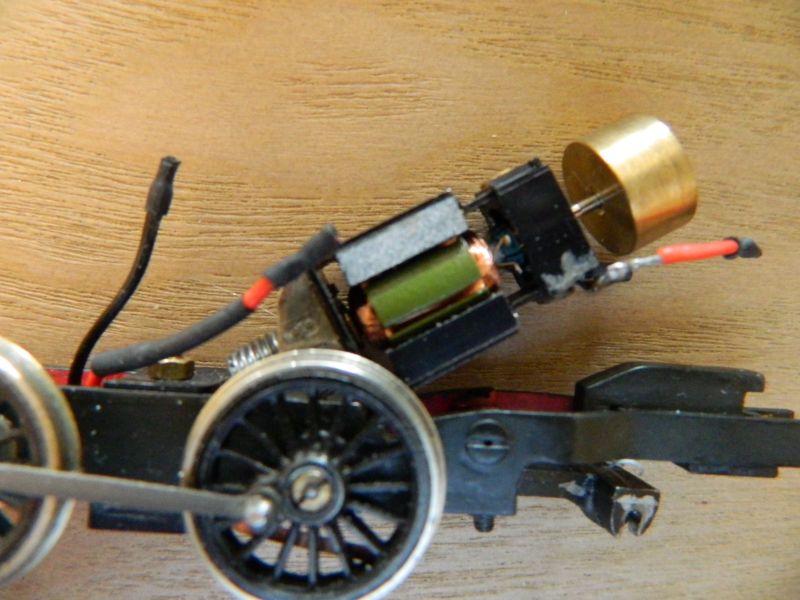
I normally use the small open frame motors and gearbox from Branchlines. The worm and gear are matched and have the right clearance for smooth running. Best to email Brian Osbourne and ask for a catalog by return email. Hopefully they're still in business, I haven't used them for a few years. I just had a look at the K's 14xx that's in the middle of a rebuild - see photo's. Those phosphor bronze girders are due to be replaced with some P/B wire. All the wires are for an N-scale decoder (and speaker).
It says 8R on the gearbox, and it's a 5-pole motor. Works well under DC or DCC, especially with the small flywheel.
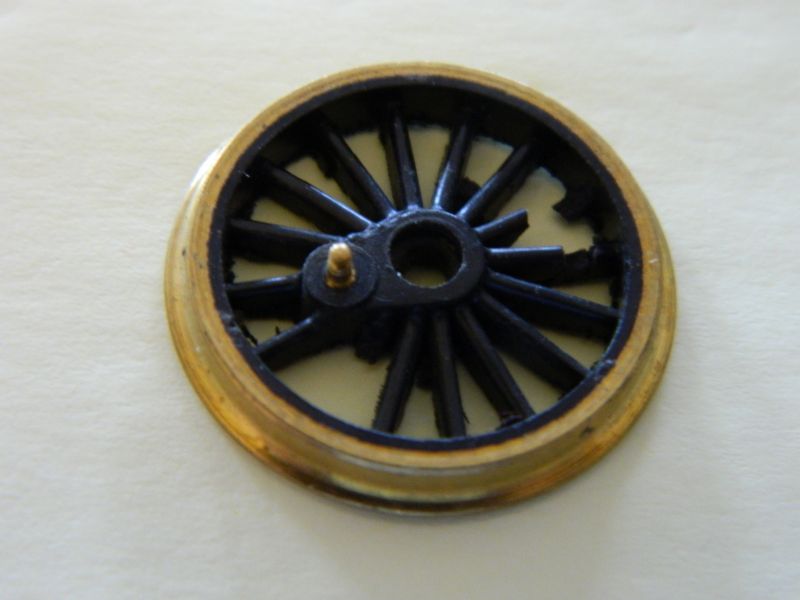
If that worm and gear won't mesh it's because the holes for the axle/worm are not in the middle and/or inaccurate gear cutting. Bin the motor, worm and gear, they're lost causes, as are the wheels that come with the kit. After all these years the plastic hubs will fall apart or drop out of the rims when you look at them. Get Romfords and the quartering is easy (and it will run).
One thing to watch out for with K's kits is that they're often smaller than they should be because of excessive shrinkage after casting. This 14xx is around 10% smaller in all dimensions than it should be. If you are soldering check the iron on a bit of scrap metal from the kit. K's didn't pay too much attention to the white metal mix, hence the variable shrinkage and melt temperatures. Some places on these kits are nigh-on impossible to solder - use 15-second CA, not epoxy. Make sure the metal is clean and bright for both soldering and CA.
Nigel

"See that old K's kit lying on the table over there,
It's gotta good price and plenty of bits to spare,
Somebody's gotta to do it,
(Somebody's gotta do it,)
Somebody's gotta do it,
(Somebody's gotta do it,)
And that somebody aint me."
"Those old K's kits can be a whole lotta of fun,
But if it comes near me I'm gonna cut and run,
Somebody oughta try it,
(Somebody oughta try it),
Somebody oughta try it,
(Somebody oughta try it),
And that somebody aint me."
(Apologies to Sam Lay and his band - "Somebody's gotta do it").
Save
©Nigel C. Phillips
Posted
Full Member
Posted
Full Member
Every Keyser kit I've done came with drilled and tapped spacers, and countersunk holes in the chassis for screws. Nice design, no need for a jig Maybe you are supposed to solder it in place? New one on me. Is this kit OO or HO scale?
Sizing a replacement motor is not difficult - just measure the dimensions of the K's dinosaur and find a small one to fit. The gear need to be comparable in size to the one in the kit and with a ratio of around 40:1 given the weight of the body. The Branchlines motors and gear/box are OK, the kit really doesn't justify the expense of a High Level one. Most I would go for would be a Mashima can motor and a Branchlines gearbox.
I had a look at the gear that came with the 14xx. Rough cutting, straight cogs (noisy) and as usual the hole is not concentric. I've known others who have brazed a piece of thick walled brass tube into the hole and re-drilled it to a tight 1/8". I don't have the patience for that. If you have a run-out gauge you could check yours. If it's OK one thing you can do to ease any tightness is to liberally coat the gear and worm with gear polishing paste (fine emery grit) and run it for 30 minutes or so. Many of use have resorted to regular toothpaste or kitchen sink cleaner.
That still leaves you with the motor. K's motors came in 2 types - really terrible and not so terrible (the Mark-2 motor). Both will fail. Neither runs that well with DC and are even worse with DCC.
Rule of thumb with a K's kit - whatever you spend on buying it you will spend at least 1.5 times that (and probably a lot more) on a decent motor, worm, gear, gearbox and wheels.
Can you scan the instructions and send them to me for a read? (Je parle français, plus que 35 ans en France et au Québec).
Nigel
©Nigel C. Phillips
Posted
Full Member
Posted
Full Member
Is your 230G like the one in the following link?
http://www.ebay.fr/itm/122257435382?rmvSB=true
If so, there are some useful downloadable photos, although the notice de montage is sadly only partly visible.
So glad to see Nigel on board with this one and great to see that his talents are truly multi-faceted!
Good luck and have fun,
Bill
At 6'4'', Bill is a tall chap, then again, when horizontal he is rather long and people often used to trip over him! . . . and so a nickname was born :)
Posted
Full Member
Posted
Full Member
Good to know precisely what you're dealing with and it looks a good kit to get your teeth into and indeed a bargain, as leboncoin tends to be. There is another currently on offer on ebay.fr at a buy it now price of 199€, so well done indeed!
The sun is about to set here after a bright sunny day with the temperature just into double figures, so at a difference of 18 deg, I'll stay put for a while, but will venture a few hundred kms south in April to visit a close mate who will be starting major alterations on his new place.
Time to throw another log on the fire John, do keep warm, regards,
Bill
 Last edit: by Longchap
At 6'4'', Bill is a tall chap, then again, when horizontal he is rather long and people often used to trip over him! . . . and so a nickname was born :)
Posted

Inactive Member
But I'm still following along.

Max
Port Elderley
Port Elderley
Posted
Full Member
Hi Bill,Hi John,
Is your 230G like the one in the following link?
http://www.ebay.fr/itm/122257435382?rmvSB=true
If so, there are some useful downloadable photos, although the notice de montage is sadly only partly visible.
So glad to see Nigel on board with this one and great to see that his talents are truly multi-faceted!
Good luck and have fun,
Bill
As far as I am concerned they are kits of last resort. Based on some pretty irritating and frustrating builds over the years, Caveat emptor applies.
The issue is not the white metal castings, they normally jigsaw together reasonably well and the detail is pretty good, and minimal fettling is required. It solders up nicely. It's the chassis (rudimentary), wheels, axles, motor, and worm/gear. Getting a decent etched chassis often doesn't work because the body can be undersized (really 3.5mm scale after all that shrinking). Even in 1976 turned Romford drivers were being recommended for improved running by retailers of the kits.
These kits date from the 1970's-1980's. Use modern mechanisms, what's in the box or blister pack is not up to the job (not that it ever was). When they were being sold they were the cheapest kits around, and were heavily discounted (for good reason).
Nigel
©Nigel C. Phillips
Posted
Full Member
You've built far too many such projects to ignore advice from such hard won experience, so as John's only in for 25€ so far, it may be best to put this one in the spares box. I think I would and I also need to look at some of my old loco kits purchased new during the same era!
John, if you get bored, this could be a good first kit to practice and perfect building and finishing skills.
Bill
At 6'4'', Bill is a tall chap, then again, when horizontal he is rather long and people often used to trip over him! . . . and so a nickname was born :)
Posted
Full Member
For €25 it's definitely worth investing €37.5 in wheels, axles, motor and gearbox (that ratio of 1.5 applies here and would just about cover it, postage not included).
They're nice kits to practice on, either solder or CA to put it together. Epoxy also works, but get it wrong and it's sitting in paint stripper for a month. You really do need a temperature controlled iron for these kits. Some of the castings can be quite thin, too hot an iron and hey presto, a hole.
One more "gotta do it":
"It's a nice looking kit, somebody oughta try it,
But count me out I'm on a Keyser-free diet,
Somebody's gotta do it,
(Somebody's gotta do it),
Somebody's gotta do it,
(Somebody's gotta do it),
But that somebody aint me"
That said, I just soldered-up the body of the 14xx, having pulled the box out to take a photo of the chassis. And I have an Armstrong outside frame 0-6-0 Goods (so called outside frame Dean Goods) awaiting the tender touch of the iron. PITA, as it's EM gauge, and Keyser kits were designed for OO. MTTIW.
Nigel
©Nigel C. Phillips
1 guest and 0 members have just viewed this.