3D print body shells
Posted
#229656
(In Topic #12552)

Full Member
Best adhesive for attaching styrene and brass
Hi All,Just giving a tryout to a bash using a 3D body shell from Shapeways (On30, O scale running on 16.5mm track) and a Bachmann HO 44 tonner diesel switcher/shunter chassis (Bo-Bo) that is going spare (from a body swap that didn't work). The body shell is "white, strong and flexible", the site says it's nylon with a matt finish. First time I've worked with this material, but if my experience working with delrin is anything to go by, it might not be easy to do what I want. I'm treating the shell as a "scratch building aid", not the foundation of a kit.
The issues: 1. The definition on the ventilation grills (louvers) is very poor, and they have already been taken off by sanding progressively with 80, 150, 320 and 400 grits. This material is a PITA to work with, it has taken 3.5 hours so far, and there is still some shadow in the nylon. Shapeways says the poor definition of the grills is because of the orientation of the print, which is vertical, not horizontal, which makes sense. To their credit they're working on the problem. I'll be replacing the ventilation grills with either plastic or metal grills (brass or stainless steel); 2. The chassis is from the latest version of the 44 tonner, and is slightly longer and not as tall as the old one, which is what the body shell is designed for. So it will need some packing so the body shell can be raised slightly and enable the chassis to be screwed to the body shell. I've already fettled the ends of the hole where the chassis is supposed to go, and it sits nicely in the body shell (height excepted).
Now as this is nylon I'm assuming it's going to be either CA or 2-part epoxy after suitable roughening to key the surface, and possibly brass pins through the shell to make sure nothing comes adrift. If anybody with experience in getting details to stick reliably to this material has any suggestions about what's best I'd appreciate it.
Nigel
Some pictures so you can see what I'm up to.
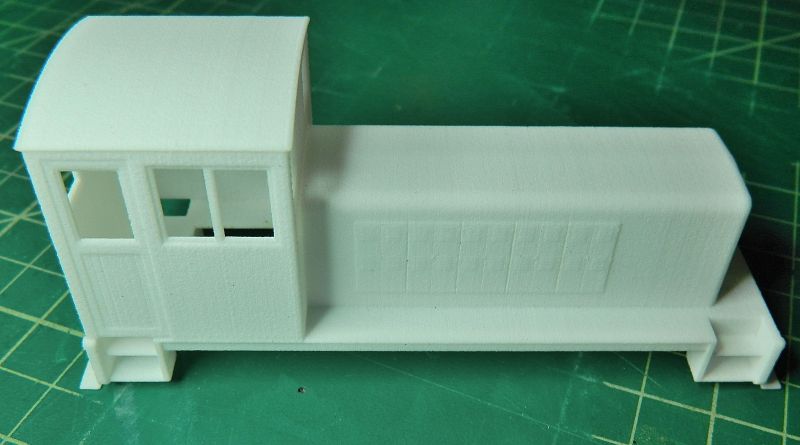
Before…

After…
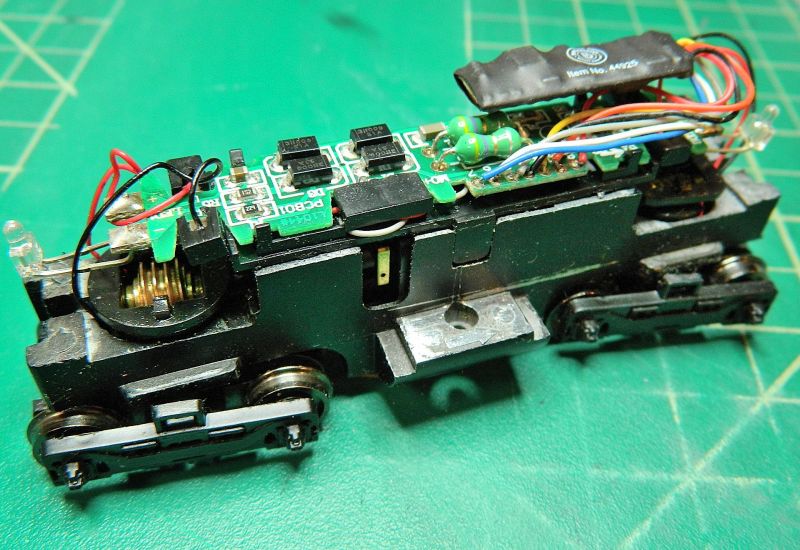
Bachmann 44 tonner DCC "on board" chassis. Not a bad runner for the price ($55 new, complete with decoder and a generic body shell).
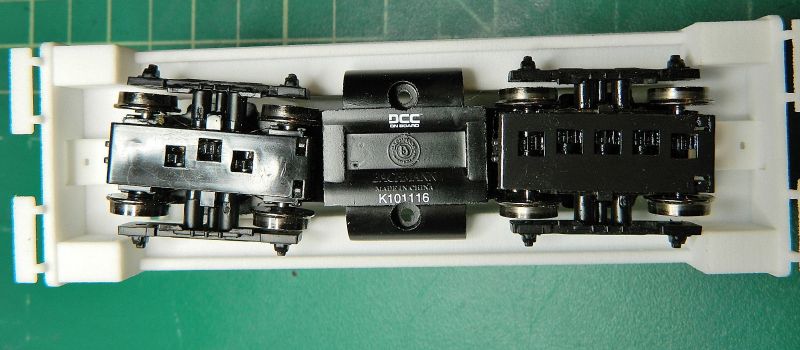
Chassis in the shell after a bit of fettling at the ends to accommodate the longer new chassis. Those 2 screw holes through the fuel tank hit air, so some additional material needs to be attached to the body shell to anchor the screws and raise the body shell by amount 2 mm. The new fuel tank casting is not as tall as the old one.
Save
©Nigel C. Phillips

Posted

Full Member
You my recall that I built a JLTRT CCT kit recently. The material used for the body, floor, sides and roof is cast resin. I used Zap A Gap medium CA for assembly and it worked very well. Not the same as your material I know. I abhor epoxy, a mess to use and it takes ages to cure fully.
I agree about pins, I'm never wholly confident in butt joints. However, I didn't use any on my kit - so far so good.
John
John
Posted

Full Member
The material, as Nigel says, is not easy to work with regarding filing etc. - it seems to be sort of "sticky" and soft. Detail definition, I'd have thought, was a Shapeways problem and something they really should be able to correct.
It's also quite pricey since Shapeways changed their pricing policy.
As for glues - I have no idea !!!
'Petermac
Posted
Full Member
Thanks. I agree, seems a lot to pay for air. I only need maybe 3 body shells, so investing in a decent fine definition printer and the software (and the time to get to grips with it) is not economical. One thing I've realized in browsing the Shapeways site (and a lot of others) is that the choice of material is interesting. Nylon is the cheapest, FUD (frosted ultra detail) is about double that of nylon, with FED (frosted extreme detail) another 25% more than FUD. Now for uninteresting locomotives such as diesels, where it's essentially slabs and a few rivets, nylon is actually OK. Where is seems to fall down is in things like grills and louvers, and that can be easily dealt with. Older designs such as the one I have would have been done prior to the introduction of the newer polymers and finer nozzles. After a fair bit of reading my conclusion is that 3D printing is not yet there with resin casting (even with the fine detail polymers), and nowhere near brass or N/S photo-etching for surface detail.
The cost of this shell was $50, using one from an O-scale switcher would have been about as much, and too big for what I want. HO or S scale body shells are more like the real things, and a pair for a center cab bash would be around $10. Those old Airfix/Dapol Drewry diesel shunter kits look suitable as well.The designer of this particular one also does cabs or frames and cabs, donor body shells are required.from the donor HO locomotive and I've a few of those around. All that said, an evening with some styrene sheet and the big blade would produce pretty much the same thing at 1/10 of the cost of the 3D print. Rivets and louvers are not an issue, they come as decals in O scale. If i get desperate I'll do some photo-etches myself. I'm going with the cab alone for the next bash, should keep the costs down, as well as the sanding time!
Steam in On30 is not an issue, there are still plenty of the Bachmann range around that look great with a bit of detailing, and with new cabs and footplates (or even an On30 body shell) and some detailing my old 4mm scale 0-6-0 and 2-6-2 locomotives would look the part (they're already narrow gauge anyway ;-)). Lots of hacking and bashing, not for the faint-hearted. More coming in a new thread.
Been doing a bit of research on the adhesives failing anything coming from the club so far. Nylon is of course a Dupont trademark for various polyamide polymers.Slipper stuff (hydrophobic) with low surface tension and high chemical resistance. Consequently a pain to glue to itself or dissimilar materials. Surface prep to get a decent gluable surface is interesting and way out of my capabilities (corona discharge plasma discharge, or gas flame treatment anyone?). That said there are some glues that will work, but not standard CA or epoxy. Standard Gorilla glue (a polyurethane) works, and Loctite do some nylon-specific 2-part CA and epoxy adhesives.Expensive of course.
Nigel
©Nigel C. Phillips
1 guest and 0 members have just viewed this.