Grass scatter
Posted
#210108
(In Topic #11487)
Guest user
How to do it ?
Started my layout 7 months ago and I am now ready to have a go at laying down my first grass. I have got several small bags of scatter and need to know the best way of applying it? The area is quite small, an embankment above a supporting wall.Advice please.
Posted

Site staff
Regards
Alan
Born beside the mighty GWR.
Alan
Born beside the mighty GWR.

Posted

Inactive Member
http://yourmodelrailway.net/view_topic.php?id=10595&forum_id=21&highlight=trevennan
Try doing it on some waste material first and see how you get on. The gorse bushes in the pics are made from clumping material with blobs of neat watercolour paint dabbed on to represent the yellow flowers.
 Last edit: by 60019Bittern
Posted
Guest user
Thanks for the advice and the link to your layout.Nice progression of photos showing the evolution of the layout. Gave me a few ideas for my embankment. Nice one….
Don
Posted

Banned
Take a look here at how I do my scenery :
http://yourmodelrailway.net/view_topic.php?id=12116&forum_id=21&page=2#p213052 Read on the next few pages. You may find my thread useful.
Cheers, Gary.
Posted
Guest user
Thanks for the info.Had a good look at your work. Very impressive.Finished off the last small area with the mod rock plaster bandage so this weekend I will,try with the scatter.
Thanks again
Don
Posted

Full Member
What time frame are you modeling? and what scale? If it's 4mm/OO and scatter (not static)
Dark brown and green paint applied as camouflage.
Let dry, paint with PVA (diluted 25%), apply fine scatter. I use a mixture of W/S burnt grass and earth, fine grade, 50:50.
Let set up for 15 minutes, mist with diluted PVA from a mister, apply the next layer of grass. At this stage vary what you put down. I use mixtures of burnt grass, earth, yellow grass and weeds.
Let dry overnight. Next up is clump foliage. Neat PVA in an old yogurt pot, add clump material (ring the changes, W/S do 5 different greens plus 4 fall/autumn colors), and use fingers to get the clumps saturated. Blob of PVA, press a finger/thumb full of the clump down in the blob. It will spring up, the blob of PVA is to keep it where desired. Keep it low, think blackberry bushes.
Using a herb chopper or coffee grinder, give the fine scatter a 30 second whiz. Light dusting over the clumps usually with a lighter color to represent new leaves before the PVA sets up. Use some of the fine purple/yellow/red scatters to give some berries. Plus some long grasses planted here and there.
Embankments today are far removed from the state they were kept in during the days of steam up to the 1950's. Bushes and long grass were not tolerated because of the fire risk. Scalped embankments were common, especially after the sleet train had been at work.
Nigel
©Nigel C. Phillips
Posted
Full Member
Something like this was achieved using the techniques I described (not the back scene!). Clearly the 1950's with all that gorse and dog roses. This is the branch line on the BMRCM club layout in Montreal where it crosses the canal. Check out http://bmrcm.org/patchwick-branchline-update for some more pictures (not all my work).
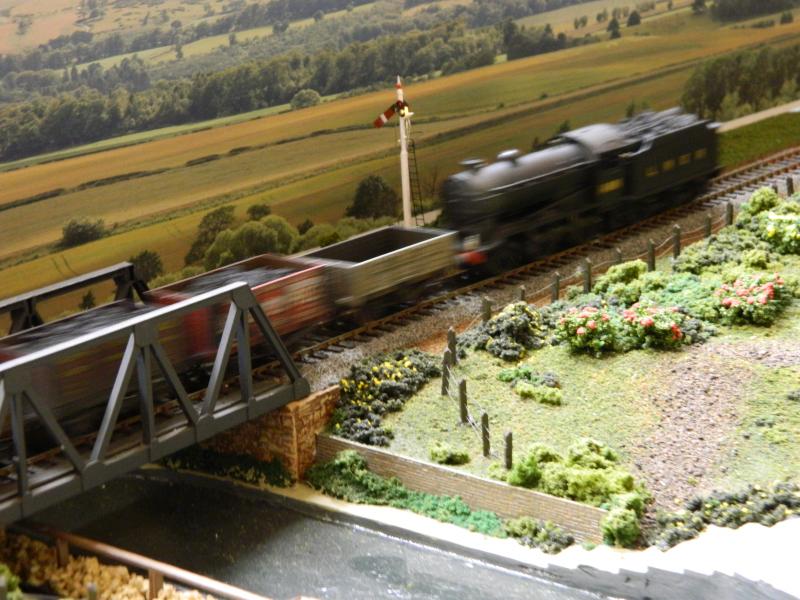
Nigel
©Nigel C. Phillips
Posted
Guest user
Thanks to all that replyed
Don
1 guest and 0 members have just viewed this.