S-88's and shuttle control plus slow motion point motors
Posted
#10977
(In Topic #1038)
Full Member
Which S-88
In selecting appropriate occupancy detectors to use with the ECoS, I initially opted for the Veissmann 5233 which was an adaptation of the Veissmann 5217 S-88 for two rail DC DCC use. It has since transpired that there are issues with this particular occupancy detector in regard to the ECoS. It seems that it can be used but it cannot be the last occupancy detector in the chain. I have resolved this by buying an LDT RM GB 8 to be the last in the chain. These seem to be the occupancy detector most favoured by ESU for use with the ECoS. There are four recommended for use in the ECoS manual however two, the Maerklin 6088 and the Viessmann 5217, are for use with AC current & Motorola only and the LDT REM DEC 88 is for use with reeds so that leaves the LDT RM GB 8 as my preferred option.

Setting up the shuttle lines
The Occupancy detectors are initially to be installed on the shuttle lines. In future after testing I will extend this to the main lines. For these lines I have set up a couple of raised designated lines specifically for this purpose. The scenery when finished will show mountainous terrain and will be Swiss at one end and Scottish at the other. I recently decided to extend my UK outline part of my layout and I thought a gradual progression from the Highlands of Scotland to the Alps might be the way to go.
For track I will be using Tillig code 83 Elite as I was very impressed with its looks. These lines are at close to eye level so detail is crucial in this area.
I have decided to have two small terminus stations at each end. These will each have a siding so that there can be an option of which loco to use on the shuttle service. In order to power the points I will be using Tillig point motors as they are the most appropriate for Tillig track. They will be connected to Lenz LS150 point decoders. The shuttle lines will be at close to eye level and will be excellent to showcase highly detailed loco motives and running stock. I had initially intended to run my Bachmann Turbostars on these routes but the length of them relative to the length of the shuttle lines has me doubting whether this is such a good idea. Smaller locomotives would be more appropriate and this is an area in which my running list is severely lacking. As regards the Swiss end the Croc is ideal. It is relatively short and can easily travel slowly as per the prototype with cargo. The Turbostar however should be going faster which is not an ideal option on a route which is only four or five metres. Comparing a Turbostar to a length of track as shown below shows it just comes with one strip of Tillig track length. I have added a small bit on to that block of track as this will be the trigger for the decelaration and it is crucial it does not miss this!

The other problem with the Turbostar is that it will have current draw from all three coaches and the track with the S88 contact, in order to be triggered, needs to be slightly larger than the loco or coaches which will trigger the contact. In the case of the Turbostar this will be about a metre which is quite long when you consider that I must have at least two of these track sections on the shuttle line. Some experimentation will be necessary before this is settled.
First step is to enter the s88’s into ECoS. This is pretty easy. You must ensure that you insert the connector the correct way up. Ensure that the cable hangs downwards. You tap up the appropriate screen for S-88 entry.

You then enter what type of S-88 (e.g. whether it is 8 or 16 port) it is and then tick the box.

Then lay the track connecting the S88’s to the track.
One piece of advice is to ensure that the current drawing train or loco which will trigger the S88 will fit in its entirety into the track section being monitored. One issue I have already come up against is that the locos or units which you will run will be of variable length. E.G. I intend to run Turbostar DMU’s and also SBB Crocs. These are obviously of different lengths and the stopping distant needs to be taken into consideration for the shuttle line. How I have got round this is by having each single piece of track wired for DCC. For the regular DCC track I have wired each rail but for the rail which connects to the S-88 I have in some areas split the track in half and inserted an insulting joiner. The reason for this is so that once the track has been ballasted I do not have to lift it to apply new contacts or insulators. The contact wires have already been installed and I can connect them up underneath the baseboard in a combination which can be adjusted to accommodate the length of train or loco which I need to be detected. Track laying for this sort of venture is more laborious than normal as there is a further variable which requires consideration. To connect up the wires after track laying, all the straight DCC rail wires can be tied together and connected up as one. The S-88 connected rail wires can be varied according to the size of the loco you need detected and where you want it to stop. Yet another factor for consideration here is the stopping distance of your loco. I have found these to vary considerably and you may be surprised how short or long a distance it will take for your loco to stop. My K.Pev P8 pretty much stopped dead in its tracks. So I can allow a distance of 10cm for it whereas my Bachmann Turbostar requires a longer sort of distance to stop, so this needs to be taken into consideration prior to laying the track.
I will also try to have the points triggered by S88’s too in order to test this feature.
Another factor is consideration of which S-88’s to use. I have compared them both and there are some points worth pointing out. The size of the units are substantially different. The Veissmann is compact and takes up less space. However the cable for the Veissmann is very short and will have to be sited very close to your controller. The S-88’s have to be connected in a daisy chain manner. You can buy an extension cable should you require it from several companies including LDT. The LDT has a longer length cable which is a lot more flexible. Which ever you choose it should be borne in mind that the LDT will have to be the last in the chain as there is a problem with the Veissmann in this respect.
The Viessmann S-88 has plastic plugs to hold in the connecting wires with whereas the LDT has screw in blocks. This may seem trivial but wait till you forget to have screwdriver handy to find out the difference this makes. Also worth considering is what you will use when you inevitably loose the provided plastic plugs.

I have used the choc block connectors for this as recommended by David (DWB) as the shuttle routes are something which will be adjusted and reconnected periodically depending on what I am running on them.

Another issue for consideration is that because of the short cable length keeping the s88’s located close to the controller is that you will have to run a long length of wire from each track block which you want detected to the controller. Buy plenty of wire before hand if you have a large layout, you really will need it. You could buy an extension cable or two to take your S-88 close to where it is needed but then you will have the same problem again because your next area of occupancy detection may be some distance from the first and you will need even more S-88 extension cable to connect to the next S-88. I preferred to keep them all close to the control unit.
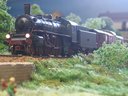
Here are a couple of views of the track from one end. The terminus shown will be a West Highland station which will be scratchbuilt at some point.


Here is the other end which is a Swiss mountain station.

Having constructed my lines the nest thing to do was to wire them up. This was easy enough although be prepared to rewire this over and over again as you try to get the loco or train to stop where you want it. The only real problem I had installing the S-88’s was the polarity. I got a short circuit first time around. A quick switch round of the wires got this sorted.
I found the Veissmann S-88 more limited than the LDT in some ways. The LDT has two power inputs so you can use it to cover two track sections. I am using the LDT to cover both shuttle lines. You can get by with as little as three detected sections on a shuttle line. The Veissmann does not have this facility and will only allow you to do eight sections right next to each other. The Veissmann also says that if you’re going to have detected sections next to undetected, then you must install a module, which consists of diodes and resistors to prevent interruption of the signal. The LDT doesn’t seem to need this. I also didn’t like the plastic plugs in the Veissmann as they have tendency to fall out after use. I prefer the wire screw in blocks of the LDT.
The length of the cable with the Veissmann is far too short. It can only be three inches from the ECoS at most!
One suggestion which may be worth considering when setting these up is that you will need about five times as much wire for the S_88 detected rail as you will for the undetected rail. The undetected rail is just a standard power bus and can follow the track along. The detected rail however has every detected section requiring a wire going from the track back to the S-88. Bit like the difference in between the circumference of bicycle tyre relative to the sum of the length of all the spokes. For the centre section, unless you want anything else going on which requires detection like points are signals, you can just connect up all the wires for that centre section to a common module port.
The shuttle lines in operation.
Having done all the wiring up and installation it was now time to get a train going. My test pilot was to be a Scot Rail Turbostar. Turbostars were one of the DMU’s I had in mind when I thought of the shuttle feature so I wanted to see how these went.
First you set up your shuttle line.
You go the Shuttle line menu and either add a new one or select one you want to edit. These are listed by name.

This is the screen which opens up and in this screen you enter the name of the route and specify the time it will stay in the station or terminus.

This box allows you to select the S-88 module.

..and this one the port of that module.

After that just confirm by ticking the box and it will then close.
Next step is to select a loco and start it to run at the required speed on the shuttle line.
Then from the drop down menu select shuttle line, this will trigger a new menu with a list of your shuttle lines. Select the one you want and it then goes into shuttle mode. You cannot then control the loco until such time as you terminate shuttle mode. You can have eight of these going at once.

Since I set these up I have done a fair bit of tweaking and as I have been working out there most of the day, I have had a Turbostar and a Swiss Croc shuttling back and forth for hours without any problems, other than the Turbostar decoupling itself once which is unrelated to the system. They seem to be able to carry on perfectly well as long as there are no issues with the loco or track.

Some thoughts for consideration are that if you are going to set these lines up and intend to use different locos and units on these lines I would recommend that you take each final length of track at each end (and if you are using a DMU or EMU you may need to make this two lengths) leave one rail complete and the other rail which you intend to use with the S-88 divide into four and use isolating connectors to rejoin them. Solder a dropper to each isolated piece of rail and now you will be in the position that you can adjust, under the baseboard, the length of rail and location of the rail which will detect the loco. Having used two very different locos to check this out, if you want to have the loco stop in the station precisely where you want it to, you need to adjust where it gets the message to stop. If you do not do this before you ballast your track you will have to rip it up every time you use a substantially different loco or unit.
I am finding out that it seems that the loco stops when it leaves the detected track that you set up on your shuttle line . I still have more to find out about this system to get it down to a fine art. I have got pretty close with the Turbostar and can get it to a couple of cm of the buffer stop.
I’m quite pleased to have got to this point where the shuttle lines function smoothly as it was major consideration in buying the ECoS over a budget system. I will now see where I can set up more shuttle lines so I can allow the trains to run themselves. These lines are more suited for DMU’s, EMU’s and the like as the return journey will involve a loco pushing the train rather than pulling it. This is no big issue, just a point for consideration. Overall I think this is an excellent feature which is ideal for terminus to terminus layouts.
Points motors and decoders
In addition to the shuttle lines I have been experimenting with motorised point motors. I actually had to install these before I could get the shuttle lines up and going as they are part of the lines. For the motorised points I was going to use a Lenz LS150. I installed the Tillig ones first and they are very good I have to say. I used the Tillig point motors with the Tillig track as they are best suited. These were a bugger to install but this is not a problem with the motors. It was the location that was the problem. I didn’t have enough room to get a screw driver in so I had to use one of those special small screw drivers, the blade of which was a bit too broad so it kept slipping out. This took ages. The second motor I decided to remove the base board and lift the track and then install it. Pays to think ahead with point motor installation. This is the only area on my layout with such restricted access so fortunately I don’t have to deal with this again.
Preparation of the Tillig motors is easy. You remove them from the box and choose which of the two pins suits you and insert it in the slot. They come set for a 6 mm switch which is correct for Tillig points, so no adjustment necessary there. I found the instructions a bit hard going so it’s just as well I didn’t really have to consult them much. The Tillig motors are easy to wire up, they are mentioned in the Lenz booklet as Pilz motors and can be wired as simply as snap double coil motors. No messing with diodes, somebody appears to have thought ahead and installed them already. Allocating addresses was straight forward and as per the Lenz LS150 manual.

However although I set the pulse duration to about two seconds on the ECoS it only seemed to be a fraction of a second. I figured that not only do you have to set the pulse duration on ECoS but also on the LS150. There are instructions in the manual and this sorted the problem. This could have been a problem if I had used the LDT point decoder as I don’t remember them mentioning anything about setting pulse duration.
The Tillig motors are great but how do they rub up against the old favourite, the Tortoise? Well this photo should tell you a fair bit. Look at the difference in size.

The down side of the Tortoise compared with the Tillig is that you have to;
Locate and buy diodes,
Mess around bending wire,
Add three inches to clearance considerations,
Do some soldering.
I actually found the Tortoise easier to install but that was because I had four feet of clearance under the layout where I was working instead of three inches. It makes a big difference. Installing the wires was more fiddly as you have to ensure you have your diodes the right way around.
Are there any pluses to the Tortoise motor then? Well there’s one big one which may well be at the top of many peoples list of priorities; it’s considerably quieter than the Tillig.
I quite liked both point motors. For domestic purposes I will go with Tillig as they are easier wire up and take up less space. However for shows I can see why people would choose Tortoise.
In regard to point decoders, I like the Lenz LS150 best as it is more compact, allows you to set pulse duration and has far more comprehensive instructions.
So now having done this I can get on with some scenery to make this area look like a mountain railway.


1 guest and 0 members have just viewed this.