What is the best method for connecting to a Bus Wire?
Posted
#147272
(In Topic #8096)

Inactive Member
I have tried cutting partly all around the sheaving twice (about 5mm apart) and then slitting through to reveal the wire but it's very difficult to do without cutting into some strands of the actual wire. I thought of using snap-lock connectors but as two sizes of wire are involved this may not work too well, also I don't particularly want to use "chocbox" connectors as the wires can break when screwing down onto them.
Ken.
 Last edit: by Ken
'It don't mean a thing if it ain't got that Swing'

Posted

Inactive Member
You'll have to scroll down a bit, Ken.
Basically, it's like whittling. :cool:
Max
Port Elderley
Port Elderley
Posted
Inactive Member
I'll try it and see how I get on. I'm still a bit concerned about cutting through some of the wires but gently does it must surely be the watchword? :roll:
Ken.
'It don't mean a thing if it ain't got that Swing'
Posted
Inactive Member
Practice on a scrap piece first. Good Luck. :thumbs
Max
Port Elderley
Port Elderley
Posted
Inactive Member
Bus wire strippers are available both here and in the uk….do a search for them and you should find them at Gaugemaster and possible your local DIY centre.
Very useful tool which makes it very easy to strip out a small section with no damage to the bus wire.
Regards Kim
Posted

Full Member
'Petermac
Posted

Banned
Cheers, Gary.
Posted

Site staff
http://www.jaycar.com.au/productView.asp?ID=TH1827&form=CAT2&SUBCATID=954#1

Ron
NCE DCC ; 00 scale UK outline.
NCE DCC ; 00 scale UK outline.
Posted
Inactive Member
Hi Ken,
Bus wire strippers are available both here and in the uk….do a search for them and you should find them at Gaugemaster and possible your local DIY centre.
Very useful tool which makes it very easy to strip out a small section with no damage to the bus wire.
Regards Kim
Thanks Kim and I actually have a wire stripping tool but didn't think this would work as I'd be using it in various positions of the middle of the bus wire and not at the end where the norm is to remove only about 10/15mm (where it works fine for all the droppers). However I notice you say it's easy to strip out a small section so how do you pull the tool away to reveal the wire when (in my case) there's at least 3 or 4 metres of sheathing and about 20 droppers involved? I appreciate I could start at one end but I know how difficult it is to slide sheathing along which is why I discounted this method.
Thanks too to Gary (I might try that but don't have any of those connectors) and Sol for their input.
Ken.
'It don't mean a thing if it ain't got that Swing'
Posted
Full Member
Sol will be far better placed than I am to explain because he's used it but, from what I can make out, it's not just a simple wire stripper - at least I hope not at the price although Sol's link would suggest it might be - there's no reference to cutting into the centre of cable attached at both ends ……. :roll::roll:
'Petermac
Posted
Site staff
Ron
NCE DCC ; 00 scale UK outline.
NCE DCC ; 00 scale UK outline.
Posted
Full Member
Got mine at Jaycar about 10 years ago and still going strong.
Posted
Inactive Member
Its no problem working along a length of cable.The stripper pulls a nice gap in the cable insulation allowing another wire to be joined.When you remove the stripper tool the insulation tends to shrink back but does leave enough wire exposed to join another to.
regards,
Derek.
Posted
Full Member
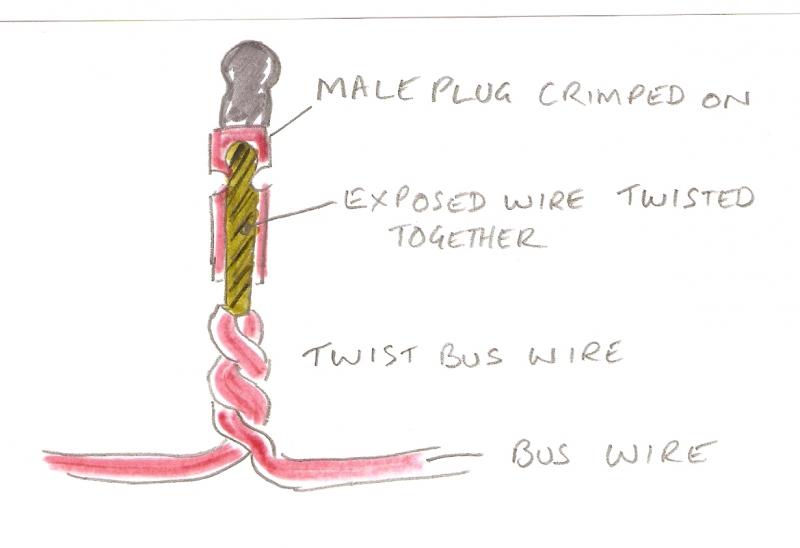
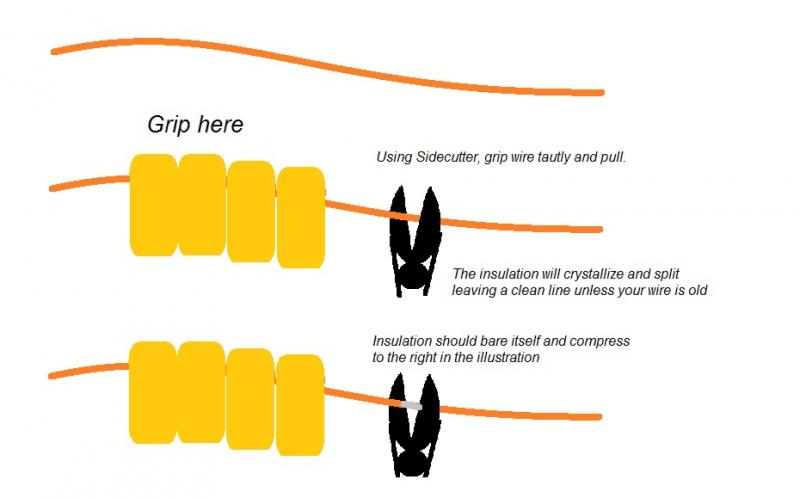
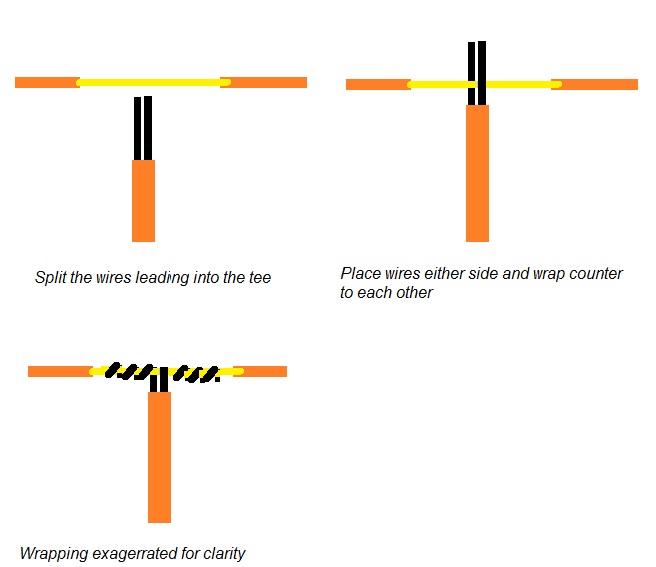
I know being an electrician by trade helps me but if you use a pair of side cutters, hold the wire securely with one hand and grip the wire with the side cutters just slightly tighter than the diameter of the plastic and slide it. The insulation will shear at that point and you can "bunch it up" exposing enough wire to wrap around the tee. Join and solder. You might need to practice a few times on some extra wire as you are bound to cut through it the first few times. I do not use strippers as there are many situations that you cannot get them into place.
If you are making a Tee it is a good idea (I think anyway) to do a tee wrap before soldering… see the illustration!
Hope these drawings make sense,
Regards
Trevor
]
Last edit: by xdford
Posted
Full Member
I think, in most cases, the bus wire will be pulled tight under the baseboard so a mistake resulting in cutting through it would be a bit of a PITA ……………..
I do like your suggestion of splitting the cores of the dropper and contra-winding around the bus - unless of course, your droppers are single core …………..:roll::roll::roll:
'Petermac
Posted
Full Member
The trick is to grip it "just enough". If you don't get it quite right, the plastic will stretch to appear whitish but it will occur at the shear line. If you hold it too tight the wire may snap as you suggest so a bit of practice first. Yes I do cut through occasionally!
As for single core wiring, it would be OK if your layout was stationary but I have seen exhibition layouts built with single core and there are more problems than you can dream up ,
Cheers
Trevor
Posted

Inactive Member
I have the exact same wire stripper as Sol and it works a treat. I would suggest practice first on some scrap. These wire strippers are adjustable and need to be set correctly before you dive into your main piece of wiring.
:cheers Gormo
"Anyone who claims to have never made a mistake, never made anything!!"
https://sites.google.com/site/greatchesterfordmodelrailway/home
https://sites.google.com/site/greatchesterfordmodelrailway/home
Posted

Site staff
Regards
Alan
Born beside the mighty GWR.
Alan
Born beside the mighty GWR.
Posted

Full Member
These deffo do the job, I recommend them. With the setting screw there is absolutely no danger of cutting into the cable braids. I also have a pair of 'Sol' strippers in my serious toolbox, excellent they are too, but could cost 2-3 times as much.
The 5" version is possibly a little larger than needed, and the B&Q price is a bit steep.
They can be used in confined spaces, too.
Doug
Last edit: by Chubber
'You may share the labours of the great, but you will not share the spoil…' Aesop's Fables
"Beer is proof that God loves us and wants us to be happy" - Benjamin Franklin
In the land of the slap-dash and implausible, mediocrity is king
"Beer is proof that God loves us and wants us to be happy" - Benjamin Franklin
In the land of the slap-dash and implausible, mediocrity is king
Posted
Full Member
clean off the varnish and solder. i also made up a busbar for my layout wiring it runs the whole length of the layout and i use
droppers from the lights then one switch wired from the uncontrolled output on the transformer. simple!
1 guest and 0 members have just viewed this.