The camera never lies dammit
Posted
#186936
(In Topic #10482)

Full Member
First attempt at scratch plastikard
Parts of this should probably should be subtitled how not to do it. The camera finds things the eyes miss!!I used the same basic design as I've been using for card terraced houses but substituting Slaters embossed plastikard, the plotter cutter handled the cutting OK, not quite completely through in places, probably should have taken an additional pass so I had to resort to a knife a few times, much better than doing it all by hand though.
I used Humbrol Liquid Poly, it does the job OK, but sets a lot quicker than the PVA I use on card, that resulted in one or two pieces not being as straight as they should be, I may attempt to remove the worst and refit. The roof I experimented with using strips of thin card painted grey & glued onto a plain card roof, then making cuts to try and represent tiling, after which I applied a fairly dilute wash of black acrylic, which I wiped off almost immediately hoping that enough would stay in the cuts, worked in places!
Windows and doors etched brass from Peedie, coloured with fine point ink markers, the single chimneys at the ends are bottom half of Scale Link white metal gate posts, the double chimneys are plastic square tube covered in brick paper label stock and plastic rod. Gutters half round plastic, drain and down pipes more plastic tube and rod.
Lintels drawn with white paint marker, window cills plastic strip.

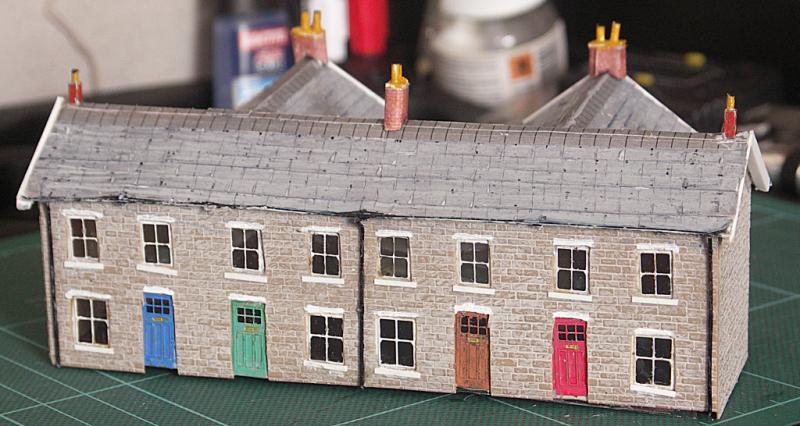
Front view, red door is a bit skew whiff, some window cills slope a bit, still have to put a pavement and steps on. The gutter looks as if it slopes down at left, but on looking closer I suspect it's due to the shadow, the light is off to one side. Also shows that the gutter is not close enough to the eaves

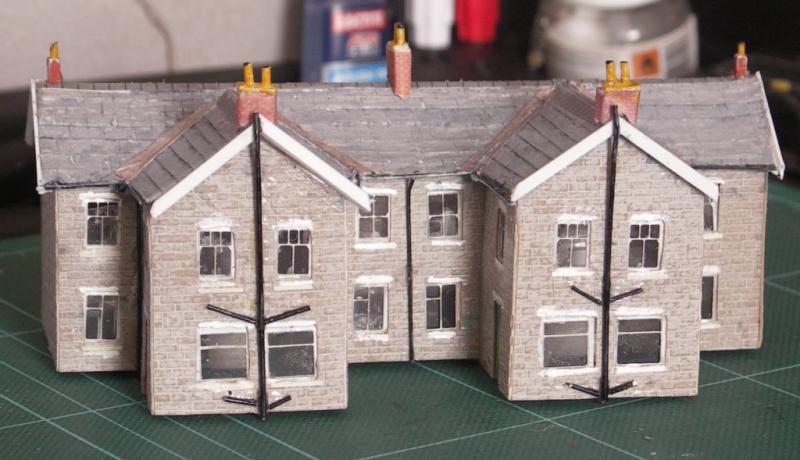
Rear view, the extension on the left will have to come off (liquid poly caught me out there!) and put back straight as will one of its chimney pots
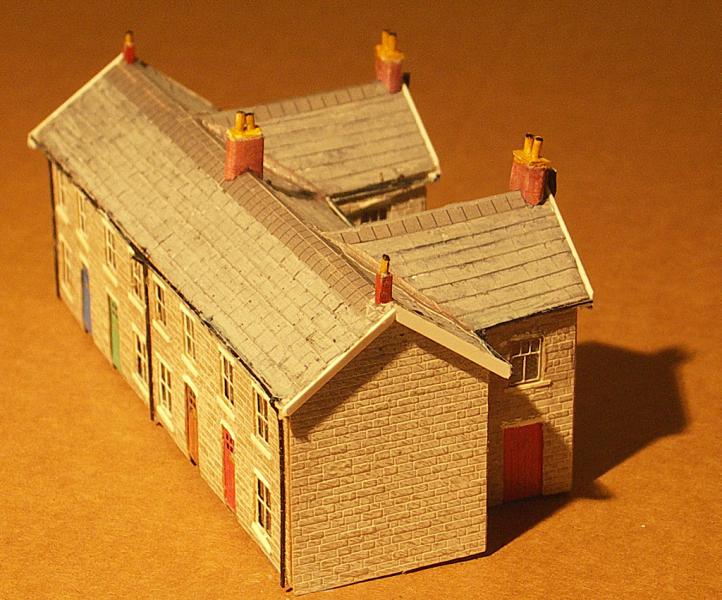
From above, this does show up the texture of the plastikard well which is what I wanted.
A few lessons learnt, they do say we learn by our mistakes. They also say the camera never lies, too right, (for that you need photoshop!)
Cheers MIKE
I'm like my avatar - a local ruin!
I'm like my avatar - a local ruin!

Posted

Banned
I have been modelling with styrene for eons (well, atleast 20 years off and on) and I always end up placing something out of whack. I purchased some Deluxe Materials 'Roket Bond 20 second', which I used sparingly, with a very small dab here and there for general positioning, before applying MEK for a firm bond. I ended up not using it as I found once it had hardened, it was a PITA to remove. I now use Revells 'Contacta' which gives me time to adjust the individual parts. In the end, it forms a great bond. For bonding card (paper) to styrene to wood, I use Zap-a-Gap Medium CA. With this, you need to coat the whole surface for a good bond between to different mediums. Also, you don't have a second chance with this !

Keep it up and looking foward to the repositioning of the extension.
Cheers, Gary.
Posted
Inactive Member
Could be in a mining district where subsidense has taken its toll ?.
Cheers,
Derek.
Posted

Full Member
I'm amazed that the plotter cutter can deal with the slater's plasticard, it's notoriously thick and difficult to cut?
The doors look great, nice colour washes and the window frames the same.
For me, getting the cills and lintels square will improve things dramatically.
I also think that the rear drain pipes are a tad too thick, picky stuff I know but it might help.
Definitely worth some tweaks and another go.
The relief on the brickwork looks great.
cheers
Marty
Posted
Full Member
I'm using a KNK Zing which had quite a lot of discussion a while back on this forum, there are machines that will cut heavier stock but at greater cost, the best seller is the Silhouette Cameo at £146, but cutting force is only 200g, the Zing at £269 cutting force 750g is rated best value in this review, scroll down for comparison chart.
http://die-cutting-machines-review.toptenreviews.com/
I admit the drain pipes are a bit thick, I used what rod I had in stock. I'm still experimenting with cills and lintels, this is the first time I've tried drawing some with ink marker pen, I think I'll go back to 1.5mm wide strips of self adhesive label stuck full length of the building above/below windows then cut out the bits between windows, that should ensure they are lined up. The label does not leave a mark on the surrounding area like liquid poly or PVA.
The "brickwork" is actually cut stone work, Slaters call it grey, but it looked beige/light brown to me so I mixed some emulsion 75mL match pots (in dove grey and pebble) and applied with a 4" roller.
 Last edit: by Dorsetmike
Cheers MIKE
I'm like my avatar - a local ruin!
I'm like my avatar - a local ruin!
Posted

Full Member
Good effort first off. The downpipes may be little generous, but at least you have put them in, so many modellers do not bother doing it at all. What scale is the building?
Bob
Posted
Full Member
Cheers MIKE
I'm like my avatar - a local ruin!
I'm like my avatar - a local ruin!
Posted
Full Member
I'd still like to figure a better way to do guttering, on this I used a piece of half round plastic strip fixed to slivers of strip glued under the eaves, not easy to get positioned, what would be handy would be some "P" section strip, you could glue the "leg" of the "P" under the eaves and leave the half round bit showing. Gutters being only about 3 or 4 inches on houses, would mean about 0.5mm in N gauge, I see some kits now use a sheet of card under the roof slightly larger than the roof, has anybody built one using that method? Does it look about right?
Last edit: by Dorsetmike
Cheers MIKE
I'm like my avatar - a local ruin!
I'm like my avatar - a local ruin!
Posted
Guest user
I have found Slaters Plastikard supreme for a textured finish to dry brush with acrylics, especially the stonework with its different depths of stone effect. But plastic card on its own lacks the structure rigidity and flatness of Daler board - so I have used both. I cut out the structural walls in Daler board, and surface each piece with genuine Slaters Plastikard before assembly - be it brick, stone, close boarding or whatever. I sandwich Brassmasters etched windows between the two layers of the sandwich. I leave a tongue of Plastikard overlapping the edge of one mating part of an L shaped pair to hide the edge of the card - and sand off when joined with PVA.
So not card OR Plastikard - card AND Plastikard in a sandwich.
Because I haven't been modelling for very long you may consider this of little value though.
Posted
Full Member
I have used a floor of mounting board to hold things square, and reinforced the corners with square section plastic, the latter mainly to gain a larger surface area for adhesive.
The etched brass windows and doors (from Peedie Models) I glue to the plastic, then fix OHP transparency film over the complete wall area, that may add some rigidity to the walls with windows but none on the ends which have no windows.
Cheers MIKE
I'm like my avatar - a local ruin!
I'm like my avatar - a local ruin!
Posted
Guest user
Posted
Full Member
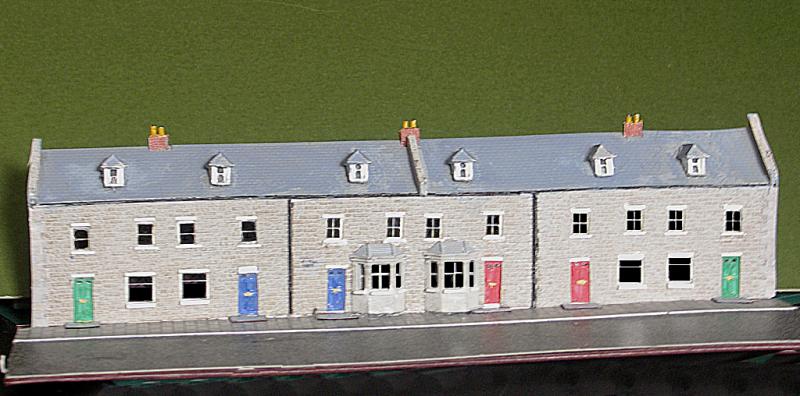
The dormers and bays are Scalelink cast white metal, the dormers have cut down Peedie models etched frames, the dormers I didn't have any etched frames that would fit so used some left over Metcalfe windows..
Cheers MIKE
I'm like my avatar - a local ruin!
I'm like my avatar - a local ruin!
Posted
Full Member
Cheers
Marty
Posted

Full Member
Always try to look on the bright side of life!
Barney
Barney
1 guest and 0 members have just viewed this.