Laser cut buildings
Posted
#196000
(In Topic #10872)
Guest user
All the buildings on my proposed layout St Michael (nee San Miguel) have been purchased from Lcut creative (lcut.co.uk) a manufacturer of laser cut models. The reasoning behind this particular idea is that the layout is intended to give me lots of building time (the same reason for purchasing Airfix or white metal cast rolling stock, and the Tim H baseboards) when i finally get to live in Spain and reduce the amount of time sampling the Rioja.
I dont know if many members are aware of Lcut but they are constantly improving their range and have just introduced a full interior kit for the signal box at a very reasonable price and are well worth a look.
Laser cut buildings are coming into their own nowdays but I do feel the painting/finishing requires careful attention (I myself intend to clad them in Scalescenes sheets) so if any member has any suggestions I think it would make interesting reading.
Regards Ian
Posted

Full Member
I used to be indecisive but now I'm not sure.

Posted

Full Member
'Petermac
Posted

Site staff
Is it laser cut, card, wood, plastic, or what

Ed
Posted
Full Member
 Last edit: by Folkwizard
I used to be indecisive but now I'm not sure.
Posted
Site staff
Noticed someone on 'that other forum' commented they're like a "cross between balsa and card", so you need a sharp knife.
Be interesting to see how Ian gets on with the ones he's bought.
Ed
Last edit: by Ed
Posted
Full Member
Cheers, Pete.
it was already on fire when I got here, honest!
Posted
Guest user
Ian
Posted

Legacy Member
Yes Ian painting must be done with care and I found a light wash (several if necessary) before assembly is the best way as the material is a form of card which if soaked tends to distort. Also, covering them with any form of paper destroys one of their best features imho as the brickwork etc is nicely embossed and its relief stands out nicely when painted
My first attempt was the medium signal box. Nicely packaged in a stout box but my first observation was that some of the pieces had deformed no doubt due to the heat process during manufacture but I was unable despite trying several methods to rid them of the curved form they had taken - I had one piece in a later kit that was pressed under two house bricks for a week and it was still curved when released from the press, making them damp prior to pressing didn't improve things and I just had to work my way round the problem during assembly.
The kits went together reasonably well apart that is from the bits that slot together. LCut suggest pushing them together on a flat surface 'VERY CAREFULLY' but on a box like structure you still have one corner that can't be done this way and which will require manual manipulation - which is not easy, the miniscule protrusions are very, very fragile and easily deform or break if anything but the slightest pressure is applied. Multiple dry runs are not recommended (by me) as the same thing can happen so, put them together once whilst dry and glue down the inside only. The protrusions are not completely square on the ends - more rounded slightly, and I wasn't happy with the corner joints when done (see images). They are also slightly short on length so don't fully reach the thickness of the adjoining wall piece, Lcut suggest filing the joins with neat PVA to 'fill' the small gaps but I found this to be of little use.
My main concern with the box was when partly complete it appeared considerably under scale - more of a TT or large N scale product which didn't sit well with my 00 stock;-
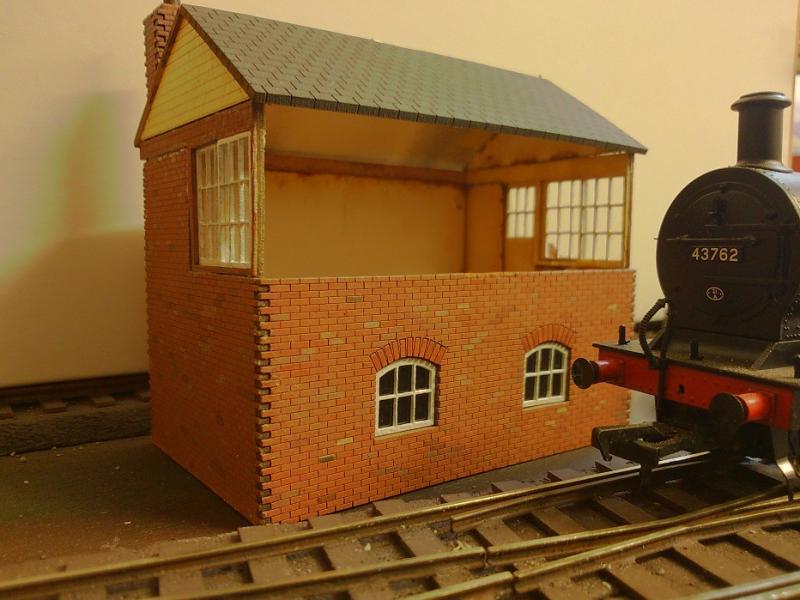

I may be wrong but whenever I've been in a signalbox I always seem to be looking down at loco crew and not as would be the case here - up at the footplate.
An e-mail reply re this query from the manufacturers stated they had researched sizes and their product was generally accepted as being of the correct dimensions for a medium box - my opinion is that whilst this may be true of the floor size the box round it was definately too small, however, I must stress this is only my opinion and you would have to decide for yourselves.
Overall impression was that it was a nice kit requiring considerable finesse to paint and assemble but further development is required to make it a great kit. Further extended research is also needed with the tape measure.
My second attempt was an alternative canopy for a scalescenes kit as I didn't like the one supplied;-


This was undoubtedly the most problematic of the two kits regarding curving pieces. The kit is in two sections which ultimately you glue together end to end but both roof top panel sections had become warped as had the two front valances and required considerable surgery, extra constructional material, plus the brick presses mentioned earlier, to get them anywhere near flat. The above two photos show it completed and fixed to my ham fisted adaption of the scalescenes low relief warehouse/dock. I'm still not 100% happy with it as there is a slight 'sag' in the roof line which can be seen in the second photo (the front right end corner of the canopy).
Overall I'd give them about 8 out of 10 with curved pieces and signalbox dimensions losing them points.
Oh and should you wonder - the signalbox went in the bin as, despite what the manufacturers said, it was way out of proportion with everything else on my layout…..
Last edit: by 16A
Mike
Praise is an excellent fillip for waning ambition.
Praise is an excellent fillip for waning ambition.
Posted
Full Member
I don't think they'll be getting any of my hard earned cash ……….:thumbs
'Petermac
Posted
Legacy Member
It wasn't intended that way Peter and they are only as fiddly as getting flashing off of white metal kits to get them fit for assembly, however they do require a certain amount of finesse - no bull at a gate rushing here…Well that reads like a fairly damning report to me ……………..:roll::roll::roll:
I don't think they'll be getting any of my hard earned cash ……….:thumbs
I was simply trying to give an honest opinion detailing my own personal experience with these kits and some of my problems may have been due to old age, too many thumbs and poor eyesight, however, others may have a different experience. I feel if LCut went about it in the right way and learned from comments made by customers (they may do, I don't know) they would end up with quality products - a few adjustments with their processes could iron out these rather irritating but small issues.
As a customer I recieve regular e-mail updates on their product lines which they do seem intent on increasing rather than rectifying existing issues such as those mentioned but, due to the rather negative reply I had re the sizing of the signalbox, I didn't bother e-mailing them about the distortion issue as I, maybe wrongly, assumed their reply - probably should have dropped them a line…..
Mike
Praise is an excellent fillip for waning ambition.
Praise is an excellent fillip for waning ambition.
Posted
Guest user
Ian
Ps give my regards to 'the Trip to Jerusalem' me being a Woodhouse Eaves lad
Posted
Legacy Member
Thanks for your review of these.
reg
Posted
Full Member
As Reg (Sparky) said, there are plenty of kits out there so why waste time and money on something that's less than "ideal" ?
I think my time would be better (and easier) spent with Ian's battle tanks, rather than flattening out warped kit panels ……….although somehow, "patience and dexterity" are not images that would immediately spring to mind when talking about tanks …………:shock::shock::shock:

'Petermac
Posted
Guest user
Posted
Full Member
And I always thought the key to good military vehicle design was that not only would they do what it says on the tin, but also that repairs could be carried out simply and in the field …………exactly where the darned things are needed !!! :roll::roll:
'Petermac
Posted
Guest user
Ian
1 guest and 0 members have just viewed this.