Going round the bend?
Posted
#253072
(In Topic #13901)

Full Member
Extension to a baseboard
Hi All. I have just had an idea? I would like to add to my existing baseboard, but I cannot think how to do the job.I need to put a bend/curve in the baseboard sides leading to a terminus station. But I would like to build it with plywood, without cracking or splitting the material. Best wishes Kevin
Staying on the thread Kevin.

Posted

Full Member
Just to clarify, are you thinking of an extension to your existing board to turn the track through 90 degrees for the terminus on a new board, the whole thing fitting in a corner of the room?
In essence, easy enough, although you need to ensure alignment of the boards top surfaces, particularly if using a different material such as plywood, as the new board will almost certainly be higher than the existing. Again not a problem, just flip new and existing boards upside down on a flat surface, shim the new board for track thickness on the existing one (use some track), then very carefully fit alignment dowels where the boards fit together and also use appropriate length legs on the two boards with adjustable feet.
If you are thinking of making a new plywood board yourself, it may be a good idea to buy the top board of an appropriate module size (1200 x 400mm for example) and get the plywood supplier to cut the frames for you. They have to be very accurately cut, which is easier with a large table saw, although I use a circular saw set up with clamped guides on a solid workbench, as making these cuts with a hand saw is never an easy task!
The much easier option however is to buy a modular flat pack baseboard kit. These are perfectly cut and available from many suppliers, including Hattons!
Hope this helps.
Bill
 Last edit: by Longchap
At 6'4'', Bill is a tall chap, then again, when horizontal he is rather long and people often used to trip over him! . . . and so a nickname was born :)
Posted

Full Member
Bill is right. Unless you have access to a jig saw or band saw (or you know somebody who does) cutting curves is not easy. You can use a circular saw, but gentle curves only. Fret saw if you have the patience. Then you have to deal with kurfing the outside frame (or find some pre-kurfed ply). Or using a skin of bendy panel.
Most modelers just use a square baseboard with 2 corners cut down to give a pentagon if it's an outside curve. The dimensions of this will depend on what radius you can use and where you want it (ourside edge, middle, inner edge). I think your current boards are 2 feet wide, if you use a 2x2 board, the maximum radius is about 18". Some modern stock is designed for a minimum of 22" radius, which is really pushing it. If your width is less, say 18", you would be looking at unrealistic radii.
If you start the curved track on the inside of the regular boards and use the outer edge of the corner that effectively increases the radius but means two reverse curves (with transitions if possible for smooth running). I'm doing this on the current build, when I get on the computer later today I'll draw you a diagram.
Sounds simple, with lots of space it is. Mini layouts are more challenging.
Nigel
©Nigel C. Phillips
Posted
Full Member
Staying on the thread Kevin.
Posted
Full Member
See the (rough and quick) diagram for the limitations inherent in "going round the bend". I used 18" width for the boards. Three different radii, the the innermost blue track uses reverse curves, although the outer (red) track could be used with 2 points to the blue track. For that matter even the middle black track. The inner and middle track is really only suitable for narrow gauge modeling. Even the 18" radius is almost toy-train modeling. Increasing the width will of course increase the radius. I have not shown any transitions, as you already know real railways do not abruptly change from tangent track (infinite curve) to the radius of the curved track, the change is achieved by an ever decreasing radius between the two..
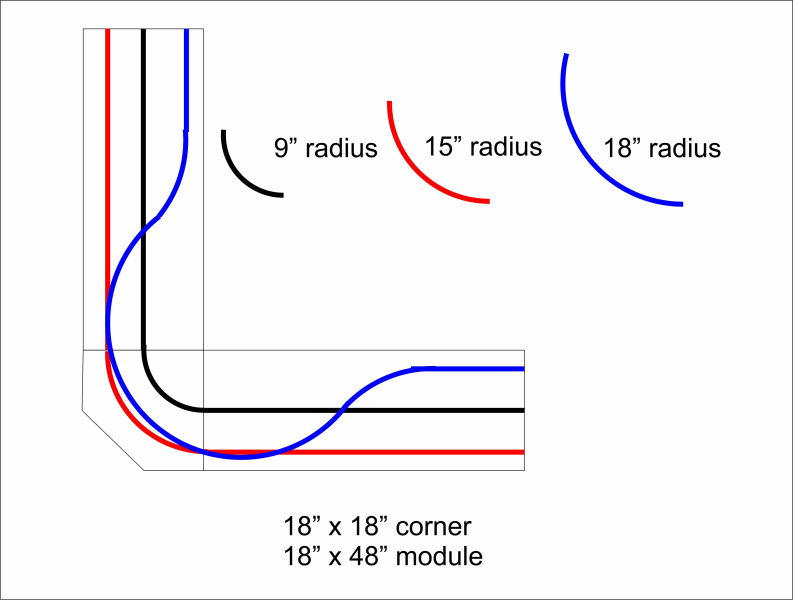
I drew this up on the computer, a compass (or a pin and some thread), a pencil and some squared graph paper works just as well. My mini-layout in the building stage is only 12" wide, so as much as I would like a fiddle yard (two actually) at 90° to the scenic boards, it's just not going to happen as it would really encroach on the scenic section..
I see England is in lock-down, so probably some theoretical modeling for the moment.
Nigel
©Nigel C. Phillips
Posted
Full Member
Staying on the thread Kevin.
Posted
Full Member
Pentagon - a five sided figure. In this case I think it's an irregular convex pentagon. Long time since I did this. A useful design element given the usual pelvis height of layouts. Avoids those painful moments. If you have the space one way around a sharp curve is to simply increase number of corner units so that they match the desired radius. 3 x 30° modules for example. Depends on how much space you have.
Box file? No. Try finding one here - hen's teeth territory. No point in paying to ship empty space.
Nigel
©Nigel C. Phillips
Posted
Full Member
Staying on the thread Kevin.
Posted
Full Member
Rereading your post I am not sure what you are trying to do. Putting a curve in plywood is not difficult if you have access to a table saw. By the sound of it you want a curved module. So what you do is to make a series of cuts (kerfs) in the plywood almost all of the way through and closely spaced. The closer the kerfs the tighter the curve. Then it will make a curve. Or just buy pre-curved or pre-kurfed ply wood. Look for Flexiply. The alternative is to just use thin MDF board and curve it to the frame. The top has to be curved to the shape as well. Very few baseboard suppliers will do any of this for a very good reason - cost. It's labor intensive, and not standardized. My supplier will not touch it.
Nigel
©Nigel C. Phillips
Posted

Full Member
That will cope with the sort of curve you need in, say, 9mm ply provided you can use a bit of effort with sandpaper afterwards. The woodwork underneath need not follow the curve as 9mm ply should be rigid enough if you just have the 2x1 underneath meet at right angles and then cobble in a bit across diagonally to join them, just staying inside the curved edge.
Douglas
'You may share the labours of the great, but you will not share the spoil…' Aesop's Fables
"Beer is proof that God loves us and wants us to be happy" - Benjamin Franklin
In the land of the slap-dash and implausible, mediocrity is king
"Beer is proof that God loves us and wants us to be happy" - Benjamin Franklin
In the land of the slap-dash and implausible, mediocrity is king
Posted
Full Member
Staying on the thread Kevin.
Posted
Full Member
Staying on the thread Kevin.
Posted
Full Member
Just a thought. You can take a rectangular board, and using blue or pink HE foam cut curved sections and add to the sides. Use scrap ply as base, glue to existing sides. Use cork for the top surface. Or use scraps of ply and do the same.
It does give more visual interest. Might try this in fact.
Nigel
©Nigel C. Phillips
Posted

Full Member
If you go back to the early posts on Marty's Newcastle Emlyn layout, he formed a curved road bed using this system - I think it was referred to as a "splined road bed"
'Petermac
Posted
Full Member
Staying on the thread Kevin.
Posted
Full Member
I avoided any reference to splining ply. As you point out, lots of clamps (and glue) and it requires a stable jig to do it.
One other way is to steam curve, but that needs a steamer and a jig. If your heart is set on some curves, try and get some Flexiply also called Bendiply).. Cuts all the hassle out of this. There are plenty of suppliers in the UK. You might have to persuade them to cut to size though.
I'm afraid that without the appropriate tools you may be somewhat limited in what you can do. At least with styrene sheet all you need is some adhesive, a straight edge and a decent blade.
You could also contact the commercial baseboard folks and see if they can do a bendy one. I somehow doubt it, but you never know. White Rose Modelworks say they do custom boards, or you could use a corner board as supplied by Model Railway Solutions. Just search model railway baseboard suppliers UK
Nigel
©Nigel C. Phillips
Posted
Full Member
Staying on the thread Kevin.
Posted
Full Member
D
'You may share the labours of the great, but you will not share the spoil…' Aesop's Fables
"Beer is proof that God loves us and wants us to be happy" - Benjamin Franklin
In the land of the slap-dash and implausible, mediocrity is king
"Beer is proof that God loves us and wants us to be happy" - Benjamin Franklin
In the land of the slap-dash and implausible, mediocrity is king
Posted
Full Member
Staying on the thread Kevin.
1 guest and 0 members have just viewed this.