Finally, a New Layout
Posted
#217174
(In Topic #11859)

Full Member
Thoughts on baseboards
Well, after I don't know how many years, I'm going to make a layout for myself again. My first layout, which I called Barnoldswick (and nothing much like the real location) was a double end to end of 20 ft overall length. I did exhibit it quite a number of times but it's number one failing was weight. It was back breakingly HEAVY! I had used 1/2 ply throughout and ended up adding 4" extensions to the sides. It was murder to move.The other issue was that I used wooden dowels to align the boards but these tended to fall out as the glue/hole interface deteriorated over time. The do need a mechanical backup.
So, I've had some thoughts on the subject but nothing particularly revolutionary.
I did build a smallish layout (12ft) for a friend and, for that, used 1/4 ply for the tops. This worked OK, but I thought it was a bit wimbly.
So, here's my theory:
Tops: 3/8 VG ply -
Ends: 1/2 birch ply - dense, stable and expensive.
Sides: 1/2 rubbish both sides ply. Full of filler and quite light.
When I bought the wood, I had the yard cut it into 4 in. strips and pre cut the tops to size.
I also have a notion to remove those areas of the top that don't support track and replace with foam.
To locate the ends I have used C&L steel dowels:

First you can see the packet of dowels as they come - two pairs with screws.
You will need a 1" forstner bit and, preferably, a drill press to make the recess for the dowels. You will need to drill holes through the ends as well.
The reverse of the male piece has a point. When the first recesses have all been made, put the male dowels in the recess point side up. Align the boards and press to make witness marks.
Back to the drill press and forstner and, ever so carefully, drill recesses for the female dowel. Sounds easy in theory but I messed up on two of the end sets.
Secure the male dowels as shown at top.
Secure one female dowel and slide the other loosely over the other male dowel. Now trial fit to see if things align.
No worries if they don't. Use a C clamp to compress the boards together so that the female dowel base makes a mark in the wood. Return to drill and scallop out the offending wood. The boards should go together when you're done.
Now to make sure everything aligns, I temporarily glued the last female down into the recess (I put a piece of paper over the male dowel to ensure that any leaking glue didn't bond the boards) and clamped the boards together. When dry, the female dowel is secure enough to drill pilot holes and secure.
If the boards don't quite align at the top (mine didn't), I found a rasp worked well to even things out.
A lot of work but once done, the boards will be stable and remain aligned.
I leave it up to the readers to decide what works for them. I note that Nigel has an alternative method.
….and what of the layout itself you ask?
The board plan is this:
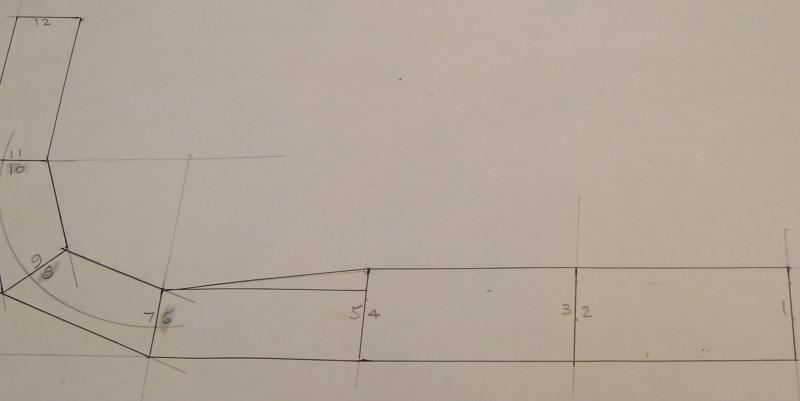
You can see it is L shaped. The two rightmost boards are 2' x 4'. The third and sixth boards are 18" x 4'. The other boards are angled and do pose complications.
The idea is that the 8 ft of board on the right will contain a terminus station and all the other ancillaries (goods, engine sheds, cattle dock etc). Nothing is final yet.
The 3rd and angled boards will have the approach track and are going to be sunken (hence the strange shape of the top board above). I have in mind an embankment, crossing a road and canal. Perhaps a pub.
The 6th board will contain the fiddle yard.
I mentioned that the angled boards present complications. Getting the sides to fix to the ends is an issue I foresee so I made some brackets to help with that:
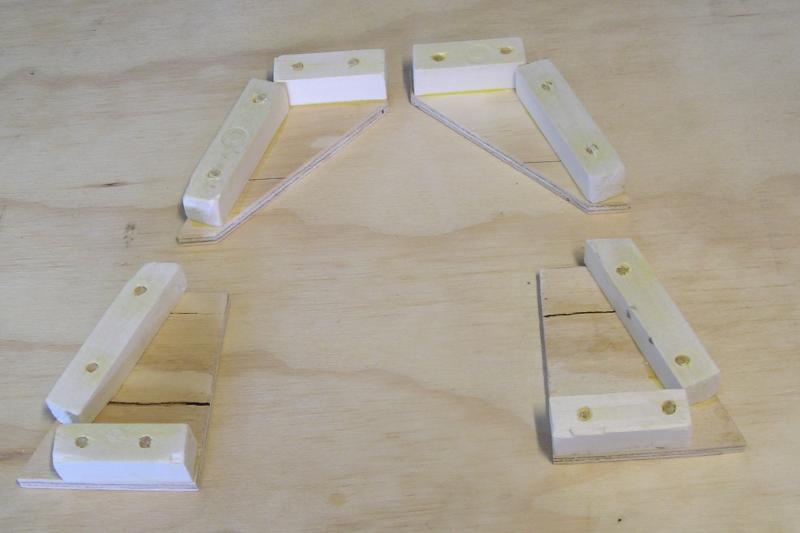
The plan is to secure these to the ends to permit the sides to align correctly. Pictures to follow.
Track you ask?
Being somewhat inclined to the hair shirt brigade, my plan is to use code 75 finescale track. I intend to construct my own points/turnouts (please yourself) using C&L components. I bought some DCC Concepts 00 roller gauges and 3 point gauge from C&L a few weeks ago.
What about era?
I'm quite partial to the railways of the 1930s - it seems to me that the period 1930 - 1939 was a golden age for British rail. My origins in Lancashire (and my gramps) mean that I model LMS.
That's all for now.
Cheers
John
John

Posted

Full Member
Always good to see a layout taking shape from the very beginning. It will be interesting to see how you get on with these dowels. The baseboard will be very sturdy when constructed using 1/2" ply. I will be interested to see how the noise levels work out once the track is down and ballasted. I am using 6mm MDF with my N gauge layout and once the track was fixed and ballasted the noise levels rose. Will watch developments.
Bob
Posted
Full Member
6mm is about 1/4" in old money.
It's hard to effectively acoustically isolate the track from the baseboard. I have used cork as a roadbed in the past. However, when ballasted and using PVA - which sets rock hard, any damping is going be lost. I have dabbled with using artists matte which is supposed to dry more flexible than PVA but I didn't see any obvious difference.
Roadbed this time around is going to be foam. Woodland Scenics do it as do C&L. I've seen rave reviews about this Ballast Magic stuff - wonder if it gives any benefit to noise.
John
John
Posted

Full Member
You didn't mention bracing. What's the plan? 16" centers?
I like the brackets for the angle ends. I shall borrow the technique for the wedge inserts I use.
Nigel
©Nigel C. Phillips
Posted
Full Member
When I got the boards that you sold me home I realized that they were back breakingly HEAVY! Aaaaaargh, talk about deja vu.
I've taken them apart - not that difficult and reused a lot of the wood. Tops are 3/8" so consistent with my ideas. You also helpfully supplied bracing with lightening holes cut in them, so I shall use those.
Glad to know I've helped you with my bracket idea. It remains to be seen how well they work.
John
 Last edit: by Brossard
John
Posted

Full Member
I will be following your progress !!! :doublethumb
Posted
Full Member
I have finished the first board. After a lot of faffing and several errors:
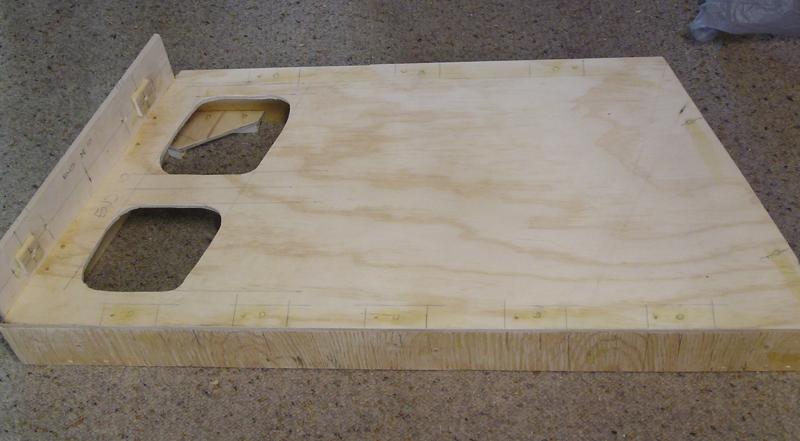
I used glue and dowel construction which I think is very strong. I put a bracket on wrong and had to wreck it to get it off.
Holes are for hand access to board joining bolts - 3/8" dia. I made a right dogs' breakfast of the cuts using a jigsaw but I got myself a drum sanding attachment for the drill which neatened things up. I'll use a hole cutting saw the next time.
The underneath:
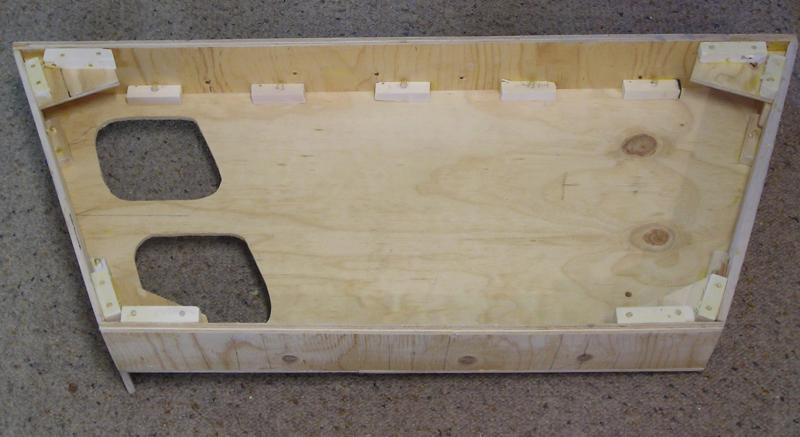
The brackets are evident here. They are essential to give strength to the angled corners. I used 3/4 x 3/4" dowelling strips. Most of the dowels are 1/4" but I used 5/16" dowels to secure the top.
The board is certainly sturdy.
More to come.
John
John
Posted
Full Member
Posted
Full Member
John
John
Posted
Full Member
Posted
Full Member
I can perhaps do some lightening holes in the ends. Birch ply is really quite dense and heavy. I mentioned cutting away those areas of top that don't support track.
John
John
Posted
Full Member
Bob
Posted
Full Member
(The method in short:
- lay down foam for the roadbed
- glue track to paper
- pin/glue the paper under the track to the board but let the track "float" on foam)
John
Last edit: by Brossard
John
Posted
Full Member
My favourite for material to use as baseboard top is what the Americans call Homasote board…its a paperfibre sound-insulation building board that is wonderful to pin and runs very quiet…a bit dusty if cutting with power tools, but it cuts very easily with handsaws and razorknives…great layout material.
Posted
Full Member
As for Homasote - now you tell me! It seems to be widely used, but, because of its' cellulose base I would be concerned about it absorbing moisture.
John
John
Posted
Full Member
I finished a 2' x 4' board yesterday so that's 3 down and 3 to go. Well, not quite, I'm seriously considering adding a 3' board a la Nicks' (Much Murkle) design.
On the topic of sound reduction, by serendipity, I just read MRJ 245. In it an article by Geoff Forster "Llangunllo" mentions the use of the C&L foam roadbed and that it does work to reduce noise.
John
John
Posted
Full Member
Posted
Full Member
John
John
Posted
Full Member
Posted
Full Member
J
John
1 guest and 0 members have just viewed this.