All other RTR Locomotive and other
Posted
#236894
(In Topic #13097)

Full Member
Peco buffer stops
Hi All. Not exactly mobile ? unless they get tested? I am looking for a way to improve Peco buffer stops ( that is apart from throwing them away) I have read various ideas, about cutting off the lamp and replacing them with an electric lamp? But, they are fragile and gluing them doesn’t seem to work, unless anyone knows better? Painting may work with a mix of “ black and white paint? a tip I found somewhere, but I thought black and white made grey? Weathering sounds better? But on one of my “ mobile Shunting Puzzles “ , that get put away after use, there is a lot of bumping in the process .meaning sometimes they need putting together again , Peco sleeper built may have the same problem, I did build one, that turned out over scale. Best wishes. Kevin
Staying on the thread Kevin.

Posted

Full Member
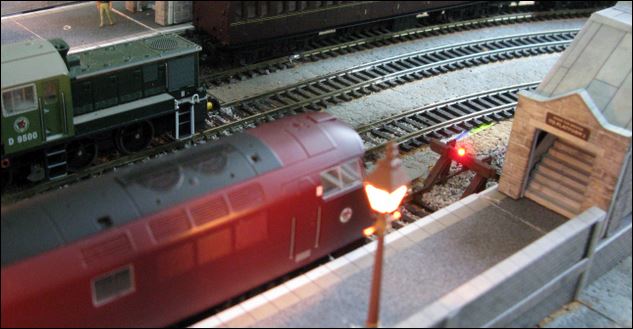
On my previous layout I modified three peco buffer stops by carefully drilling through the lamp on the top and inserting a micro LED.. In the process in ruined two buffers and three LEDs before I got the three that worked on the layout
One can be seen in the picture below. Unfortunately none of them survived the move to the new layout as the wiring is super fine and broke off when I attempted to recover them.

Posted
Full Member
Staying on the thread Kevin.
Posted

Full Member
http://www.train-tech.…fer-lights/2-buffer-light
I am using one at the end of the LT siding underground in the tunnel.
Jeff Lynn,
Amateur layabout, Professional Lurker, Thread hijacker extraordinaire
Amateur layabout, Professional Lurker, Thread hijacker extraordinaire
Posted
Full Member
Best wishes. Kevin
Staying on the thread Kevin.
Posted
Full Member
 Last edit: by Passed Driver
Staying on the thread Kevin.
Posted

Full Member
Doing you own from some scrap rail is not hard (JLTRT), but you will need to give it some heat treatment from a propane torch to get it to bend easily. NS rail is essentially hard brass alloy, it will kink if you try and bend it as is. Code 75 is of course easier to work with than code 100. You can then of course solder it to the track.
Nigel
©Nigel C. Phillips
Posted
Full Member
Staying on the thread Kevin.
Posted
Full Member
Kevin, Peco buffer stops are cheap and are fine if you can find an adhesive which is capable of holding them together. I glue mine to the track which seems to hold the whole structure firmly in one piece. Best wishes, Terry.

Posted
Full Member
Staying on the thread Kevin.
Posted

Inactive Member

Hi Kevin
There are four lugs on the buffer stops. Drive track pins through these lugs into the base board and the buffer stop will not move.
Cheers
Max
Max
Port Elderley
Port Elderley
Posted
Full Member
Staying on the thread Kevin.
Posted
Inactive Member
Max
Port Elderley
Port Elderley
Posted
Full Member
Correction - butane or propane torch. You just need to heat-treat the parts that bends, not the whole length. For that you would need a plumbing torch. Mine is a mini butane torch/soldering iron/heat wand (for heat shrink).
You could of course isolate the section of track just before the ends with a switch. I do that as a matter of course. Unless you have sophisticated gears, big flywheels or heavy duty stay-alives, at shunting speeds it will stop dead. One loco length plus an inch. Or install an IRDOT system.
Cheapo way is a clear plastic head pin or rod in the middle of the track at buffer height before the stop. Or pin some barrels in place after the stop.
Unless the plastic rail stops are pinned in place as suggested they will dislodge with a good thwack (even CA glued) They're meant to be cosmetic, not functional. For that you need real rail. The sleeper box ones are much sturdier.
Nigel
©Nigel C. Phillips
Posted
Full Member
Best wishes. Kevin
Staying on the thread Kevin.
Posted
Full Member
Staying on the thread Kevin.
Posted
Full Member
Staying on the thread Kevin.
Posted
Inactive Member
I have a couple of Archimedes drills, of both kinds. They never break drills.
If your drills are sharp, they require very little pressure to make them cut. 0.5 mm is the size for Peco track pins.
Perhaps you could try a pin vise.
The photo is from Terry's post, two above. It's a Peco SL-40
Max
Port Elderley
Port Elderley
Posted
Full Member
Staying on the thread Kevin.
1 guest and 0 members have just viewed this.