New Life For Old Wagons
Posted

Inactive Member
Weathering basic plastic no frills old Hornby wagons
Crikey Gary,That`s a handy link!!!
:cheers Gormo
"Anyone who claims to have never made a mistake, never made anything!!"
https://sites.google.com/site/greatchesterfordmodelrailway/home
https://sites.google.com/site/greatchesterfordmodelrailway/home

Posted

Site staff
Ed
Posted
Inactive Member
Straight from the tube for the major colours. I used Burnt Sienna for rust and decided to water that down…it was more or less washed on and spread to suit.
Technique is really up to you but once the base / major colours are in place, I tend to add the muck as thin layers. The acrylic dries fairly quickly so it`s best to work small areas and then you can manipulate the paint before it goes off.
Sounds like a video demo might be appropriate.???
:cheers Gormo
"Anyone who claims to have never made a mistake, never made anything!!"
https://sites.google.com/site/greatchesterfordmodelrailway/home
https://sites.google.com/site/greatchesterfordmodelrailway/home
Posted
Site staff
[Anybody noticed that this thread doesn't show up when you select 'Recent Topics', have to go to the weathering forum to see new posts (oh err).]
Ed
Posted

Site staff
Regards
Alan
Born beside the mighty GWR.
Alan
Born beside the mighty GWR.
Posted
Site staff
Posted
Inactive Member
I thought I would present you all with a video demo showing the methods I am using at the moment. This is just my way of doing it at this point in time. I am open to any new or existing ideas and at some stage further down the track I intend to have a go at Gary`s method. I have seen the results of his work in the flesh and they are extremely good.
Anyway these vids are much longer than my normal offering, so settle down with a packet of crisps and a beer or two. If you are sick of watching the telly or you`ve become bored with watching paint dry or watching the grass grow, you may find this a little less boring……hopefully..:roll::roll:
There are three videos to cover the one project and some still photos to better show the results of the weathering.
Part 1
https://www.youtube.com/watch?v=dk2qzIt8lkA
Avant d'accéder à YouTube
Part 2
https://www.youtube.com/watch?v=7XWJ2HncU_o
Avant d'accéder à YouTube
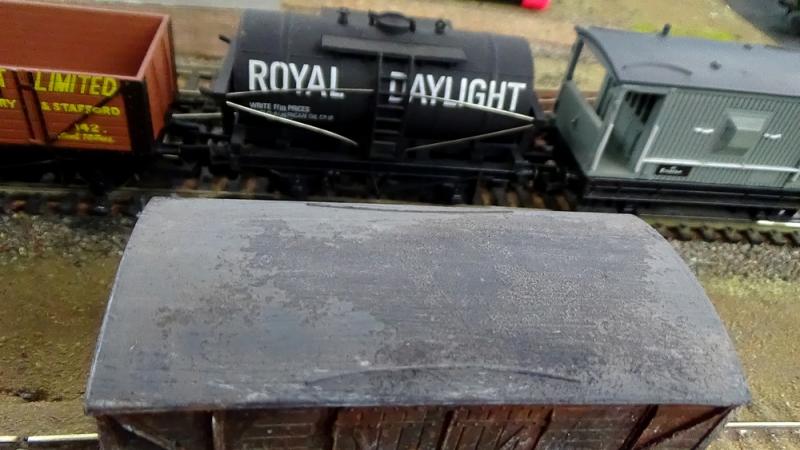
Well I was not entirely happy with the roof after this session so I put a coloured wash across it and dabbed it semi dry with some foam rubber. I also treated the walls of the wagon with the wash although you`d barely notice. You can see the shine on the wet roof below.
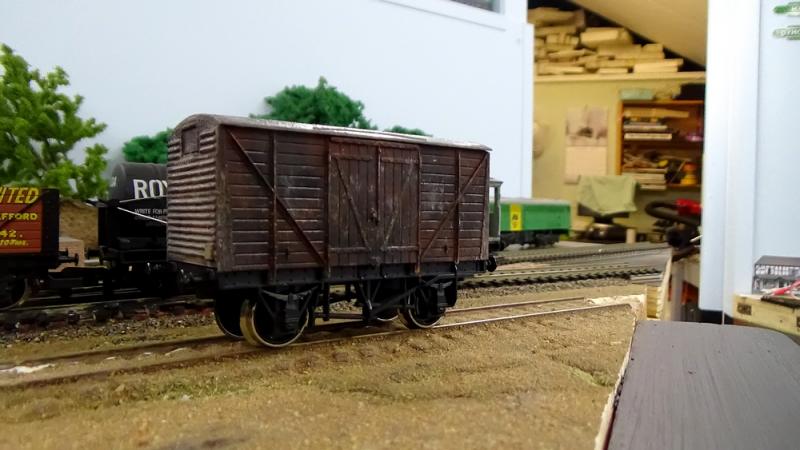
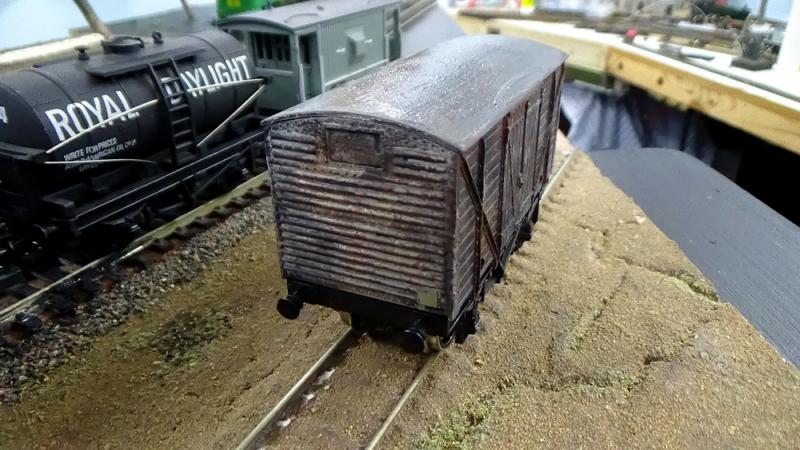
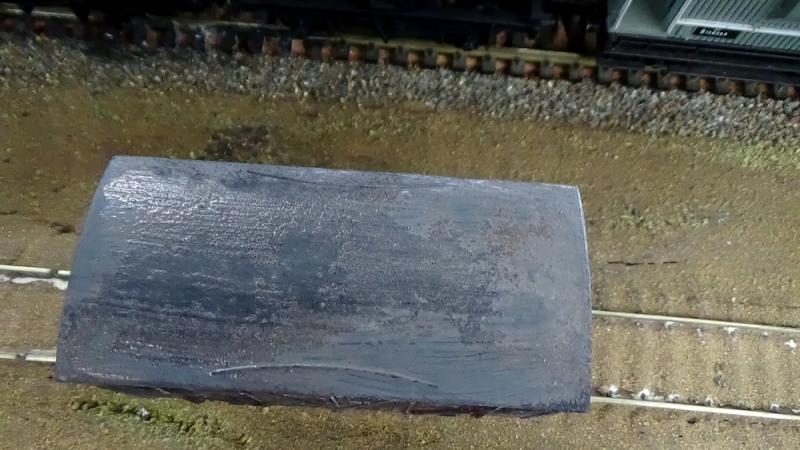
The combination of the wash, the paint and the foam rubber has left a rough effect on the roof which resembles surface deterioration……a happy accident!!
So then we move onto the next part involving work on the chassis and wheels.
Part 3
https://www.youtube.com/watch?v=8HhSATO20UM
Avant d'accéder à YouTube
This is how the roof turned out after the wash had dried….I am quite pleased with that!!
Some end detail prior to the chassis being painted.

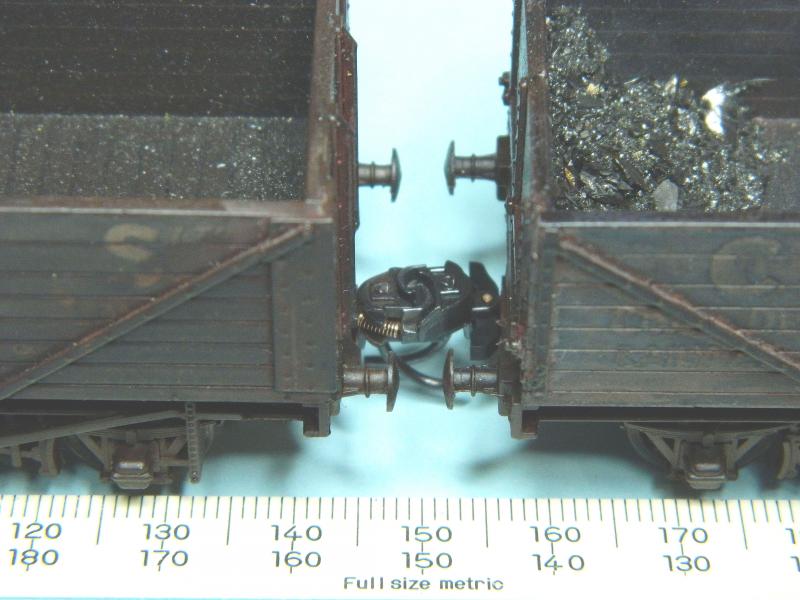
A view of the side and chassis and wheel detail

Buffer treatment

A better view of the chassis and wheels

Bachmann couplings fitted

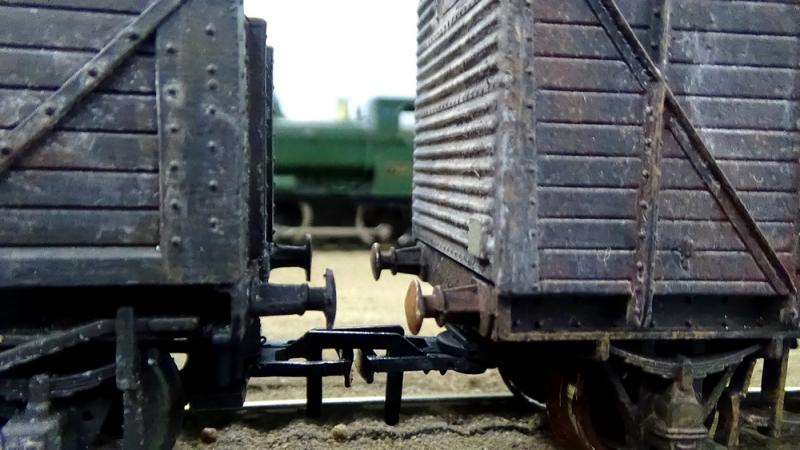
And ready to roll

Well there you go folks…..I hope the videos don`t put you to sleep and I hope you gain something from them…..I think those couplings need weathering too.????
 hmm
hmm:cheers Gormo
"Anyone who claims to have never made a mistake, never made anything!!"
https://sites.google.com/site/greatchesterfordmodelrailway/home
https://sites.google.com/site/greatchesterfordmodelrailway/home
Posted
Guest user
I've only looked at the stills at the moment as the battery on my I Pad is about to go but I will catch up with the videos tomorrow night.
The wagons look great. You have really taken well to the art of weathering in such a short space of time. Keep up the good work. This is going to be a great reference thread.
:nice
Toto
Posted

Banned
That's a pretty decent job for an 'ordinary lookin wagon' ! The techniques you have used are quite simple and safe. Being water based acrylics, the paint could be washed off if you think you have made a meal of it.
The roof and end walls on the vent van came up a treat after the application of the wash. I like it. :thumbs
I'm guessing you were not happy with the roof as the paint brush marks could be seen through the sponge applications, prior to adding the wash ?? One thing I learnt in my art classes many years ago, was when painting anything rectangular, paint across the shortest distance. This reduces the chance of elongated brush strokes, along the length of the rectangle.
Could I suggest with the application of white paint on the body sides, drag your sponge horizontal with the timber planks, then sponge downwards. This should give an effect of individually weathered and faded timbers. ;-)
All in all, a great tutorial. :doublethumb
Cheers, Gary.
 Last edit: by Gary
Posted
Inactive Member
I`m glad you like the vids and thanks for the painting tips. That makes a lot of sense, I`ll try that next time around. I anticipate my next project with rolling stock will be a crane. I have a TYCO American version, which with a bit of conversion and persuasion and a paint job, would look OK sitting in the sidings as a maintenance train. It will need considerable mods as it sits too high at the moment and can`t clear my mouse holes…..but I think I have the answer for that……out with the cutting tools:thumbs
:cheers Gormo
"Anyone who claims to have never made a mistake, never made anything!!"
https://sites.google.com/site/greatchesterfordmodelrailway/home
https://sites.google.com/site/greatchesterfordmodelrailway/home
Posted
Site staff
Finally got time to watch the videos this morning (well it is here) :thumbs
My only question is, when do you know when to stop weathering.
Bet the temptation is to just add a bit more, and then just a bit more, and then ……………………..
Think the van looks brilliant. It's not just had a rough life, it looks like it's about to be condemned

Think you should leave the 'little ripper' as it is, or only a light weathering.
After all, some wagons would be new or nearly new at any one point in time.
Ed
Posted
Inactive Member
Ah!!! the all important question….when to stop???…I guess that depends on the condition of the wagon and what you want to achieve.
These first steps into weathering for me are a boots and all approach because the wagons were just old crappy, train set, plastic, ordinary, bargain basement jobs that normally wouldn`t get a second look as viable stock to run on my railway.
Items like my little ripper will attract a more measured approach if indeed I decide to weather that quality of wagon at all.
At the end of the day the amount of weathering on any wagon is optional.
:cheers Gormo
"Anyone who claims to have never made a mistake, never made anything!!"
https://sites.google.com/site/greatchesterfordmodelrailway/home
https://sites.google.com/site/greatchesterfordmodelrailway/home
Posted

Inactive Member
Thanks for the videos. Hopefully I'll be able to find them again if I ever get around to weathering mine.
Correction: That should read, "WHEN I get around to weathering mine."

Max
Port Elderley
Port Elderley
Posted
Inactive Member
No worries mate!!
Gormo
"Anyone who claims to have never made a mistake, never made anything!!"
https://sites.google.com/site/greatchesterfordmodelrailway/home
https://sites.google.com/site/greatchesterfordmodelrailway/home
Posted

Full Member
Very nice weathering. One source of "inspiration" that I use is the 'PO Wagons" series. Up until the mid-1930's most PO stock had legible and intact lettering even if it was dirty from coal and track dust - the wagon was after-all advertising the PO (although Hornby and Mainline wagons with often fictitious brands should be verified). Post 1939 and into BR transition (P numbers) they just got dirty(ier) and weathered. Faded lettering, often just an outline, and unlettered/unpainted replacement planks were quite common. Even more so on stock in private yards. I've found with Mainline wagons that the lettering can be faded to an outline using 99% IPA and a cotton swab. In most cases the outline was overprinted on the background color, giving a thicker paint. See below for a pair of Mainline CWS wagon given the IPA treatment*. Limonene-based products should give the same effect (Goo-Gone or similar). Alternately some 1000/2000 grit emery paper gives the same effect but takes out the outline as well. Both methods give a polished surface that of course needs weathering. Not sure whether the IPA treatment will work with more recent wagons.
The other thing that needs addressing on these older models is the position of the brake shoes (see below). Unless re-gauging to EM or true scale gauge they need moving in, especially if fine-scale wheels are used. One of the idiosyncrasies of OO/16.5mm gauge where the body is 4mm scale and the wheels OO gauge. Modern OO offerings have the brake shoes over the wheel tread, which of course now have to be moved out for EM/true scale gauge.
The other alternative is full-sided decals, printed and already faded. DIY or outsource the design to Robbie's Rolling Stock. Older wagons tended to have just one running number. I'll be using this approach for the P numbers on grey sided wagons (Dapol), as well as the CWS wagons, as I'm modeling WR/BR 1950's transition. I'll post when done.
Nigel
*The NEM knuckle couplers have since been changed for fine-scale ones, and the magnetic trip pins removed.
©Nigel C. Phillips
Posted
Inactive Member
Firstly apologies for the delayed response. I`ve been away on holidays.
Your methods and information are very interesting and in depth. Anything further you can add will be much appreciated.
Thank you
:cheers Gormo
"Anyone who claims to have never made a mistake, never made anything!!"
https://sites.google.com/site/greatchesterfordmodelrailway/home
https://sites.google.com/site/greatchesterfordmodelrailway/home
Posted
Full Member
A few years ago I got a Tri ang 6 ton crane very cheap and using a small brass fret from the link below concerted it to 10 ton version replacing the wheels were a bit of a challenge. But I think iit was worth it.
Triang crane conversion

I made the hook from lead flashing…

A piece of lead on the hook keeps the line taught.
Posted
Inactive Member
Well done, you. :thumbs
Max
Port Elderley
Port Elderley
Posted
Inactive Member
That`s an excellent result Alan
:cheers Gormo
"Anyone who claims to have never made a mistake, never made anything!!"
https://sites.google.com/site/greatchesterfordmodelrailway/home
https://sites.google.com/site/greatchesterfordmodelrailway/home
Posted
Full Member
The weathering was done with powders (rust, white, red, brown, black) and a large sable brush*. No acrylic paints - in my hands it overpowers, and looks like, well, acrylic paint. If I want a dusting of track dirt I use the airbrush under v. low pressure (5 psi or thereabouts) before using weathering powders.
I don't often tackle vans, but reference to the prototype is useful. The roof on a van was normally a plank/canvas affair, and in the days of steam would have been covered with a layer of cinders from the engine. paint the roof the desired shade of grey, and then use a regular Kleenex-type tissue (the cheaper and rougher the better). Glue one ply to the roof with matt water-based varnish (Micro Sol or similar), crumple as required at the edges and ends (use a tooth-pick) and let dry. Follow with a dilute coat of paint (shades of grey) and a light dusting of home-made weathering powders while the paint is still wet. Do not finish with varnish (even matt). You want it gritty. Thumb and finger application from above. Horse vans were nearest the engine, so more weathered. Guards vans the least weathered.
I use pastel sticks from the local art shop - black, grey, brown, black, orange, red - and a coarse file or scapel blade to make coarse powders. About 1/50th of the cost of commercial powders. Use a fine file for finer powders. In the 1920's-1930's the cinders would have been light grey/black (high quality Welsh or Lancs/Yorkshire steam coal), in the late 1940's-1950's all sorts of colors from the low-grade imported coal. Hence the orange and red pastels.
Covered loads. In the days of the individual companies a black canvas tarpaulin with the initials of the company, a number and date of manufacture (month/year) would have been used, tied down with ropes to those bits of ironmongery on the chassis. Buy them or make your own, suitably weathered. Use thin photocopy paper (20 lb weight), design in Word, Powerpoint or Corel Draw (I use Corel Draw), print and then randomly fold, refold and refold. The idea is to break the paper fibers and end up with something similar to tissue paper. Place over the load (I use old Lego blocks, infinite variety, light weight, and the scale is right on) and glue the tarpaulin to the sides of the wagon. Add tie ropes if desired. I print eyelets. Vary the background color (new almost black, 5 years old a very light grey), add dirt/oil/grease stains, etc. when designing, not after printing. A coat of varnish in a depression followed by some 2-part 5 minute epoxy gives a pool of water. They can be folded and and the corners glued so that they just sit over the load. I'll post when I can find the file and templates (and some wagons to practice on).
Nigel
*Turn the air-conditioning off. Otherwise questions will be asked about the red/black/orange/grey dust that suddenly appears on the furniture. And wear a good face mask. Most of the oranges, reds and browns are iron-oxide based, and can be quite inflammatory if inhaled.
©Nigel C. Phillips
1 guest and 0 members have just viewed this.