A Small, Rural Pond
Posted
#1211
(In Topic #314)

Full Member
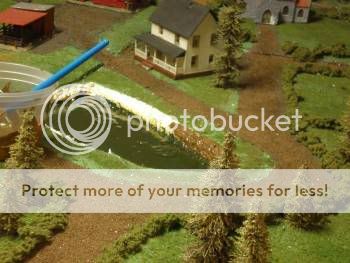
The area of the pond had been previously decided, and had been left unpainted in the centre of the layout. It was time to start digging!
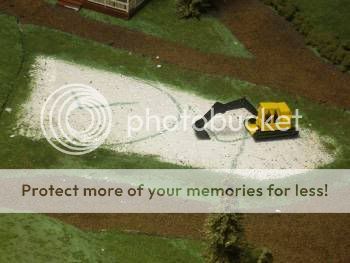
Removing the 2cm thick foam was easy, cutting down with a small serrated knife blade. I wasn’t too concerned about the accuracy of the pond’s outline or the smoothness of the edges, reminding myself that this was a farm pond and not a swimming pool!
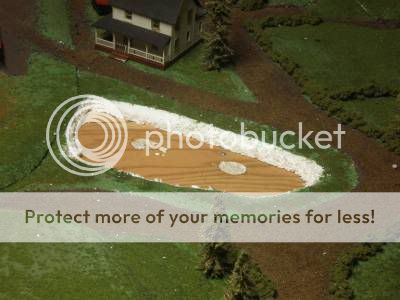
The next, and all important, step was adding the base colour to the bottom of the pond. Getting this right makes a big difference. Pond waters are never blue, so to be realistic I had to create a green-based ‘yuck.’ I mixed various acrylics including burnt umber, dark green and grey to create a soup. Four coats of this were painted on, and I made sure that each coat was totally dry (and not just to the touch) before applying the next one. (Sadly this photo doesn’t do the colour justice)
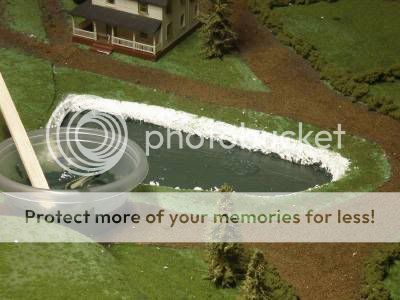
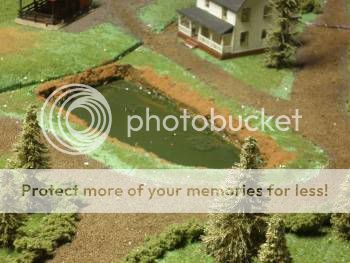
To create the water effect there are many commercially-made products out there, but I decided to use clear marine varnish. The one I chose was low vapour – a good idea if you are modeling in a confined space such as a basement or attic.

This part of the process was slow. To create a depth effect multiple coats are necessary. I liberally brushed the varnish across the pond, and then allowed each coat to dry for 24 hours before applying the next one. I has happy after the fourth coat, but aware that four days had passed! Best to have other projects on the go …
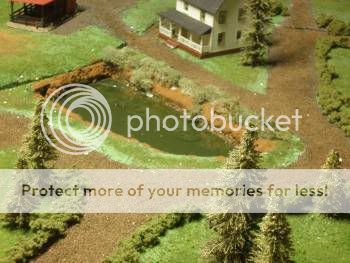
Once happy with my water it was time to start on the banks. Sealing them with brushed PVA glue is a good way to start (thanks, Perry!) Once dry they can be painted. I chose an acrylic medium brown, taking care not to apply too much at once and running down onto the water. Two coats were enough.
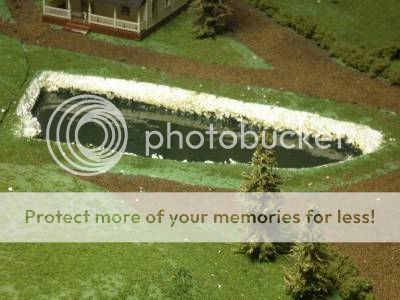
When this paint had dried I then painted the banks with white glue and carefully applied the earthy ground cover. I used a commercially-made cover made by Walthers Inc.
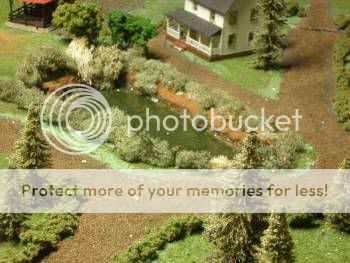
I allowed all this to thoroughly dry for a few hours, and then started to add the vegetation. I glued various shades of reindeer moss/lichen using dabs of white glue, making sure that some of the growth trailed down towards the water.
Then added a few trees. These ones are an assortment of smaller, Woodland Scenics trees which simply push into the foam scenery.
And that was it. A small pond (my first water feature) but easy to make and very satisfying to look at. When I came to dismantle the layout it was the most difficult bit to destroy! (Also the water came away from the baseboard in one solid piece. Now that’s varnish!)


Posted

Full Member
This is a great article and it is good to see it back on the forum.
Novice
Posted

Legacy Member
Posted
Full Member
Posted

Full Member
I was hoping you were going to be able to retrieve this for us, Tim.
Thank you. :D
Perry
Due to cutbacks, the light at the end of the tunnel has been switched off.
Posted
Full Member
Posted

Full Member
Phill
Posted
Guest user
Mike
Posted
Legacy Member
Posted
Full Member
Sorry, Bob - you meant on the old forum :oops: I couldn't find it and simply assumed that it had gone the way of so much stuff lost.Robert said
It's ok Tim I have found it.
The new text (which I put together this afternoon) is, I think, shorter and simpler than what I remember of the old :)
Posted
Guest user
Posted
Full Member
Matt said
do we get a fisherman on your new latout?

Well, maybe - when I do my next water feature :!: There are plenty of ponds on the Outer Cape, and fishing is a popular sport … I also want to create a cranberry bog :shock: (There's a nice "How to make a bog" in the latest MR magazine :wink: )
Posted
Guest user
Mike
Posted

Full Member
Brian(G)
Posted

Full Member
rector said
Matt said
do we get a fisherman on your new latout?
Well, maybe - when I do my next water feature :!: There are plenty of ponds on the Outer Cape, and fishing is a popular sport … I also want to create a cranberry bog :shock: (There's a nice "How to make a bog" in the latest MR magazine :wink: )
"HO" scale cranberries - now there's something to look forward to
Glad the pond didn't go down the drain !!
Petermac
'Petermac
Posted
Guest user
using the new Faller station canopy with moving people on it :P You would just need to use the bottom part with the motor and magnets underneath your pond :roll: Darryl
Posted
Full Member
Perry
Due to cutbacks, the light at the end of the tunnel has been switched off.
Posted
Guest user
It is just that ever since i 1st bought their working showground rides etc, i have been fascinated with models that work. And that is why i have decided once again to install their car system, this time with Buses driving around.
2 weeks ago it was just going to be trains then due to what i saw EX-Novice write somewhere now i am going full out on it :roll: :roll: :roll:
Darryl
Posted
Guest user
My first pond was a failure. I copied your article. with this info I will try again. Very informative. Easy to follow.
Paul Williams
Posted
Full Member
My pond had its own shaky moments, but I was very pleased with the result. It also proved that such a feature could be made without spending too much money - using what was already in the shed, so to speak.
When my new layout allows I hope to recreate this pond :!:
1 guest and 0 members have just viewed this.