The art of compromise.
Posted
Inactive Member
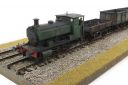
Finally gettiing out of my system.
Great modelling Terry. I have been catching up with your layout thread and the attention to detail throughout is great.:thumbs
Happy Modelling
Kev
Kev

Posted
Full Member
Terry
Posted

Full Member
Luffley! Thank you.One for Doug. Point rodding and signal wires to be installed.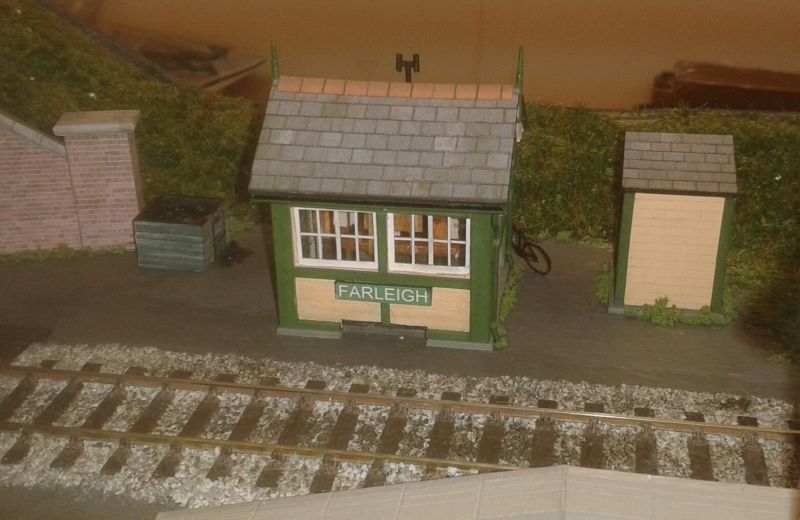
D
'You may share the labours of the great, but you will not share the spoil…' Aesop's Fables
"Beer is proof that God loves us and wants us to be happy" - Benjamin Franklin
In the land of the slap-dash and implausible, mediocrity is king
"Beer is proof that God loves us and wants us to be happy" - Benjamin Franklin
In the land of the slap-dash and implausible, mediocrity is king
Posted

Site staff
Cheers
Matt
Wasnie me, a big boy did it and ran away
"Why did you volunteer ? I didn't Sir, the other three stepped backwards"
"Why did you volunteer ? I didn't Sir, the other three stepped backwards"
Posted

Full Member
Michael
Posted
Full Member
Thanks Matt and Michael. I have a small mirror doing nothing at present. Good idea to have it on hand for visitors. The bicycle is an etched brass kit by Shire Scenes, obtainable from Dart Castings. It comes off the fret as a complete model, just requiring folding to shape. The pack also includes minute brilliants to represent the front lamp. The pack includes gents' cycles, ladies' cycles and tradesmens' cycles. Highly recommended by me. I previously used one from the same pack on Poppy Lane…

Terry
 Last edit: by col.stephens
Posted

Full Member
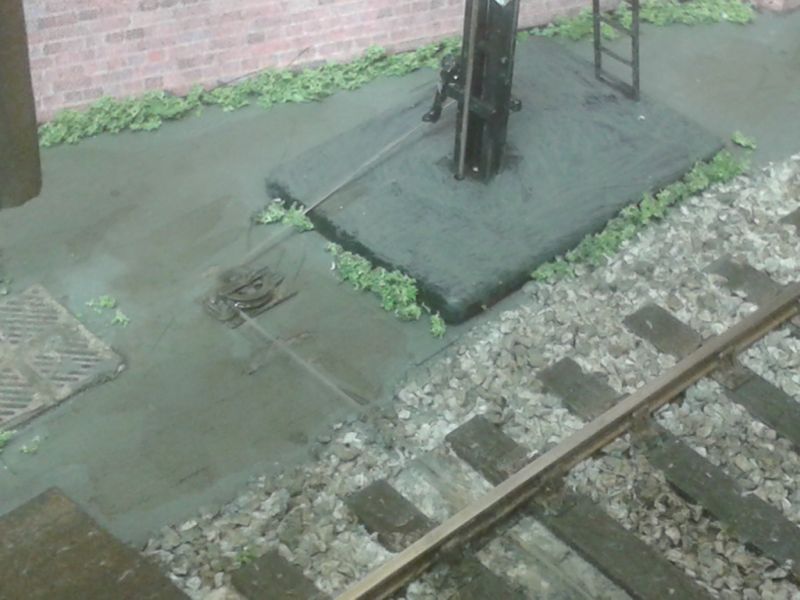
Hi Terry. I am uncertain about point motors/blades insofar as the “Satisfying thud†is noticeable by its absence on my planks, wether that’s good or bad is up to the individual? But I am for the quiet life.Best wishes KevinThe SEEP point motors are installed. I haven't yet thought about a control panel so operating switches have been temporarily fitted to test the point motors and ensure that trains will run over all of the trackwork. Having never used point motors before, I am finding it quite novel to flick the switch and watch the blades spring over with a satisfying thud!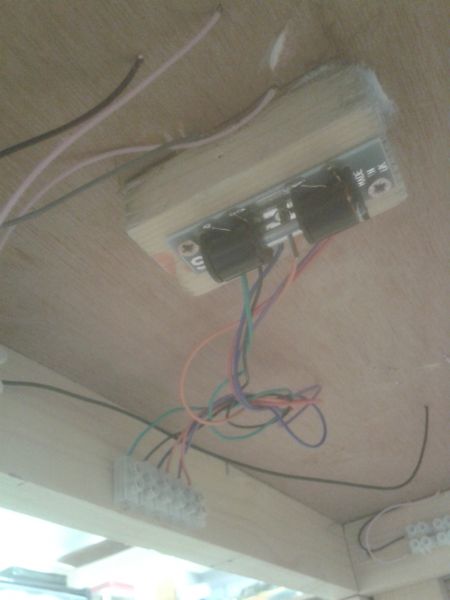 I was quite gleeful when, having wired and fitted the first point motor, it all worked perfectly. My glee was short lived however, as when testing the second point, the frog was completely dead, causing my test loco to come to a sudden halt. That particular point had been recovered from my previous layout building effort so I looked at some others from the same source to try to understand why power was not reaching the frog. I came across this…
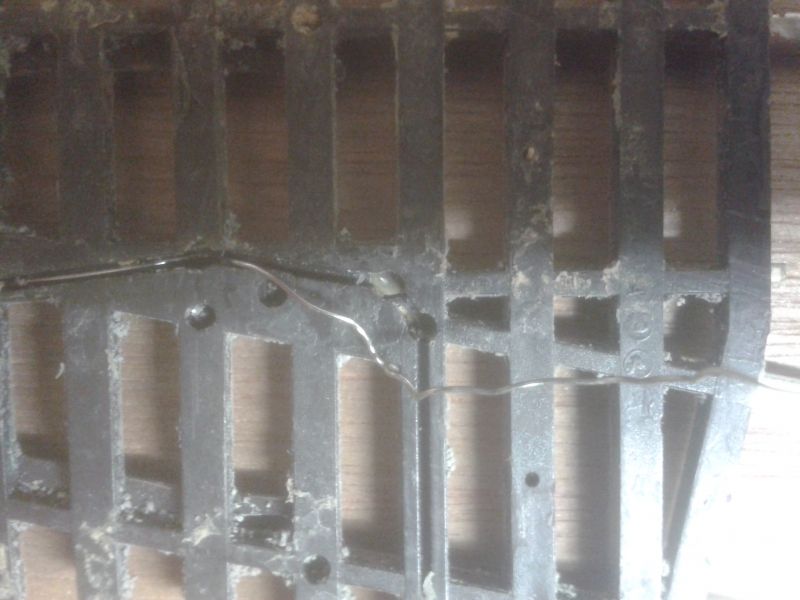 The two circular holes in the centre of the picture appear to contain metal contacts to which the thin wire had been previously soldered, thereby providing power to the frog. The wire obviously has become detached. I wondered if the same had happened to the point which was not working properly. I couldn't lift it to look underneath so I decided to take the bull by the horns and solder another wire from the side of one of the rails forming the frog, and connect it to the appropriate terminal at the relevant choc block. Deep joy! Power was restored.The project grinds slowly forward.
Staying on the thread Kevin.
Posted
Full Member
Thanks for your post. I'm glad that you are back to railway modelling after your recent health problems. I have always used wire in tube or rods for point control and will probably do so again in future for small layouts. However, I still find it strangely satisfying to hear the clunk of the point being thrown at the flick of a switch. Fitting point motors on Farleigh was a first for me, but I will certainly use them again. The Dapol signal also adds to the noise with its loud, whining motor. However, once again I am fascinated at watching the signal move at the flick of a switch and will buy more in the future. Actually, I already have some Dapol LMS signals in stock for a future layout.
Best wishes,
Terry
Last edit: by col.stephens
Posted

Full Member
That "clunk" produced by the SEEPs - or indeed, any solenoid motor, is indeed very satisfying and, no matter where you are around the layout, you know a point has thrown.
That's not the case with either the Tortoise or the servo - particularly if, like me, you have sound locos running.
I suppose it proves nothing is perfect - the risk of shaking your precious point apart with all that violent clunking or not being sure the point has thrown with the other 2 systems I use. That's why, where it matters most, in my hidden storage yard, I installed the LED route indicators on the control panel.
p.s. It is indeed good to see you back in modelling mood Kevin - just don't rush into things - you've been laid up a long time.
'Petermac
Posted
Full Member
Best wishes Kevin
Last edit: by Passed Driver
Staying on the thread Kevin.
Posted
Full Member
Staying on the thread Kevin.
Posted
Full Member
Hi Terry. Thank you for your reply. I have a Peco 3 way asymmetric point, and I was considering electric point, whatever, motors are the best, but only to make the operation simpler.By the way I noticed that you are using catch points,are these bought as or converted from regular points, and are they worked by WIT or point motor?
Best wishes Kevin
Hello Kevin. The catch points are Peco products, as bought. Although they are capable of being operated I have installed them just for show, so they are not connected to any operating system.
Terry
Last edit: by col.stephens
Posted
Full Member
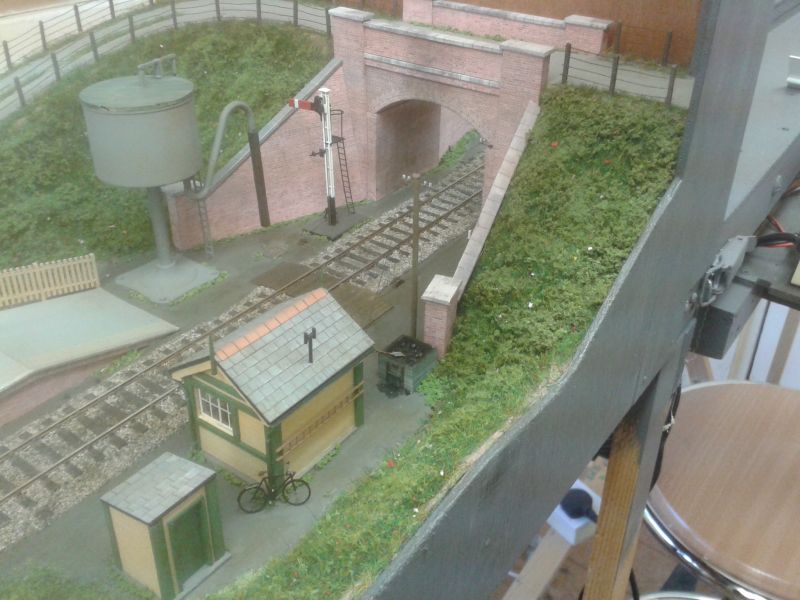
Some recent developments on Farleigh. Fencing has been fixed along the rear of the yard and a gate has been installed.

I decided to install the signal cables, represented by 0.25mm nylon thread, which is almost invisible to the naked eye. The pulleys are 3D printed products available from here:
There are two signal cables, one leading to the starter signal and the other disappearing under the bridge to an imaginary home signal. The foot crossing had to be re-modelled to give clearance to the cables.

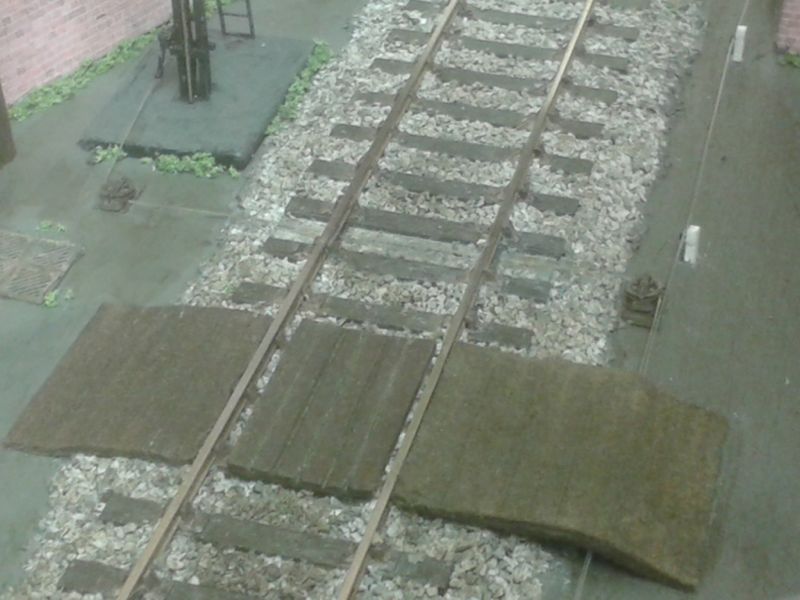
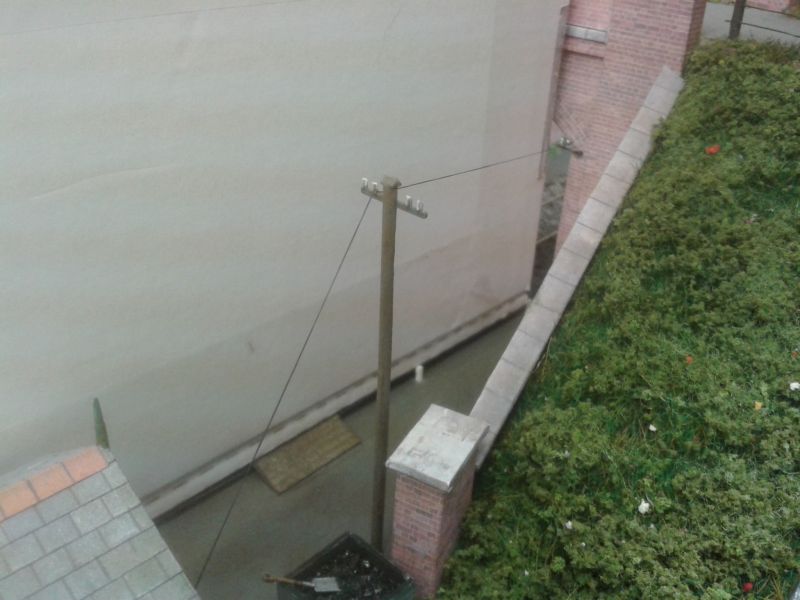
Thoughts now turning to telegraph poles, telegraph wires and point rodding.
Terry
Last edit: by col.stephens
Posted
Full Member
The new Terrier from Rails of Sheffied/Dapol arrived this week and a beauty she is.
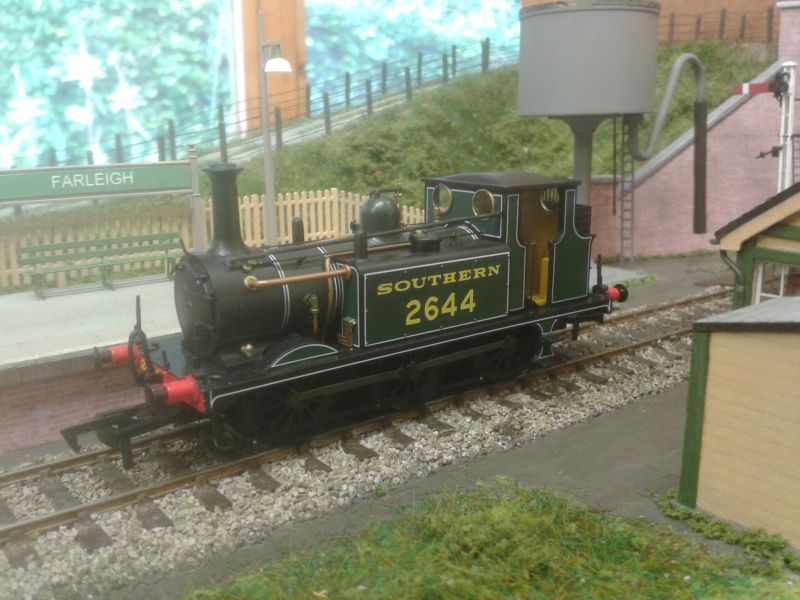
She joins her stablemate from Hornby and both will form the basis of the motive power for the layout, with an occasional visitor. Here they are together.
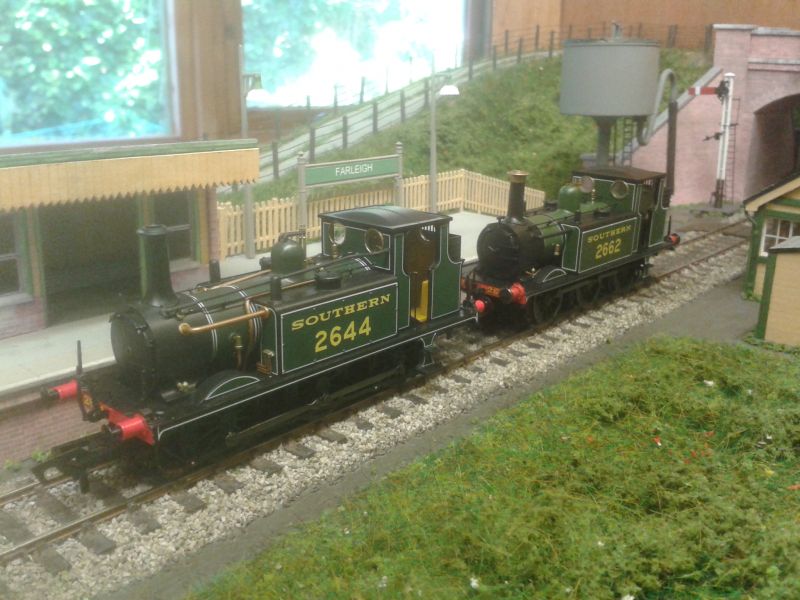
Interesting that both manufacturers have a different version of olive green, as shown below, Rails on the left and Hornby on the right.
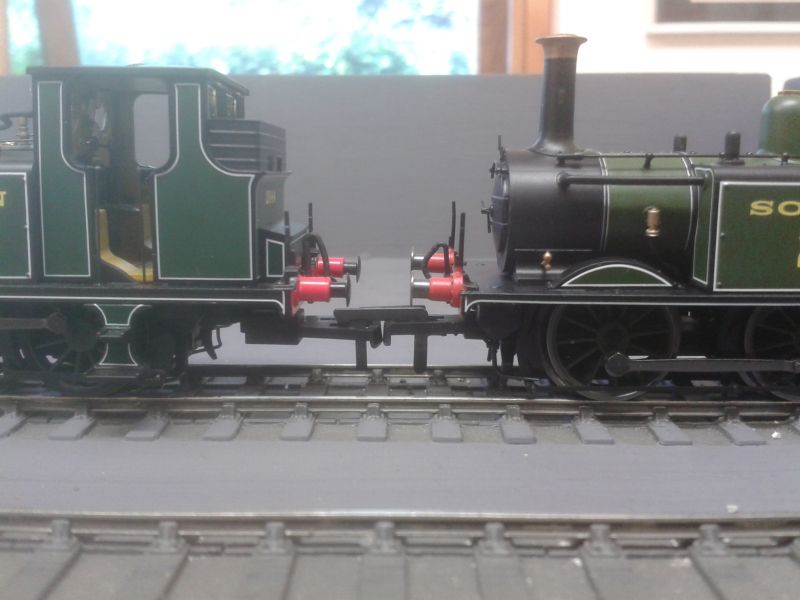
Personally, I prefer the Hornby colour, although, in my opinion, this may have a tad too much yellow in it. Of my two models, the Hornby item is a better runner being smooth and fairly silent. The Rails/Dapol version is noisier and is sometimes hesitant. Further running-in is probably needed but I suspect it will always be noisier than the Hornby version.
Terry
Posted
Full Member

Terry
Last edit: by col.stephens
Posted
Full Member

Terry
Posted
Full Member
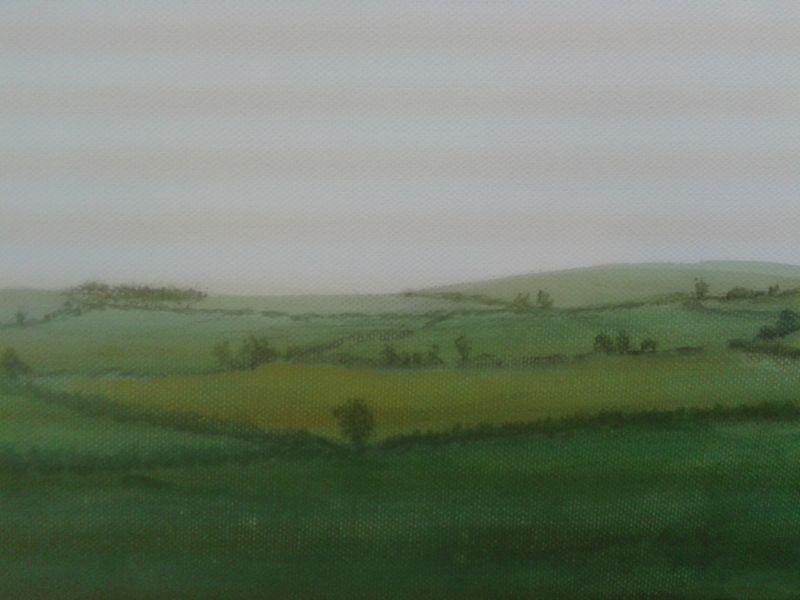
I like the backgrounds. Others prefer photographic quality but I think that something suggesting atmospheric perspective works just as well.
Posted
Full Member
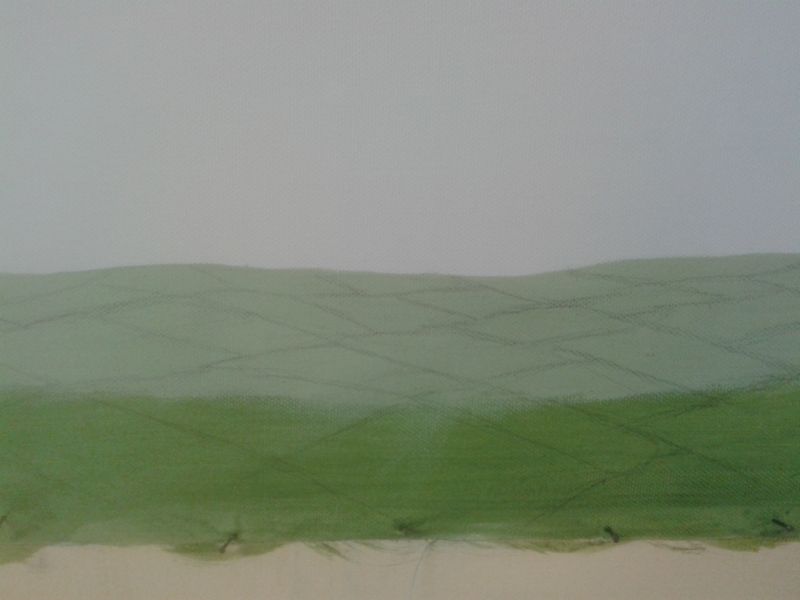
At this stage I decided to try to eradicate the hard line between the two greens and painted another coat of green, mixed to resemble the static grass used on the layout, over the lower part of the canvas. I then used a stiff artist's brush (of the cheap ten brushes for £2 variety), and used water to scrub away in an effort to blend the two colours. Very forgiving stuff this canvas. I then mixed sap green with a very tiny amount of black and, using a small flat artist's brush, started to paint over the pencil lines to represent the field hedgerows, the lines getting thinner as they receded away to the horizon. Whilst still damp, I worried the painted hedgerows with a damp stiff brush to remove some of the paint, in an effort to reduce their intensity. Some of the fields were given a thin wash of yellow ochre to represent cereal crops.

Terry
Last edit: by col.stephens
Posted
Full Member
Today, I decided to move things along by adding some trees to the landscape and to enhance the hedgerows. All achieved by dabbing a sap green/black mix onto the canvas with a small hog's hair brush. Plenty of work of this nature left to do so I probably won't be updating this thread for a short while. Here is where we are at present… (please excuse the horizontal lines caused by the shed lighting)…

Thanks for reading about my humble efforts… more soon.
Terry
P.S. I must record here that I have derived much inspiration from the book 'Creating a Backscene' by Paul Bambrick and John Ellis-Cockell. Unfortunately, I obtained this marvellous book too late to incorporate a 3D backscene as expounded by Paul, but have found the photos and text inspiring in the production of my 2D backscene.
Last edit: by col.stephens
Posted
Full Member
Michael
1 guest and 0 members have just viewed this.