Shunting Puzzle Plank
Posted
#221993
(In Topic #12111)

Site staff
With a taste of what’s to come over the next few months fresh in my mind, I thought how about a little shunting plank/puzzle I could work on indoors.
After much searching across forums and a lot of time reading the late Carl Arendt’s website, I came up with this.

‘Sort of’ based on the Piano Line, which I know a lot of theses puzzles/planks are.
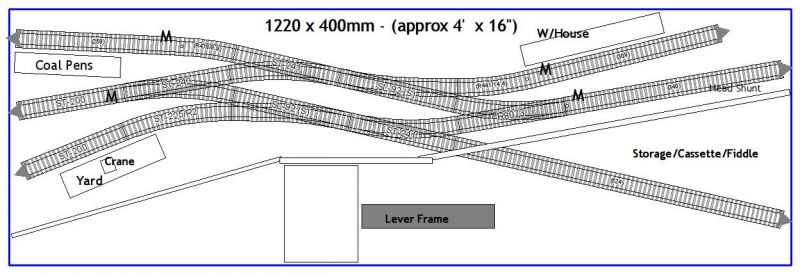
This is version …………. dunno, lost count. But it has shrunk from 6’ x 2’ to a more manageable 4‘ x 12†to enable me to carry it from the garage and set it up on the kitchen table.
All the track is left overs from previous incarnations of the garage layout, apart from one right hand Setrack point which I’ll have to purchase along with some rail joiners.
Having changed my main layouts theme/era I have a number of Hornby Pugs and a Bachmann J72 to run on the puzzle plank, along with some swb PO open wagons and vans.
Power is a Gaugemaster Model D, which is currently only used to power two point motors and the turntable (now almost redundant) on the main garage layout.
Point control will be wire in tube or similar, but may be hand from the sky initially.
I know I’ll get stalling over the Insulfrog points, but that’s not really a problem as the idea of the puzzle is to shunt specific wagons into designated sidings, with or without a slight nudge from a finger. The Insulfrogs also help keep the size of the plank down.
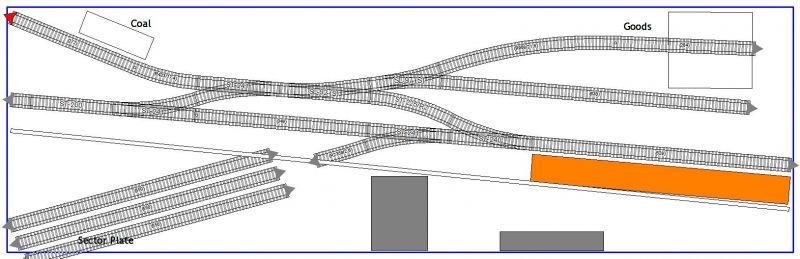
After lots of estimating I think a 3 wagon train will fit in the loop, the Coal and Warehouse sidings will each hold two wagons, and the Yard with Crane, one.
‘M’ denotes where magnets will be for uncoupling if I use Kadees. I’ll need extra magnets on the Yard with Crane siding, if I use small T/L with paper clip couplings (no Kadee shuffle).
Apologies for the long post but my question is, before I go cutting up some wood for a baseboard, have I missed anything?
Ed

Posted

Full Member
Assuming you're using a single loco, and the idea is to assemble a train in a given order on either the lower or upper siding, why would you need the sidings at the opposite side ? At some stage, your loco would end up being locked in by the stock ………………………
'Petermac
Posted
Site staff
As a shunting puzzle Ed, I'm never sure why you need sidings flying off the main central pointwork in both directions ………… :roll: :roll: :roll: Simply space Peter. How much track work can you get into a micro layout and still make it operable.
Assuming you're using a single loco, and the idea is to assemble a train in a given order on either the lower or upper siding, why would you need the sidings at the opposite side ? At some stage, your loco would end up being locked in by the stock ……………………… Train arrives from storage and you then need to push the wagon(s) into the required sidings, using the loop to run round.
Example of timesaver (done against the clock).
https://www.youtube.com/watch?v=ynoU_u2ZtZQ
Ed
Posted
Full Member
I still don't understand why it's like that………….. :roll: :roll: :roll:
With my puzzle, there is only one half of that layout - a headshunt top left and 3 sidings to the right. Wagons - 8 off - are placed randomly on those 3 sidings with the loco in the headshunt. The object is to form a train of 5 wagons in a given order on the top siding - the only one long enough to accommodate 5 wagons.
With sidings at both sides, at some stage, the loco is going to be boxed in - unless of course, you're making 2 trains …… :roll: :roll: i.e. I can't see how you can get a wagon from the left hand side of the loco to the right hand side of it as there's no "run around"……………………. :hmm
'Petermac
Posted
Full Member
It's just dawned on me. :thumbs :thumbs :thumbs
'Petermac
Posted
Site staff
Here's an earlier plan I did for four wagons is which about 5' 3" x 20".
Getting it down to 4' (albeit with only three wagons) is part of the 'fun' in designing it and makes the board more manageable.
Ed
Posted
Full Member
I'm in UK at present so can't check, but I think my board is only 4ft long. My "train" siding, top right, is long enough for 5 x 4 wheel wagons and the headshunt, top left, is long enough for the loco (0-6-0) plus, I think, 1 wagon. The other 2 sidings accomodate 3 and 2 wagons respectively. You start off with 8 wagons placed randomly on all 3 sidings and have to assemble the 5 wagon train in a given order on the top right "train" siding in as few moves as possible.
'Petermac
Posted
Site staff
On yours you make up a train, on mine I'll be 'spotting' wagons, which should be interesting if they don't come on to the layout in the order they need to be 'spotted'.
I can make it more complicated (probably impossible), by having empty wagons that need to be removed before being replaced by the one that's just arrived.
(Just playing trains really
 )
)Ed
Posted
Full Member
Ed has a Timesaver. The Inglenook is totally random, and
has British origins, whereas the Timesaver, which originated
in the States, is (or can be) a set puzzle done against the
clock and/or minimum number of moves.
 Last edit: by jcm@gwr
Jeff
Posted
Full Member
'Petermac
Posted

Inactive Member
At our last meeting, I had to kick the lads out. They couldn't stop playing with it.
Max
Port Elderley
Port Elderley
Posted

Full Member
Nice project for the winter months.
Nigel
©Nigel C. Phillips
Posted
Site staff
We've had a couple of mild winters, but last week was more like mid-Winter than late Autumn (or perhaps I'm just getting old).
I've taken most of the locos and rolling stock off the garage layout and packed them away in boxes, roll on April
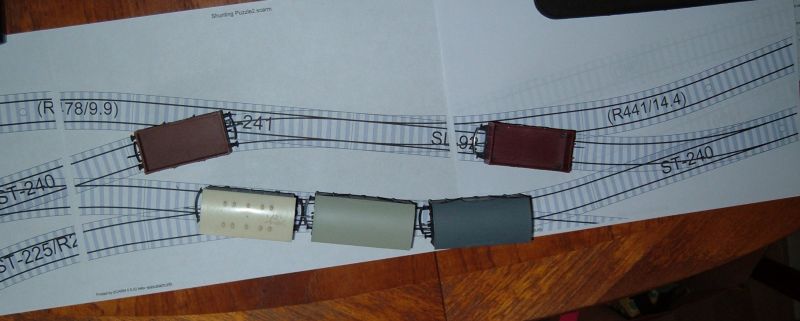
I printed the track plan and put a few wagons on to check clearances around the loop, look ok.
I've also altered the plan to make the board a bit deeper, which allows me to get the controller on the board and straighten out the entry road.
I've got to build the baseboard in the garage as there's no room indoors.
Wood's cut, just got to screw/glue everything together and get it all painted before it gets too cold again at the end of the week.
Ed
Last edit: by Ed
Posted
Full Member
I was perusing a 1945 Sanborn map of Great Falls, Montana last night (part of an ongoing research project for a currently stalled home mini-layout). These maps, drawn up by the Sanborn Insurance Company, are useful because they show the buildings and their dimensions, their owners/business, railway tracks, freight spurs, track rights, water mains, sand buckets, pipes, etc and are extremely accurate. 'Old on, I ses to meself, I sen that afore! And there they were - 2 "Piano" track plans with the typical parallel loop in the middle and a reverse turnout, one serving a large flour mill complex with 2 railroads (Great Northern, Milwaukee Road), and the second serving a group of local industries (lumber yards, iron works, warehouses, oil depot, Great Northern serviced). One after the other on the same industrial line.
A quick look at John Allen's Timesaver track plan showed them to be almost identical, length excepted, the prototypes covered at least a mile, and I definitely do not have 60', more like 5' plus a 3' fiddle at either end (rather than a storage/casette line and it keeps the width down to 15"). The essential component seems to be that parallel runaround in the middle. Another quick peruse of the GN track plan (only 2000-odd miles) and a some other Sanborn maps across the US showed quite a few other examples, especially where 2 railroads did some interchanging when servicing local industries.Just thought I'd let you know such track plans are actually prototypical. I found 3 examples between Oxford North and Morris Cowley works (you have to look carefully).
Inspiration at last. Looks like I also have a winter project. Enough of my ramblings.
Nigel
©Nigel C. Phillips
Posted
Site staff
I thought this puzzle/plan was totally fictitious, although I did read that there were sites in Somerset and Scotland that had similar track layouts to the Inglenook.
If your going to do a US one, you'll need longer sidings for freight cars than I need for wagons
Ed
Last edit: by Ed
Posted
Full Member
68" long and 10" wide is all it took. John Allen's original (there were 2, I've seen the one in San Diego) was built on a plank, code 70 track and Baker uncouplers (early tension lock design). My "board" is 64" long, plus those 3' ends. Neerenuff. If I stick with 40' boxcars I should be OK. Although those diesel switchers could be a tight fit. At least electrical pick-up wouldn't be an issue. The plan at the moment is…no, this is your thread, I'll post separately.
Nigel
©Nigel C. Phillips
Posted
Site staff


Plan stuck on, and …………
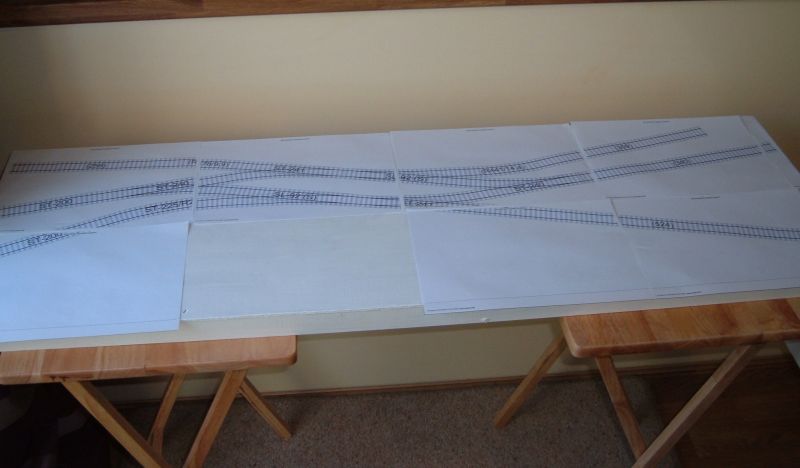
good grief, it fits.
Only problem is, one of the old points fell apart so I've had to order a replacement.

C'est la vie
Ed
Posted
Site staff
All track down
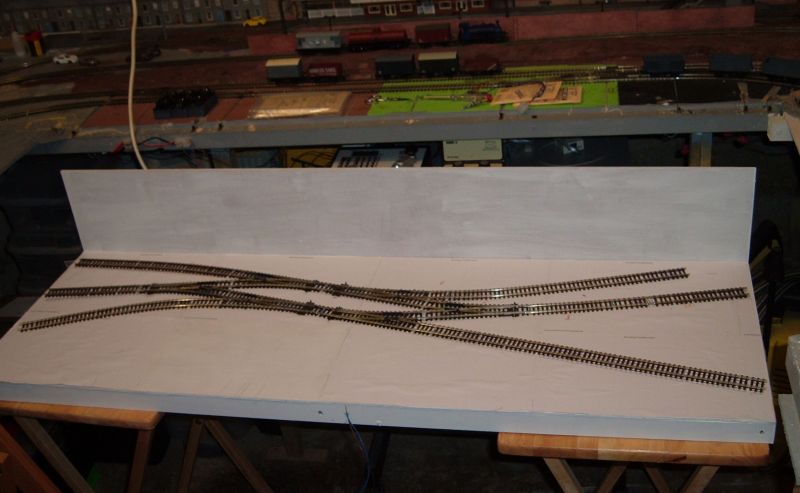
and wiring done.
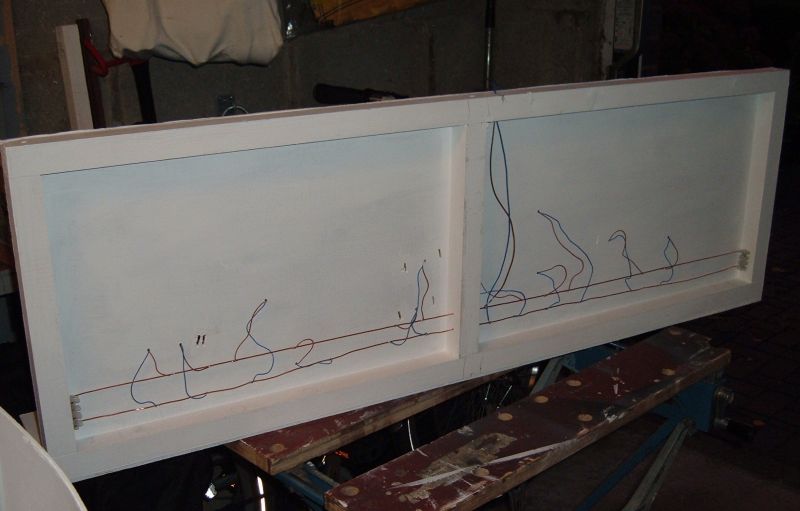
With a view to using what I already have and not buying too much, I thought about GEM Mercontrol for controlling the points.
Although I had enough levers and wire I didn't have enough PTFE tubing, so I've used some stiff garden wire, screw eyes and beads left over from previous testing on Latton Fields.

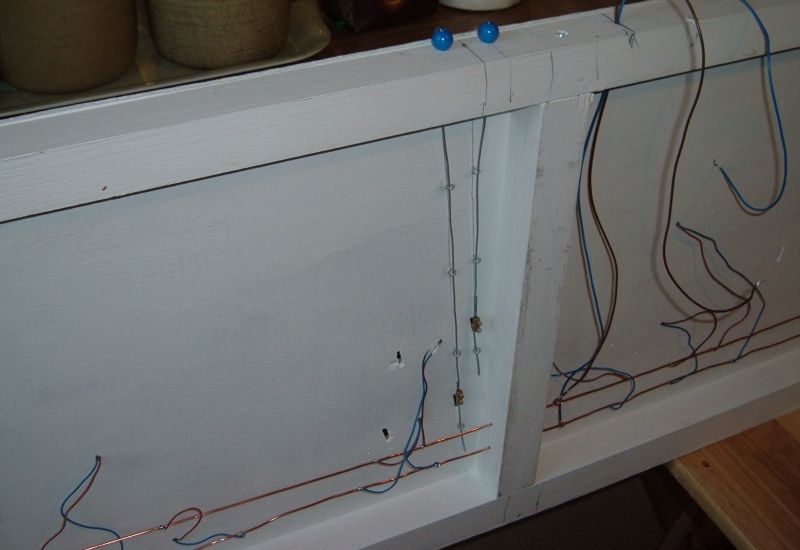
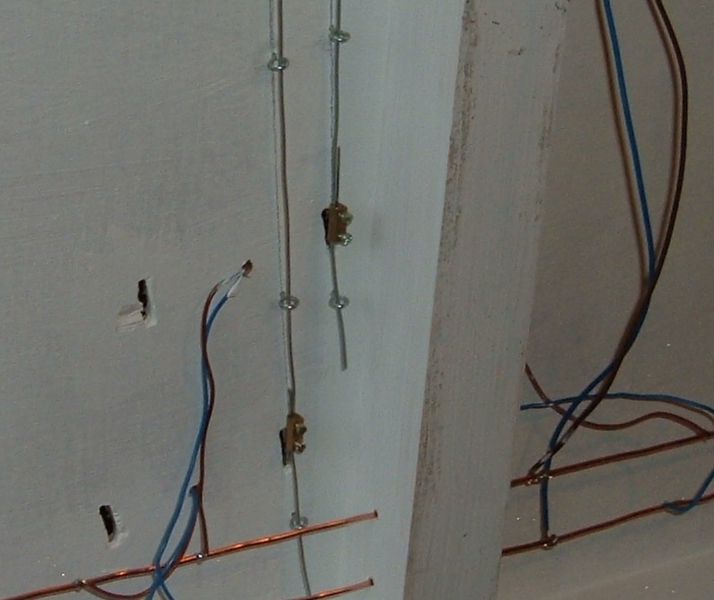
Choc block 'inards' connect the wire to bent paper clips through the tie bar, which should allow for any future adjustment.
(I know the point control wire looks very near the bus wires but believe me it isn't, it's just the camera angle.)
Just wondering how cheaply I can do this, as so far I've only bought:
Wood and Screws (Wickes) £15.77
Folding Table (Argos) for legs (I already had one) £7.99
Rail joiners, as I'd run out (eBay) £2.90
Two points as I needed one, and one I already had broke (eBay) £13.50
I was going to use the Gaugemaster Model D from the garage to power this, but as I had some Amazon vouchers left from a recent birthday so I've bought a Gaugemaster Combi for an additional £11.21.
Wiring was all left overs from Latton Fields.
Loco(s) and wagons, redundant items from Latton Fields.
Total so far, £51.37.
Can I get the puzzle working and a bit of scenery done for less than £100 :hmm
Ed
Posted
Inactive Member
Max
Port Elderley
Port Elderley
Posted
Full Member
Victorian wiring then (bare wires and nary a ceramic insulator). Makes soldering the droppers easy though.
Nigel
©Nigel C. Phillips
1 guest and 0 members have just viewed this.