Scratch building
Posted
#226558
(In Topic #12363)

Full Member
A claim? Re cost of building your own points
Hi All. I am not an over achiever where model railways are concerned. And I saw or read somewhere on "YouTube" a claim made by an experienced model maker, that he can build " Ten Sets of Points " for the Price of one, as sold by Manufacturers?? I am not disputing this fact , but to me, the bloke that never finishes a kit,and I am not proud of that fact, because I don't believe in "Pride, Glutony, Sloth etc" but that is another story. Could this job be achieved by me? Does it need some magic touch that I don't possess ? Can anyone do this or learn to build their own points? Please advise. All the best. Kevin
Staying on the thread Kevin.

Posted

Site staff
And you only learn from your mistakes.
Ron
NCE DCC ; 00 scale UK outline.
NCE DCC ; 00 scale UK outline.
Posted
Full Member
Staying on the thread Kevin.
Posted

Full Member
10:1 ratio? Ha, I wish! Not unless you do a lot of them and buy the rail and sleepers/ties in bulk. I do small batches (2-3 at a time as required), I recon the ratio is at best 3:1, less if detail such as rail chairs, fish-plates/bars or plates is included.
As Sol said, it's the time, plus all the overheads such as tools, track gauges and rollers, jigs and templates are never factored in. Get all the gear and one turnout could cost $200. One an hour is reasonable, especially if you cheat a bit and buy the frogs and points made up (which destroys the ratio immediately). Start messing around with specialized brass rail chairs and you can quickly have that DIY turnout costing twice as much as a commercial one.
That said, it's great fun and you have the satisfaction of having done your own. And it doesn't have to be expensive. My main tools are a set of decent files and a Dremel with grinding discs/heads and cut-off discs. Templates are readily available - John (Brossard) has even used the Peco turnouts ones. I normally use Templot, as it has EM and HO options. Where DIY really wins is in things like double cross-overs, 3-ways, curved diamonds, yard ladders, funny frogs (#6.5 anyone?)…
If you want to give it a try, get one of the kits which has all the hard work done for you. Hopefully C+L Finescale will be up and running in June. Marcway (marcway.net) are another alternative. Plus get one of the books on building your own track work before you start.
Nigel
©Nigel C. Phillips
Posted

Full Member
I stripped out some old code 100 rail filed and soldered up a V, then fixed it to cardboard sleepers using super glue, cut and filed all the other bits of the turnout tracks and did the same, no gauges just using the mark one eye ball on the template, I used a bit of copperclad for the tie bar and amazingly wagons went through it.
Now that was one cheap turnout, I still have it to remind me where I started with building turnouts.
I tried it like that before I invested in gauges and supplies to make sure I actually wanted to learn and build turnouts and that I would enjoy it, I did and I do.
 Last edit: by Campaman
Cheers
Andy
Andy
Posted
Full Member
There is one thing that I would like to attempt though, and that is buying a Hornby 58' Maunsell and "Cutting and Shutting" it by 10' to get it back to the original "Diagram", of a London South Western Carriage but I don't know what that would entail, it does have possibilities for an expert, which I'm not. All the best. Kevin
Staying on the thread Kevin.
Posted
Full Member
Staying on the thread Kevin.
Posted
Site staff
Layout Tours - National Model Railroad Association Inc.
especially the double junction
Layout Tours - National Model Railroad Association Inc.
and of the the 3 ways I built
Layout Tours - National Model Railroad Association Inc.
Ron
NCE DCC ; 00 scale UK outline.
NCE DCC ; 00 scale UK outline.
Posted
Full Member
Staying on the thread Kevin.
Posted
Full Member
If you use C+L Finescale products you don't even have to solder. Buy the frog (soldered up) and point blades (ground to shape), slide the plastic chairs on the rail (the fiddly bit, you need a magnifying lens and patience), and glue to either plastic or wood sleepers using the supplied template. DCC Concepts do frets of tinned sleepers of the correct width for a range of turnouts along with templates (although it's easy enough to do your own).
Only one way to find out if you're the bees knees when it comes to building turnouts…
In many ways hand-built track looks a lot more realistic than RTR - sleepers at odd angles, different widths and lengths where old 9' sleepers have been replaced with new ones, prototypical kinks in the rail, repaired fish plates missing 1 or more holes, it's always good to look at real track before starting.
Nigel
©Nigel C. Phillips
Posted
Full Member
All the best. Kevin
Staying on the thread Kevin.
Posted
Full Member
You can see the remaining brown card sleepers in this view

With some paint
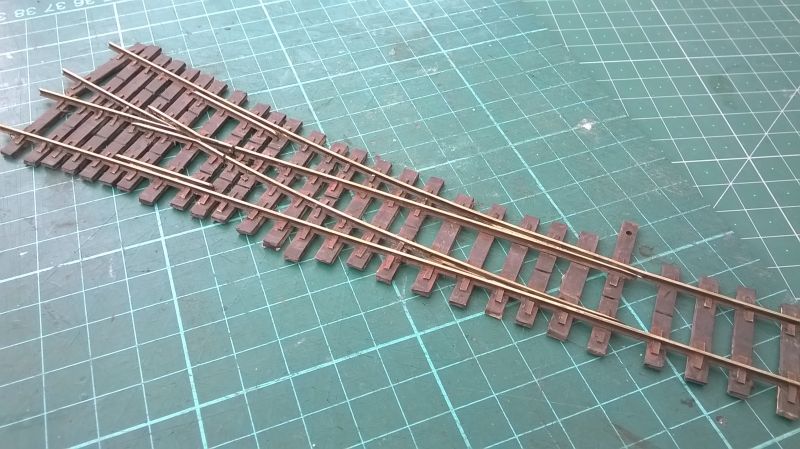
I now build just using all copper clad but you don't need to.
Cheers
Andy
Andy
Posted
Full Member
And I couldn't see it lasting long in a garden layout. But for me, I will give DIY points a miss.
All the best. Kevin
Staying on the thread Kevin.
Posted
Full Member
I did mention C+L re-opening in June in my first reply.
Like Andy I use 100% copper-clad, but you don't have to. A turnout only needs 10 or so copper-clad sleepers out of 40 or so wood/fiber/plastic sleepers for stability, straight track none.
I gave a bit more thought to the 10 for the price of 1 statement. A Peco finescale code 75 turnout is around £10 from Hattons. That means a hand built one costs £1.00. 10 yards of code 75 is £10.00 from Marcway. A turnout needs around 3-4 feet of rail, call it a yard. That's £1 already. 18 feet of copper clad for turnouts is £10.50 (Marcway), you need about 5 feet. That's another £2.90. Add another £1.00 for solder and flux (it uses a lot). That makes £4.90. Don't forget the wiring, call it $5.00 in total.
Gets cheaper if you use copper-clad for stability only, around 2 feet, that's £1.17. Add on another £1 for wooden sleepers, that's around £3.75.
Now you can get cheaper by recycling rail, using wood from the local Starbucks (coffee stirrers), but copper clad is not cheap.
Professionally built turnouts (wood sleepers) over here cost around $35 and use Fast Tracks templates. Assuming a 50% profit margin (reasonable), and 35% overhead (rent, heat, light, equipment) that allows $5.25 in materials, around £4.00.
If your modeling acquaintance can really do working turnouts for £1.00 ask him to contact me, I have a very large order I want to place.
Nigel
©Nigel C. Phillips
Posted
Full Member
Staying on the thread Kevin.
Posted
Inactive Member
Then you could easily claim you are making 10 for the price of 1…
I have no problem with soldering, but I do like the appearance of the plastic sleepers and chairs, which way I'm going needs a decision soon, I'll have about 50 to build….
Now I've finally started a model railway…I've inherited another…
Posted
Full Member
Staying on the thread Kevin.
Posted
Full Member
Cheers
Andy
Andy
Posted
Full Member
All the best. Kevin
Staying on the thread Kevin.
Posted
Full Member
I build mine on the kitchen counter*, using a piece of 6 x 12 inch pine plank placed on the cutting mat (2 feet x 1.5 feet). Just the right height. My "man-cave" is essentially 5 x 4 feet, just enough for the shelf layouts and the IKEA metal wheely trolley (to which I'm planning on adding a wooden shelf, another roundtoit project) with the tools.. And not much else.
You don't need a lot of space for making turnouts, they're only 12" long max. Two electrical sockets (one for the magnifying lamp, one for the soldering iron) and a sink in close proximity. Plus some ventilation. Useful places, kitchens.
Why don't you start with a section of straight track to get the feel of things? Useful for fiddle yards, where you can use a copper-clad every 4" or so. One of the oft neglected track structures is a catch point, which only involves some cutting and filing and a bit of rail curving, no frogs. That gets you into making a tie bar.
The elephant in the room of course is the rail section and chairs. Peco Code 75 is FB rail, if you are not modeling "modern scene" welded rail you really need bullhead rail and chairs (2,3 or 4 bolt) to suit the region. If you want it to match what you have then just use code 75 FB rail from a piece of flexitrack. Saves buying a lot of rail that you may not use if you decide not to carry on.
Nigel
*I have resisted the temptation to use the granite as a level surface.
©Nigel C. Phillips
1 guest and 0 members have just viewed this.