Loco build in plastic
Posted
#230132
(In Topic #12584)

Full Member
BR/LNER J27 scratchbuild
My Yarslow layout is very firmly set in the North Eastern Region and so my old Hornby Fowler 4F is somewhat out of place. It has tender drive and although its an old model, it runs OK. I was faced with 2 options - either sell it on eBay and then buy something at a net cost of probably £60-80, or find a suitable drawing of something to build on top of the running chassis.I chose option 2. A quick look at my magazine index pointed me at 7 ex-LNER options. The articles I have are split between drawings and "How to" descriptions of conversions etc. I needed a drawing and this reduced the options down to 5. Another hour spent looking at the Locomotives of The LNER website pinpointed those engines for which I had drawings and which were (a) around in 1963 and (b) likely to be seen in the North East (I am happy to stretch history here and find an excuse for the occasional stray although even I have limits!!)
Boiling all this research down led me to a J27. The wheels were a bit smaller than the 4F but the wheelbase was about right and, of course, a tender drive meant that the loco did not have to fit over a mechanism. It would mean I would have to rock 'n' roll somewhat with some of the dimensions (splashers mainly) but I hoped that the finished article would be recognisable as a J27. It wouldn't stand close scrutiny but, as I have said elsewhere, if it looks right, it is right in my book.
Back in the day when I were a lad, using plastic card to build wagons and coaches was a common occurance but it is some years since I were a lad!
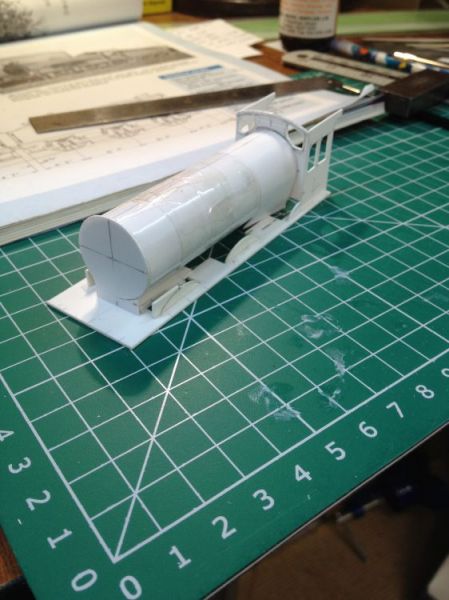
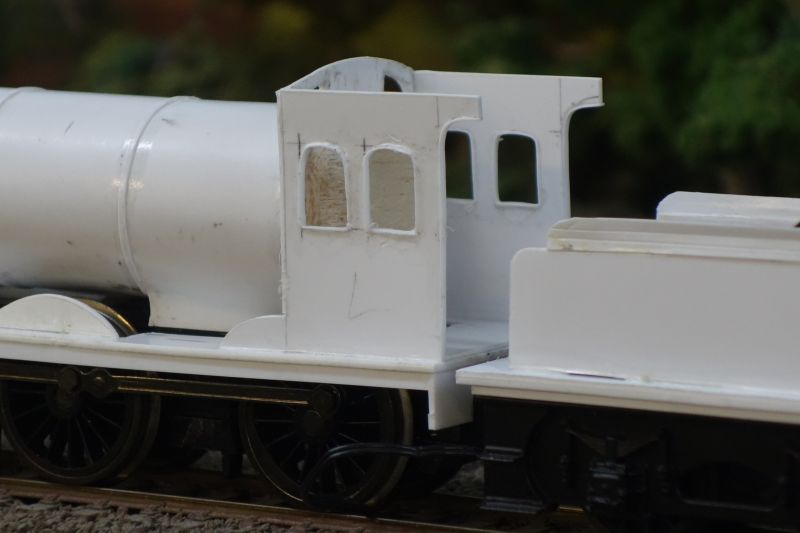
This is the result of day 1. The running plate is 60 thou whilst the cab and splasher sides are 30 thou. The boiler is rolled around a wooden dowel and the photo shows it wrapped in selotape whilst the glue dries. I will drill out the centre of the wooden dowel to add weight before final assembly. The smokebox front has been cut from 30 thou.
Note the Railway Modeller article with drawings and photos in the background - essential.
The next job will be to fit the whole thing to the chassis (the running plate it cut out to fit already) so that I can fit the splashers and work out how to fit the firebox sides. Because I run in OO, the wheels will not fit inside the splashers on the drawing so I will have to do some trial-and-error. Then I need to laminate some 60 thou to create a backplate for the cab and scour the bits-box for things I can use to create suitable looking controls.
When I get to that stage I will do the valances and buffer beams whilst I search around for boiler fittings (Mainly Trains was always my go-to source so I will start there).
Hopefully more to come and more pics.
Shed dweller, Softie Southerner and Meglomaniac

Posted

Inactive Member
Max
Port Elderley
Port Elderley
Posted
Full Member
Cheer's, Pete.
it was already on fire when I got here, honest!
Posted

Full Member
I do love a bit of plasticard modelling.
Regards Rob
Posted
Full Member

Here I have wrapped the boiler and added the boiler bands in microstrip. I have also used the same strip to add the beading to the cab windows. The smokebox wrapper is on along with the front of the smokebox which needs a door - possible purchase? The wooden boiler has been drilled out and weighted.
The buffer beam and rear plate have been added with the valances between. I will add the splashers when the chassis is ready (see below). I have a coupling hook but will need to delve deep into the bits box for buffers.

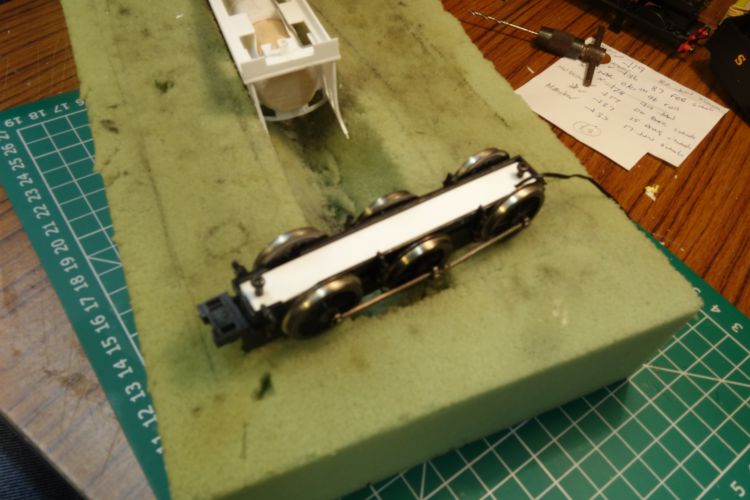
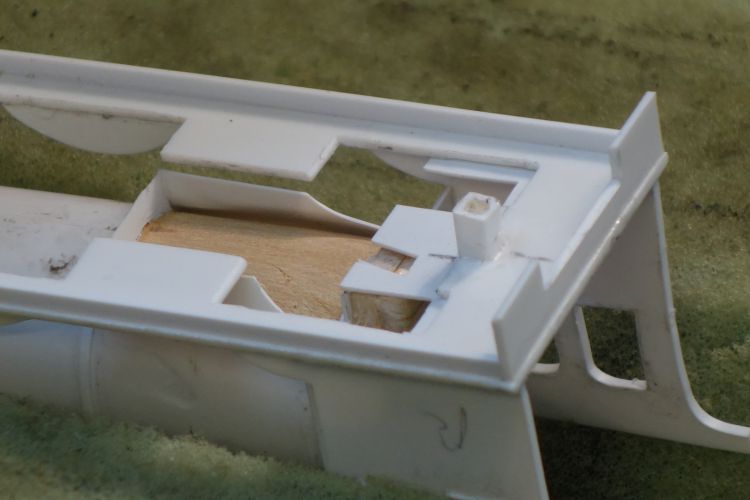
Here, you can see the cab floor and a backhead made of balsa. The shapes are not correct here as the OO gauge chassis means that the wheels are much closer together than they should be. I will disguise this with the sub-floor, seats, controls and crew. Note the cut-away in the rear plate to accommodate the tender coupling and the wires connecting the pick-ups (on the loco wheels) and the tender drive. The cab roof is cut but I will not fix this until I have sorted out those controls - back to the bits box!!
The chassis has had me swearing today - I took it to pieces to cut away the sand boxes that were moulded to the frames - the J27 has a sandbox incorporated into the front splasher - and I discovered that it has completely disintegrated - a bit like the Hornby Class 31 chassis does. The keeper plate and the main frame were both cracked and all of the fittings that take the fixing screws had fallen to pieces.

I am not minded to build a new chassis so I have added more fixing points using plastic card and mended all the cracks with superglue. Hopefully in the morning when its all dry, I can go back to building and not repairing!! If not, I will revert to a pair of 60thou frames and look out some old bearings that I know I have somewhere.
The next job on the loco is that backhead, locating some handrail knobs for the boiler, fitting the reverser and then kitting out the cab with a sub-floor, seats etc. Luckily, there are a couple of good pictures on t'internet for guidance. Thereafter, I have some research to do around cab roof vents (one photo suggests such a thing but I need an overhead) and then I must locate buffers, a chimney, dome, safety valves etc.
More rain is forecast tomorrow so here's hoping……………
 Last edit: by Barry Miltenburg
Shed dweller, Softie Southerner and Meglomaniac
Posted
Full Member
Looks great :thumbs
Terry
Posted

Full Member
Great modeling, looks the part. Those problems with the chassis sound very like the " pest", any repairs will unfortunately be temporary.
Nigel
©Nigel C. Phillips
Posted

Inactive Member
"Back in the day when I were a lad, using plastic card to build wagons and coaches was a common occurance but it is some years since I were a lad!"
Same here Barry. Arthritic fingers and bad eyes don't help at all.
Nice project. Looking forward to seeing the result. Good luck with it.
Posted
Full Member
… it was back when we complained about train sets costing £100. Now a decent locomotive comes in more than that. I also seem to spend much more than that every time I go to Specsavers or the physio……..
Shed dweller, Softie Southerner and Meglomaniac
Posted
Full Member
The bottom of the chassis - the keeper plate if you will - completely disintegrated although vast amounts of SuperGlue did hold most of it back together. I simply cut a new 40 thou base plate to sit inside the recess of the original and then drilled through the 2 holes required to use the existing fixing holes. The wire runs from the loco wheels to the tender drive. The old Hornby coupling box on the left (front of loco) will probably be hacked off as the loco will only run chimney-first.
The square sections were fitted to give the fixing screws something to bite into. Not sure on the size but I had some in the stores and it did the trick - very technical!! By the time I got to this stage, the boiler had been glued on. This view shows the wooden dowel boiler core which is drilled out and weighted. The actual boiler was cut to create the flares of the round-top smokebox. The gap between the bottom of the flares and the frame is caused by the need to remove so much frame to fit in the wheels (which are too close together in OO of course). I will fill this with plastic strip or L section eventually. Such are the compromises of building in this scale. Ironically, it would have been easier in EM or P4 but I'm not going there!
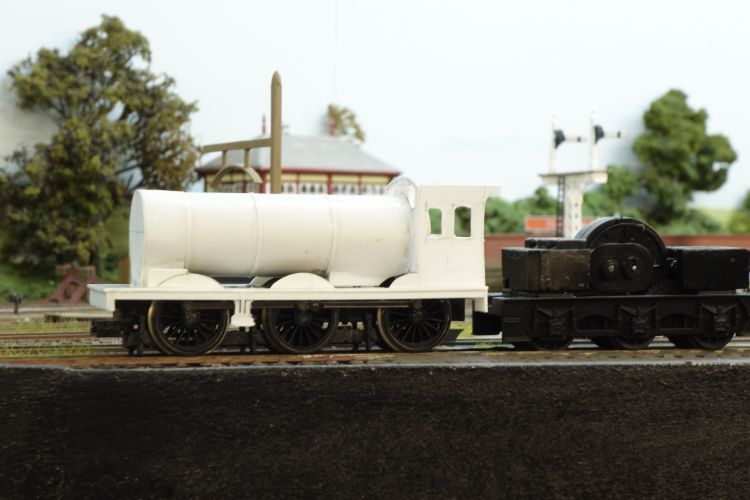
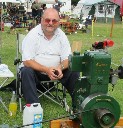
So here we are - the body sits on the chassis at (roughly) the right height (its about 1mm high) showing up the need to do a bit of fettling to allow the wheel clearances inside the frame. They are only rubbing slightly in one or two places but it needs doing. The keeper plate has dropped down in this photo because the fixing points need to be allowed to dry overnight and so I had not screwed the sections together. The steps are fitted (each comprises 4 separate bits) but things like the roof remain absent until I complete the cab. Pheonix do some lovely bits but at the GETS they did not have the ones I wanted so I'll put in an order. I only have 14 handrail knobs but this loco needs another 20 or so to accommodate the handrails under the windows, on the cab sides,smokebox front, tender sides front and rear and back of tender. Wish me luck!! Phoenix also do backheads so rather than bodge something together, I will order a whitemetal backhead and then possibly hack off the balsa one I build earlier.
The tender mechanism looks quite crude but it runs OK. Not visible in the picture is the wire seen in the earlier photo that runs from the loco wheel pick-ups to the tender drive. It passes down through the frame and keeper plate, under the fall plate between loco and tender and up to two soldered joints at the top of the drive mechanism.
Once I have the chimney, dome, safety valves, whistle, smokebox door, etc I will be able to turn this plastic beast into a loco and then give it a coat of primer before starting on the tender. Stay tuned…………
Shed dweller, Softie Southerner and Meglomaniac
Posted
Full Member
Glad to hear you got rid of the pest. Body shell is really looking the part.
Nigel
©Nigel C. Phillips
Posted
Full Member
In spent the day fitting, refitting and then re-refitting the fixing points for the body/chassis combination. I realised that the front fixing screw is slightly longer than the back and so when I used the longer screw for the front, it bottomed out and then fouled on the underside of the frame. As a result, it wouldn't pull the frames tight to the underside of the body and when I was tempted to give the screw another turn, it pulled the fixing off the body.
Having found the problem, it took about 30 seconds to fix of course!! Firstly I made a washer for the front screw and then, when I realised that the screws were different lengths, simply swapped them over.
The main development today was the production of a tender. A base plate for the old Hornby tender drive acted as a frame and then a box shape was produced for the tender - easy. No - I realised that the tender side tops are flared. Let me tell you that making tender flares out of strips of 30 though card carefully curved lengthways is not good for patience but does help develop one's Anglo Saxon language skills. I will make the coal rails tomorrow out of 30 thou so stay well away from my shed if your ears are of a delicate disposition!!!
The drawings and photos I have are not very clear on the tender layout, especially the coal space and tool box arrangement so whilst the "box" dries overnight, I will have a glass of Merlot and a hunt through on t'internet for more photos.
Pictures to follow tomorrow.
B
Last edit: by Barry Miltenburg
Shed dweller, Softie Southerner and Meglomaniac
Posted
Full Member

OK so here is the new keeper plate with the packing "washer" under the front screw to stop it fouling on the underside of the frames. The crazy angle of the rear coupling rods is less noticeable when the engine is the right way up!
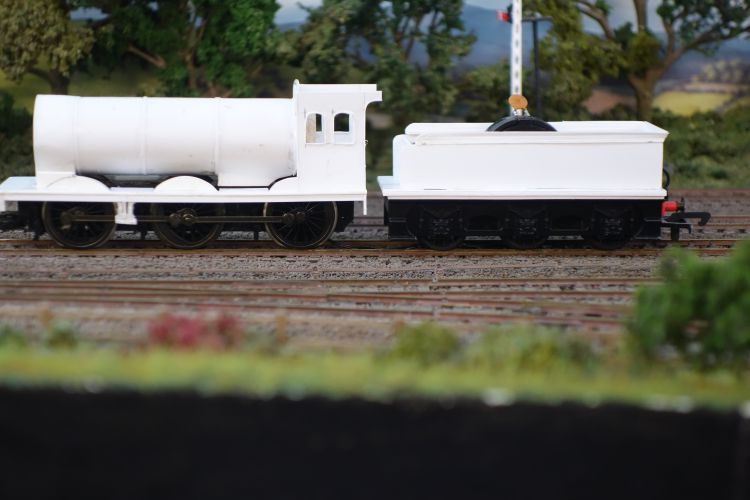
Here she is with her new tender, just sitting over the Hornby tender drive for now. The internet has yielded a number of good photos showing the layout of the coal space and tool boxes so with the drawing I have in the RM, I will be able to make a decent job of it. Note that I have side-stepped the coal rails job at this point. The old chassis has a draw bar already so I will simply refit this - its a permanent coupling so I will wait to the end.
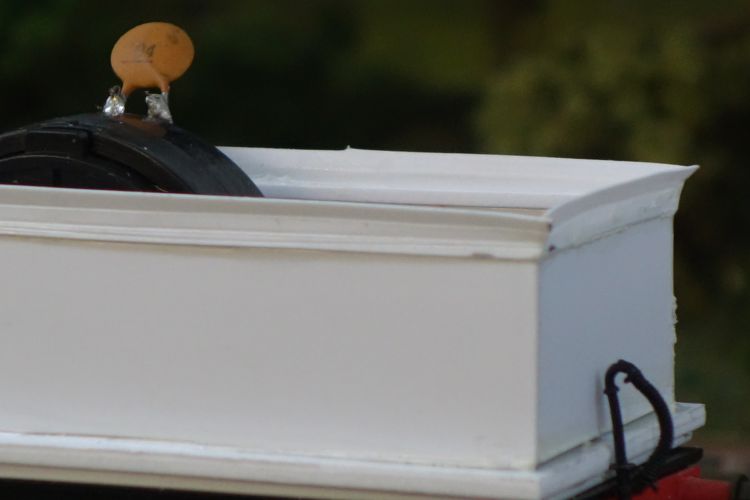
These tender flares actually look better at normal viewing distance but I will trim them up to improve the corners. They are only "tacked" on to ensure a good fit. Note the 40 thou x 40 thou square section behind the lower edge of the flare to help secure it to the tender side. The old TV supression device will be bent out of the way and hidden under the coal load. The pick-up wires will be connected to the two solder blobs sticking up.
Working on the chassis has meant that the loco body has been upside down for quite a time and as a result, I have managed to bend the cab sides. I am also less than totally happy with the shapes of the cab windows - they looked OK until I beaded them when their true shapes emerged. As a result, I may replace both sides with thicker material and have another go at those windows. The two layers of 60 thou plastic card acting as a base for the tender brought the running plate levels up together very nicely. The whole thing still sits about 1mm higher than on the drawing but given the limitations of the chassis I started with, I will accept that. The black wires in the foreground link the pick-ups with the motor and are just too short now that I have to re-route them through the alternate tender spaces. I will splice in new wire under the front of the tender and use shrink-wrap to ensure that the two soldered joints don't touch.

Just arrived - sprung buffers, whistle, safety valves and (loose) handrail knobs. This lot cost more in postage than it did in brass - if I hadn't forgotten to get them at recent shows I attended, I would have saved about £10!! I have an etched 3-link coupling in the spares box and although difficult to see on the photos, I "rivetted" the front buffer beam so she should have some character when built. I still need a smokebox door, chimney, dome and backhead but think that Phoenix (who sell DMR products) may be the guys to speak to.
A bit of a push later this week should see her detailed and running. Spurred on by that, I might then tackle those coal rails………….
Last edit: by Barry Miltenburg
Shed dweller, Softie Southerner and Meglomaniac
Posted
Full Member
After much fettling and even a burst of major surgery, the old 4F chassis has finally given up and so I am left with an unfinished body and little else. On top of that, Bachmann's new J36 is due out in a couple of months so I have shelved this project but may return to it if I get to a point where I have little else to do (unlikely) and feel the urge to build a chassis!!!
Thanks to everyone for their interest along the way.
B
Shed dweller, Softie Southerner and Meglomaniac
Posted

Full Member
Neverthelass, these exercises do serve to enhance our skills, so it is not wasted.
John
John
Posted
Full Member
Good learning experience. Been through a few of these myself. There comes a point when it's a dead one. Bet the body fits quite a few 0-6-0 chassis'.
Nigel
©Nigel C. Phillips
Posted
Full Member
Back in the day when I thought I could solder but I couldn't, I bought a Ratio 4-4-0 with a Perserverence chassis. It didn't take long to make a right pigs ear of the chassis so I built a replacement one in 60 thou Plasticard and used the bearings, wheels etc that came from the kit. It ran on the layout until a few years ago when I sold it.
These are the learning experiences……..
As an aside, I have just listened to a post on YouTube from a guy lamenting the lost skills of kit building, scratchbuilding, kit bashing and all those other dark arts that have been taken over by the output of Bachmann, Hornby and the others. This thread is probably not the right place to continue that discussion but I kinda pity newbies who don't/won't experience the failures and the tribulations.
Maybe the J27 will rise again?
Here endeth this thread.. :sad:
Shed dweller, Softie Southerner and Meglomaniac
Posted

Full Member
http://yourmodelrailway.net/view_topic.php?id=15463&forum_id=35
I'm embarked on a journey back through time to pick up from my once prolific kit building and RTR bashing days, but the lure of high quality RTR offerings nowadays is often irresistible.
Good to see so many on here though practising the old skills.
All best wishes for your continued activities. It's great fun!
Bill
At 6'4'', Bill is a tall chap, then again, when horizontal he is rather long and people often used to trip over him! . . . and so a nickname was born :)
Posted
Full Member
John
John
1 guest and 0 members have just viewed this.