RR&Co Computor Control: Discussion
Posted

Inactive Member
Post any questions arising from "First Steps with RR&Co"
I'm sure everyone will be relieved to hear that my repaired stick worked first time. Whew :exclamI'm doubly glad that my laptop is OK as well. Thanks to all for your support - especially John Dew.
Now I'm so far behind, I'll have to get my skates on . . . :pedal
Max
Port Elderley
Port Elderley

Posted
Inactive Member
Max
Port Elderley
Port Elderley
Posted
Guest user
when i set a block up i put a contact indicator left or right of the block on the track, this way you can see the indicator and block light up give them a name like staion 1 block and station 1 ind as when you add the occupancy to the blocks you can see which one to use. if you then add the occupancy to the block in the block properties, when you click on the occupancy detector the block should then turn red.
:thumbs
Posted
Inactive Member
Max
Port Elderley
Port Elderley
Posted
Guest user
For a Loksound Guru - that is a bit hard to believe :exclam…………. I've tried reading the manual, but I can't understand it either. Maybe I'm just too dumb for this.
Posted
Guest user
My station is a similar layout to Pete's so that's useful for me too.Just as a matter of interest re signalling, if those platforms are dead end as they appear then the signal giving access should only show a yellow. The buffer stop is effectively a red and so the previous signal can only display a yellow in prototypical operation. If the line is not clear to the buffer stop then not even a yellow would be displayed, but instead the calling on signal would be illuminated.
Just for info.
What's the situation for departures? I plan to use a 3 aspect Advanced Starter far enough ahead to allow an empty train to shunt from one platform to another without entering the block ahead. The yellow would be the distant for the virtual box ahead. If the starting signals are single arm stop semaphores, am I right that they would authorise a move up to but not beyond the advanced starter? If they are colour lights, what would I need? My guess would be red/green interlocked to the adv. starter, but then I guess I would need shunt signals of some sort. Do you know what the rules would be?
Posted
Guest user
you can set the blocks up and edit the stoping distance etc?, but the TC software will have no way of knowing the blocks are occupied. if you don't have the occupancy detectors (the hardware) set up. then just set up the occupancy detectors within TC. you need to
1.designate the occupancy detector with an address the same as you would a point.
2.add an occupancy detector within TC software and give it the same address.
3.associate that occupancy detector to the relevant block.
if you don't have the block occupancy detectors then just follow 2 and 3. John explains this much better than me i will look for the post.
Posted
Guest user
post no 9 and 10
BLOCKS and CONTACT INDICATORS
Sol put it into the thread
http://yourmodelrailway.net/view_topic.php?id=5707&forum_id=10
Posted
Guest user

Brian
Posted
Inactive Member
absolutely, Brian. It's mystifying. :shock:Warning to all Railroad and co members Max will be waking up soon and its Saturday morning in Australia and he will be as keen as mustard to crack on you lot better be on call all day i think you should work out a shift pattern between you
Brian
Max
Port Elderley
Port Elderley
Posted
Inactive Member
Max
post no 9 and 10
BLOCKS and CONTACT INDICATORS
Sol put it into the thread
http://yourmodelrailway.net/view_topic.php?id=5707&forum_id=10
yep, I saw it Matt. I've got it as a second session and I'm toggling back and forth, trying to understand it. I only did about an hour last night, so it hasn't made sense yet. I'll keep going. The penny should drop soon. :pedal
It could be an indication for experienced users, how mystifying it can be for brand new people.
Let's try this. Does the Contact Indicator go at any particular spot on the track within the block? It seems to me that if I put the blocks in first, I will be able to see where to put the Contact Indicators.
Max
Port Elderley
Port Elderley
Posted
Inactive Member
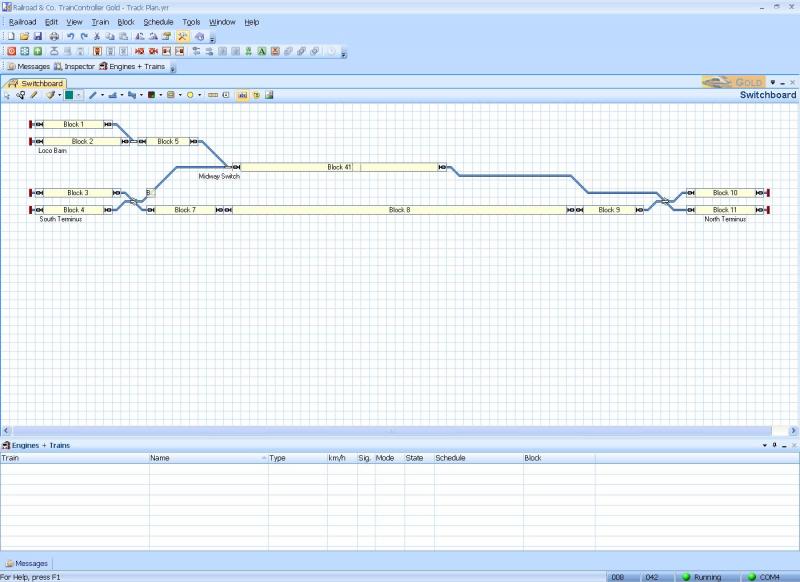
Therefore, it looks like I'll have to redraw my track plan as Block 5 doesn't reach to the turnout, Block 6 won't work at all and block 41 doesn't reach all the way down to the double slip.
Max
Port Elderley
Port Elderley
Posted
Inactive Member

I slavishly followed the manual and managed to pick up all the LB 101s. Blocks 10 and 11 were wired opposite, but 2 minutes with the small screwdriver put them to rights. You can see the 4 locos sitting in their blocks. Whew!
One thing I did learn was to not leave the cursor sitting over a block. When the timer switched on the screen saver, I hit the space bar to wake it up and it deleted the block. To get the Block numbers to start from 1 again, I had to delete the whole track plan and re-do it. Good practice, though!
Now, back to the manual . . . :pedal
 Last edit: by MaxSouthOz
Max
Port Elderley
Port Elderley
Posted
Inactive Member
Should I move on to start loading the locos? :???:
Max
Port Elderley
Port Elderley
Posted
Guest user
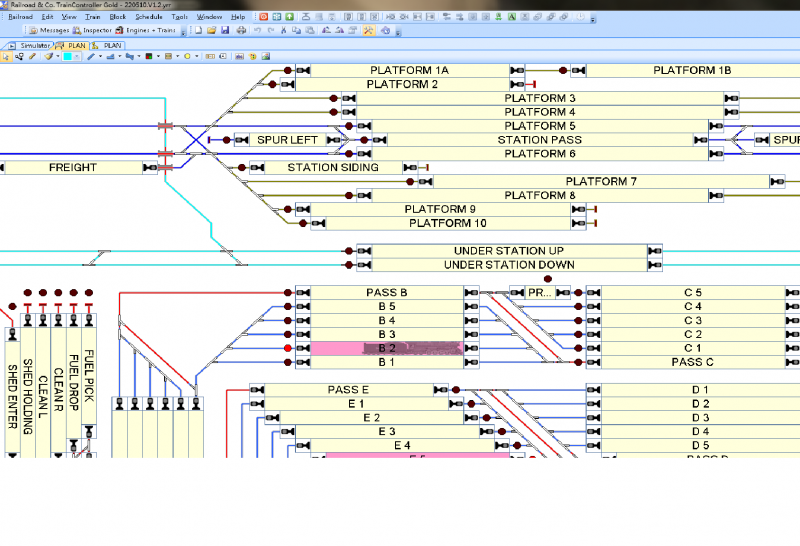
well done with the blocks, i put my contact indicators at the end of the blocks. this way it is easy to tell which block it operates. they do not have to be on the track, if you prefer you can have them on the grid next to the block. at parts of the track like sidings i place them the other side of the buffer stop. some people place the indicator under the block if space is limited, one problem with this is you cannot see the indicator.this is how mine is set up, i try and put the indicator with the direction of travel. if you look down at block C5 you will see the blocks left and right have the indicators away from the track. this is down to space, the two blocks are profiling blocks as C5 is about 6 feet long. if you look at fuel pick you can see what i mean by setting the indicator at the buffer stop. if you wanted you could even have the indicators in a row at the top or a list with text indicating what block it represents.
Posted
Inactive Member
Can you explain in words of one syllable or less what I'm going to do with them? Sorry for being thick, but I would like to understand it before I move on. :oops:
Max
Port Elderley
Port Elderley
Posted
Guest user
I'm in the same position as you, I don't see the need for contact indicators on the diagram and when I set up the tutorial on real track it worked well without them. The only reason I can see is to use them in the simulator. They allow blocks to be switched on and off with the mouse, so the sim can be altered easily. I am even further behind than you are so this may be something else I don't fully understand.
Posted
Inactive Member
Julian
Posted

Full Member
[1] Try the tutorial Max…..there is a step by step there on setting up blocks
[2] If you want to use TC to control the trains they have to be able to detect movement from one block to another. They do this with Occupancy Indicators……………..therefore you must associate each block with at least one occupancy indicator (personally I only ever use one per block)
[3] As long as you associate the occupancy indicator with a block with the software it doesnt matter where you visually place the indicator……it can be within the block, just above it (like the tutorial) or to one side (like Matt)
If TC doesnt know when a loco enters a block how can it calculate when to brake or stop the loco………………ergo at least one occupancy indicator must be associated with each block
I use occupancy indicator as a term rather than contact indicator but it is the same thing……in my case LB 101s connected to a LR101 feed back indicator.
Hope this helps
Posted
Guest user
Agreed about the need on the real track, but Juergen's tutorial in the manual sets up blocks without using a red dot on the block diagram, he just uses the pink rectangle. I'm not sure why you do it differently, but your way allows the block in the sim to be switched on and off with the mouse which is an advantage when playing around with the sim. Is there more to it than that?
1 guest and 0 members have just viewed this.